User guide
Stairs and ramps
Place a stair or a ramp between storeys or up to any height, set it up in its type, and make the few steps up to a porch or a door.
Stairs
Choose Architecture → Stair (ST). Click the foot of the stair (the middle of its first riser), then a point in the direction it climbs. For an L or U stair, a third click left or right of the flight sets which way it turns. The stair climbs from its storey to the storey above. Lapin works out the number of risers, the riser and the tread from the height and the type's rules.
Select the stair to change it in the properties panel:
- Stair type. The shape, the rules, the construction and the railing come from the type, set up in Architecture → Stair types.
- Width, Turn, Base offset and Top offset.
- Rise. Leave it empty and the stair climbs to the storey above. A value gives the stair a rise of its own, whatever the storeys. Use it for a few steps between two levels on the same storey.
- Fixed. Risers, riser, tread and landing length, when you want them fixed. Leave them empty to let the rules decide.
- Checks. Each number against the type's rules, in green or red.
A stair asks the floor above for an opening over itself. Untick Opening in the floor above if the floor should stay whole.
Stair shapes and ready-made types
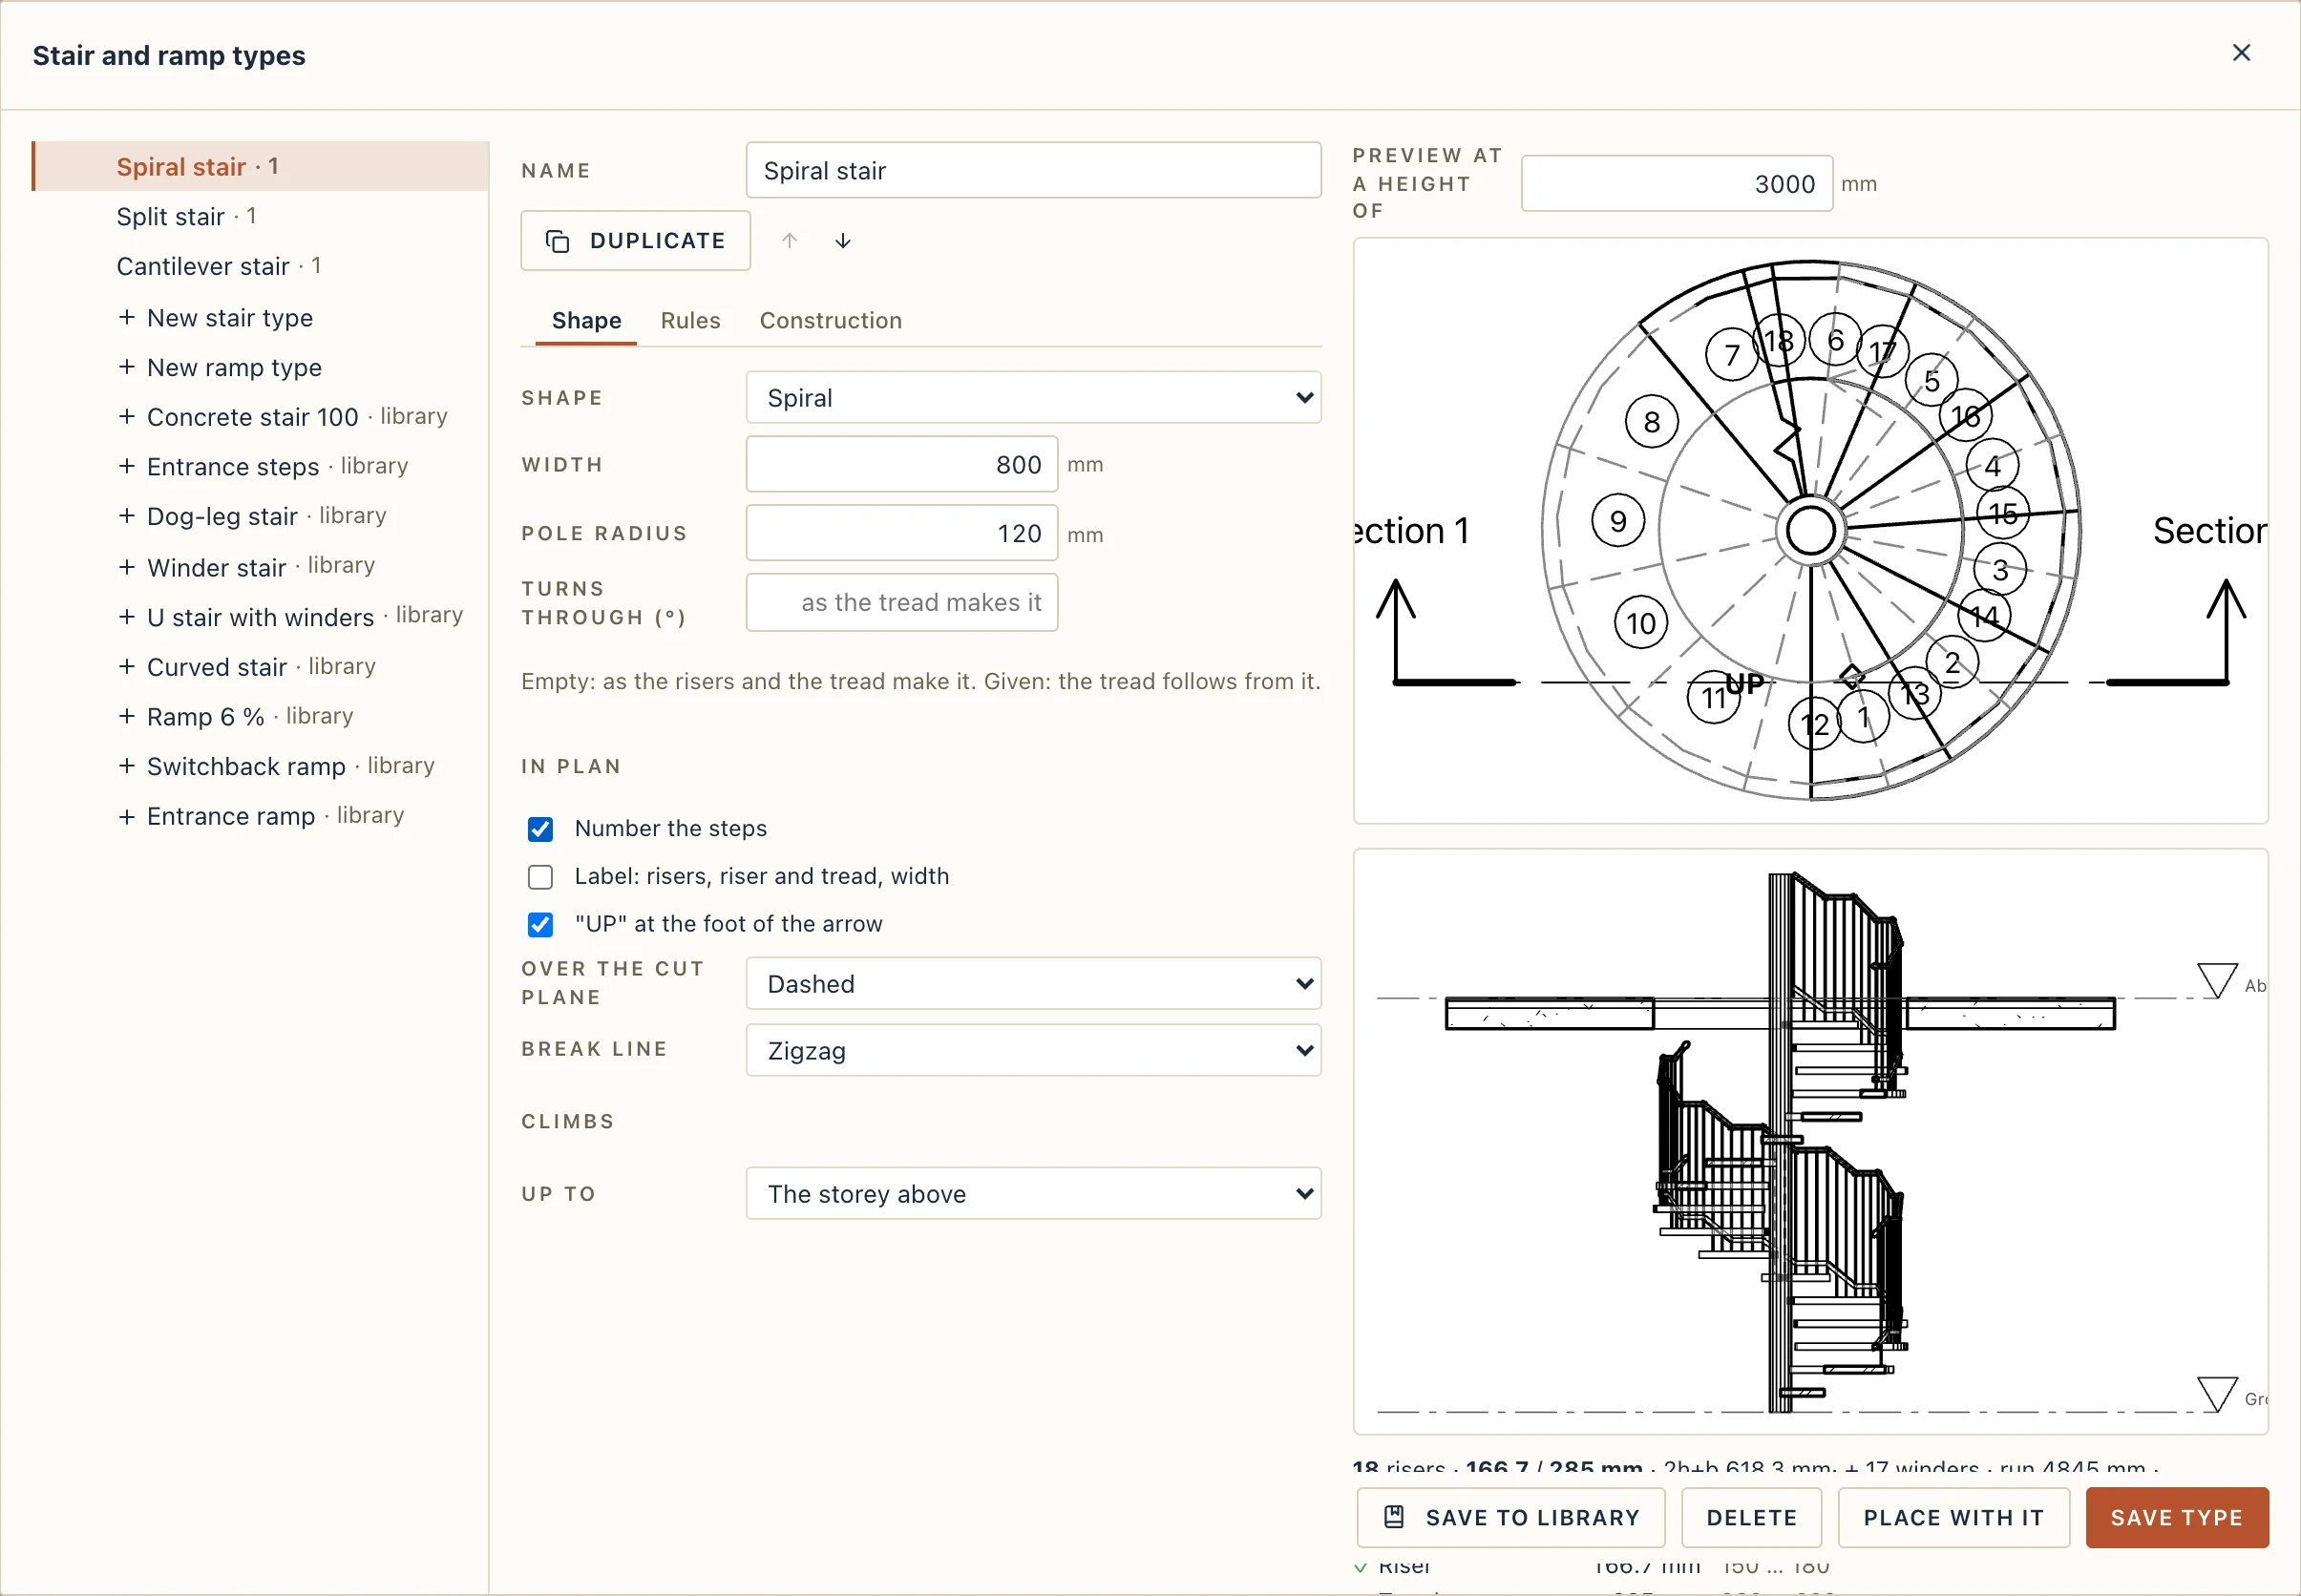
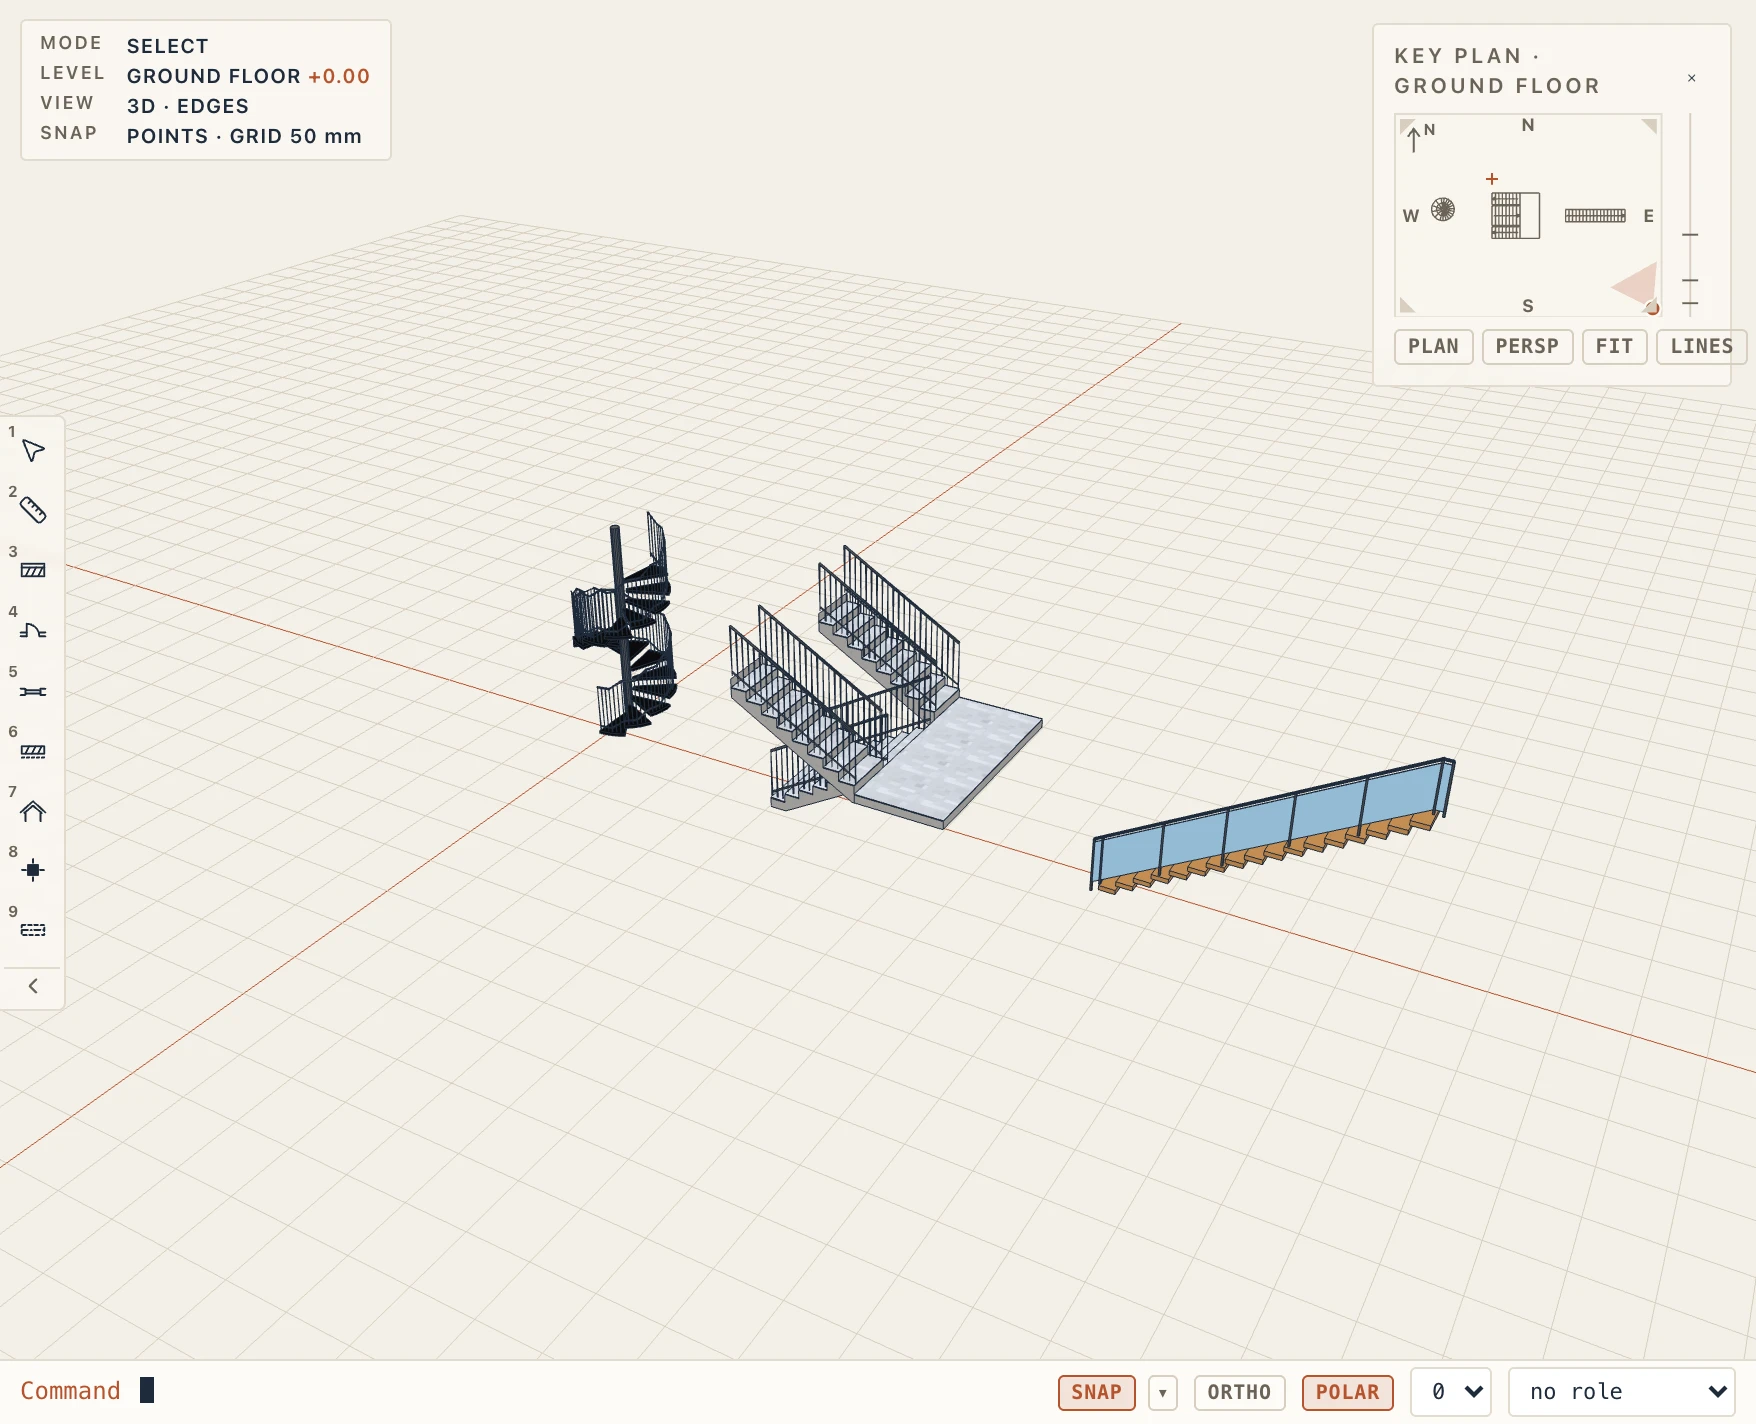
In Architecture → Stair types, the Shape tab offers: Straight, Straight with landing, L shape and U shape (each turning on a landing or with winders; a U with no gap is a dog-leg stair), Spiral (round a pole, with its Pole radius), Curved (with its Inner radius) and Split (bifurcated): a main flight up the middle to a landing, then two return flights on either side. For a spiral or curved stair, Turns through (°) sets how far round it goes; left empty, the risers and the tread decide, and given, the tread follows from it. Each stair can change it too in its properties.
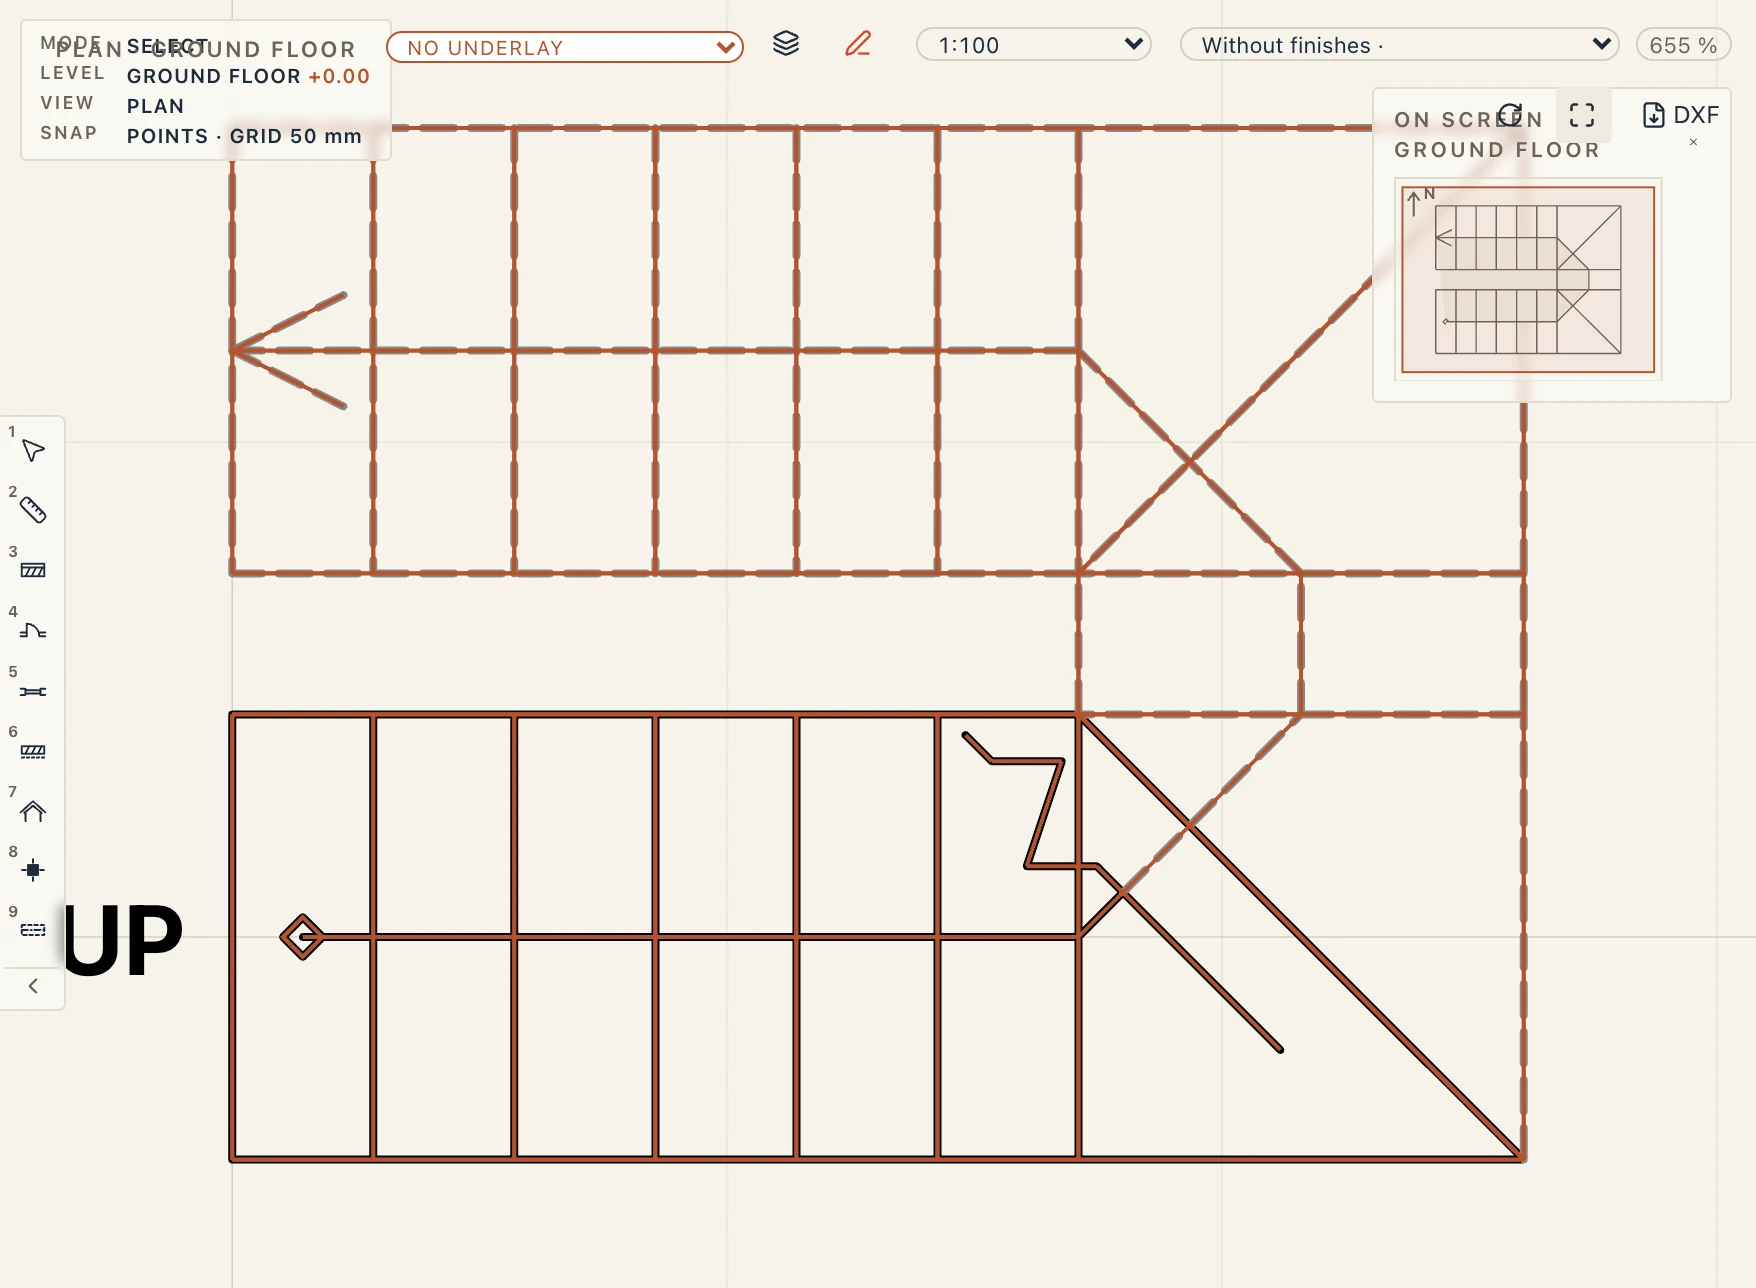
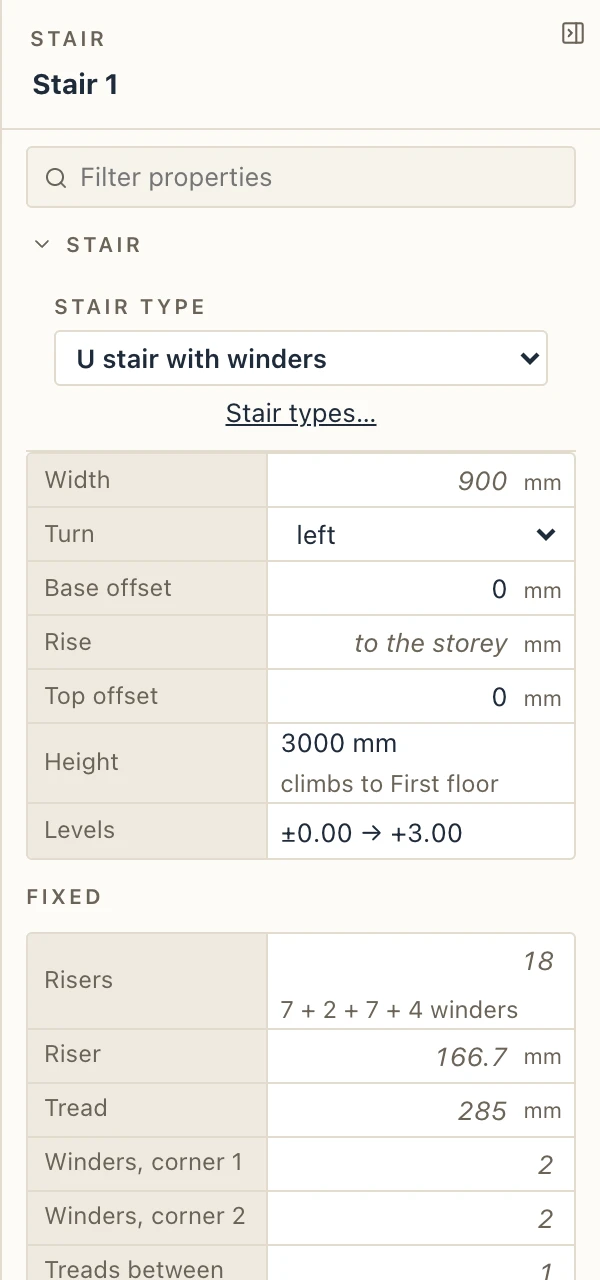
A U shape turned by winders sets each corner: Winders at the first corner, Winders at the second corner and Straight treads between the corners, the steps along the short side between them. With treads between, or a different count at each corner, each corner turns on its own and the well between the flights is as wide as those treads: winders, then a step or two, then winders. The library's U stair with winders has two in each corner and one tread between. Selected, a winder stair changes the same counts in its properties (Winders, corner 1, Winders, corner 2, Treads between; empty: the type's). The plan draws every riser, the winders and the walking line round both corners; the 3D, the quantities and IFC follow, an IfcStairFlight for each straight flight and the winders as one WINDER flight.
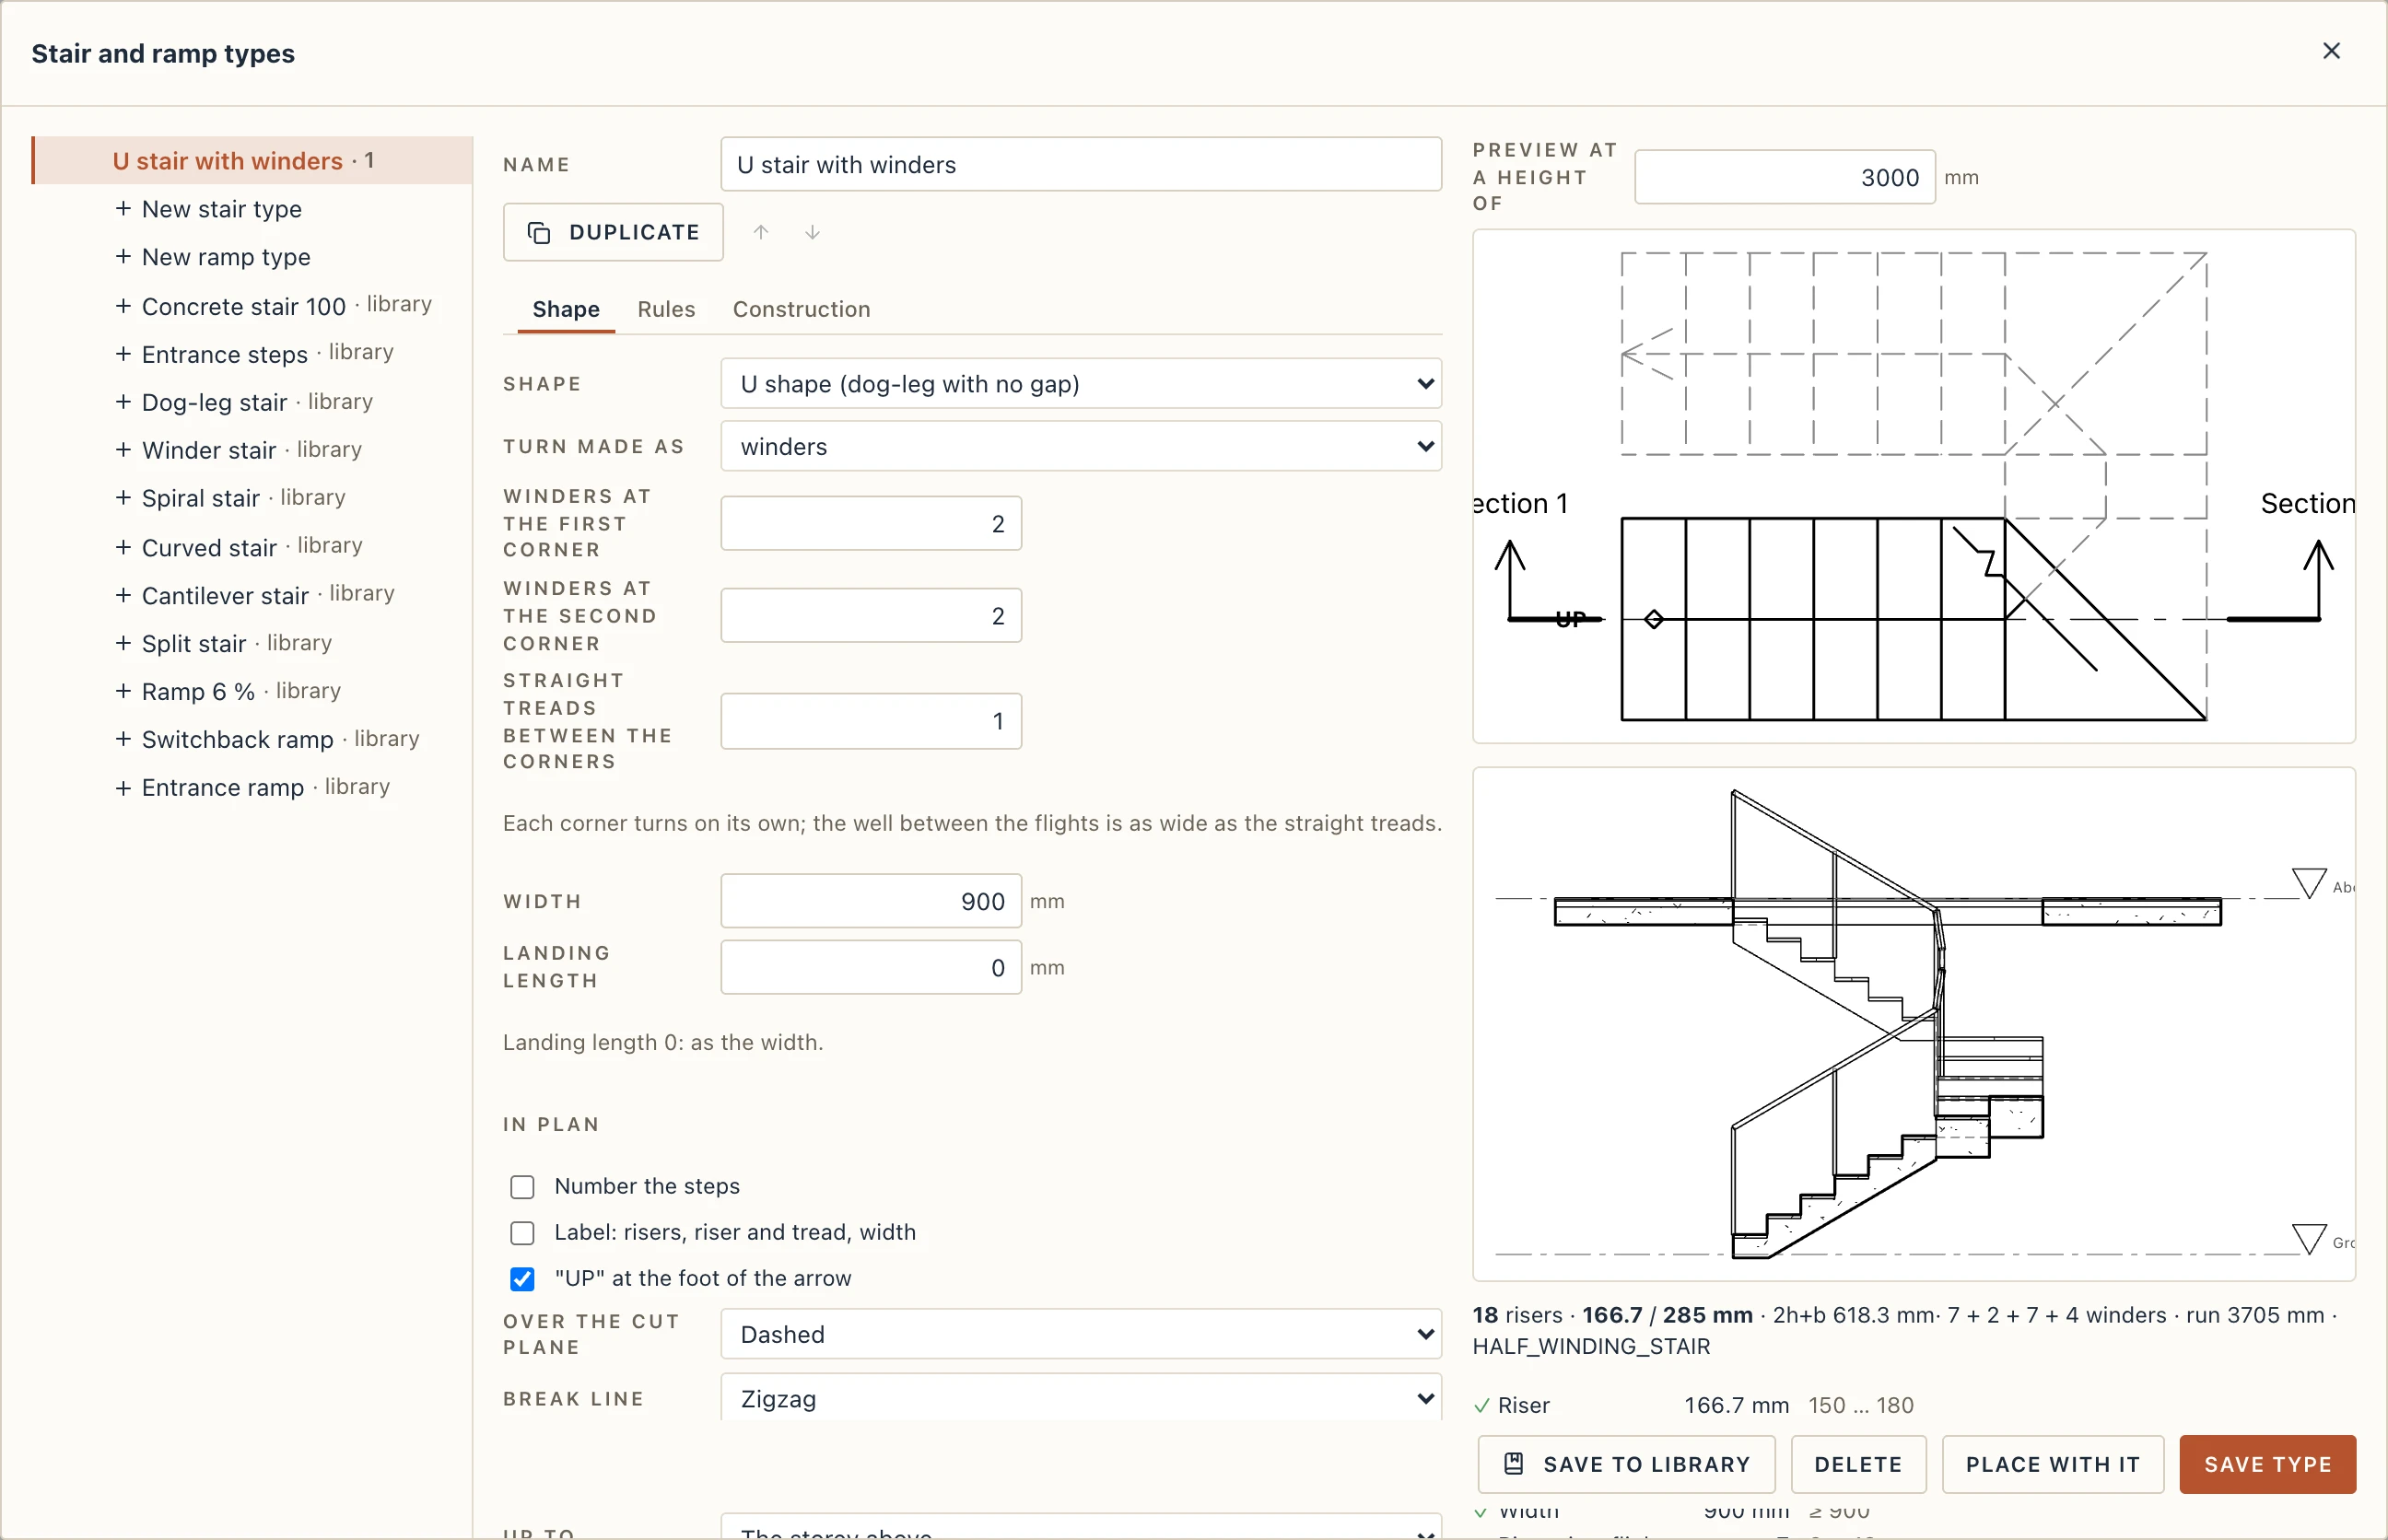
The library adds ready-made types to the project: a dog-leg stair, a winder stair, a spiral stair, a curved stair, a cantilever stair and a split stair.
On the Construction tab, Built as chooses a waist slab, solid steps on the ground, Open treads (cantilevered, floating) (each step a plate fixed into the wall) or Treads on stringers.
The Railing has its Design: Posts and a handrail, Balusters (at most the Baluster spacing apart), Glass panels, Cables or a Solid balustrade; a square or round Handrail, its height, In from the edge, how far it Runs on past the ends, and its colour. In the properties panel, Railing puts it on other sides than the type for one stair.
Railings, one by one
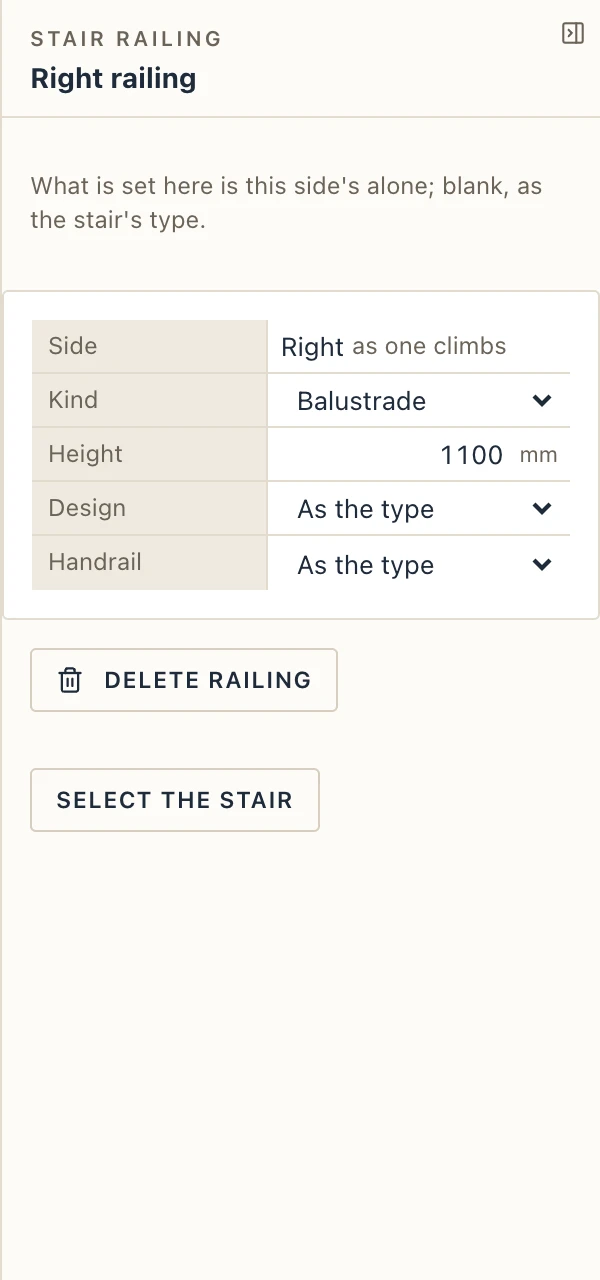
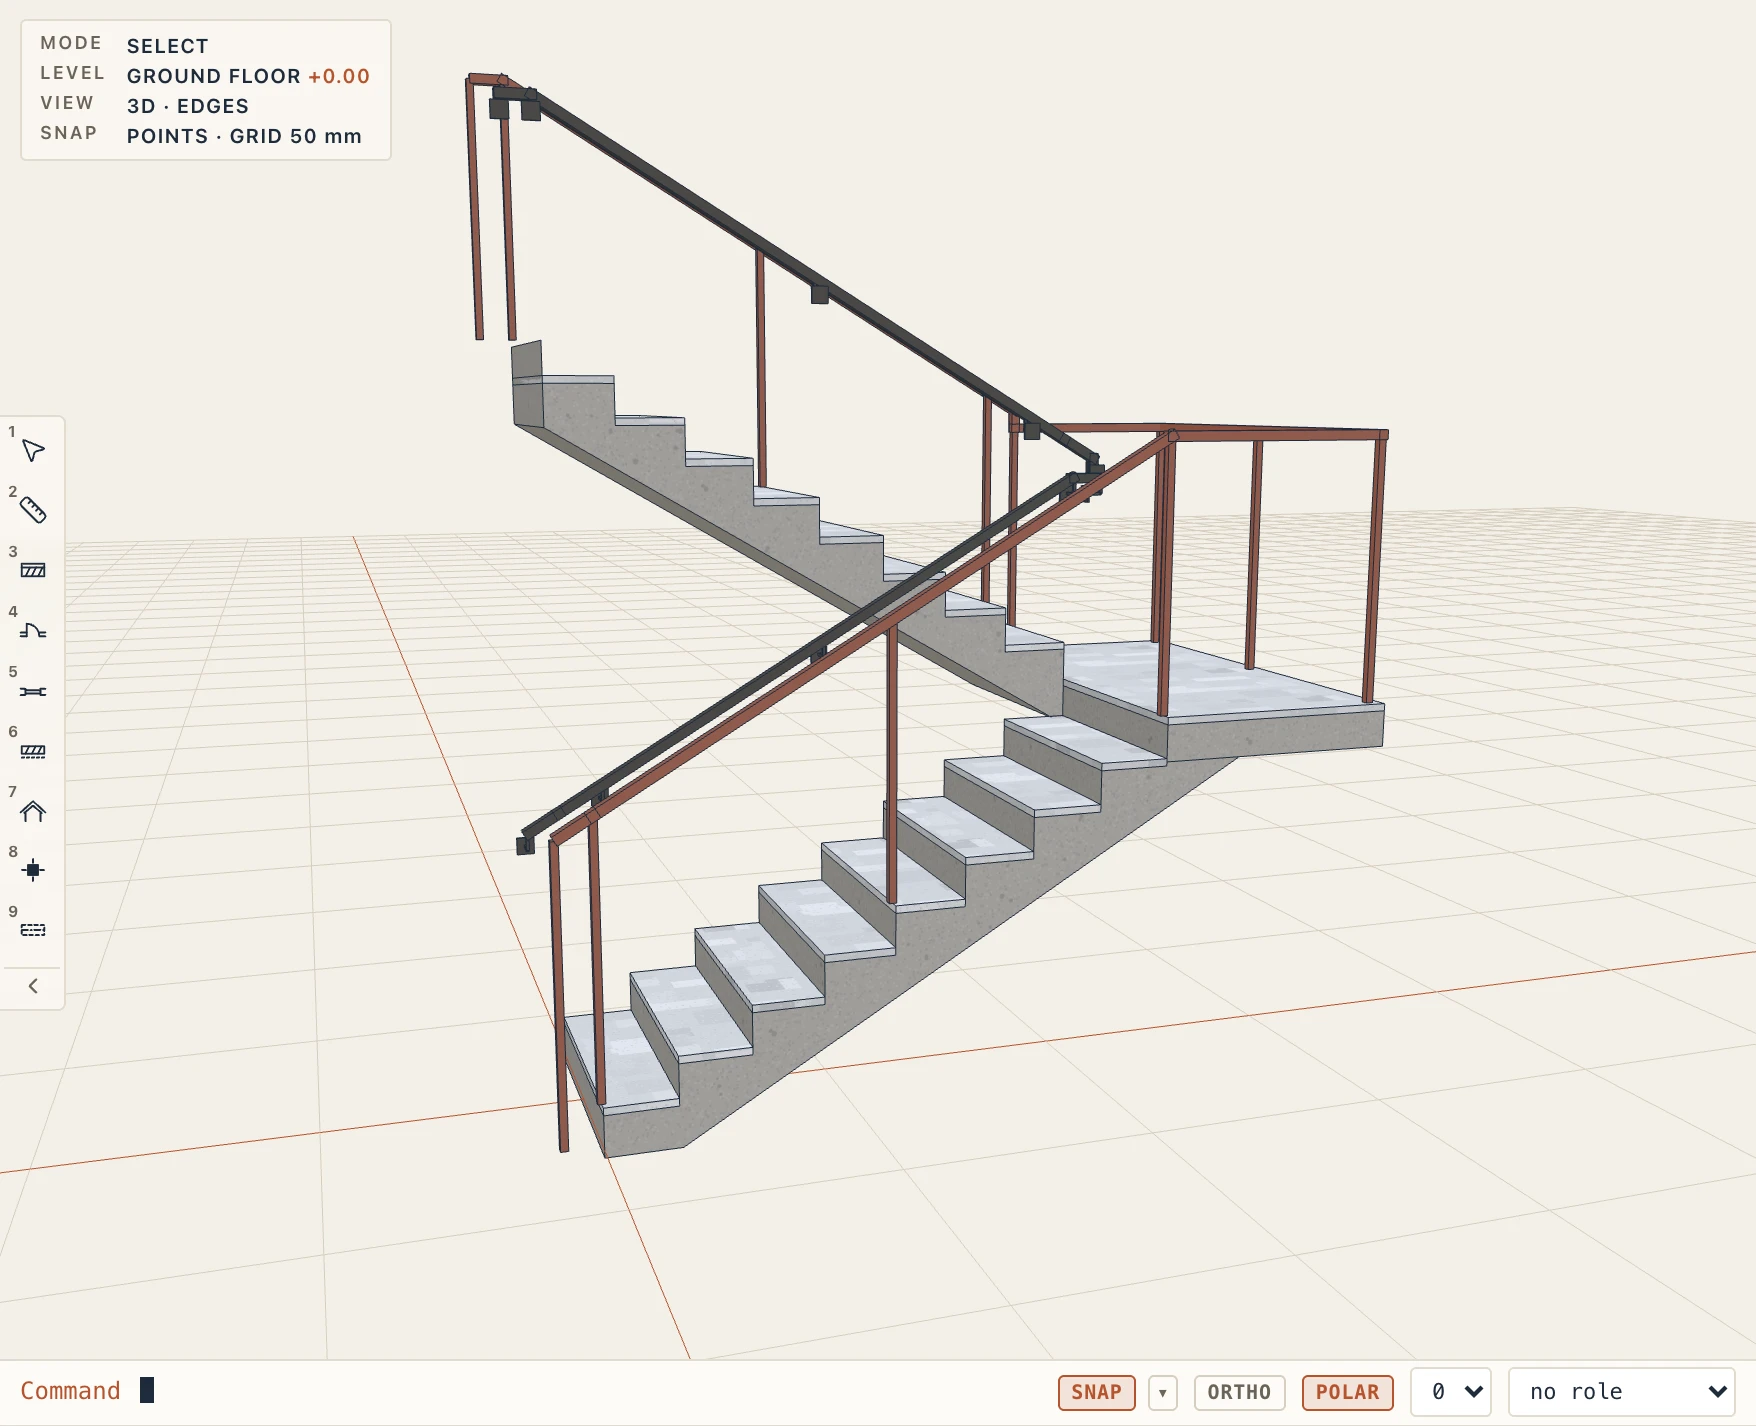
Each railing of a stair can be selected on its own: click it in a plan or in 3D. The properties panel then shows that railing alone: its Side (left or right as one climbs), its Kind (a Balustrade, or a Handrail on the wall: the handrail on brackets, with no posts, for the side along a wall), its Height, its Design and its Handrail. Left blank, each is the stair type's. Delete (or Delete railing) takes that side's railing off the stair and leaves the other; Put it back brings it back. Select the stair goes back to the whole stair.
The railing's height is measured upright from the treads' nosing line to the handrail's axis, and the handrail runs parallel to the pitch. At the foot it starts half a tread before the first nosing, still on the pitch, and drops there to its post on the floor; at the top it ends half a tread past the last nosing, level at its height over the floor. At a landing it runs level at its height over the landing, round the outside of the turn or straight across the well, and steps up onto the next flight half a tread before its first nosing: no gap, and never lower than its height. Runs on past the ends carries it on, level, beyond both ends.
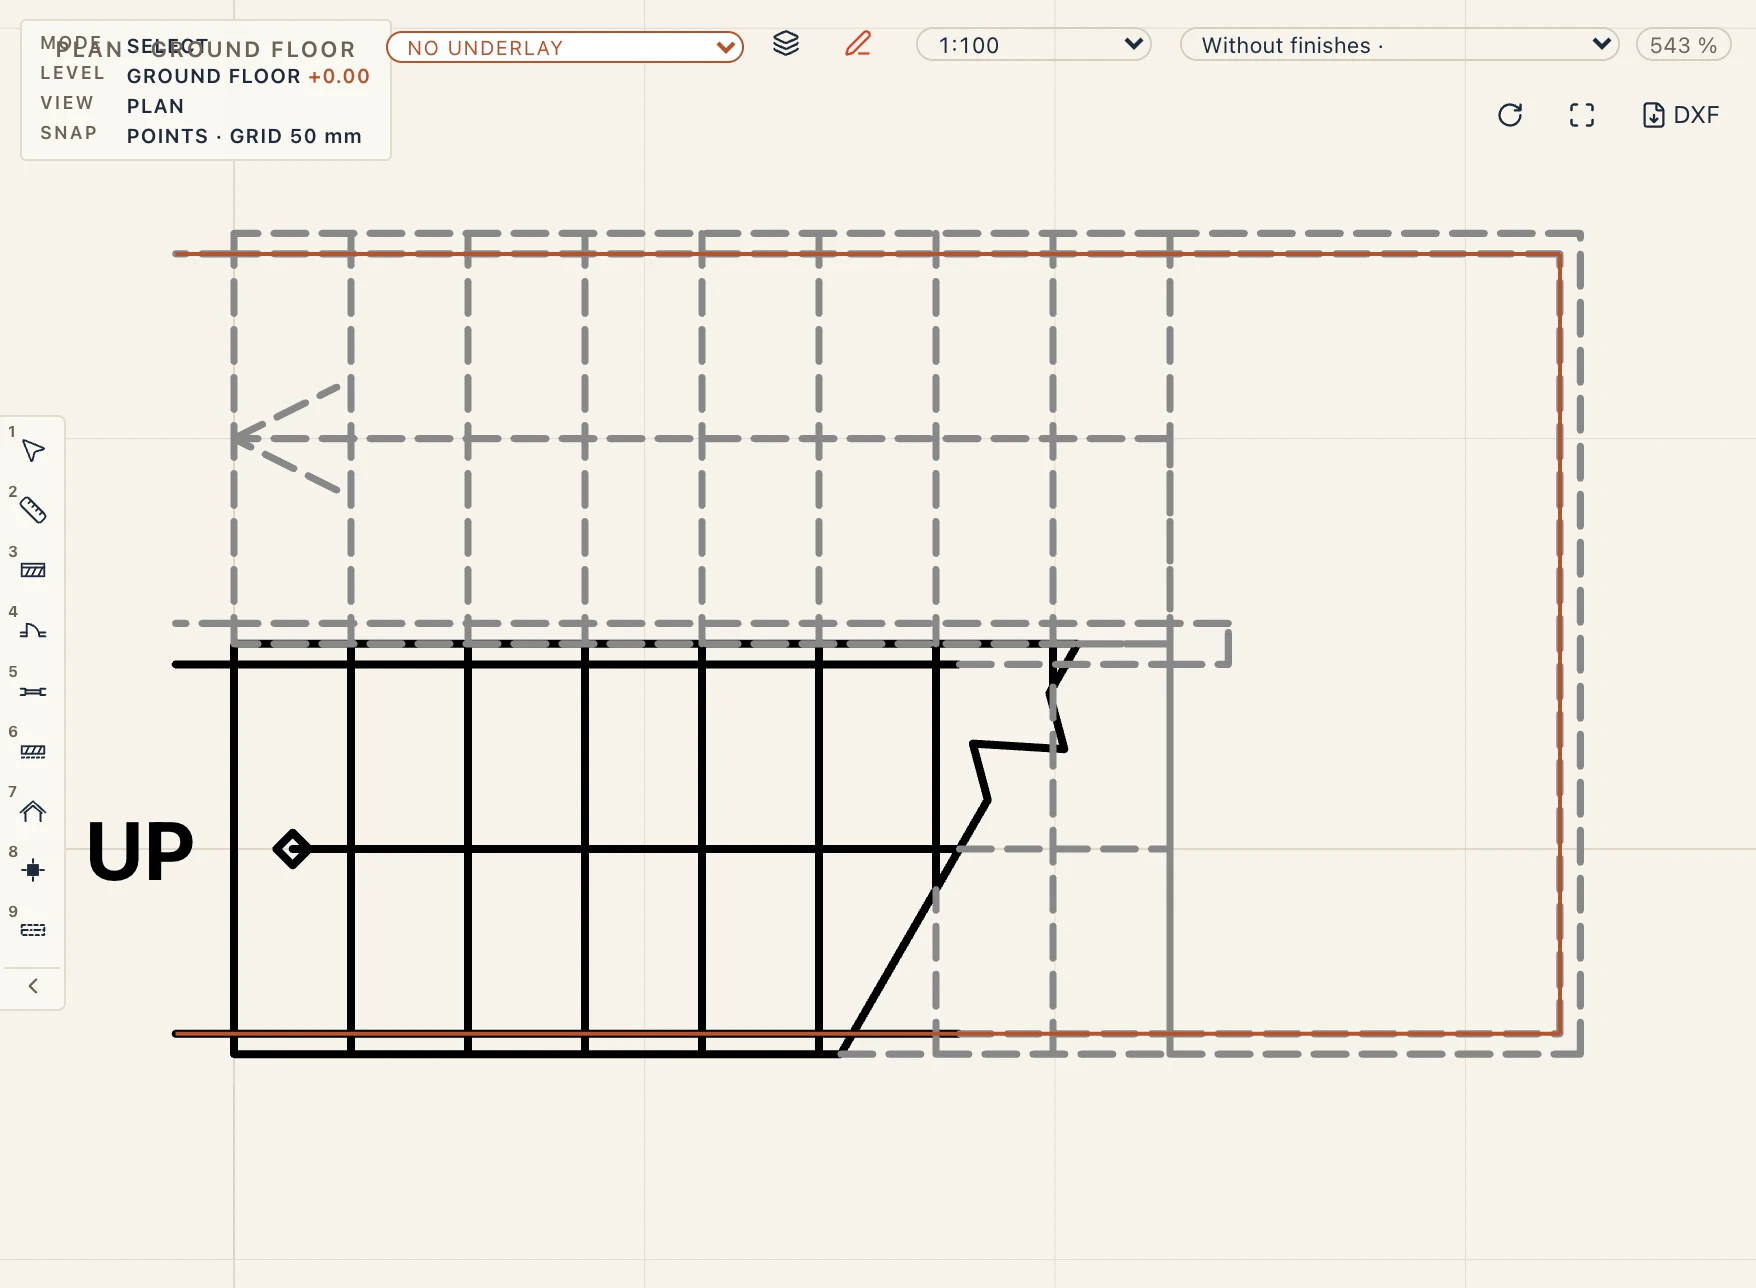
A dog-leg stair's slab
A concrete stair is one slab: each flight's waist runs into the landing, so the flight's soffit meets the landing's soffit in one line, with no notch at the landing's edge, no step and no concrete counted twice. On the Construction tab, Footing under the first flight stands the first flight's foot on a footing of its own (its Footing depth under the floor and its Footing width under the first tread, flush with the first riser), exported to IFC as an IfcFooting. In IFC each railing is an IfcRailing of the stair (BALUSTRADE, or HANDRAIL on the wall) with its side, kind and height, and keeps its GlobalId when the stair changes.
Numbered steps
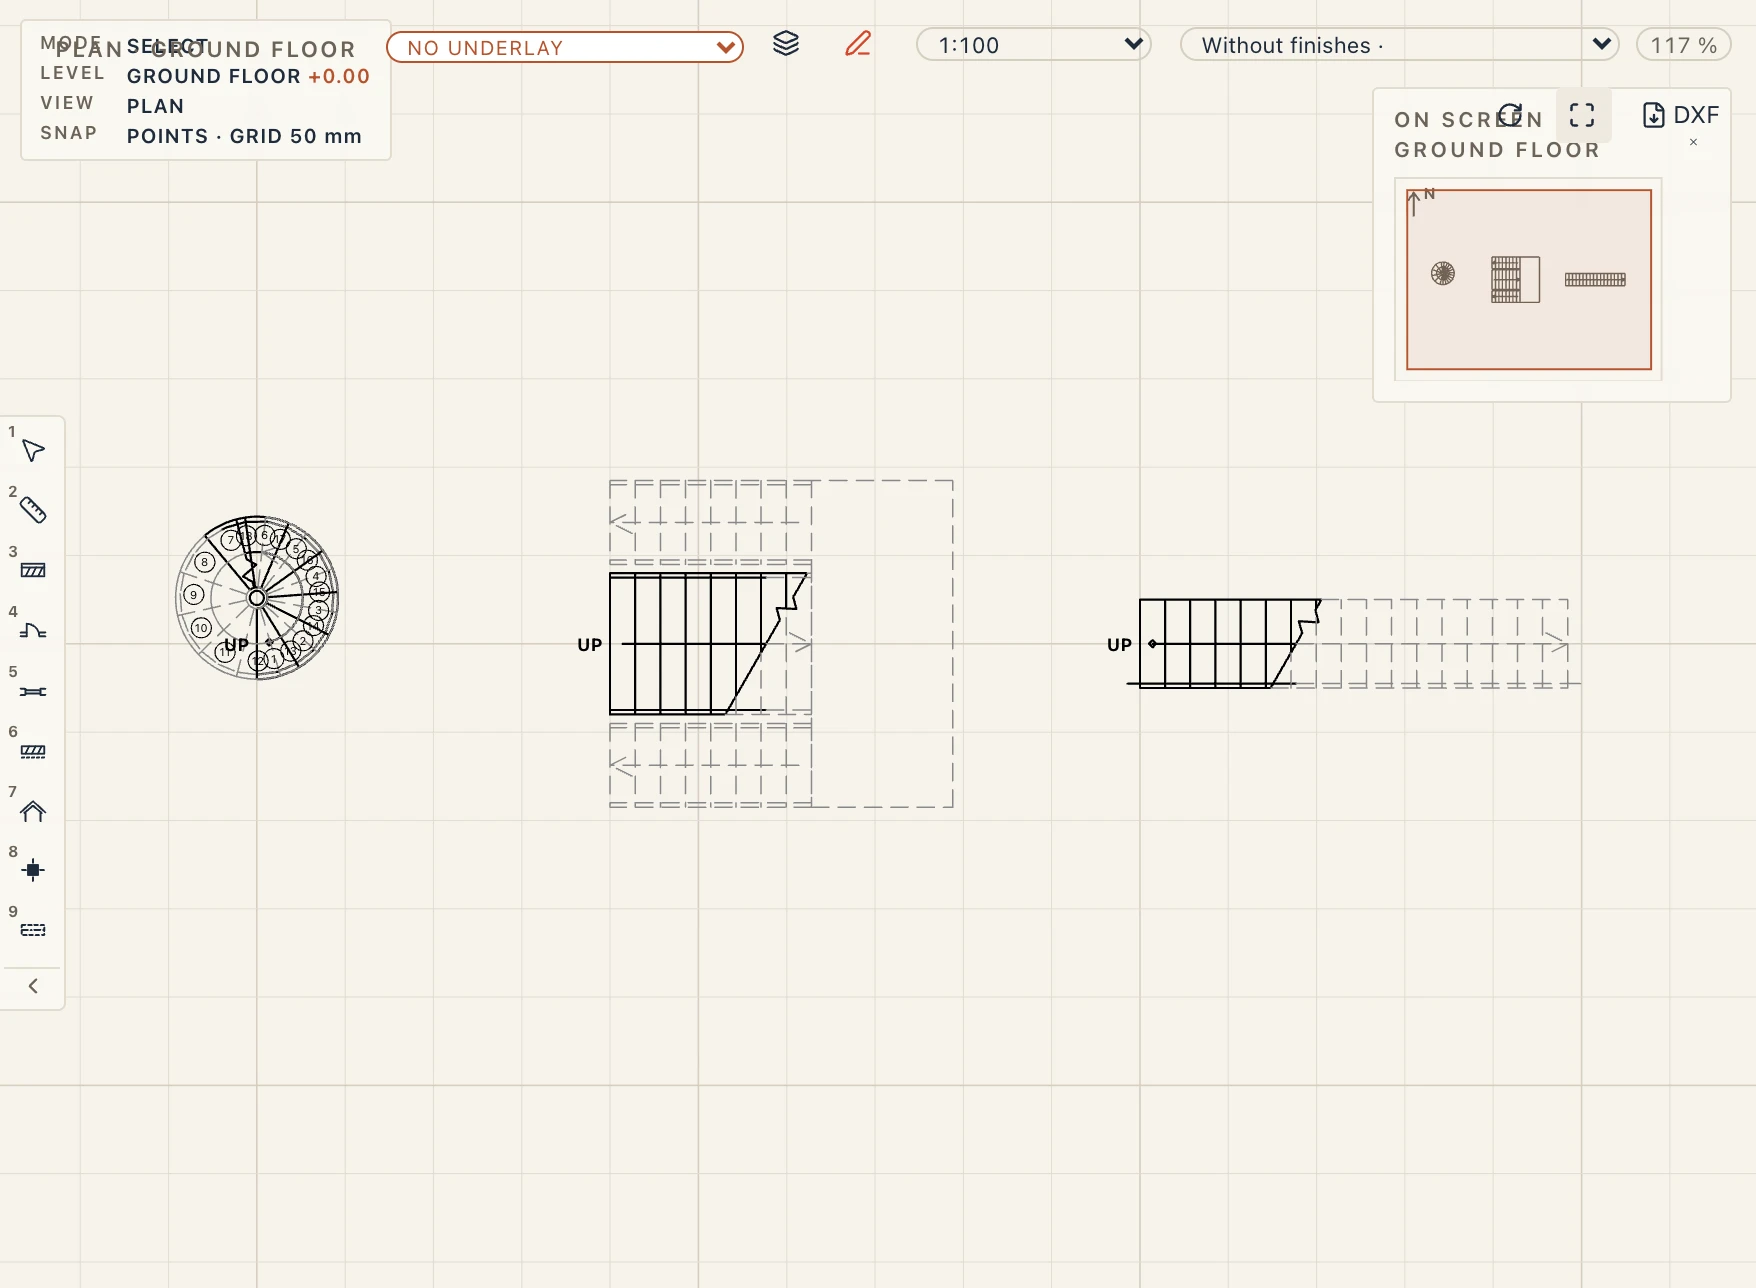
Under In plan on the Shape tab: Number the steps writes each step's number in a circle, from the first riser up; Label writes the risers, the riser and the tread, and the width by the foot; "UP" at the foot of the arrow marks where it starts. Plans and sheets show them. The numbers stand beside the walking line, never on it: on the right going up a straight stair, on the outer side of a turn, outwards on a spiral.
The stair in plan: cut at the cut plane
A plan cuts a stair where its cut plane crosses it (1.20 m above the storey, unless the view sets another cut height), as drawing standards do. The steps under the cut are drawn as seen; a break line crosses the flight, slanted, where the nosings reach the cut height; the steps above it are dashed, in the style of what lies over the cut. The walking line goes on to the top, dashed past the break, with its arrow at the top. Where the cut falls on winders or on a spiral, the break goes straight across the walking line there. A stair wholly under the cut (entrance steps) is drawn whole.
Under In plan, Over the cut plane chooses Dashed, Not drawn (the stair stops at the break line, the arrow on it, and the numbers above the cut are left out) or Whole stair, no cut; Break line is a Zigzag or Two parallel lines. The plan on screen, the sheets and their PDF are drawn by the same engine, so they show the same stair.
Entrance steps (a porch)
The steps up to a front door have a rise of their own: from the ground, a few steps below the ground floor, up to ±0.00. Lapin has a ready-made stair type for them, Entrance steps: 2 m wide, three risers of 150 mm, solid concrete cast on the ground, with no railing.
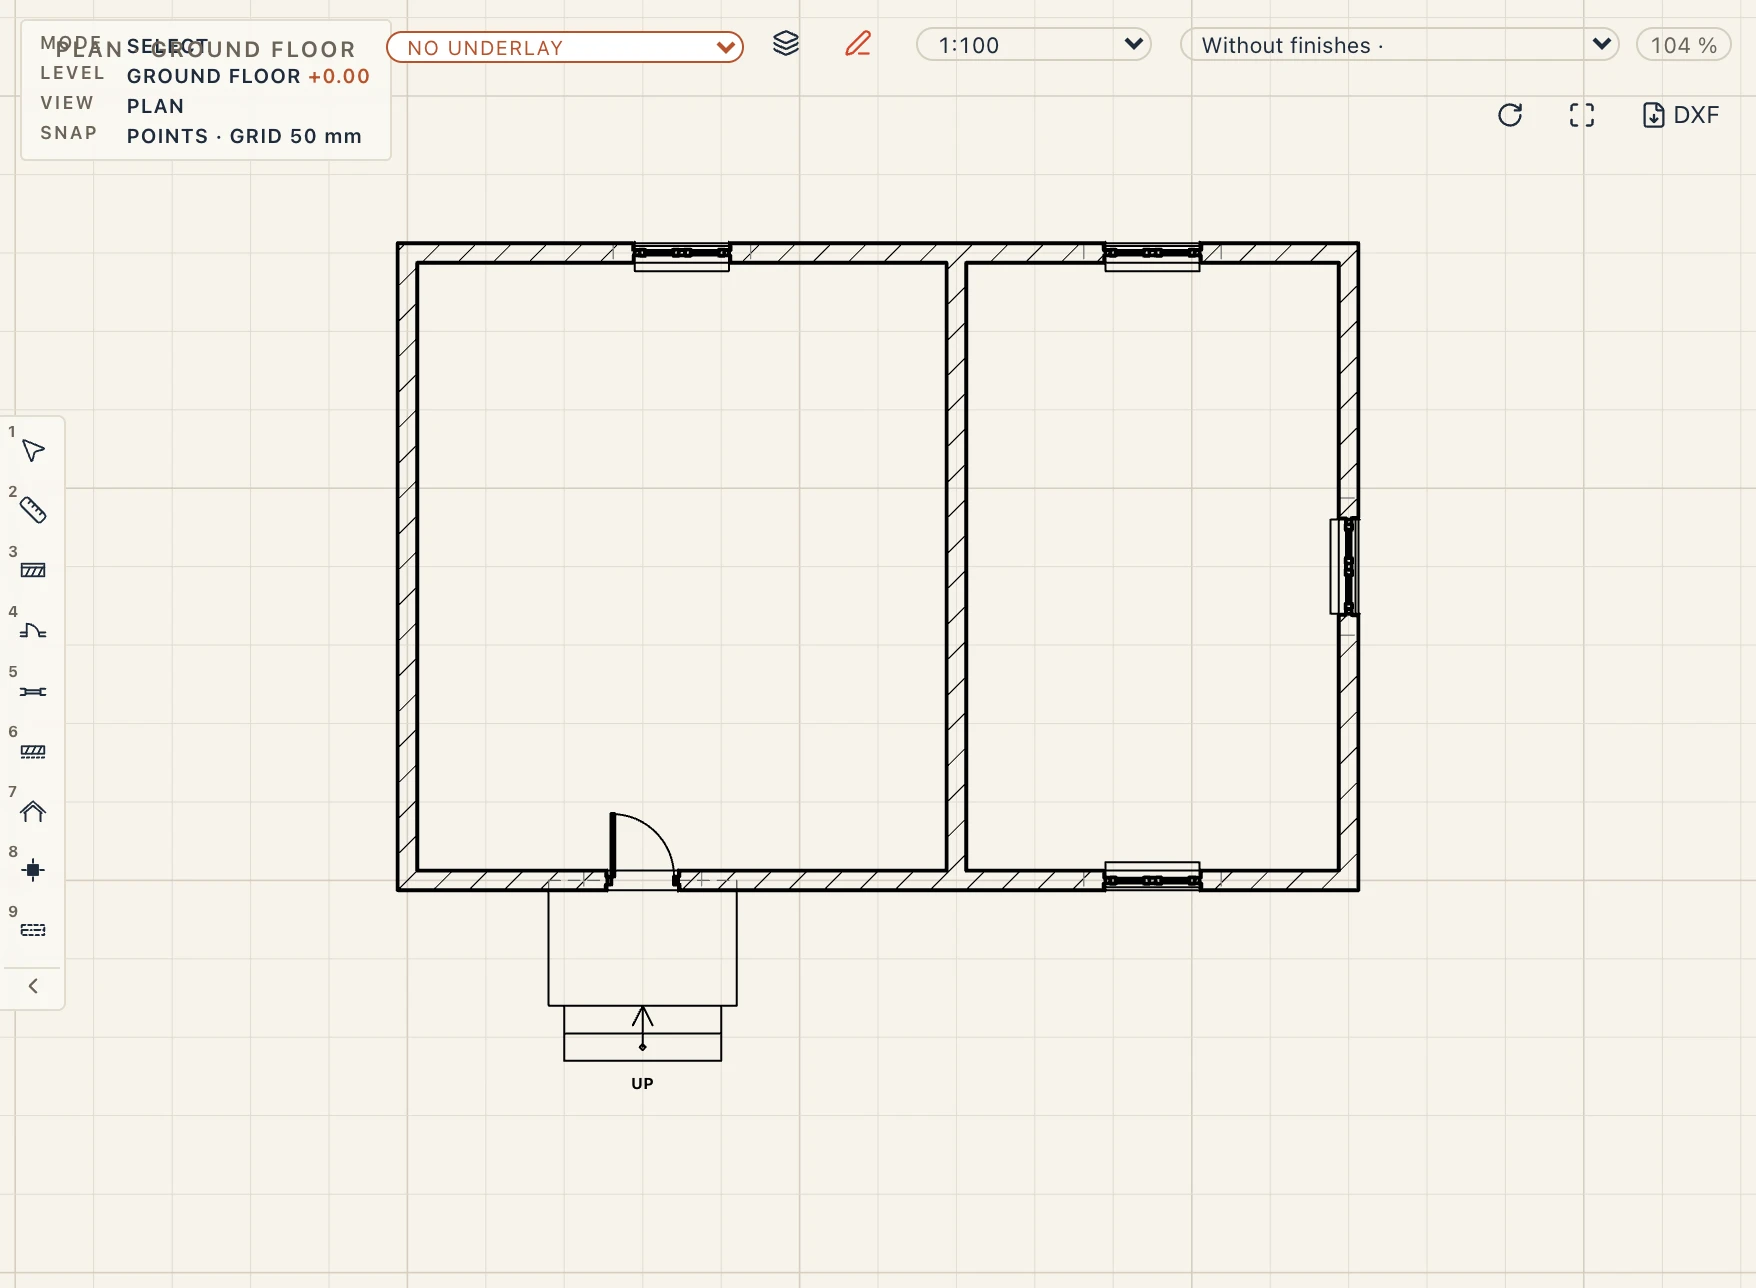
- The porch. Draw the landing as a floor: choose Architecture → Floor (SB) and click its outline outside the wall, in front of the door. A floor's top is at its storey's level (±0.00 on the ground floor) and its type gives its thickness. To change the thickness, make a floor type for porches in Architecture → Floor types, for example 150 mm of concrete.
- The steps. Choose Architecture → Entrance steps. Click the middle of the porch's edge, then click on the side the steps go out to. The steps come up to the porch edge and end at ±0.00. They start 450 mm lower: their Base offset is −450 mm.
- The height. Select the steps. In Rise, type the real difference between the ground and the porch, for example 300. The top stays at the porch and the foot moves up: the base offset becomes −300 mm and the steps have two risers. Width makes them as wide as the porch, for example 2400.
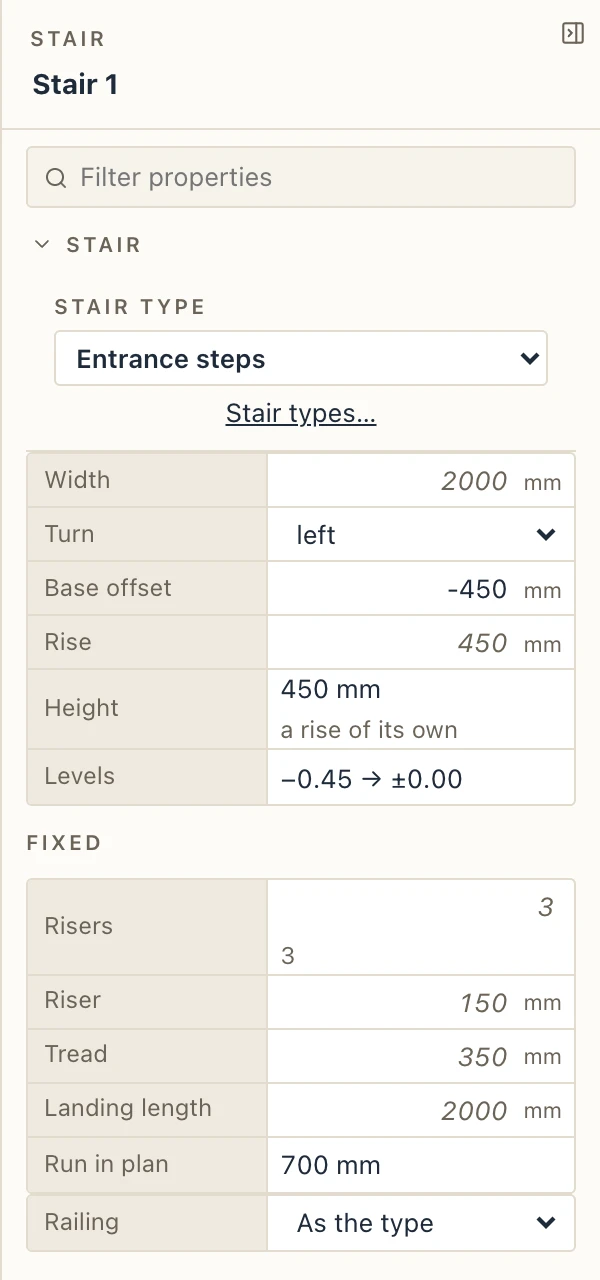
Levels shows where the steps start and end, for example −0.45 → ±0.00. With one riser (a rise of 150 mm), the step is the porch edge itself and there is no tread to build. Give the steps two risers or more to have treads in front of the porch.
The type is added to the project the first time you use it. To change it, open Architecture → Stair types and pick Entrance steps:
- Shape → Climbs → A height of its own. The type's rise, climbed Up to its storey's level, from below (an entrance); each stair can still change it with Rise.
- Rules → Rule set → entrance steps. Risers of 120–170 mm and treads of 300–400 mm, with a single riser allowed.
- Construction → Built as. Solid, cast on the ground fills the steps down to their base. Waist slab under the steps builds them like an indoor stair.
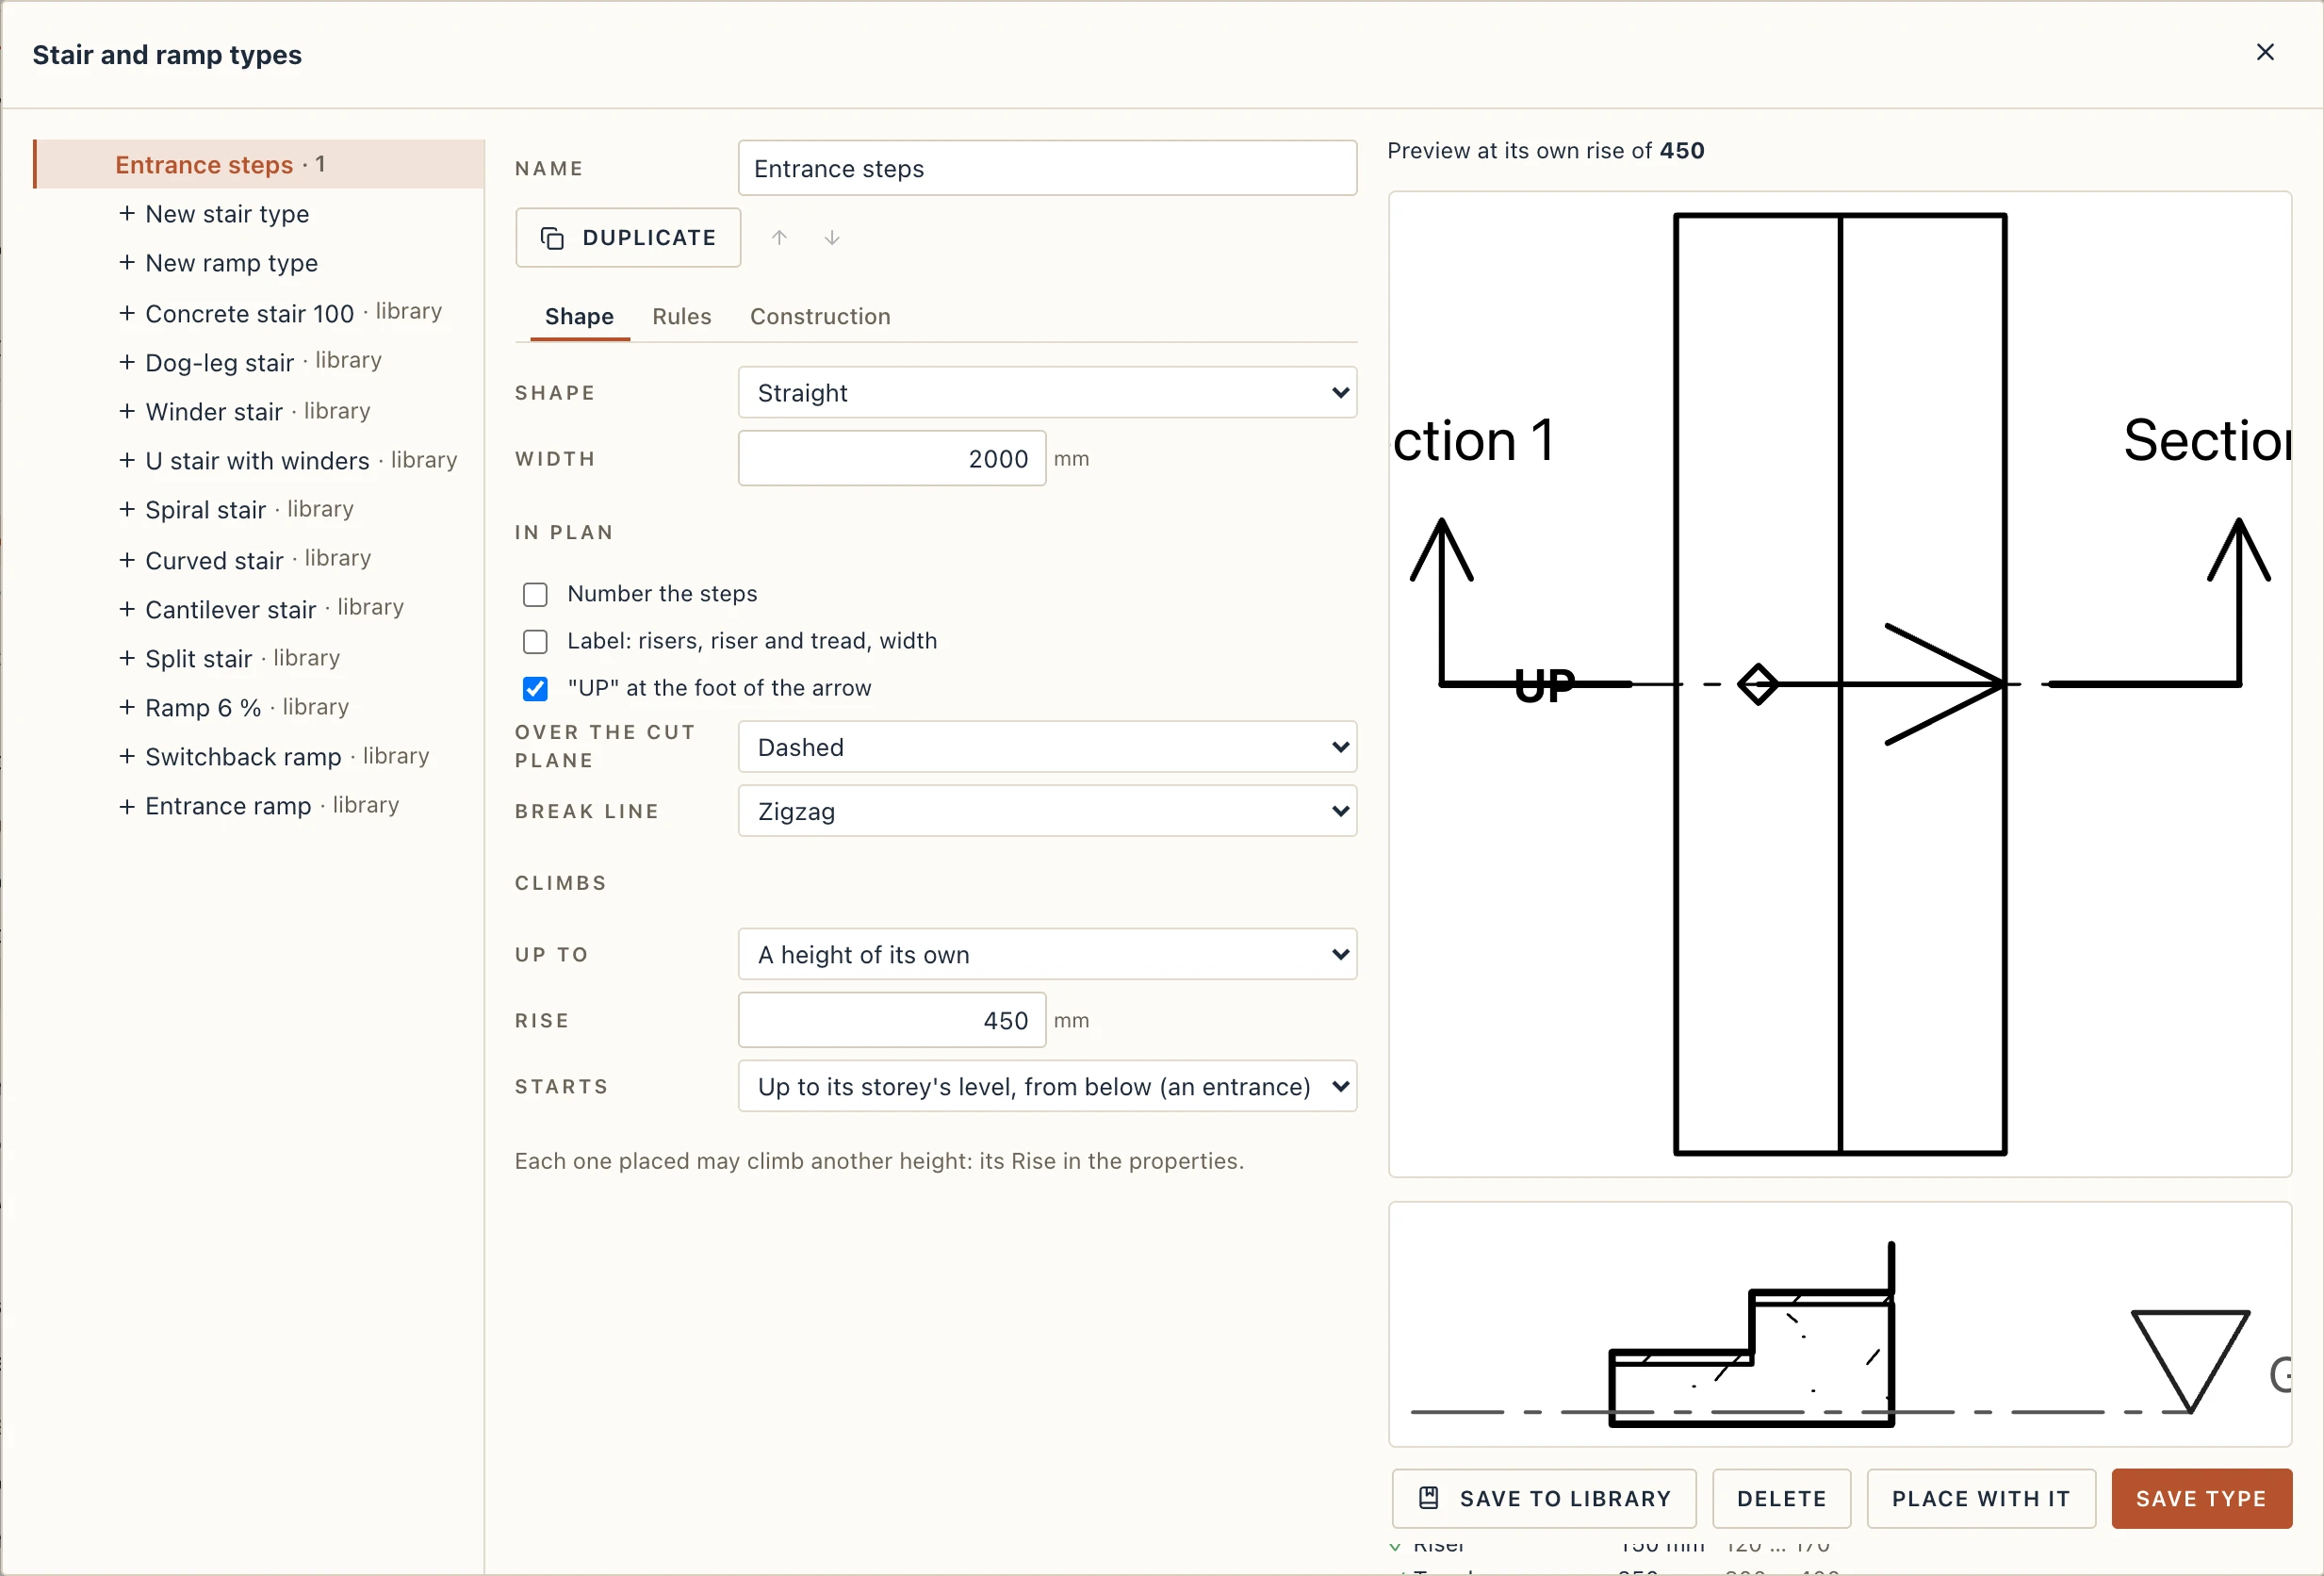
To make any other stair type climb a height of its own, choose Climbs → Up to → A height of its own on its Shape tab (see the next section). To change a placed stair into entrance steps, pick Entrance steps as its Stair type: it moves down so that its top is at its storey's level.
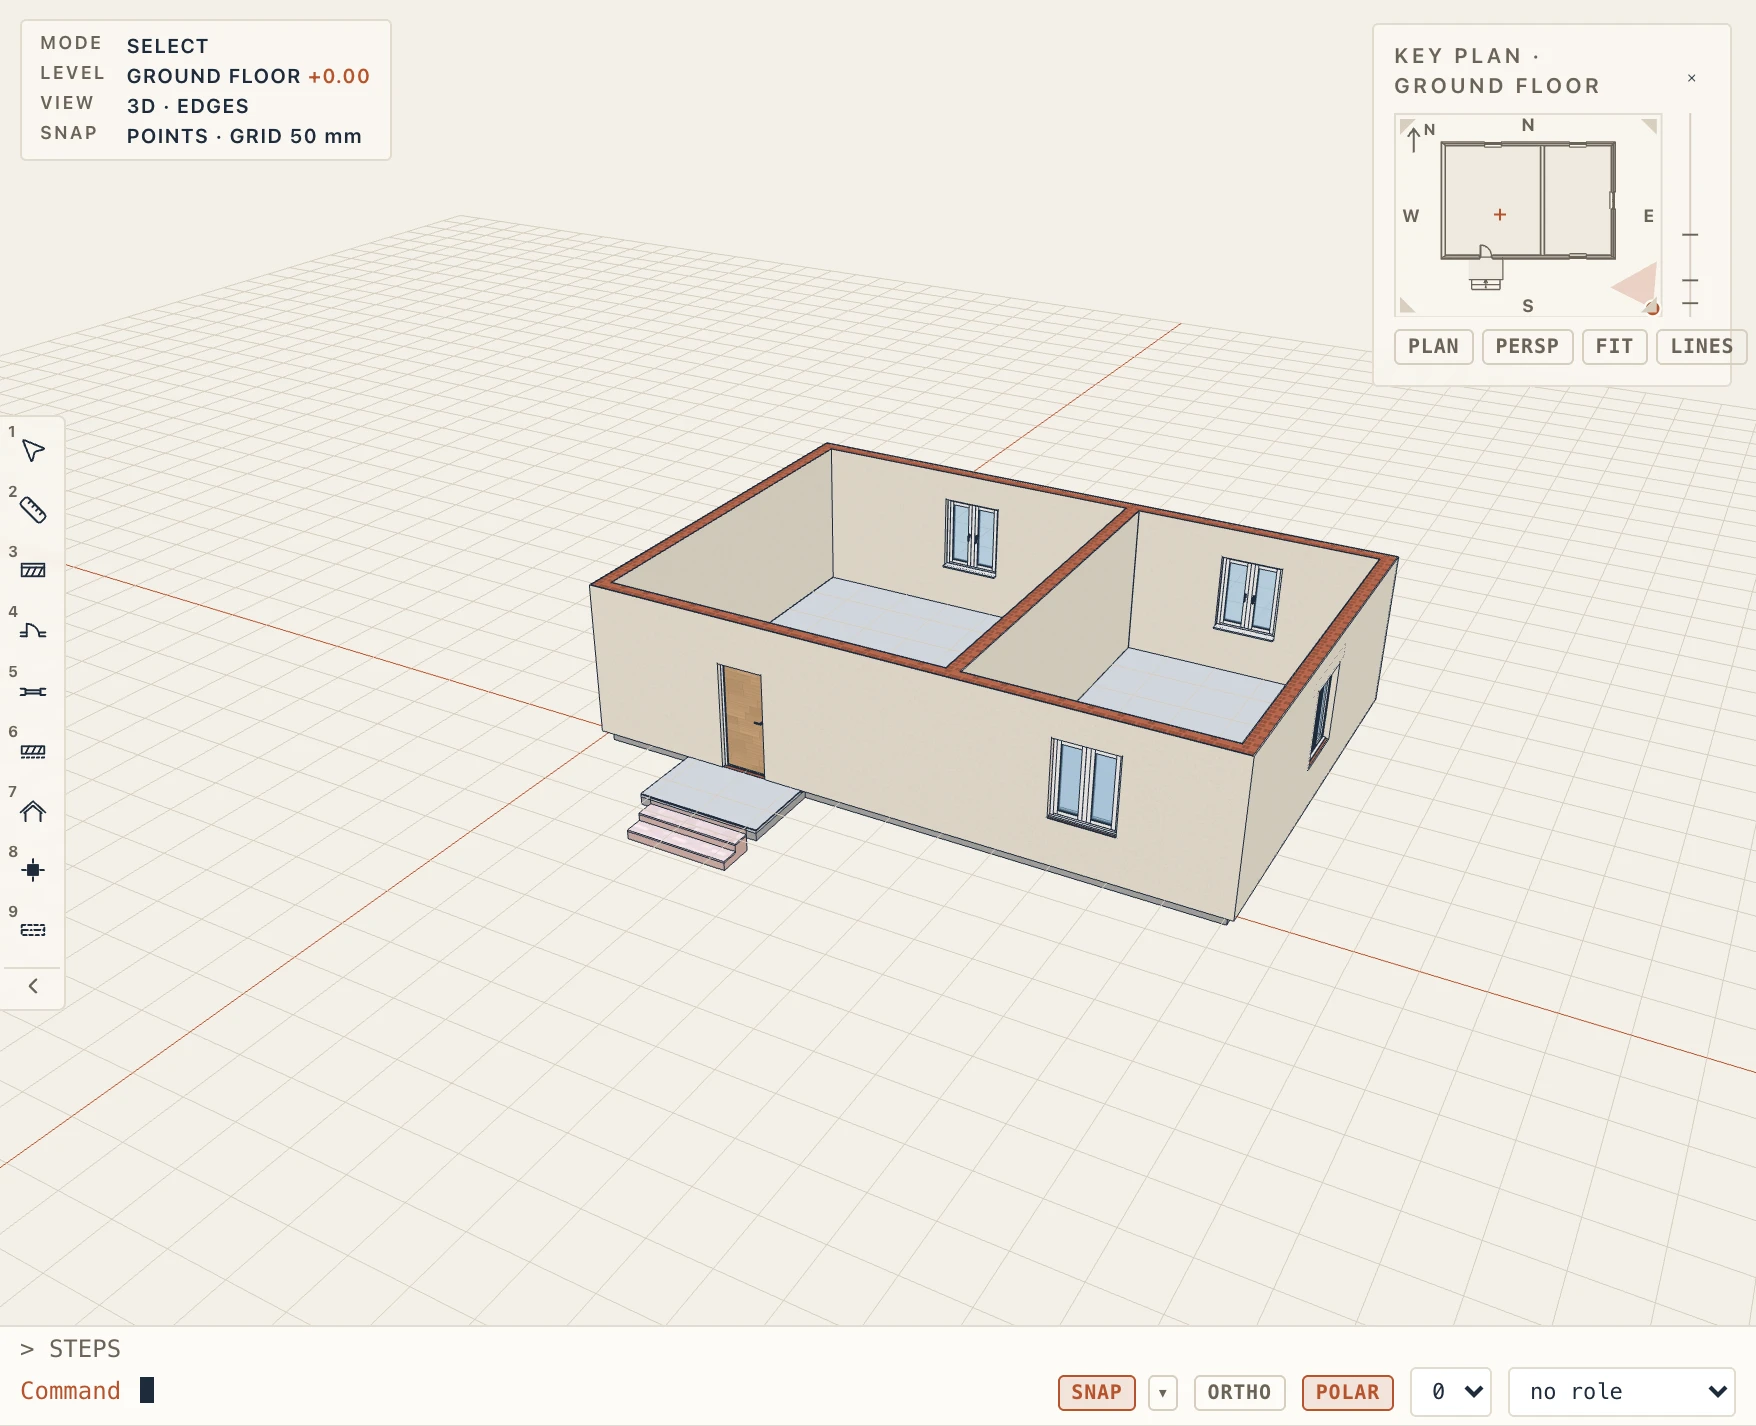
In IFC, the steps are an IfcStair of type STRAIGHT_RUN_STAIR. Its flight is an IfcStairFlight with its NumberOfRisers, NumberOfTreads, RiserHeight and TreadLength, and Pset_StairCommon carries the same numbers. The porch is an IfcSlab.
A stair to any height
A stair does not have to go from one storey to the next. On a type's Shape tab, Climbs → Up to chooses The storey above or A height of its own, with its Rise, and Starts says where it starts:
- Up to its storey's level, from below (an entrance). It ends at the storey's level and starts the rise lower, as entrance steps do.
- From its storey's level up (a terrace, a platform). It starts at the storey's level and climbs the rise: 1.20 m up to a terrace or a loading dock, for example.
Each stair placed can climb another height: type it in Rise in its properties (empty: the type's). Climbing from the level, a new rise keeps the foot where it is; coming up from below, it keeps the top.
The space under a stair
The space under a flight can be furnished: a storage cupboard, a closet office, a reading nook, an entry with a bench and coat hooks, a playhouse for small children or a dog's bed. Select a straight stair and click Space under the stair… at the bottom of its properties (or Architecture → Under-stair space).
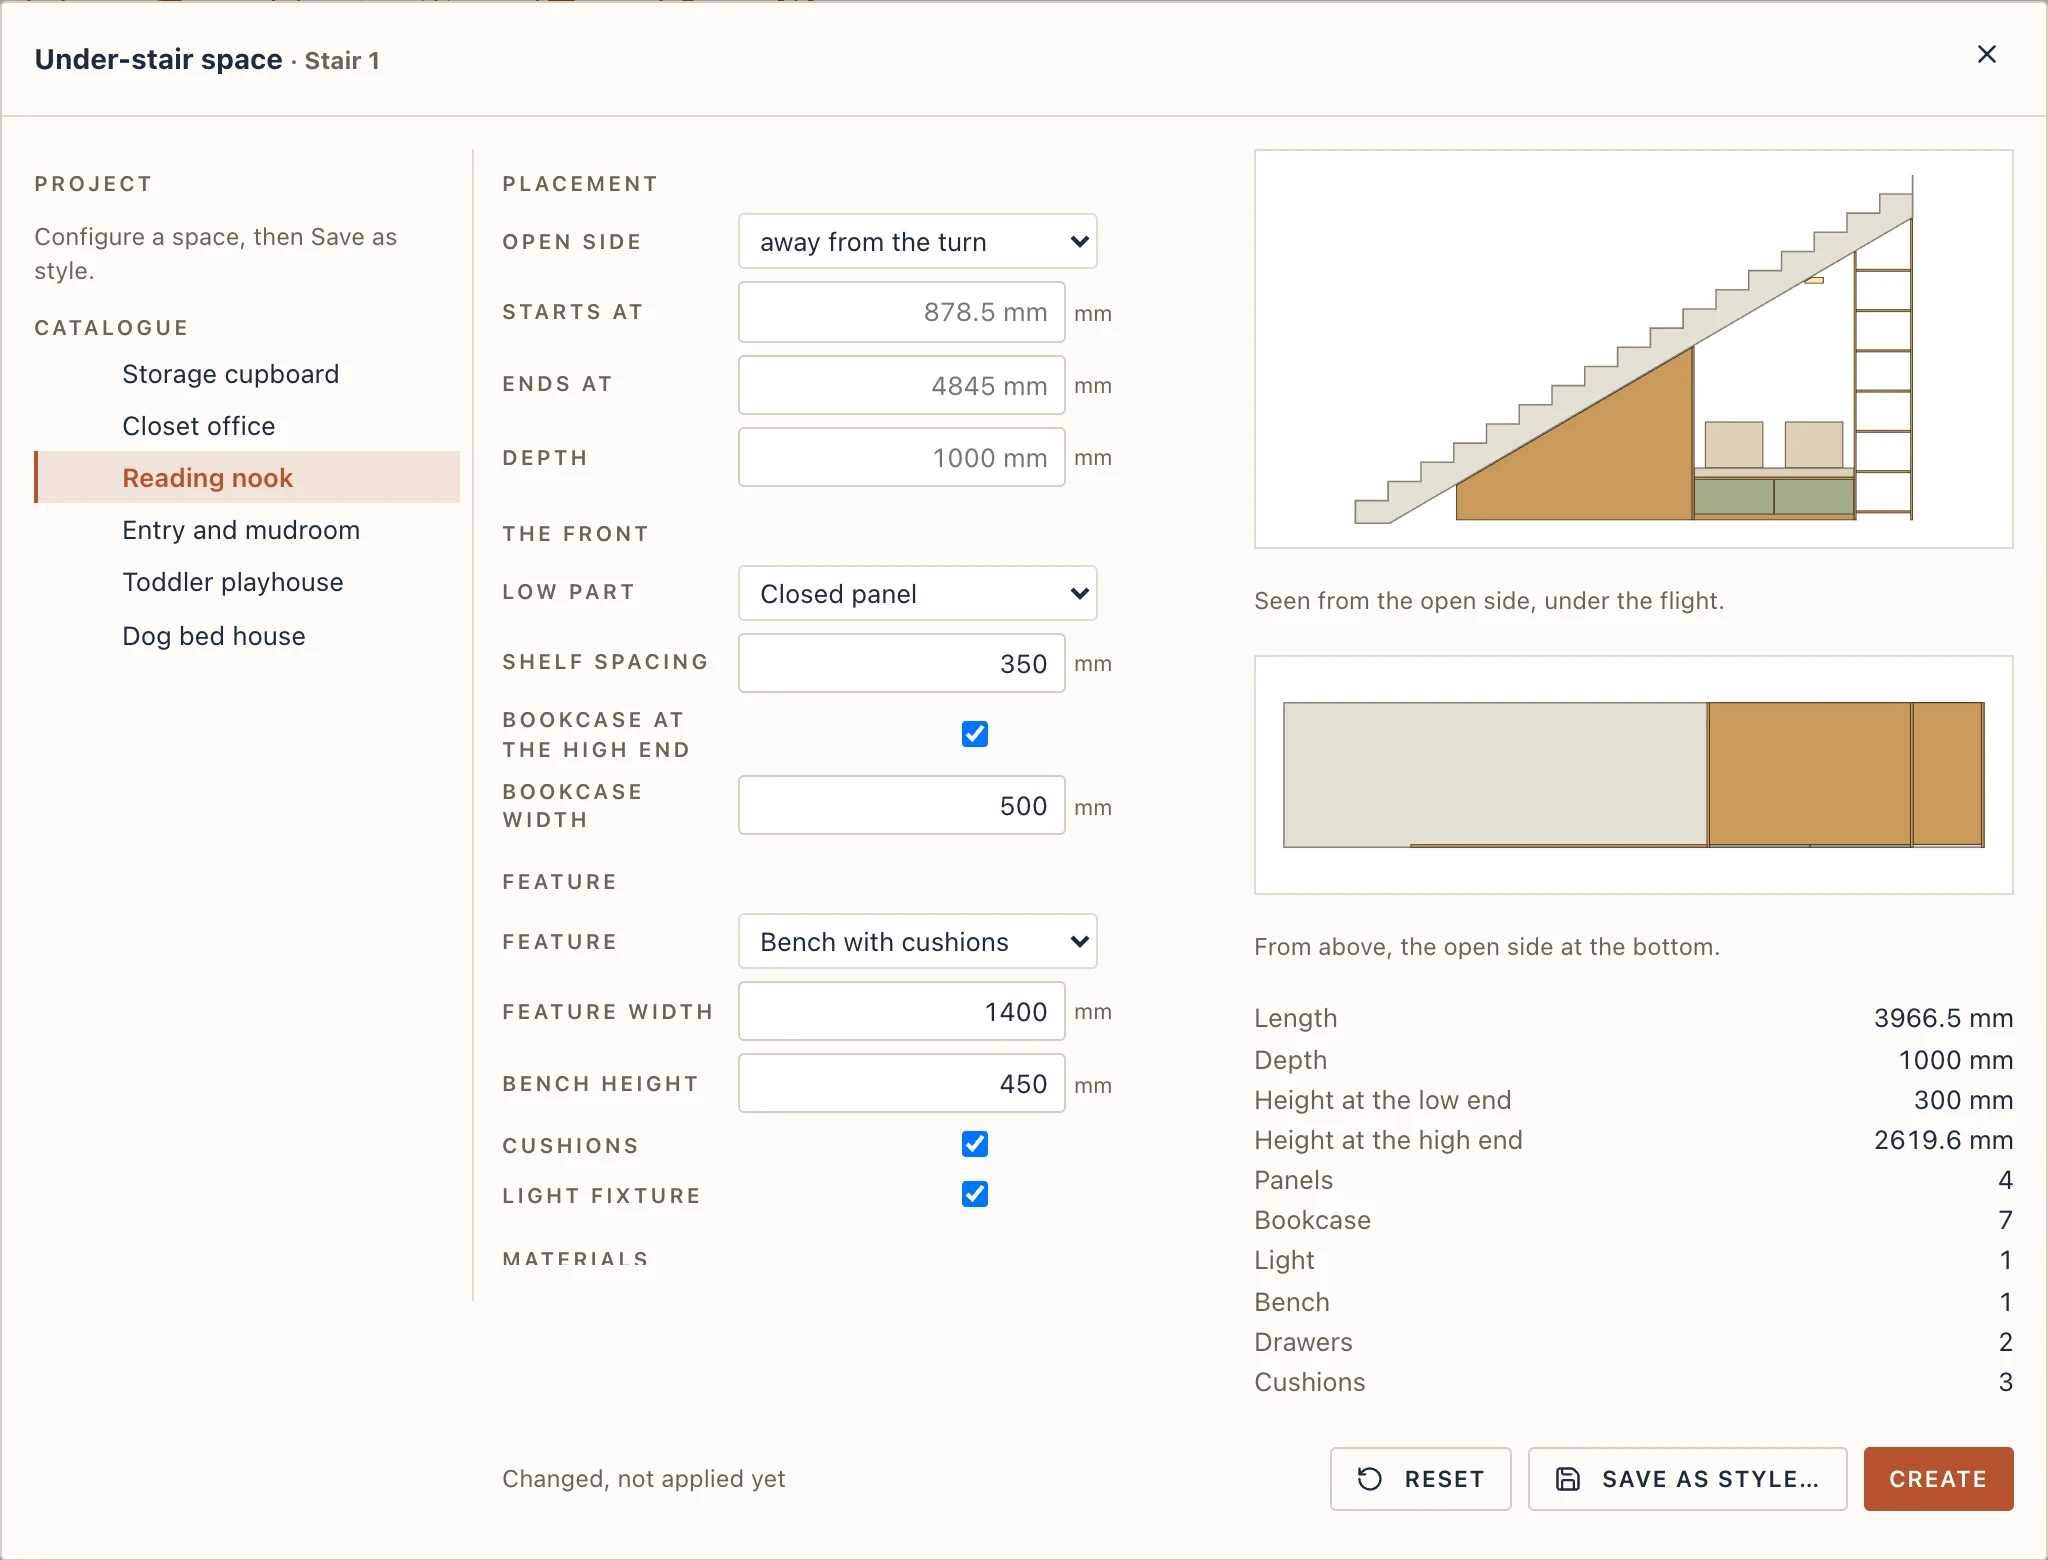
The configurator lists the ready-made styles on the left: Storage cupboard, Closet office, Reading nook, Entry and mudroom, Toddler playhouse and Dog bed house, and your project's own styles above them. Pick one and change it in the middle:
- Placement. Under flight (on an L or U stair), the Open side (by default the side away from the turn), where it Starts at and Ends at along the flight (empty: from where the underside is 300 mm over the floor, to the last riser) and its Depth (empty: as wide as the stair).
- The front. The Low part closed by Cupboard doors (about the Door width each, with Shelves behind the doors), a Closed panel, or Left open; a Bookcase at the high end.
- Feature. A Desk with a shelf (and a light), a Bench with cushions (drawers in its front), a Mudroom bench and coat hooks (cubbies for shoes under it), a Playhouse door (and a Window beside the door) or a Dog bed behind a framed opening, each with its sizes.
- Materials. The Board thickness and the Carcass, Fronts and Fabric materials, from the project's.
On the right, the preview shows the space seen from its open side under the flight's soffit and from above, its length, depth and heights, and its parts. Every part is cut by the slope; a part with no room under it (a desk where the stair is too low) is left out and the preview says so. Create or Apply is one undo step. Save as style… keeps what fills the space as a style of the project; Update style saves it again, and every space of that style follows.
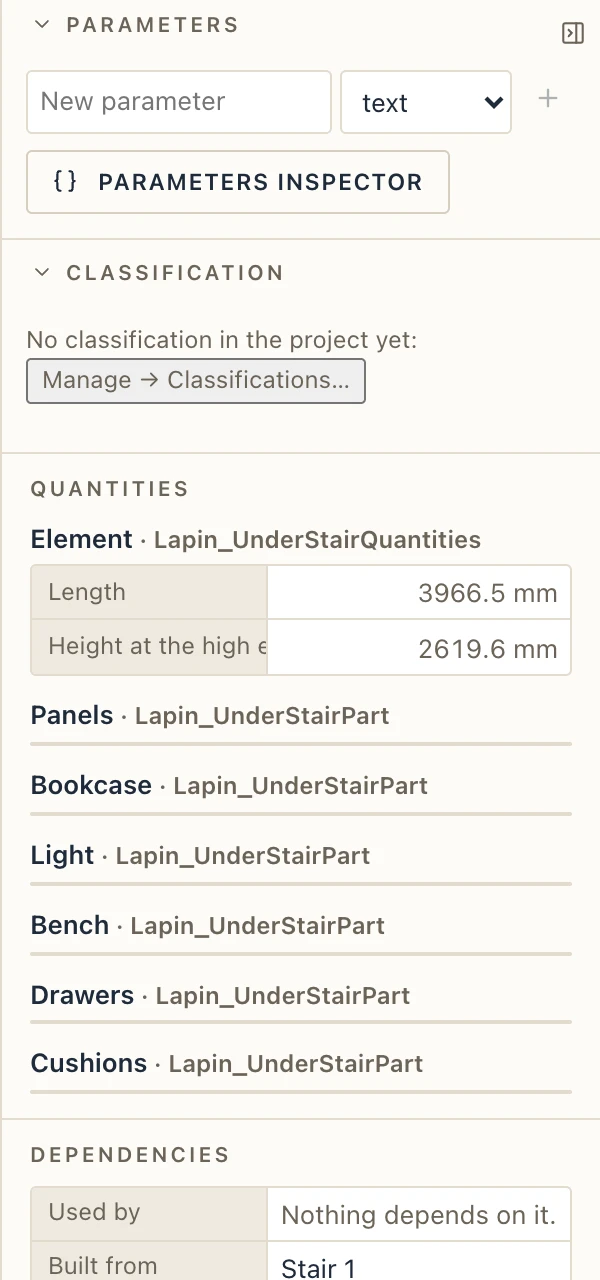
The space is an element of its own, hosted by its stair. When the stair changes (width, rotation, risers, type), the space is built again under it, and it is deleted with the stair. Its placement fields are in the properties panel, and Configure… opens the configurator again.
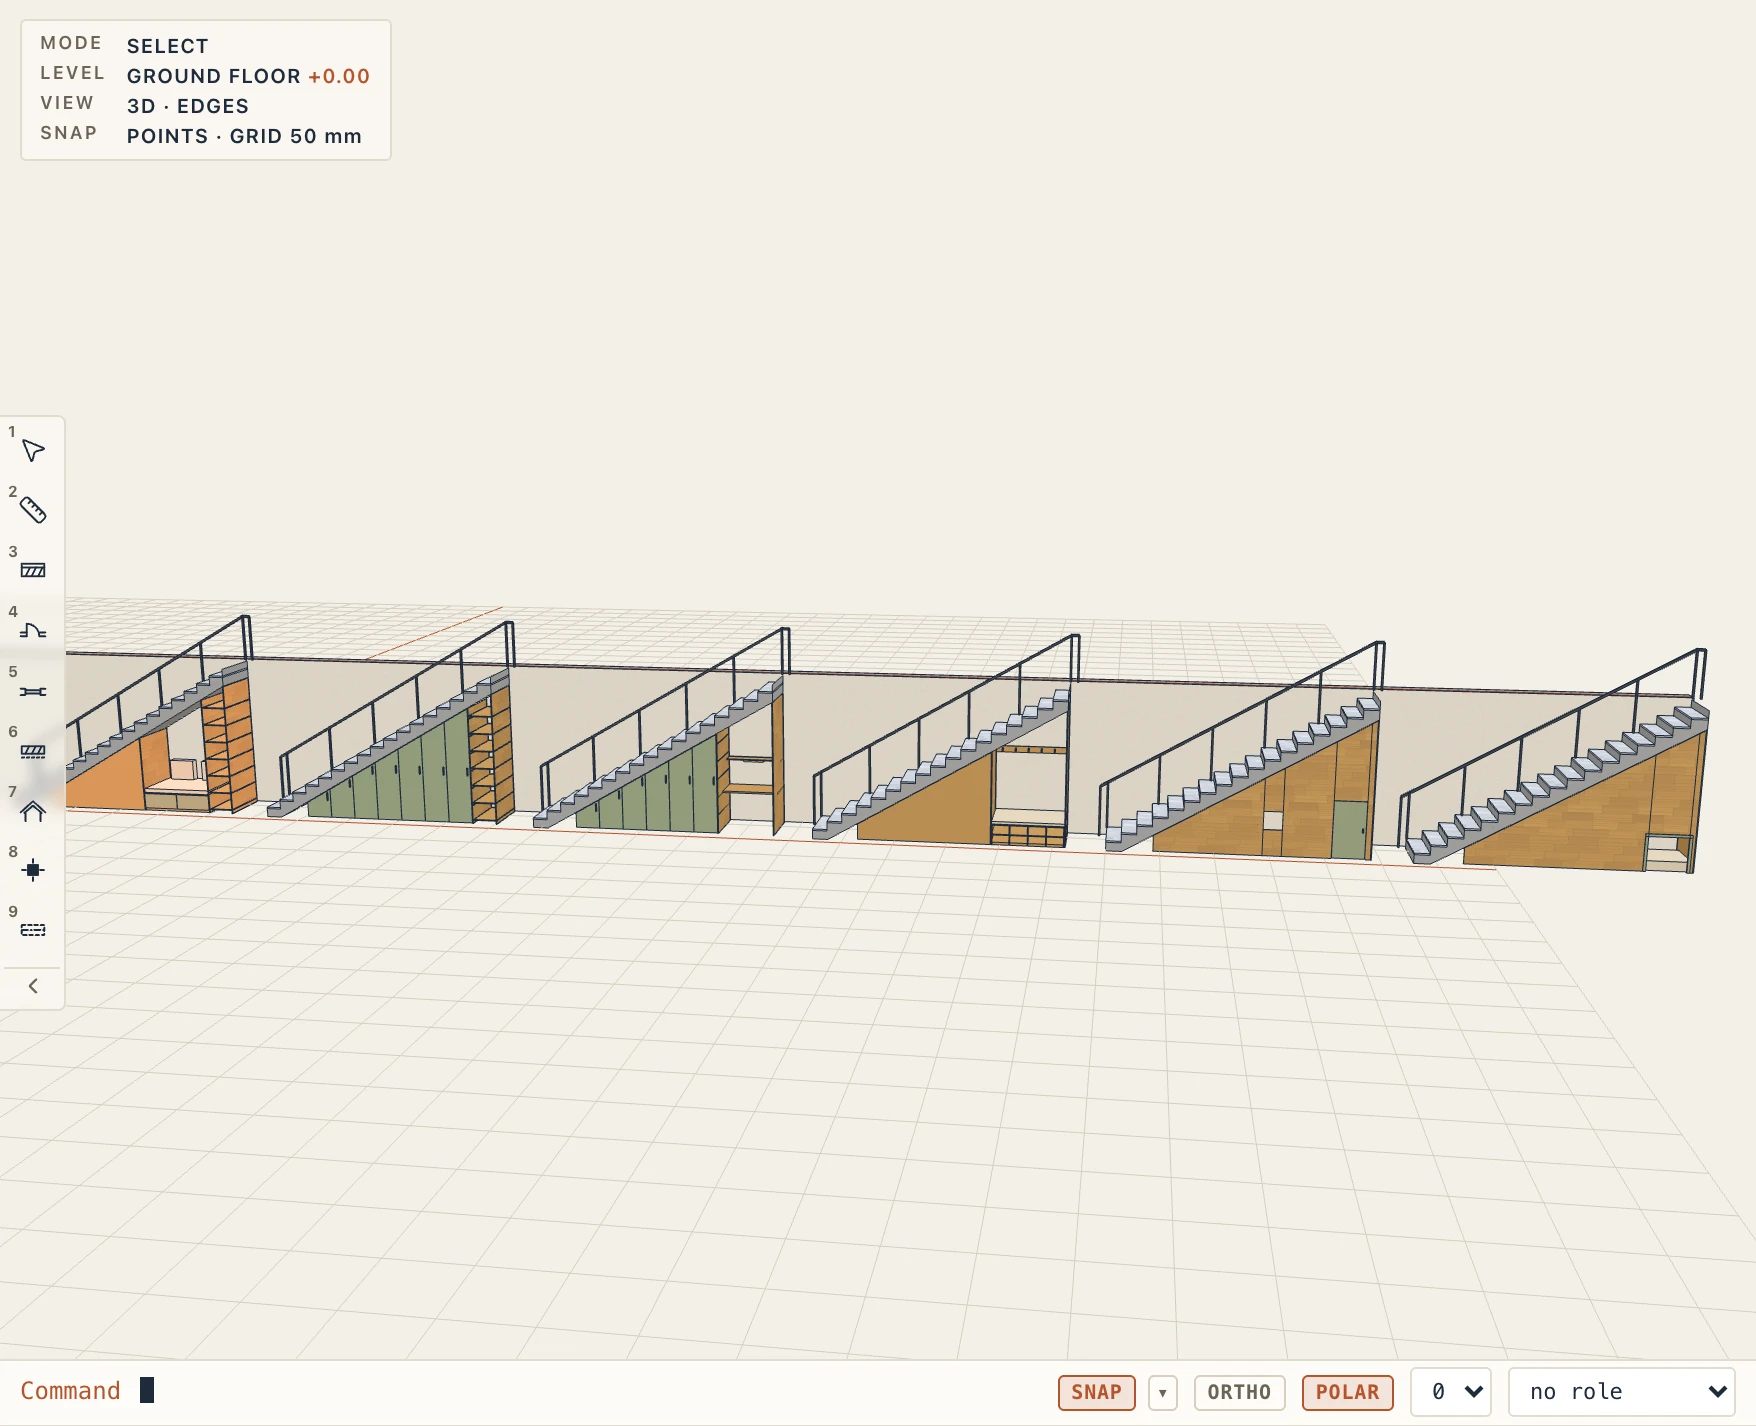
Plans, sections, elevations and sheets draw it like any other element: cut where the plan cuts it, seen below.
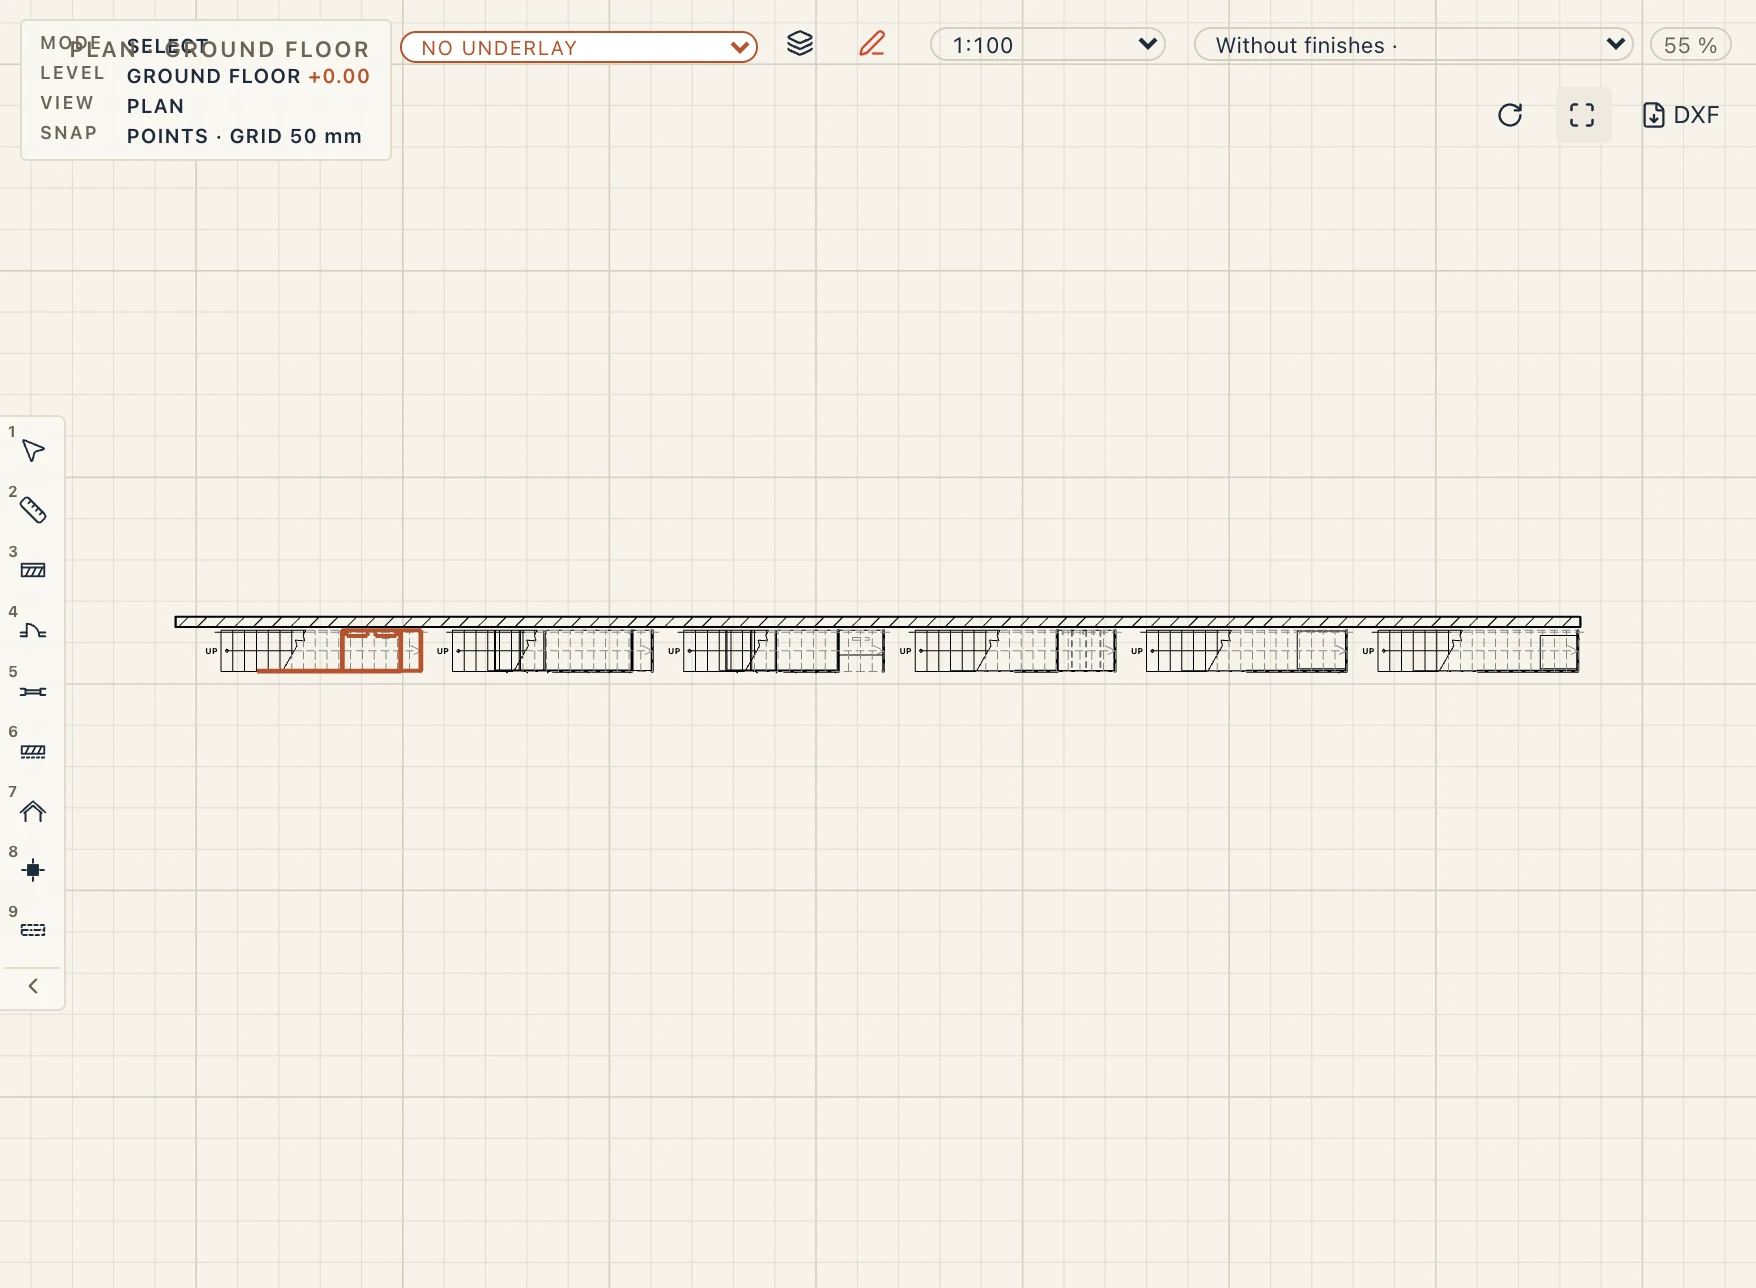
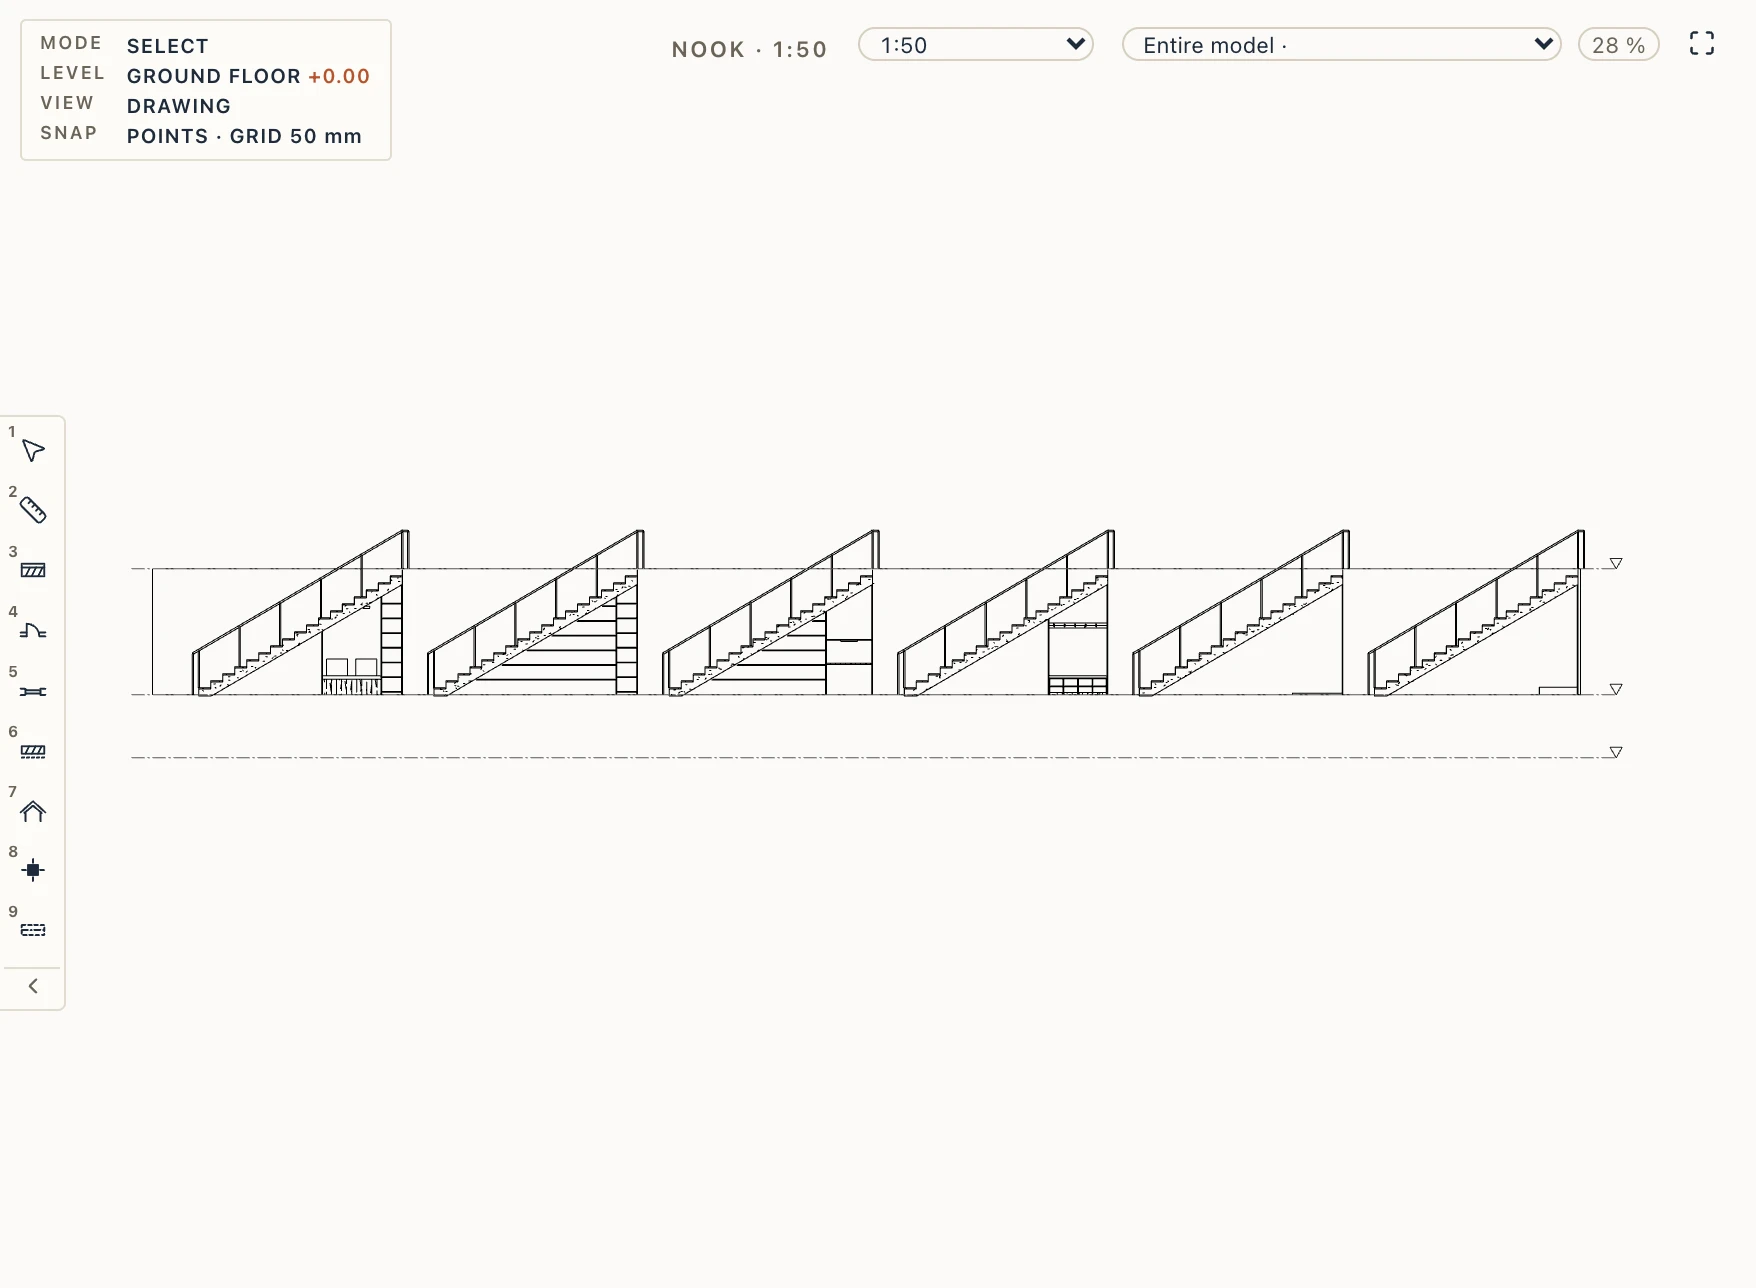
Architecture → Under-stair schedule lists each space's parts, with their pieces, material and volume, and totals by material. In IFC, the space is an IfcElementAssembly ("Under-stair space") of IfcFurniture (shelves, desk, bench, cushions, bed), IfcDoor, IfcPlate, IfcDiscreteAccessory (handles, coat hooks) and IfcLightFixture, connected to its IfcStair.
Ramps
Choose Architecture → Ramp (RU). Click the middle of the ramp's lower end, then a point in the direction it climbs; for an L or a switchback, a third click left or right of the flight sets which way it turns. The first time, the project gets the library's Ramp 6 %: 1.20 m wide at 6 %, in flights of at most 9 m with landings of 1.50 m between them, a slab of reinforced concrete under a finish, handrails on both sides. It climbs to the storey above unless its type or its Rise says otherwise.
Architecture → Entrance ramp is placed like entrance steps: click the middle of the porch edge, then the side the ramp goes out to. It comes up 450 mm from the ground to ±0.00, solid on the ground, and Rise changes it as it does the steps.
Ramp types are made in the same configurator, Architecture → Stair types, with New ramp type, or from the library's Switchback ramp and Entrance ramp:
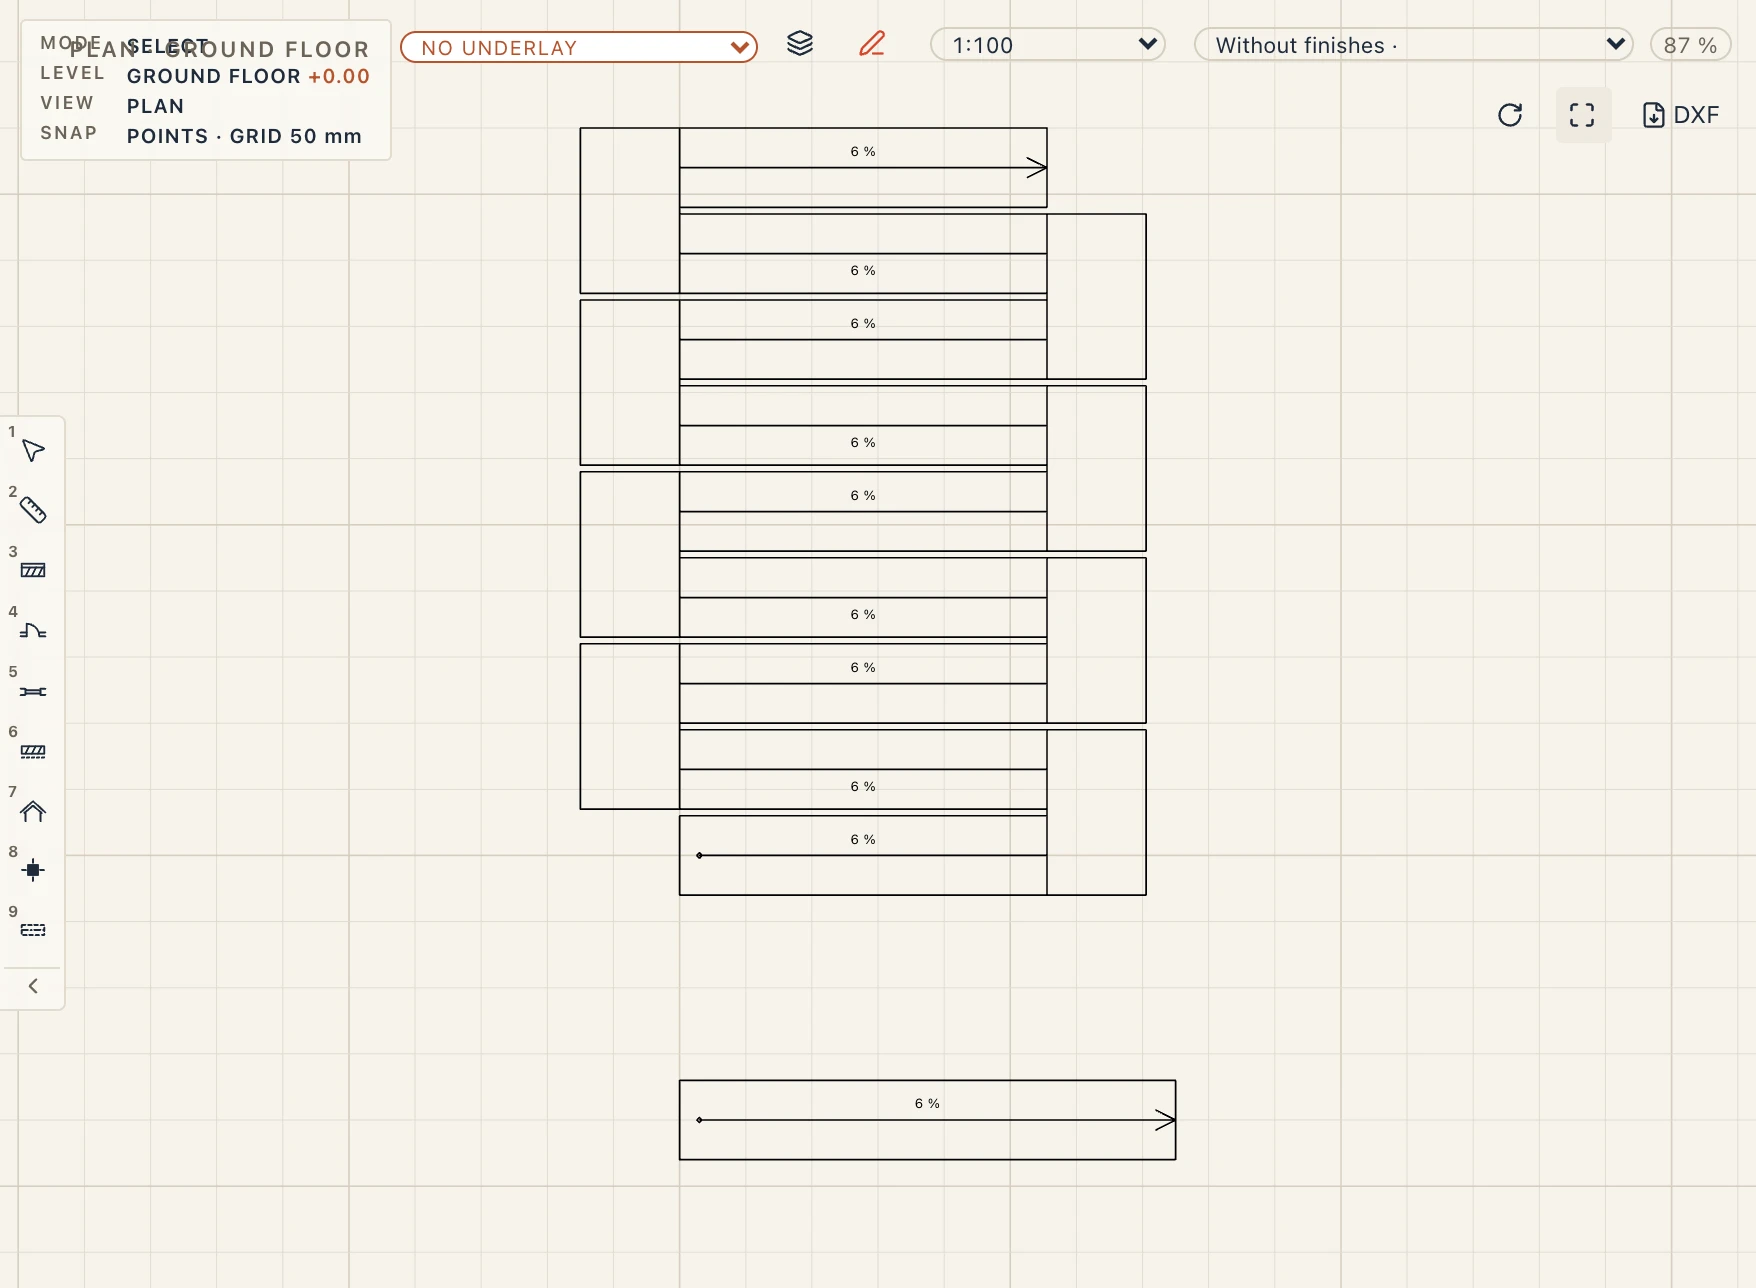
- Shape. Straight, Straight, with landings, L shape or Switchback (back and forth) with its Gap between flights; the Width, the Slope in per cent, the Longest flight (longer, the ramp is split into flights of equal length with landings between them) and the Landing length. The run in plan is the height over the slope: 3 m at 6 % is 50 m. Climbs works as for stairs.
- Rules. Steepest slope (8 % by default), Minimum width and Headroom. The checks show in red a slope steeper than the rules allow, a flight longer than the longest, and a landing shorter than 1.50 m or the ramp's width.
- Construction. A sloping slab of reinforced concrete of its Slab thickness, or Solid, cast on the ground; the finish and the railing as for stairs.
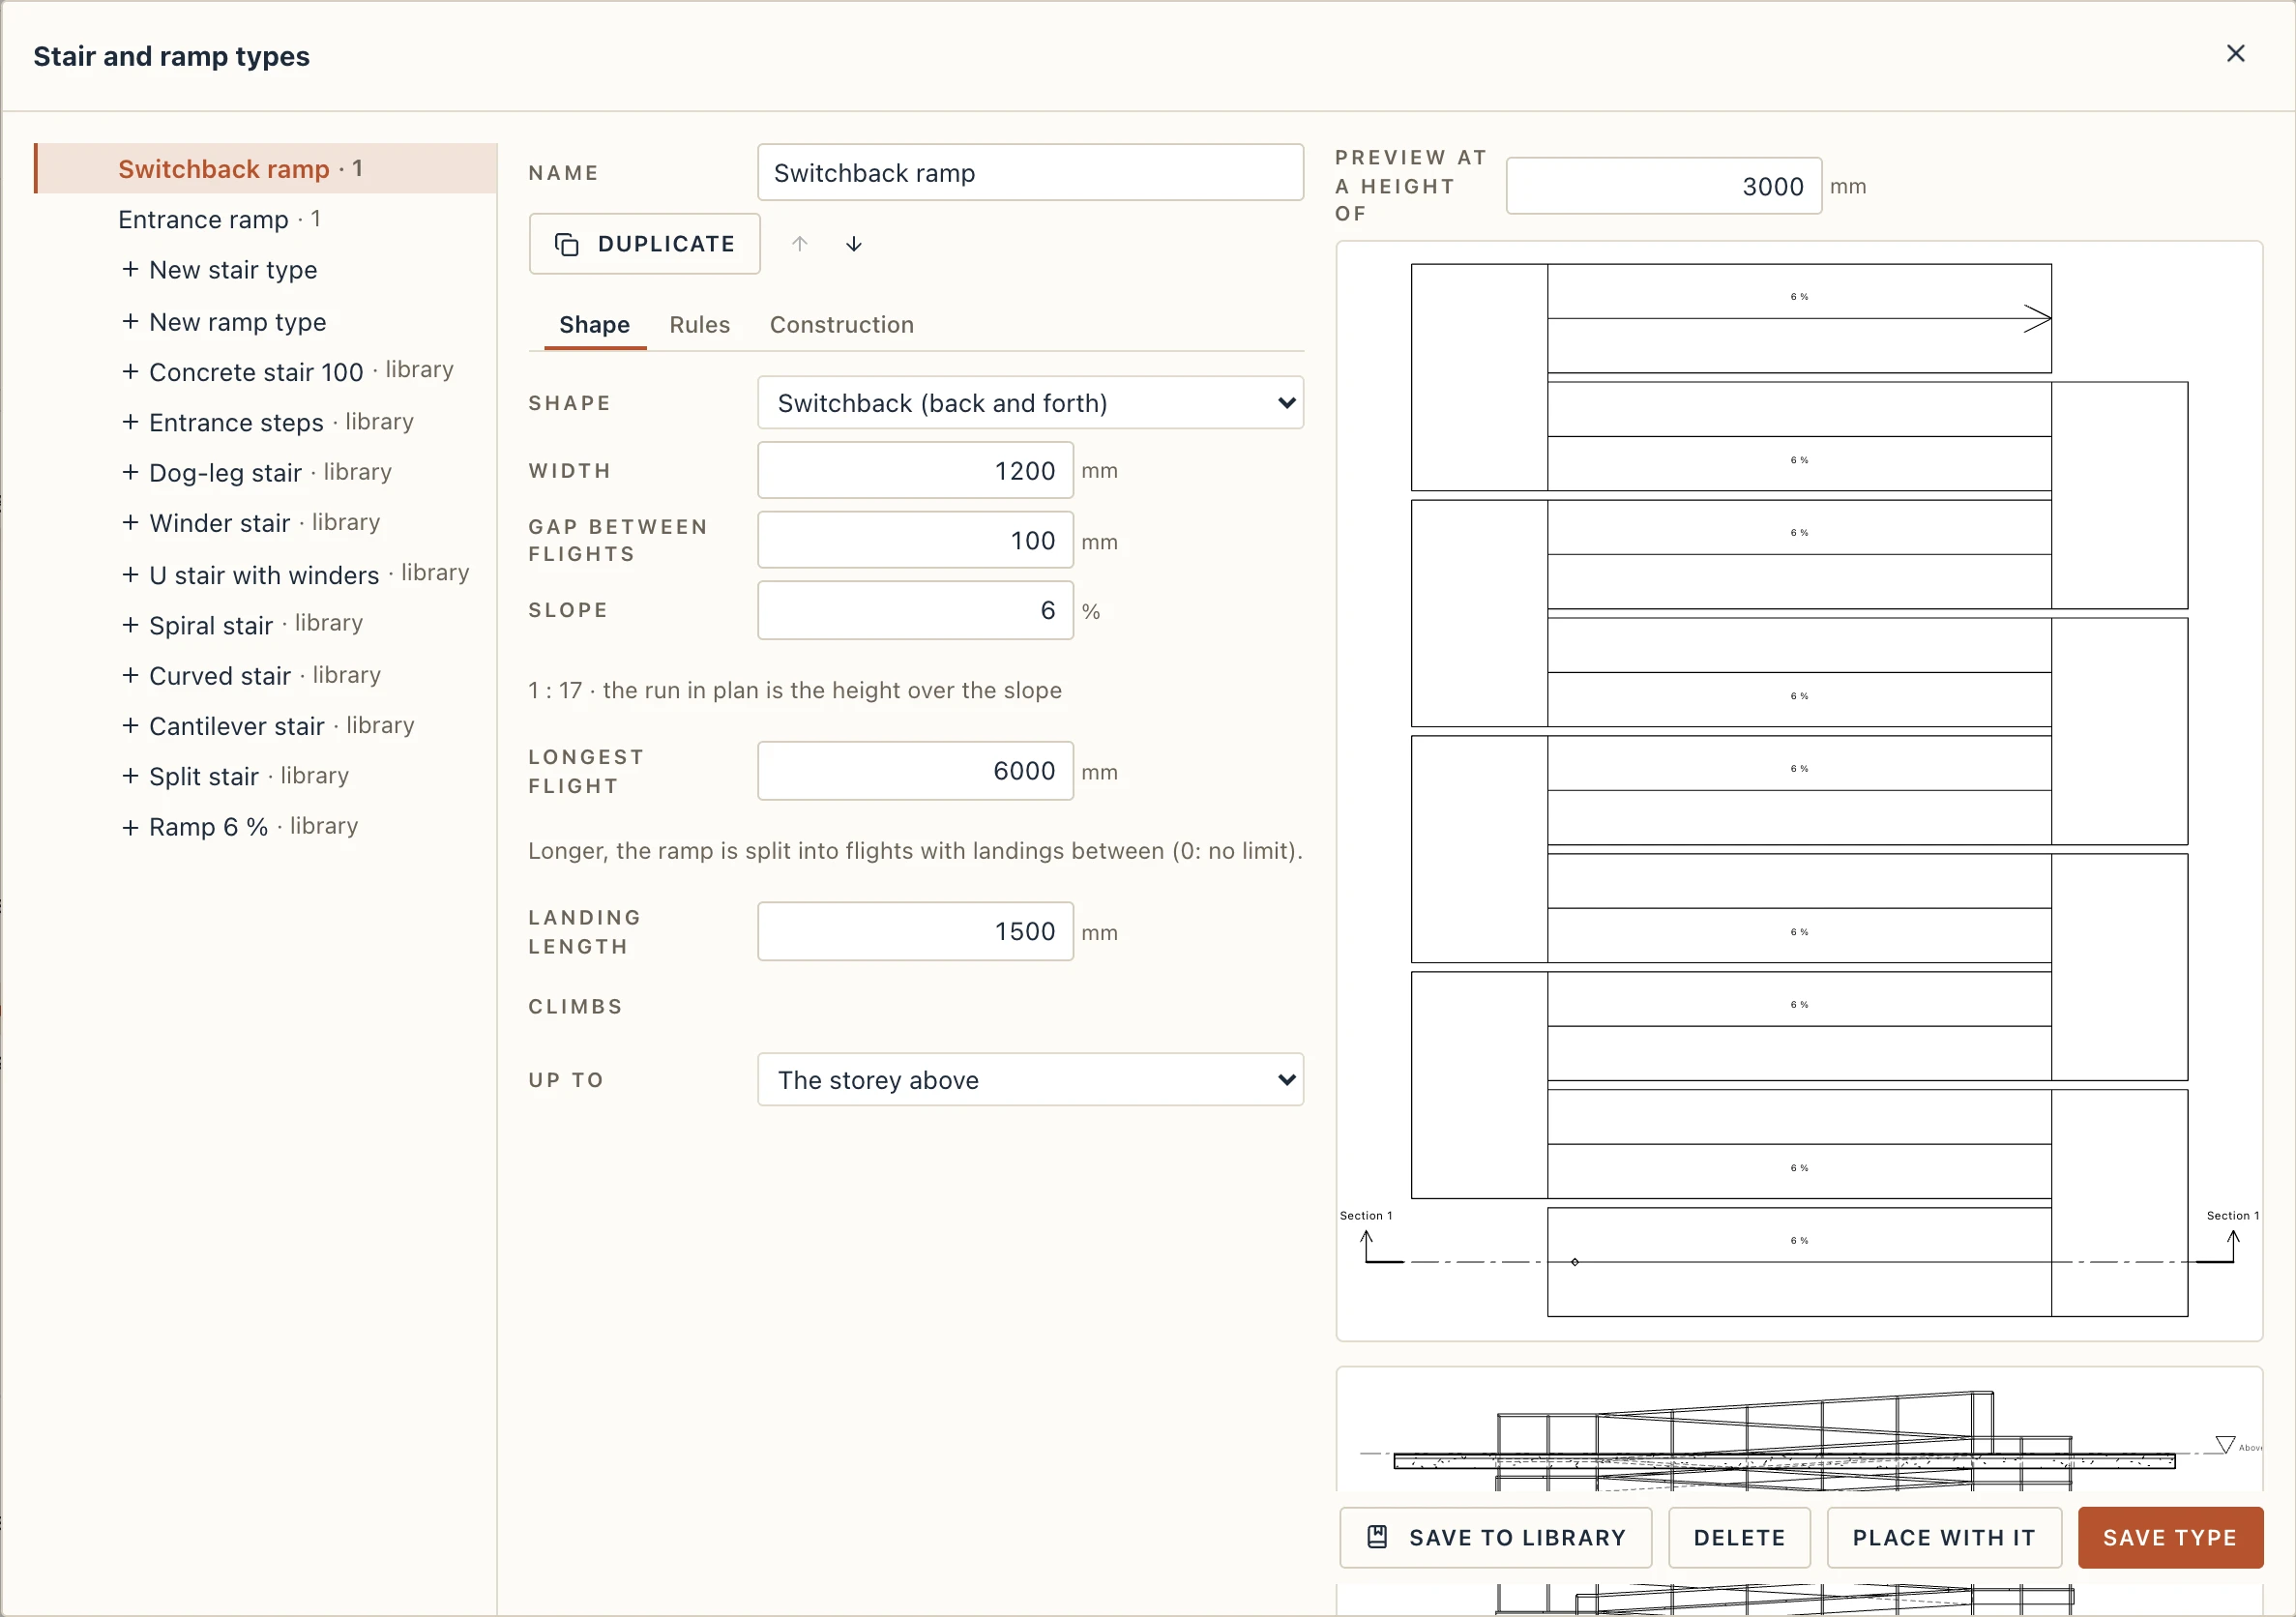
Select a ramp to see its type, Width, Turn, Base offset and Rise, a Slope and a Landing length of its own (empty: the type's), its flights' lengths and its checks. Plans draw its flights and landings, the arrow up, and the slope in per cent along each flight. A ramp that climbs to the storey above asks that floor for an opening, as a stair does.
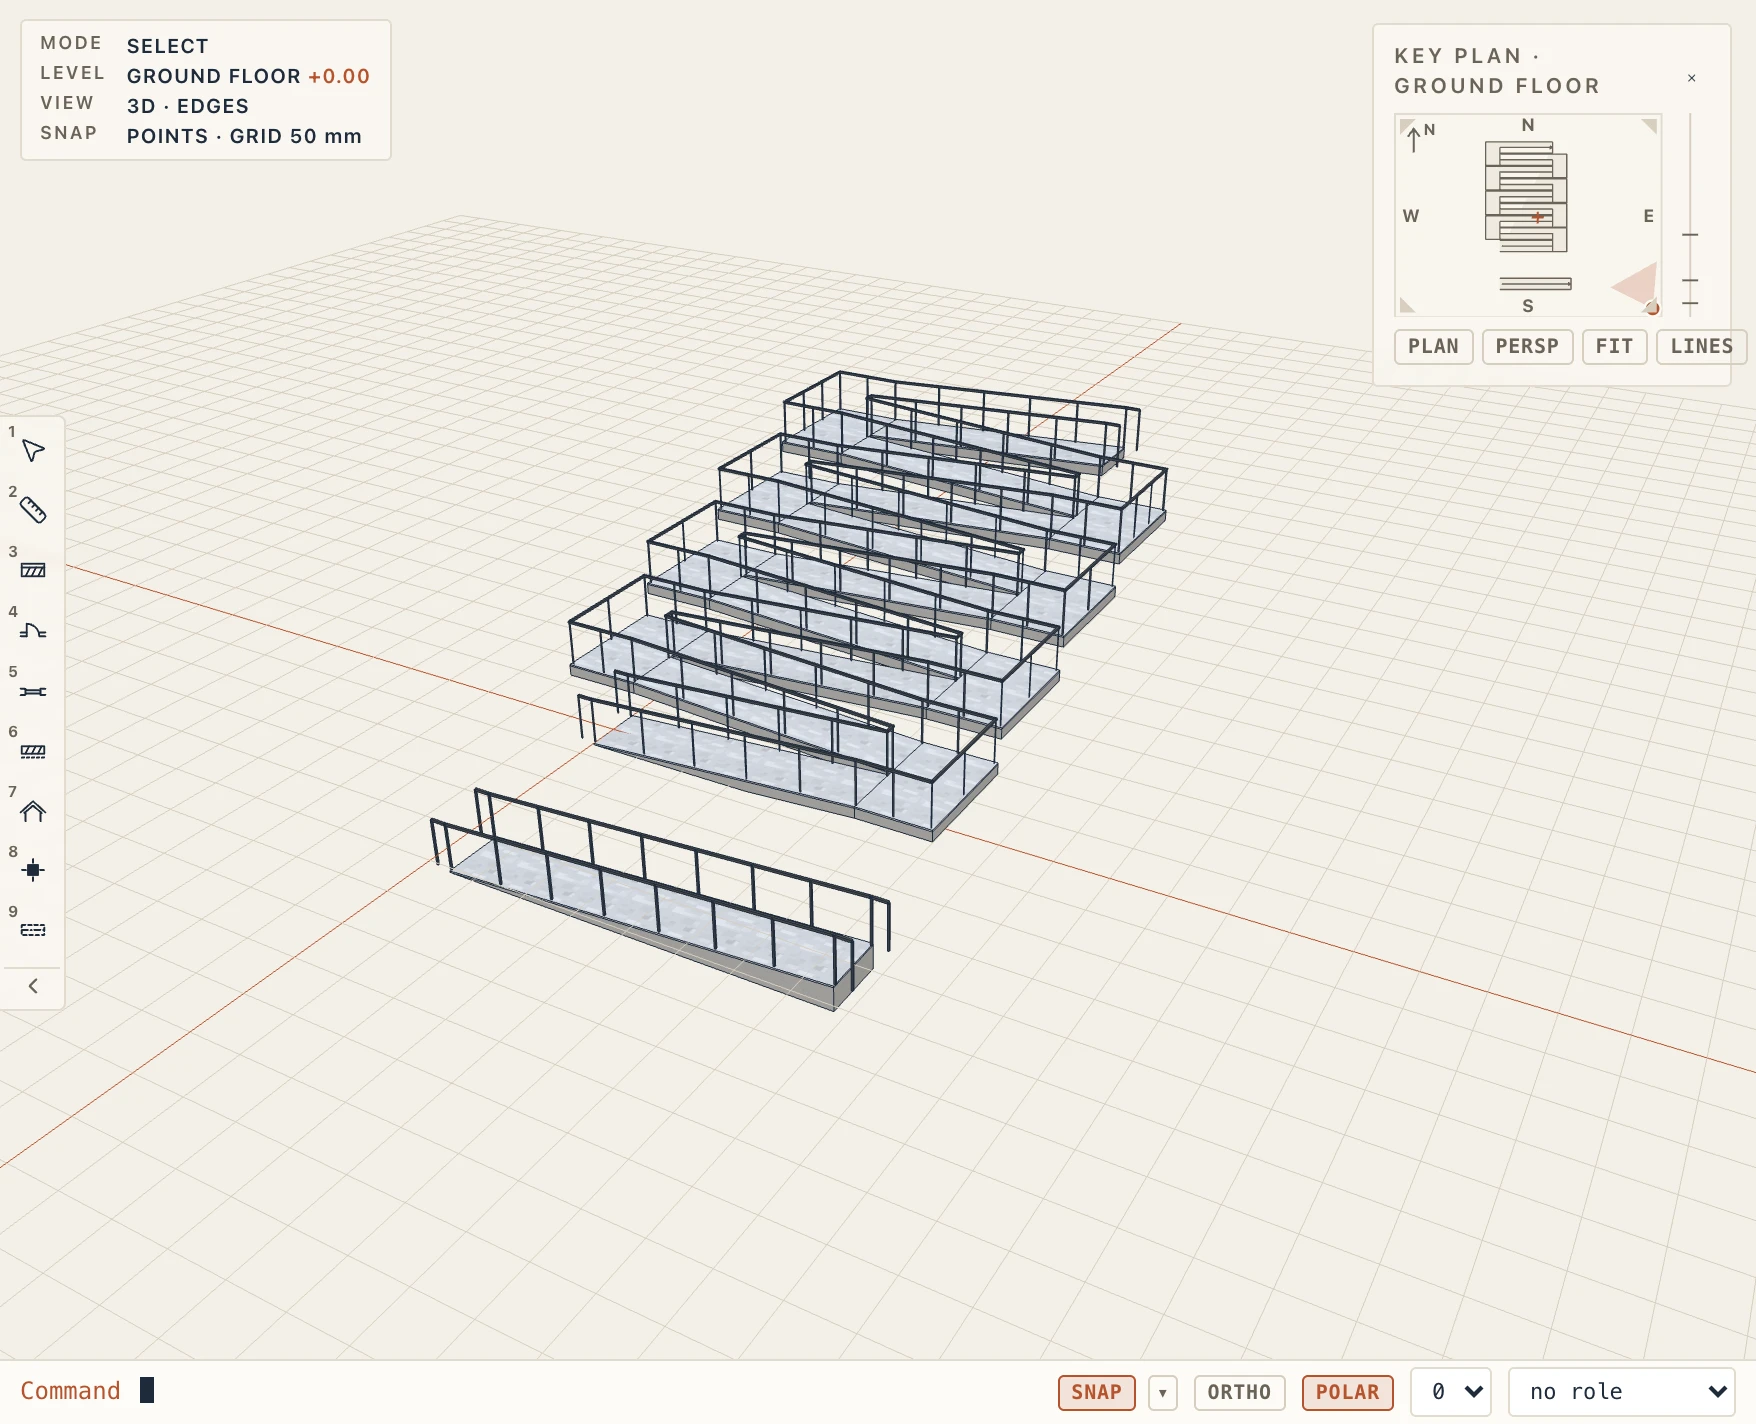
In IFC a ramp is an IfcRamp (STRAIGHT_RUN_RAMP, TWO_STRAIGHT_RUN_RAMP, QUARTER_TURN_RAMP or HALF_TURN_RAMP) typed by an IfcRampType, made of IfcRampFlights, landings (IfcSlab LANDING) and IfcRailings.
Railings
Architecture → Railing (RL) draws a railing of its own along a balcony's edge, a terrace or a gallery: click its points, Enter finishes. It takes the stair railings' designs (posts and a handrail, balusters, glass, cables or a solid panel), its height (1 m by default), base offset, handrail profile and sizes and post spacing in its properties; its points are dragged by their grips (Ctrl/⌘-click an edge's middle adds one). In IFC it is an IfcRailing (GUARDRAIL).
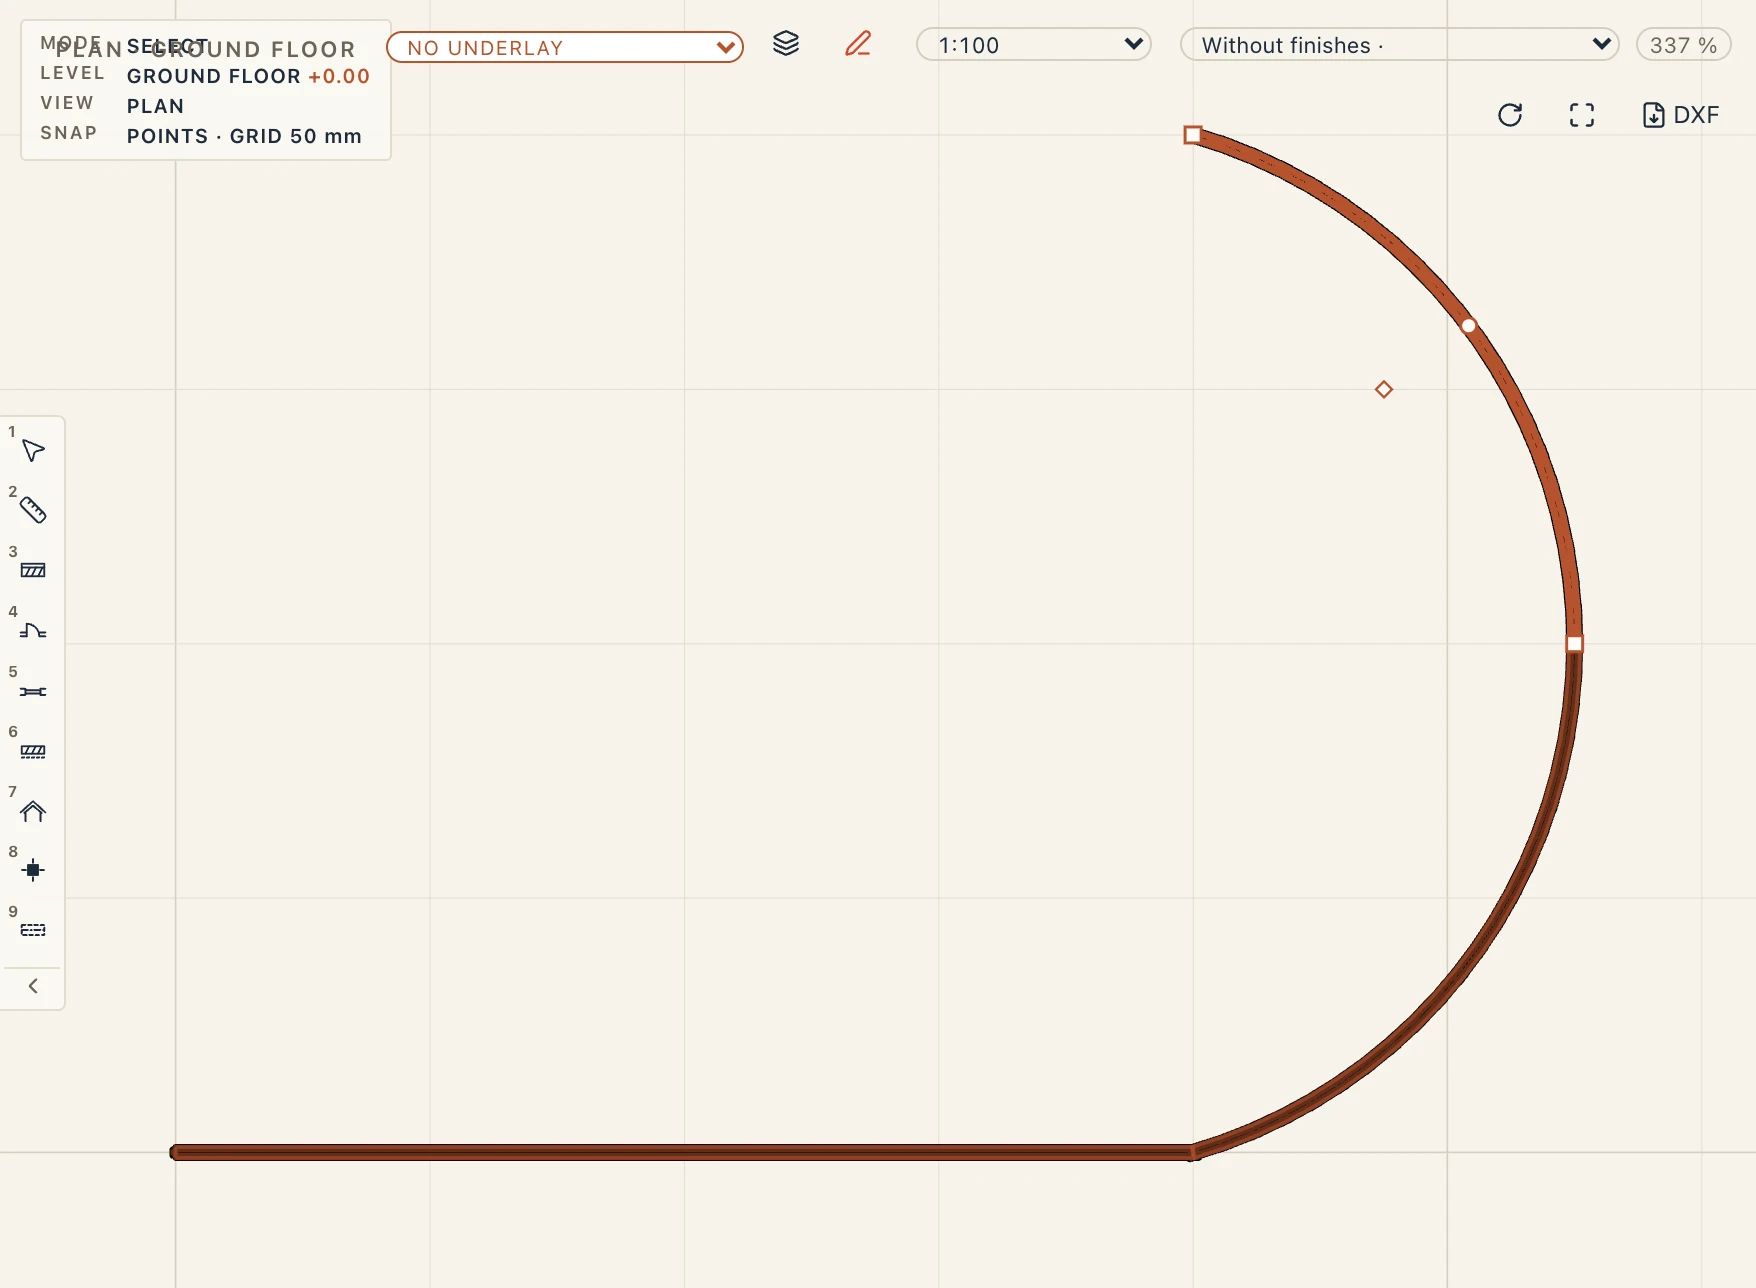
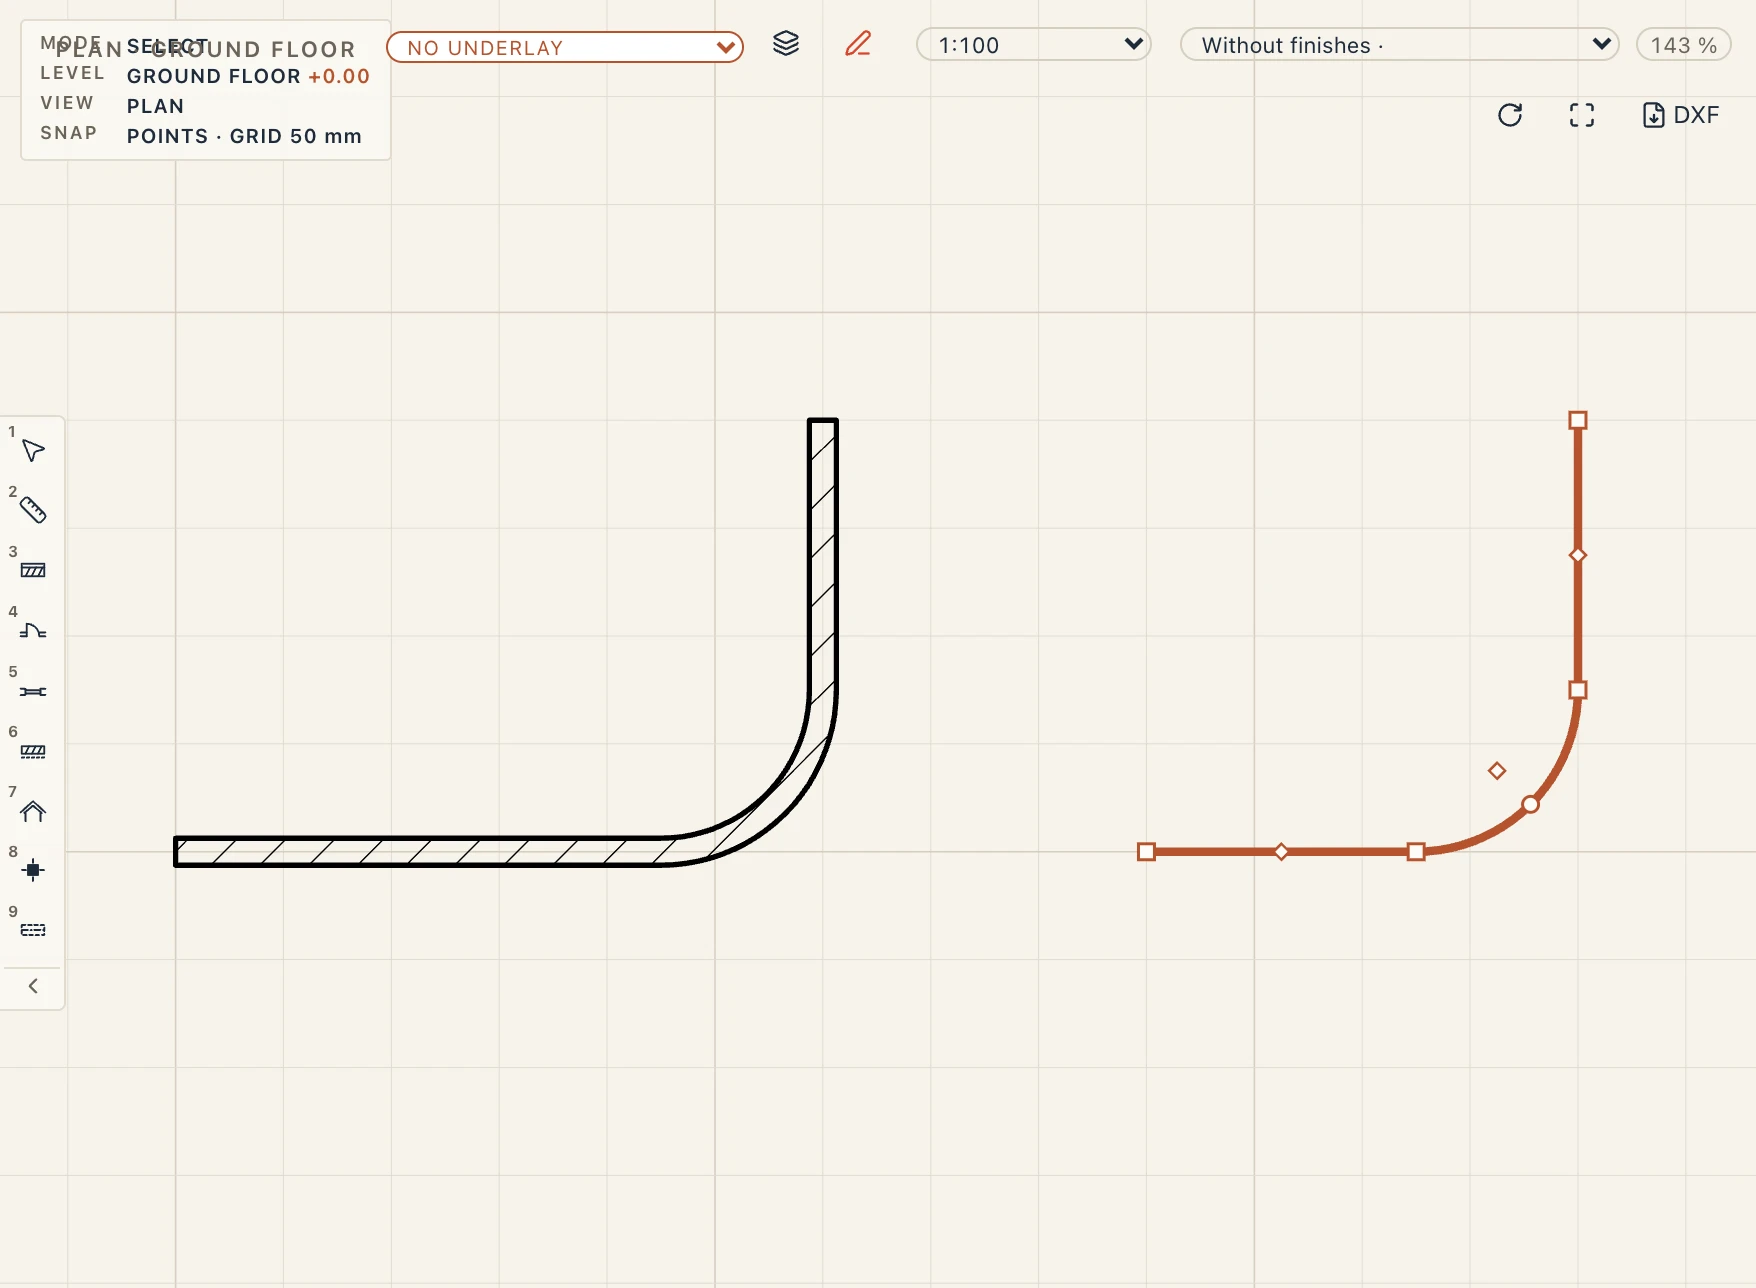
A railing's segments may be arcs. Right-click near a segment of a selected railing for Make arc (or Make straight), then drag the round grip at the arc's middle to bend it through a point; right-click a corner's grip for Fillet corner… or Chamfer corner…. Fillet and Chamfer (FILLET, CHAMFER) take railings too: click a railing on the two segments either side of a corner, or click two railings whose ends meet, or would meet carried on: they become one railing, the first one, round the arc. Its handrail, rails and glass follow the arc in short straight pieces no more than a millimetre off it, its posts and balusters are spaced along the arc as along a straight segment, and its length is the arc's own. Draft → Convert → Railing keeps a fillet's arc: lines, arcs and polylines that meet end to end become one railing (untick One railing where they meet end to end for one each). In IFC the true curve is its Axis. Stair and balcony railings follow their stair or balcony.
A railing is split, trimmed, extended and offset with the walls' tools: Modify → Split element cuts it in two where you click (an arc into two arcs of the same circle; the first keeps the id), Modify → Trim/Extend elements brings the end beyond a boundary back to it or carries the nearer end on along its end segment (an arc round its circle), and Offset copies it parallel, arcs concentric, its corners where the moved segments meet. Their lengths add up to the railing's.
Balconies
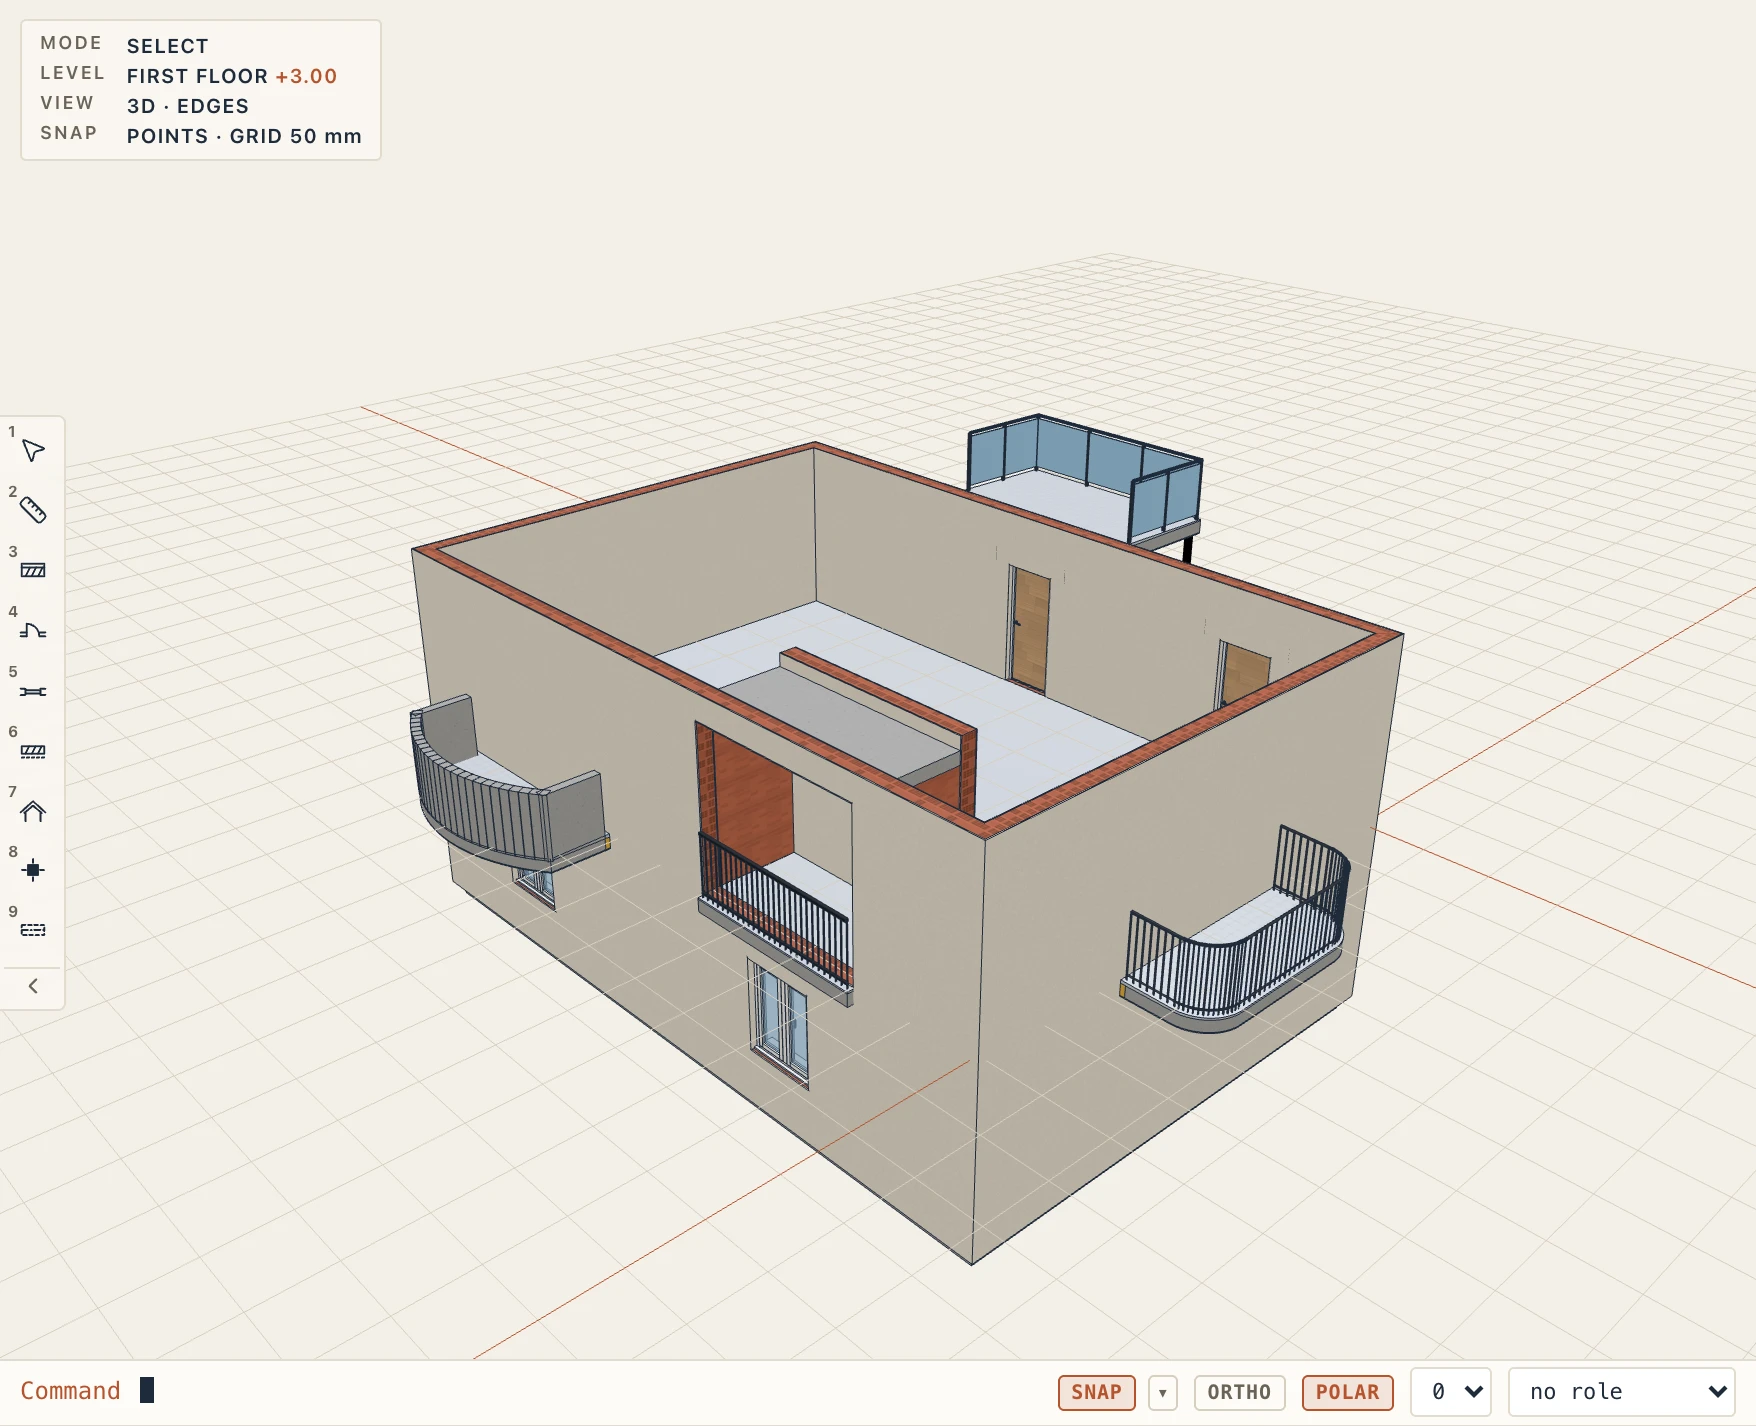
Architecture → Balcony (BY) hangs a balcony on a wall: choose its style in the command line's bar and click outside the wall's face, where it goes; it stands on that side of the wall at the storey's floor level. A Juliet balcony clicked by a door or window centres on it, 200 mm wider. Where no wall is near, the balcony stands where you click. Balcony by outline draws any shape: click its corners, the first edge lies against the building. Gallery edge draws a mezzanine's edge over a double-height space with two points (the void on the left, the gallery on the right).
A drawn balcony's edges can be arcs too: Balcony by outline has the same shapes as the Floor tool's bar, and the selected balcony's corners and edges take Fillet corner…, Chamfer corner… and Make arc from the right-click; its slab is built along the arcs and its area measured on them.
The built-in styles cover the kinds people ask for:
- Juliet balcony: a railing of balusters in front of a French door over a small stone ledge on two brackets.
- Cantilevered slab, glass: a concrete slab cantilevered from the floor through a thermal break, tiled to a fall, a drip under its edge, glass on three sides.
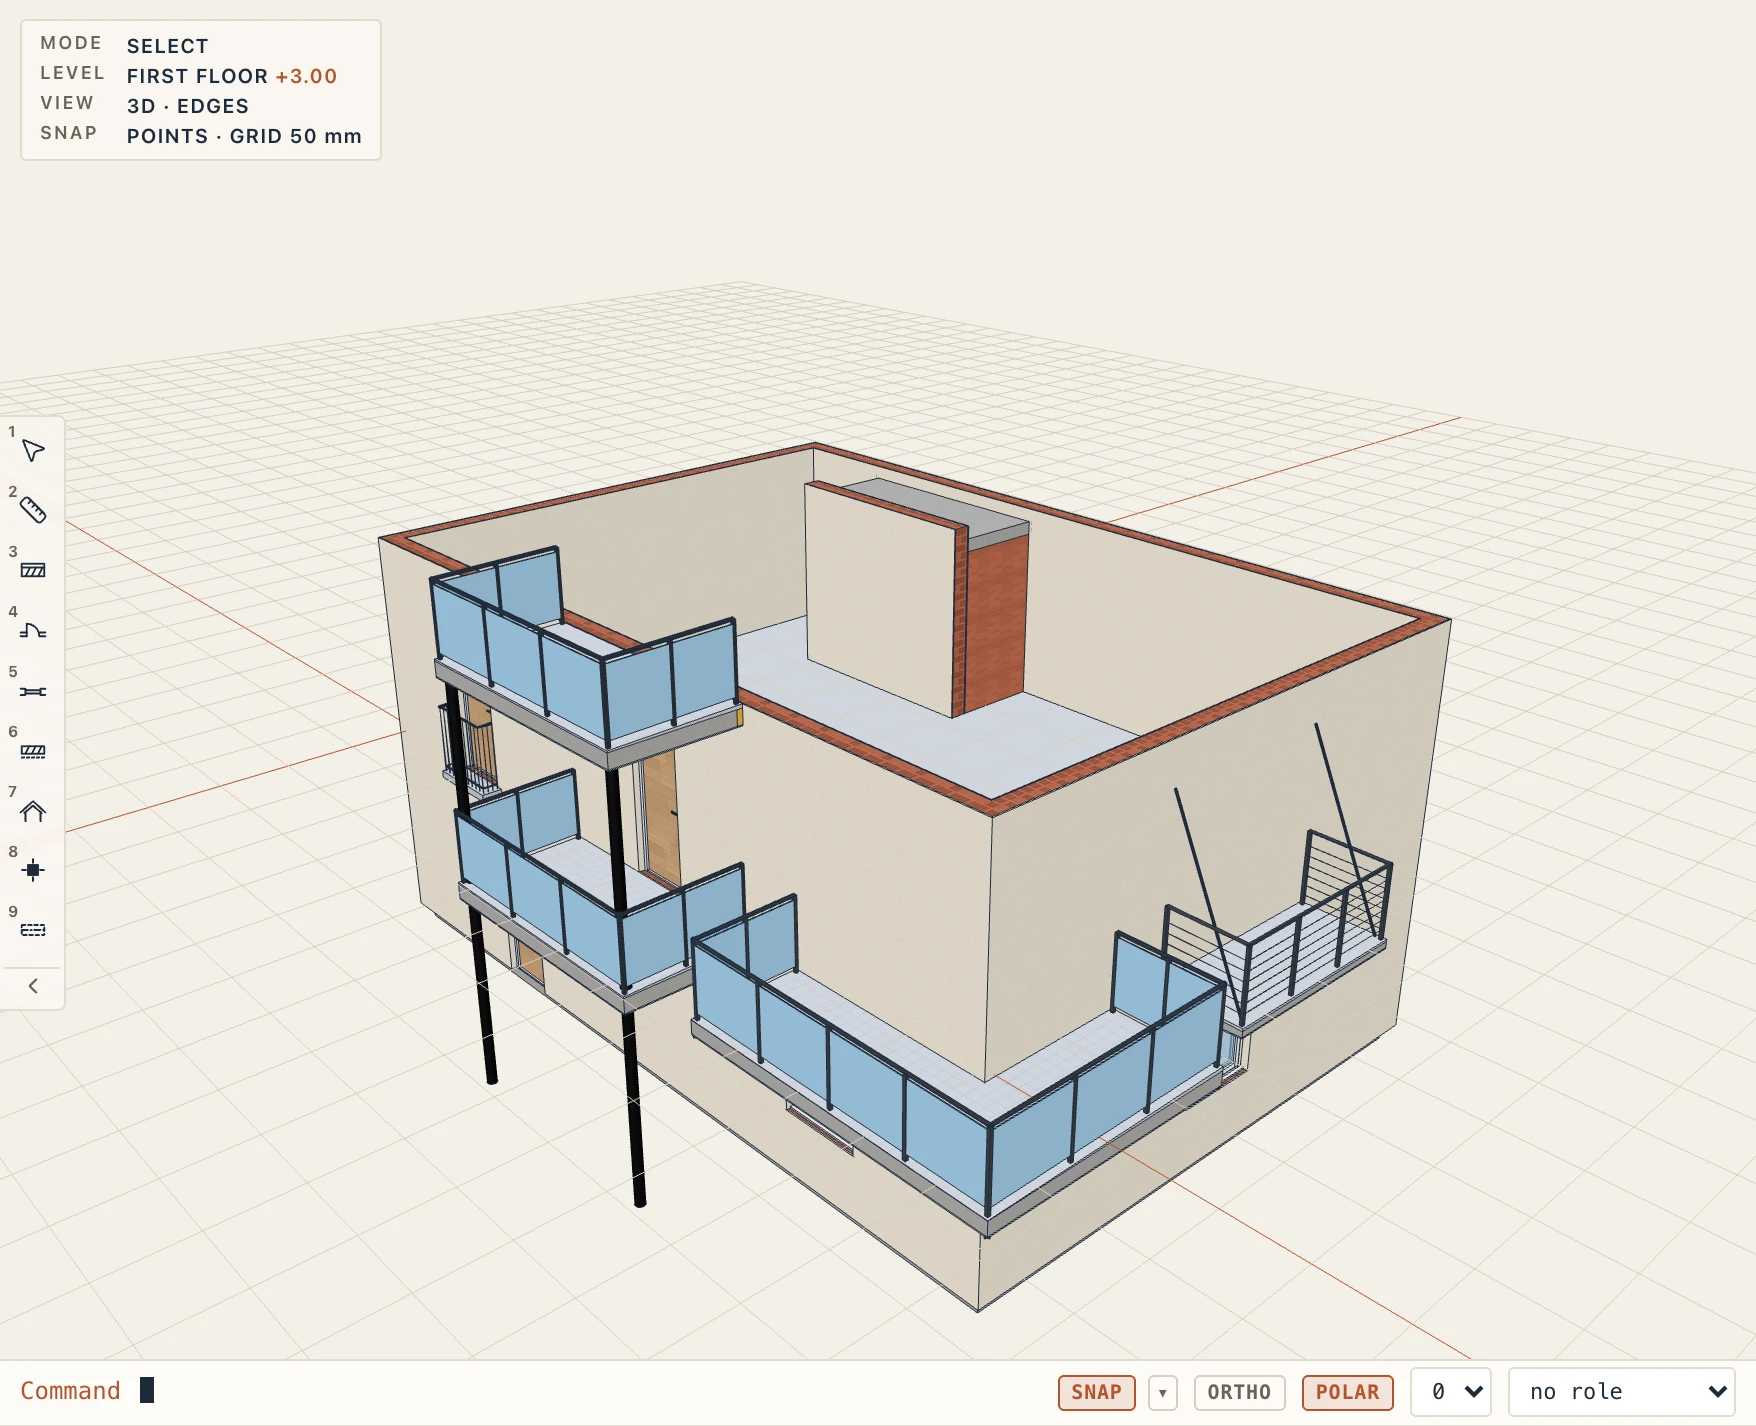
- Stacked, on posts: a slab on steel posts at its front, which stand on the balcony below (or the ground); repeated storey over storey.
- On steel brackets, Hung from tie rods (rods from the front corners up to the wall), Rounded corners, Curved front with a solid parapet.
- Loggia: recessed into the facade. It cuts its recess through its wall (an opening as wide as the loggia and as high as its Recess height), builds its side walls and a ceiling slab behind the face, and stands its own Back wall (of the wall's type, as high) the loggia's depth inside, where the door goes. The railing is at the face.
- Corner balcony: along the wall and round the building's corner, back along the side wall; clicked near a wall's end, it wraps that end.
- Mezzanine gallery edge: the gallery's slab behind its edge, a fascia over the edge and a bar railing.
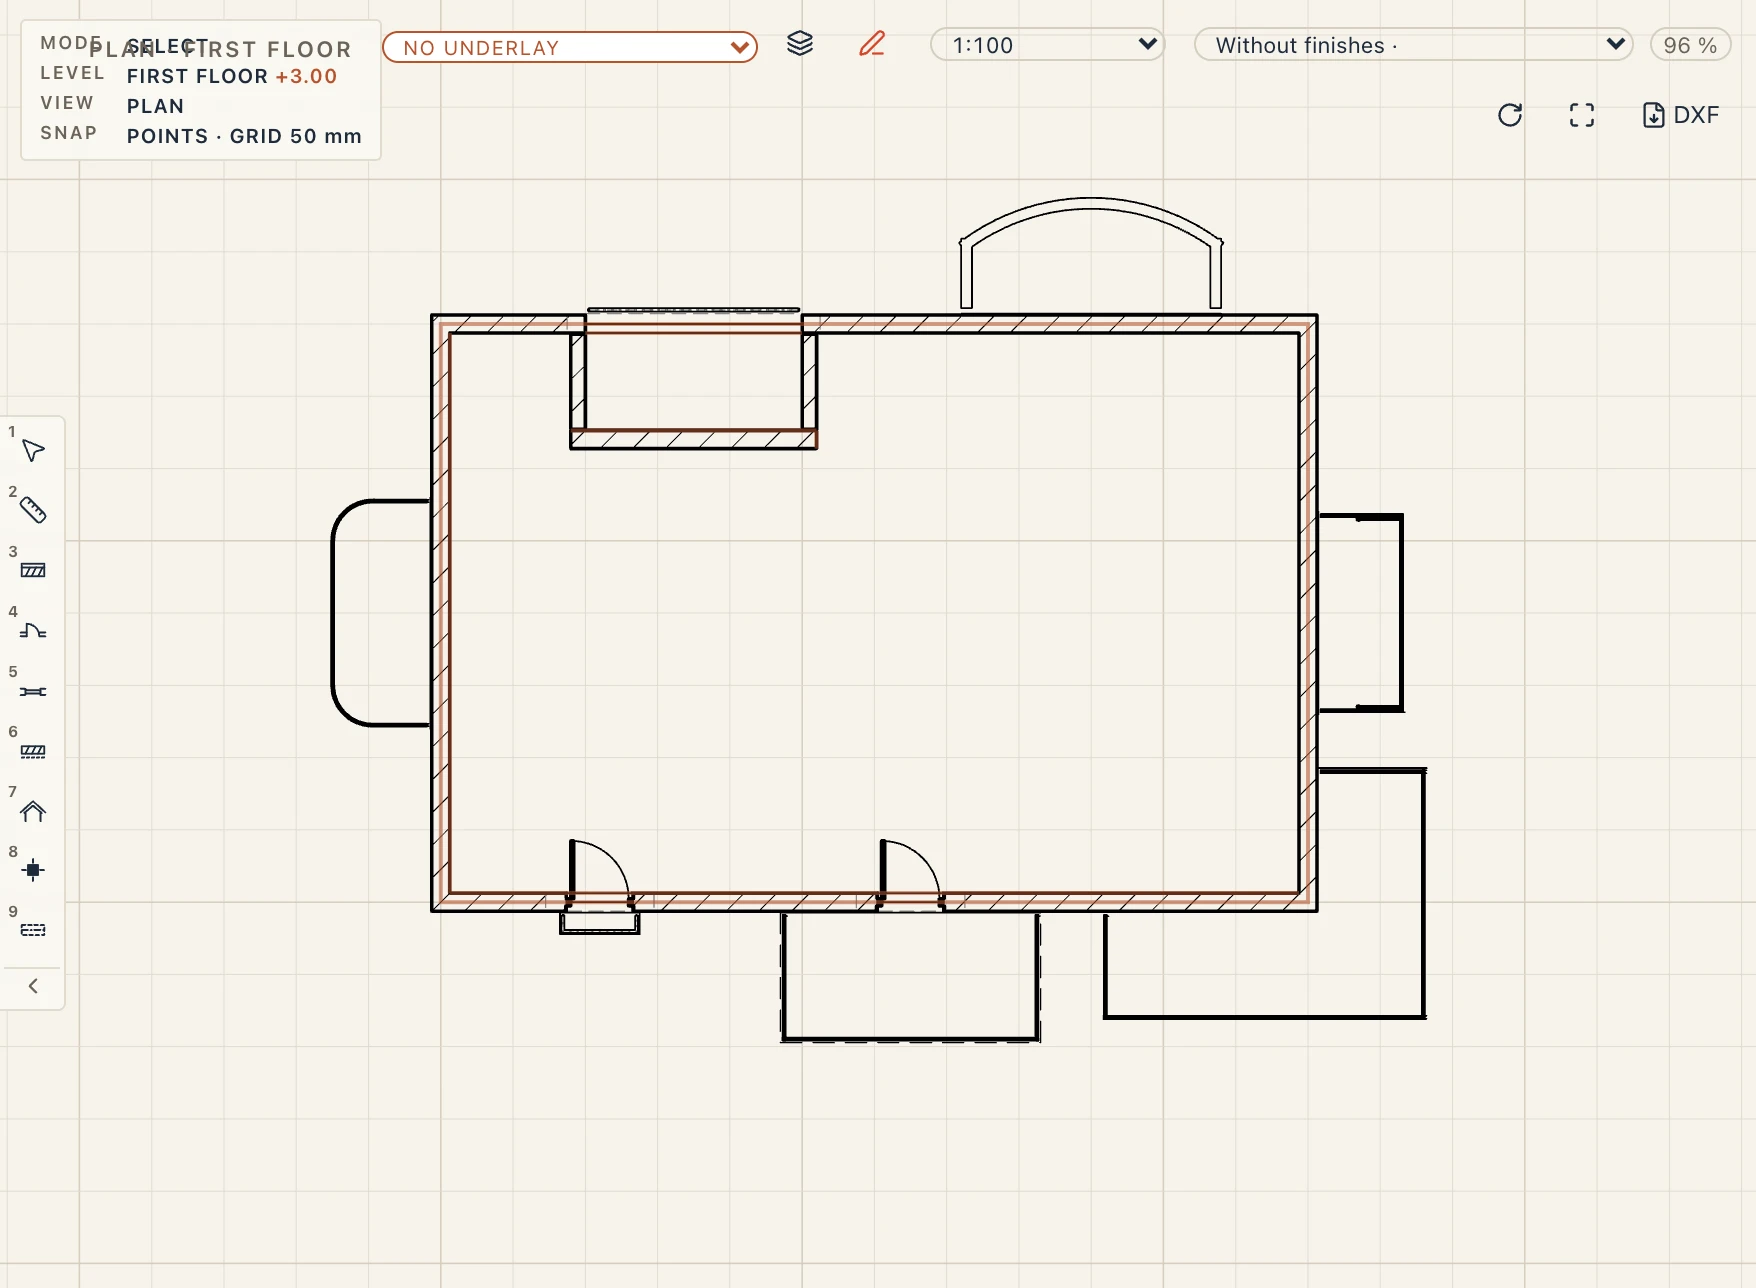
A plan draws a balcony's slab, finish and railing as it cuts or sees them, and the balconies of the storey above dashed, overhead. Sections and elevations draw its slab, railing, posts and brackets.
The configurator
Architecture → Balcony configurator (or the gear beside Style in a balcony's properties) works as the roof configurator does: the styles on the left (the project's own, then the built-in ones), the balcony's fields in tabs on the right, over its plan or a section through its middle as the draft would build:
- Shape: the Kind (Juliet, cantilever, posts, brackets, loggia, corner, mezzanine), the Outline (rectangular, rounded corners with their Corner radius, a curved front with its Front bulge, or the polygon drawn), Width and Depth, a corner balcony's Return along the side, a gallery's slab and Fascia height.
- Slab and finish: the Slab thickness and material, the Edge (square, a drip under it, a nosing of the finish past it, or tapered to its Edge thickness), the finish's thickness and material and its Fall (%) to the front (the finish thicker at the wall), the Soffit, and the Thermal break (80 mm between the slab and the floor inside; the schedule and IFC say so).
- Railing: the railings' designs (posts and a handrail, balusters, glass, cables, a solid panel) or a parapet of its own thickness and material, or none; its height, on the front alone or the sides too, how far in from the edge, the handrail and posts, the colour.
- Supports: Carried by none (a cantilever), posts (round or square, their size and spacing), brackets (their depth, height and spacing) or hangers (the height the tie rods are fixed at above the slab), and their material.
- Loggia: the recess height, the side walls' thickness, the slab past the face, the ceiling slab and the back wall.
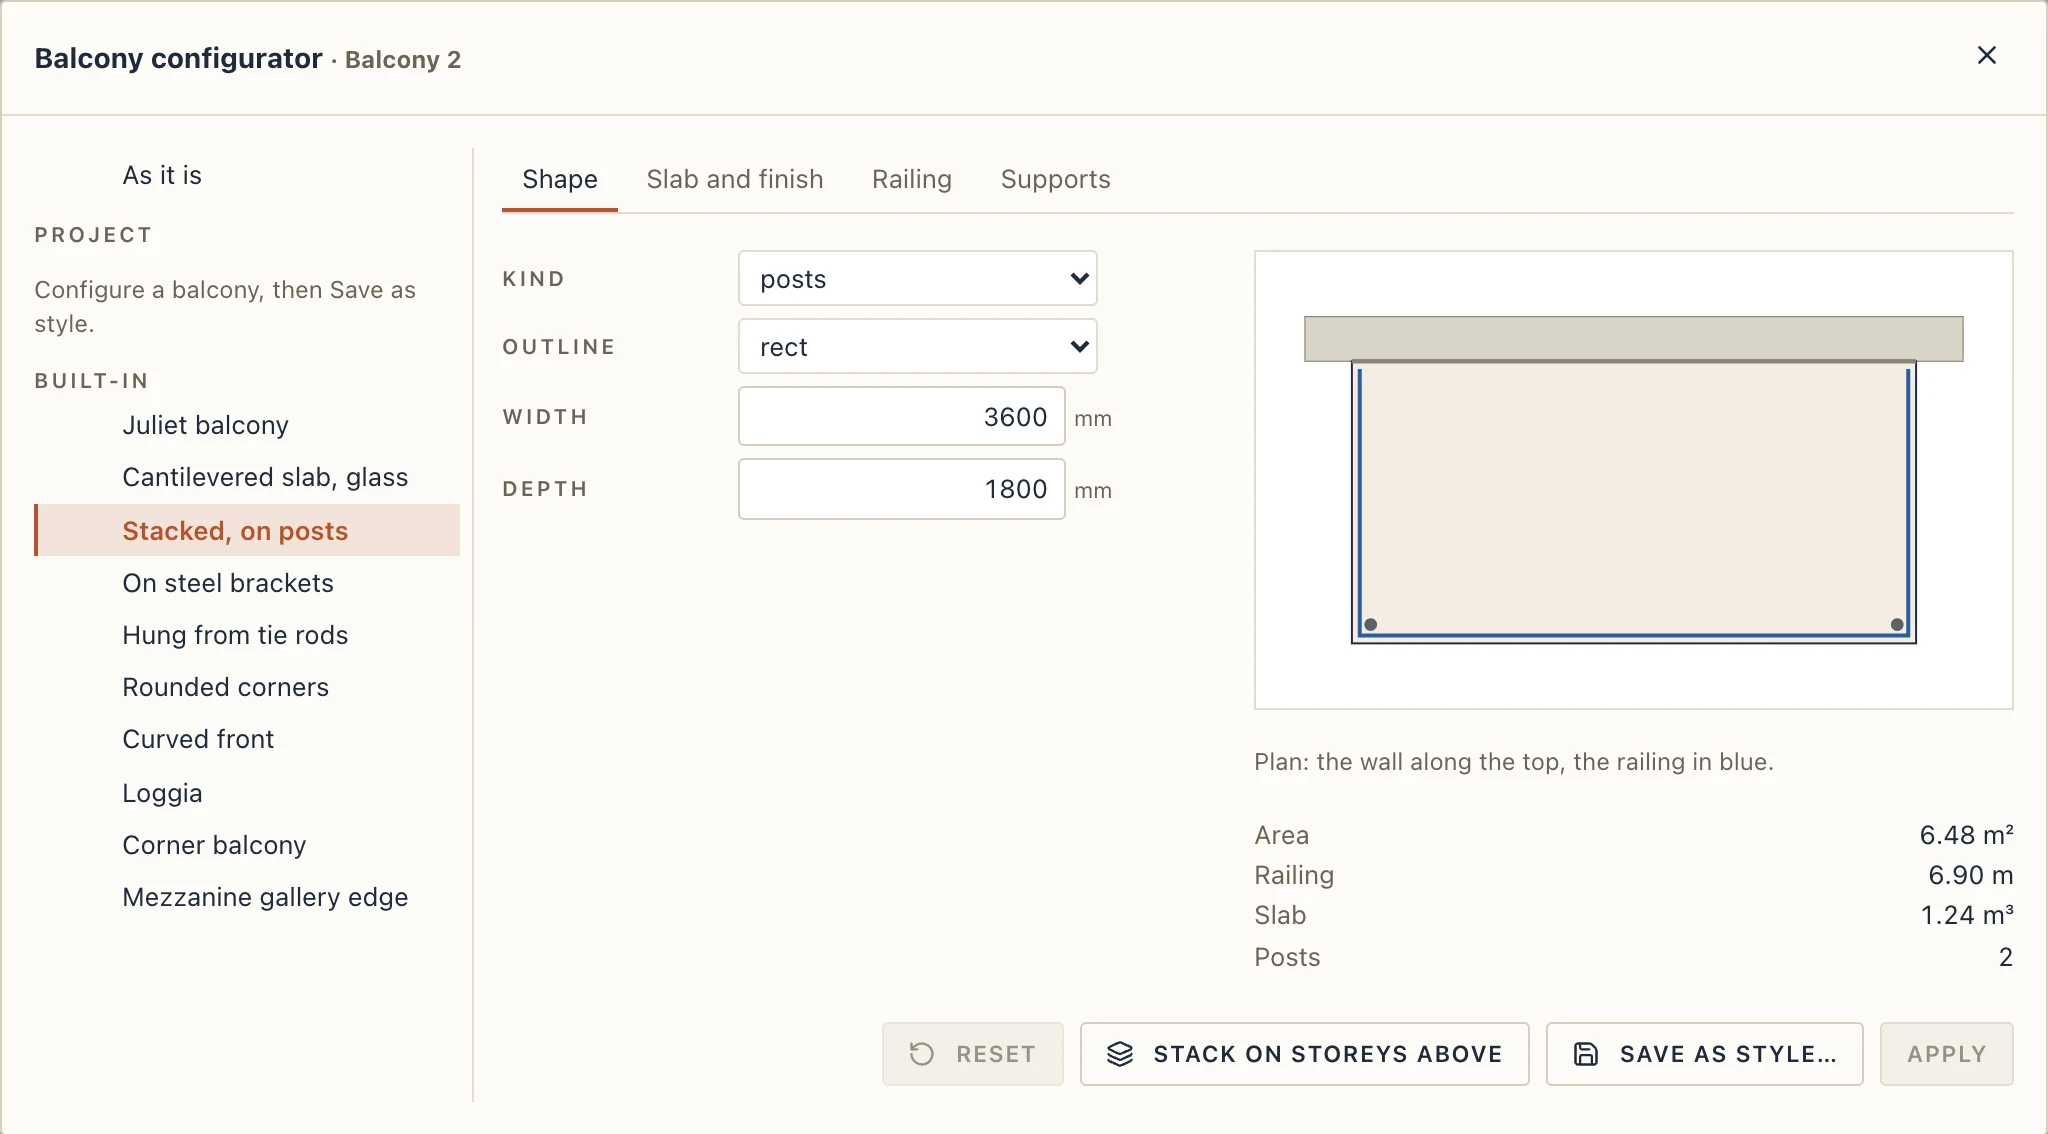
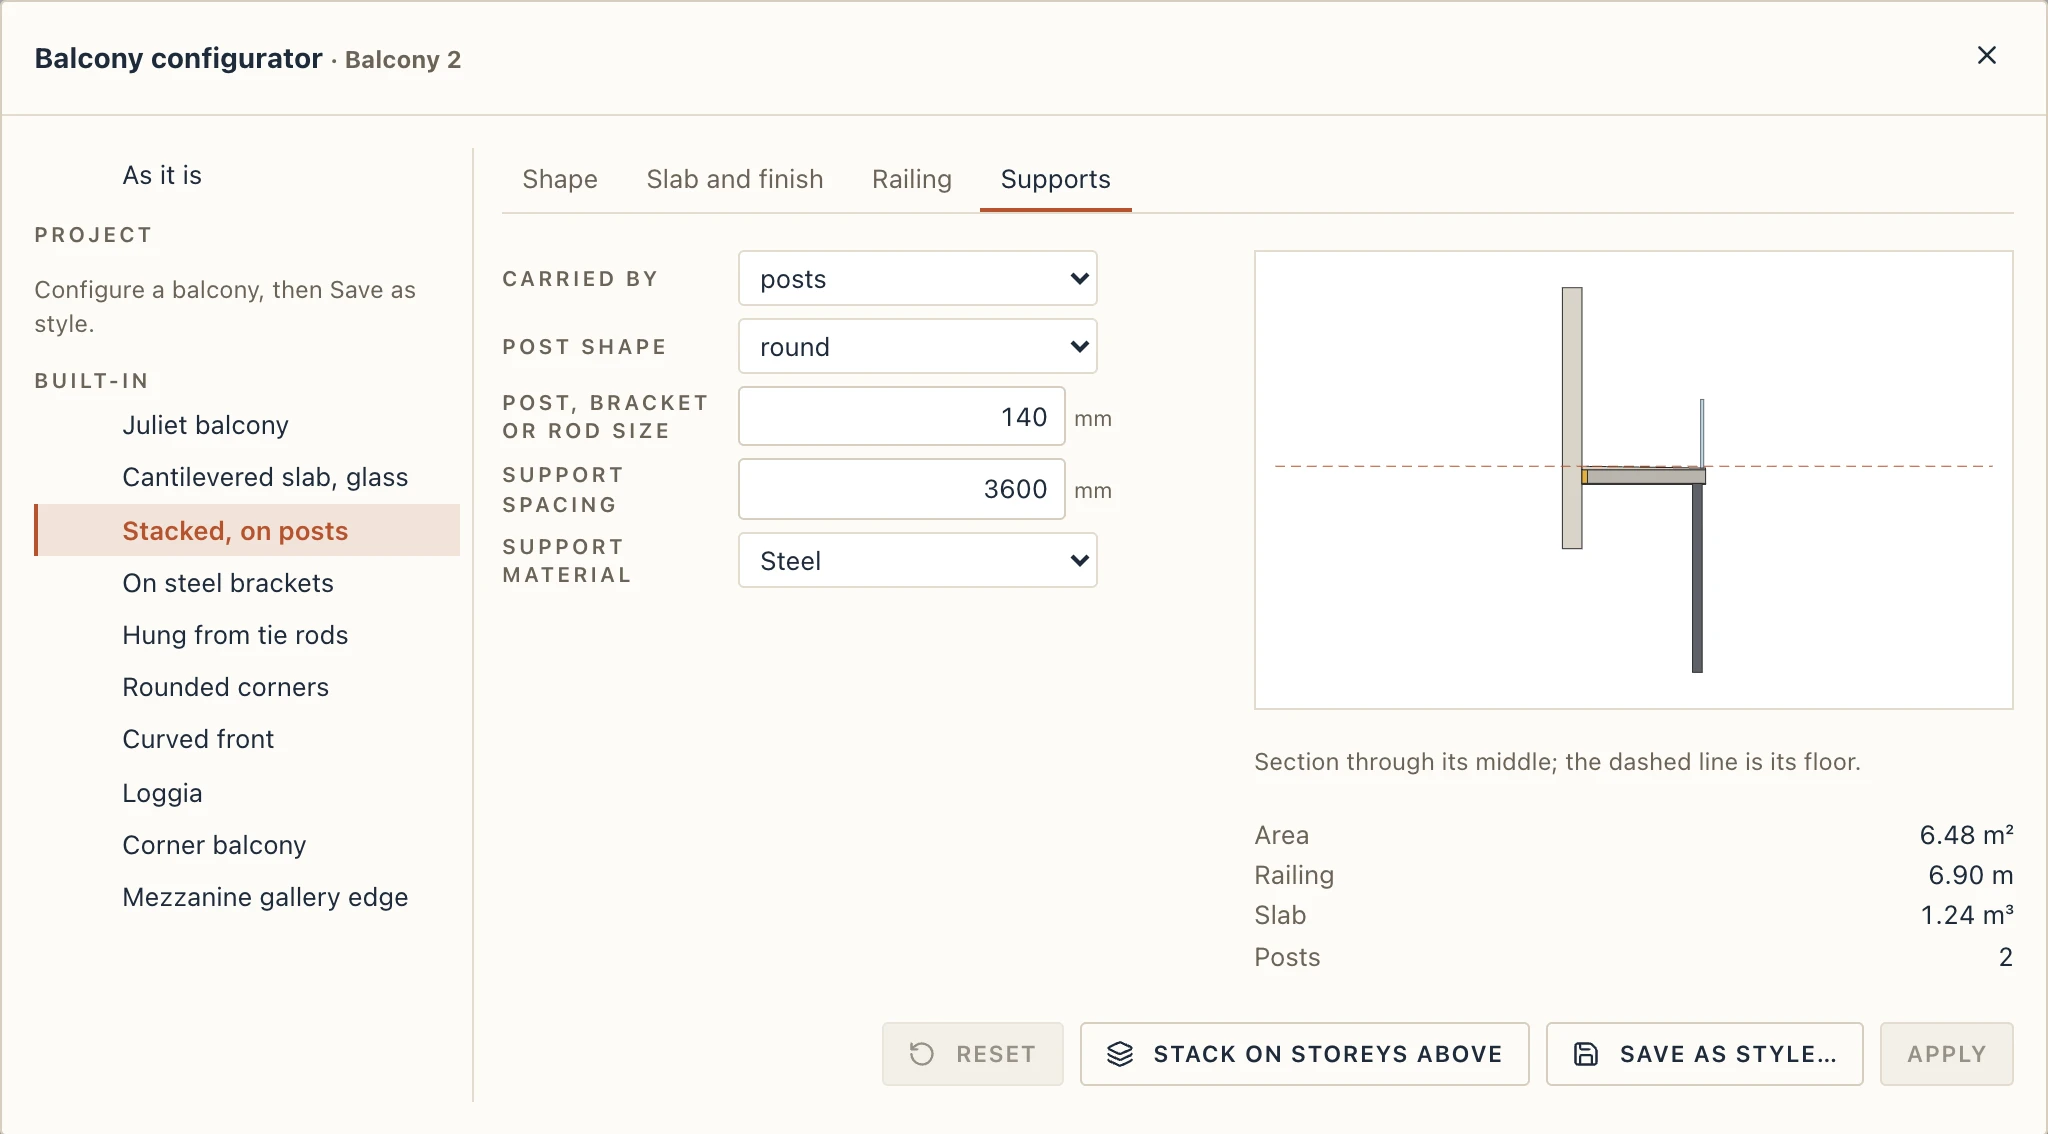
Apply changes the balcony in one step. Save as style… keeps it as one of the project's styles (a balcony type), which the tool's bar and the properties offer; Update style saves it again into its style, and every balcony of the style takes it; a style is renamed or deleted (its balconies keep how they are) beside its name. A style is a type: its cost articles (Construction → Map articles) measure its balconies.
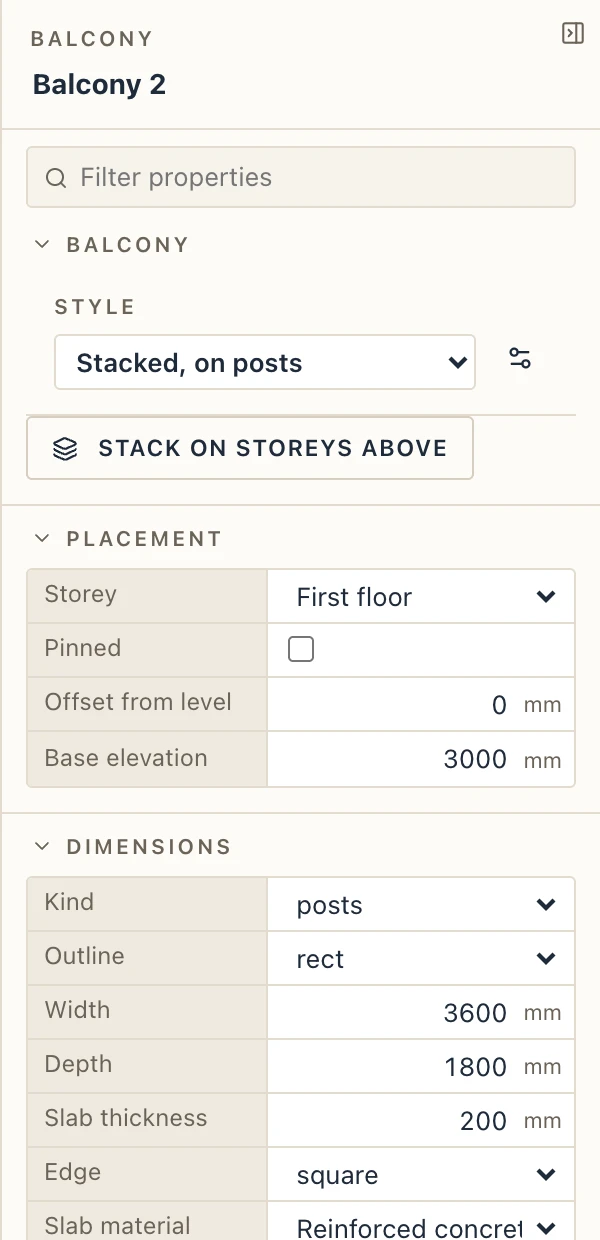
In the properties panel a balcony shows only the fields its kind uses (a loggia's recess, a bracket's depth only on brackets). Its grips drag it along its wall, its front's middle sets the depth (a loggia's: how deep the recess goes), its sides' middles the width; a drawn one is dragged by its corners. A loggia's recess and back wall follow it, and go when it is deleted.
Stack on storeys above (in the configurator, the properties or Architecture → Stack on storeys above) copies the balconies selected onto every storey above their own in one step, with Copy to storeys: a copy hangs on the wall of its storey that stands where its wall does, a stacked loggia cuts that storey's wall, posts stand on the balcony below.
Architecture → Balcony schedule lists each balcony with its storey, style, kind, width, depth, area, railing length and design, what carries it and its thermal break, with the totals. In IFC a balcony is an IfcElementAssembly (USERDEFINED, "Balcony") of an IfcElementAssemblyType, made of its parts: the slab an IfcSlab (FLOOR), the finish and soffit IfcCoverings (FLOORING, CEILING), the railing an IfcRailing (GUARDRAIL) or a parapet an IfcWall (PARAPET), posts IfcColumns, brackets IfcDiscreteAccessories (BRACKET), tie rods IfcMembers, the thermal break an IfcBuildingElementPart; a loggia's recess is an IfcOpeningElement in its wall. Lapin reads its own back as balconies.
The limits a stair is checked against (riser, tread, width, headroom, slope) are the project's Stairs rules: see Rules, where Apply to stair types copies a changed pack into the types already made.