User guide
Planning
The work schedule in a Gantt chart: generated from the model or made by hand, tasks in a WBS, milestones, links with lags, the critical path worked out on a calendar with Romania's legal holidays; the 4D simulation of the building growing day by day, on views and sheets and as a video; progress marked on site, from a phone too, against a baseline; to and from MS Project, IFC and Excel.
The Construction tab

- Generate schedule…: a whole schedule made from the model in one step (below).
- Gantt: opens the schedule under the view. The screen splits into two rows, so you see the model above and the schedule below.
- Calendar…: the working days and hours, the holidays and the winter break (below).
- Task and Milestone: a new task or milestone before the task selected in the Gantt (or at the end).
- Indent, Outdent, Link and Unlink: the WBS and the links of the tasks selected.
- Add to task… (TA) and Elements without a task: the model's elements in the tasks (below).
- Simulate, Stages sheet…, Gantt on sheet and Export video…: the 4D simulation, the model as the schedule has it on a day (below).
- Mark done (MD), Mark started (MS), Mark not started, Save baseline, Clear baseline and Import progress…: progress and the baseline (below).
- Import MS Project…, Export MS Project…, Export XLSX and Export IFC…: the schedule to and from other programs (below).
A project has one schedule. It is made the first time you add a task or generate one, and starts the next Monday. Change its start in the Gantt's toolbar.
Generating the schedule from the model
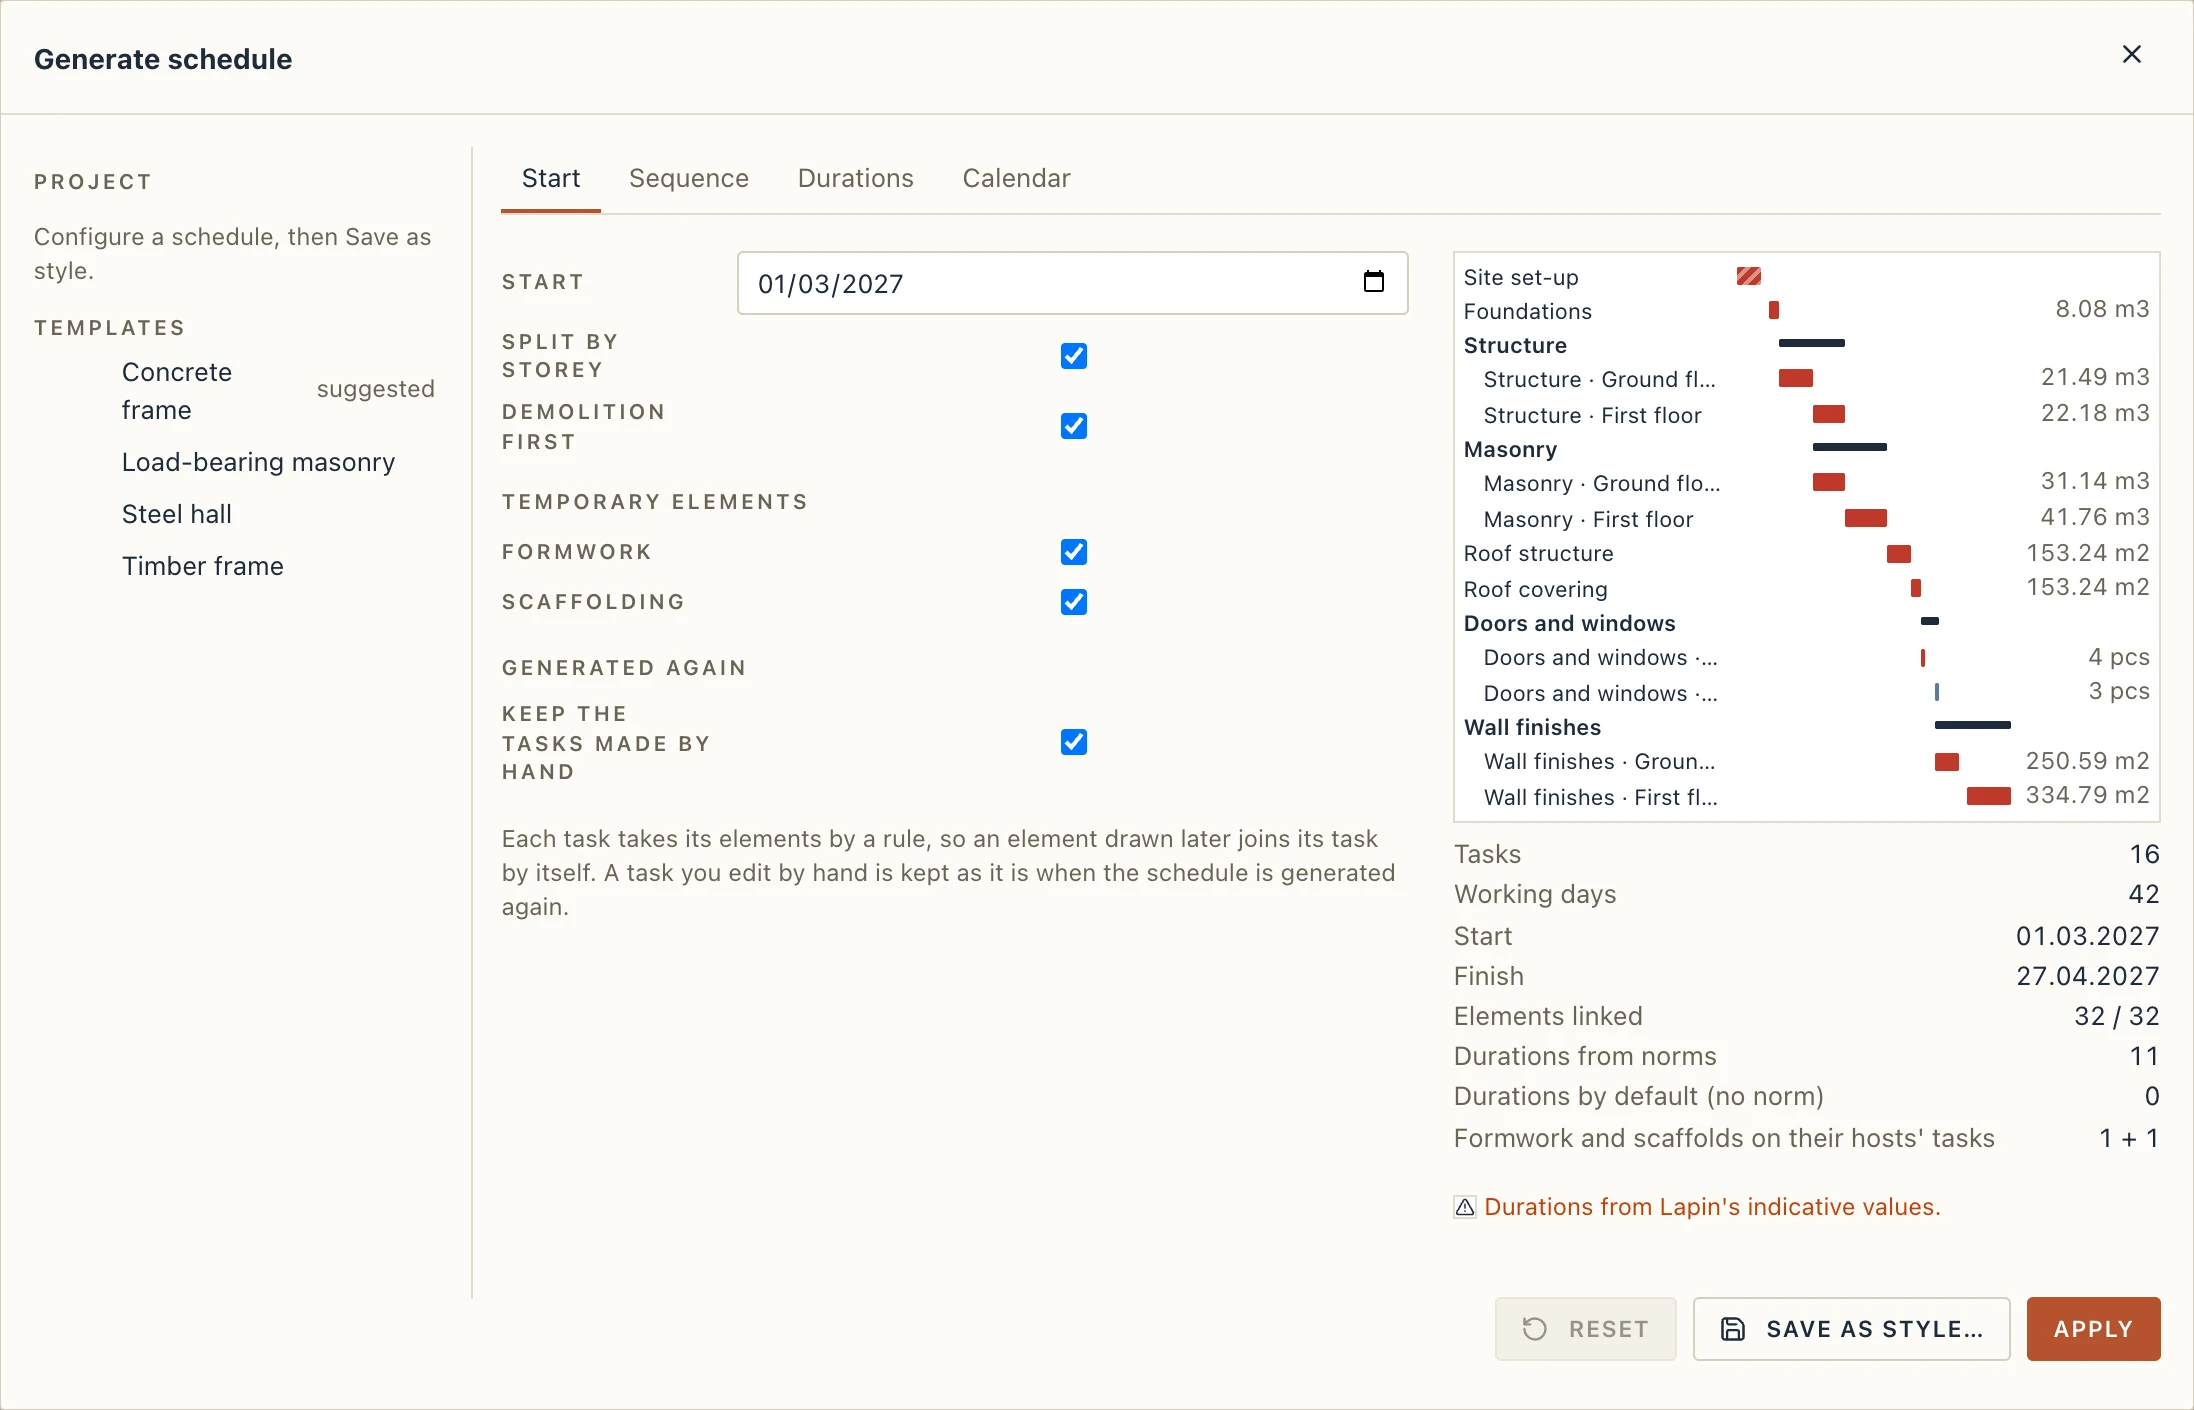
Construction → Generate schedule… (also in the Gantt's toolbar) makes a complete schedule from the model: a task for each step of the works, and for each storey where the step goes storey by storey, every task already holding its elements. On the left are the templates: Concrete frame, Load-bearing masonry, Steel hall and Timber frame. Lapin marks the one the model asks for as suggested: a steel hall when the model has one, a timber frame when its walls are framed, load-bearing masonry when it has no columns, else a concrete frame. Above them are the project's own styles (Save as style… keeps the spec you configured, for this project and the next you make from it).
On the right is the preview: the tasks the generator would make, as bars, each with the quantity that timed it, and under them the counts:
- Elements linked: the elements the tasks take out of all those that need a task. It is the most important number here. When some are left out, Show the elements without a task selects them in the view, and A step for them adds a step that takes their kinds.
- Durations from norms and Durations by default (no norm): how many tasks a norm timed, and how many took their step's days.
- Formwork and scaffolds on their hosts' tasks (below).
Apply writes the schedule in one step to undo. The screen then splits: the model above, the Gantt below.
The Start tab
- Start: the schedule's first day.
- Split by storey: a task a storey for the steps that go storey by storey (the structure, the masonry, the finishes); untick it for a task a step.
- Demolition first: the elements the phases demolish go into a Demolition task before all the others (its IFC kind DEMOLITION). Existing elements that stay are no task's.
- Formwork and Scaffolding: whether these temporary elements live by their hosts' tasks (below).
- Keep the tasks made by hand: when the schedule is generated again (below).
The Sequence tab
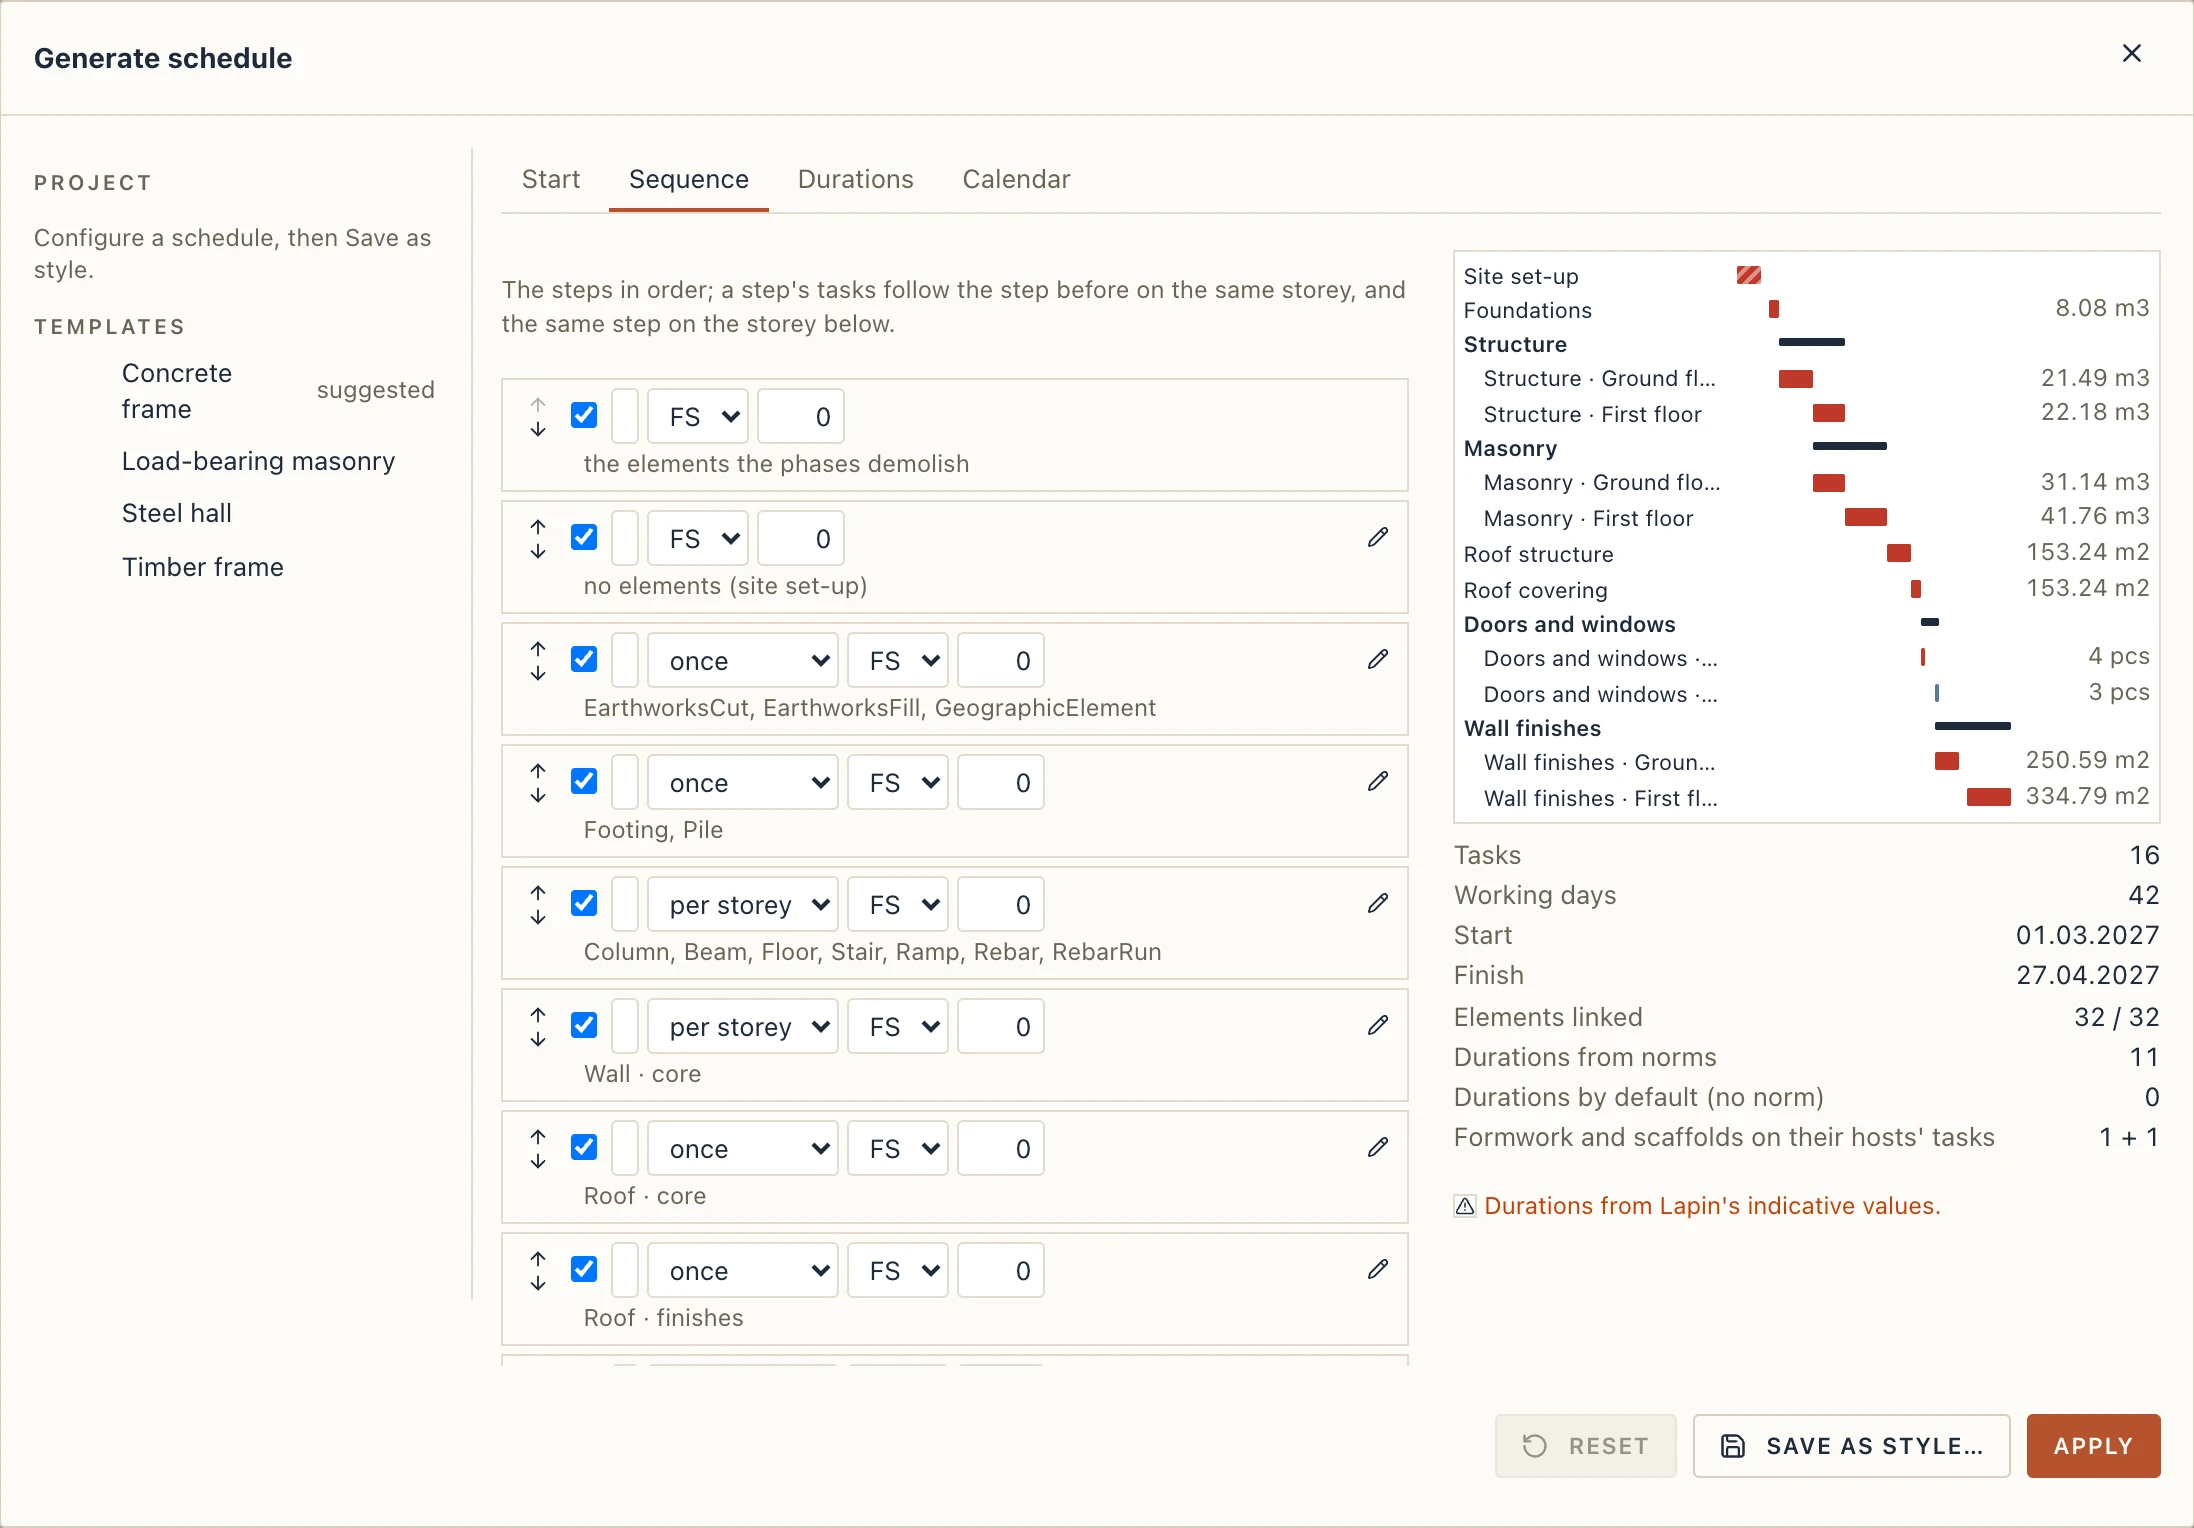
The template's steps in order. Each one can be switched off, renamed and moved up or down with its arrows. It says whether it goes once for the building or per storey, and how it follows the step before it on the same storey: finish to start (FS), or start to start (SS) with a lag, for finishes that climb behind the structure. The pencil opens what the step builds: the kinds of elements, picked from those the model has, and the Part of them (whole, their core, or their finishes, as a task's part).
The links come from the order: each task follows the step before it on the same storey and the same step on the storey below. In load-bearing masonry and timber frames, a storey's walls also wait for the floor of the storey below.
Each task is made with a rule (its kinds, its storey), so it keeps its elements: a wall drawn after generating joins its task by itself, with no need to generate again.
The Durations tab
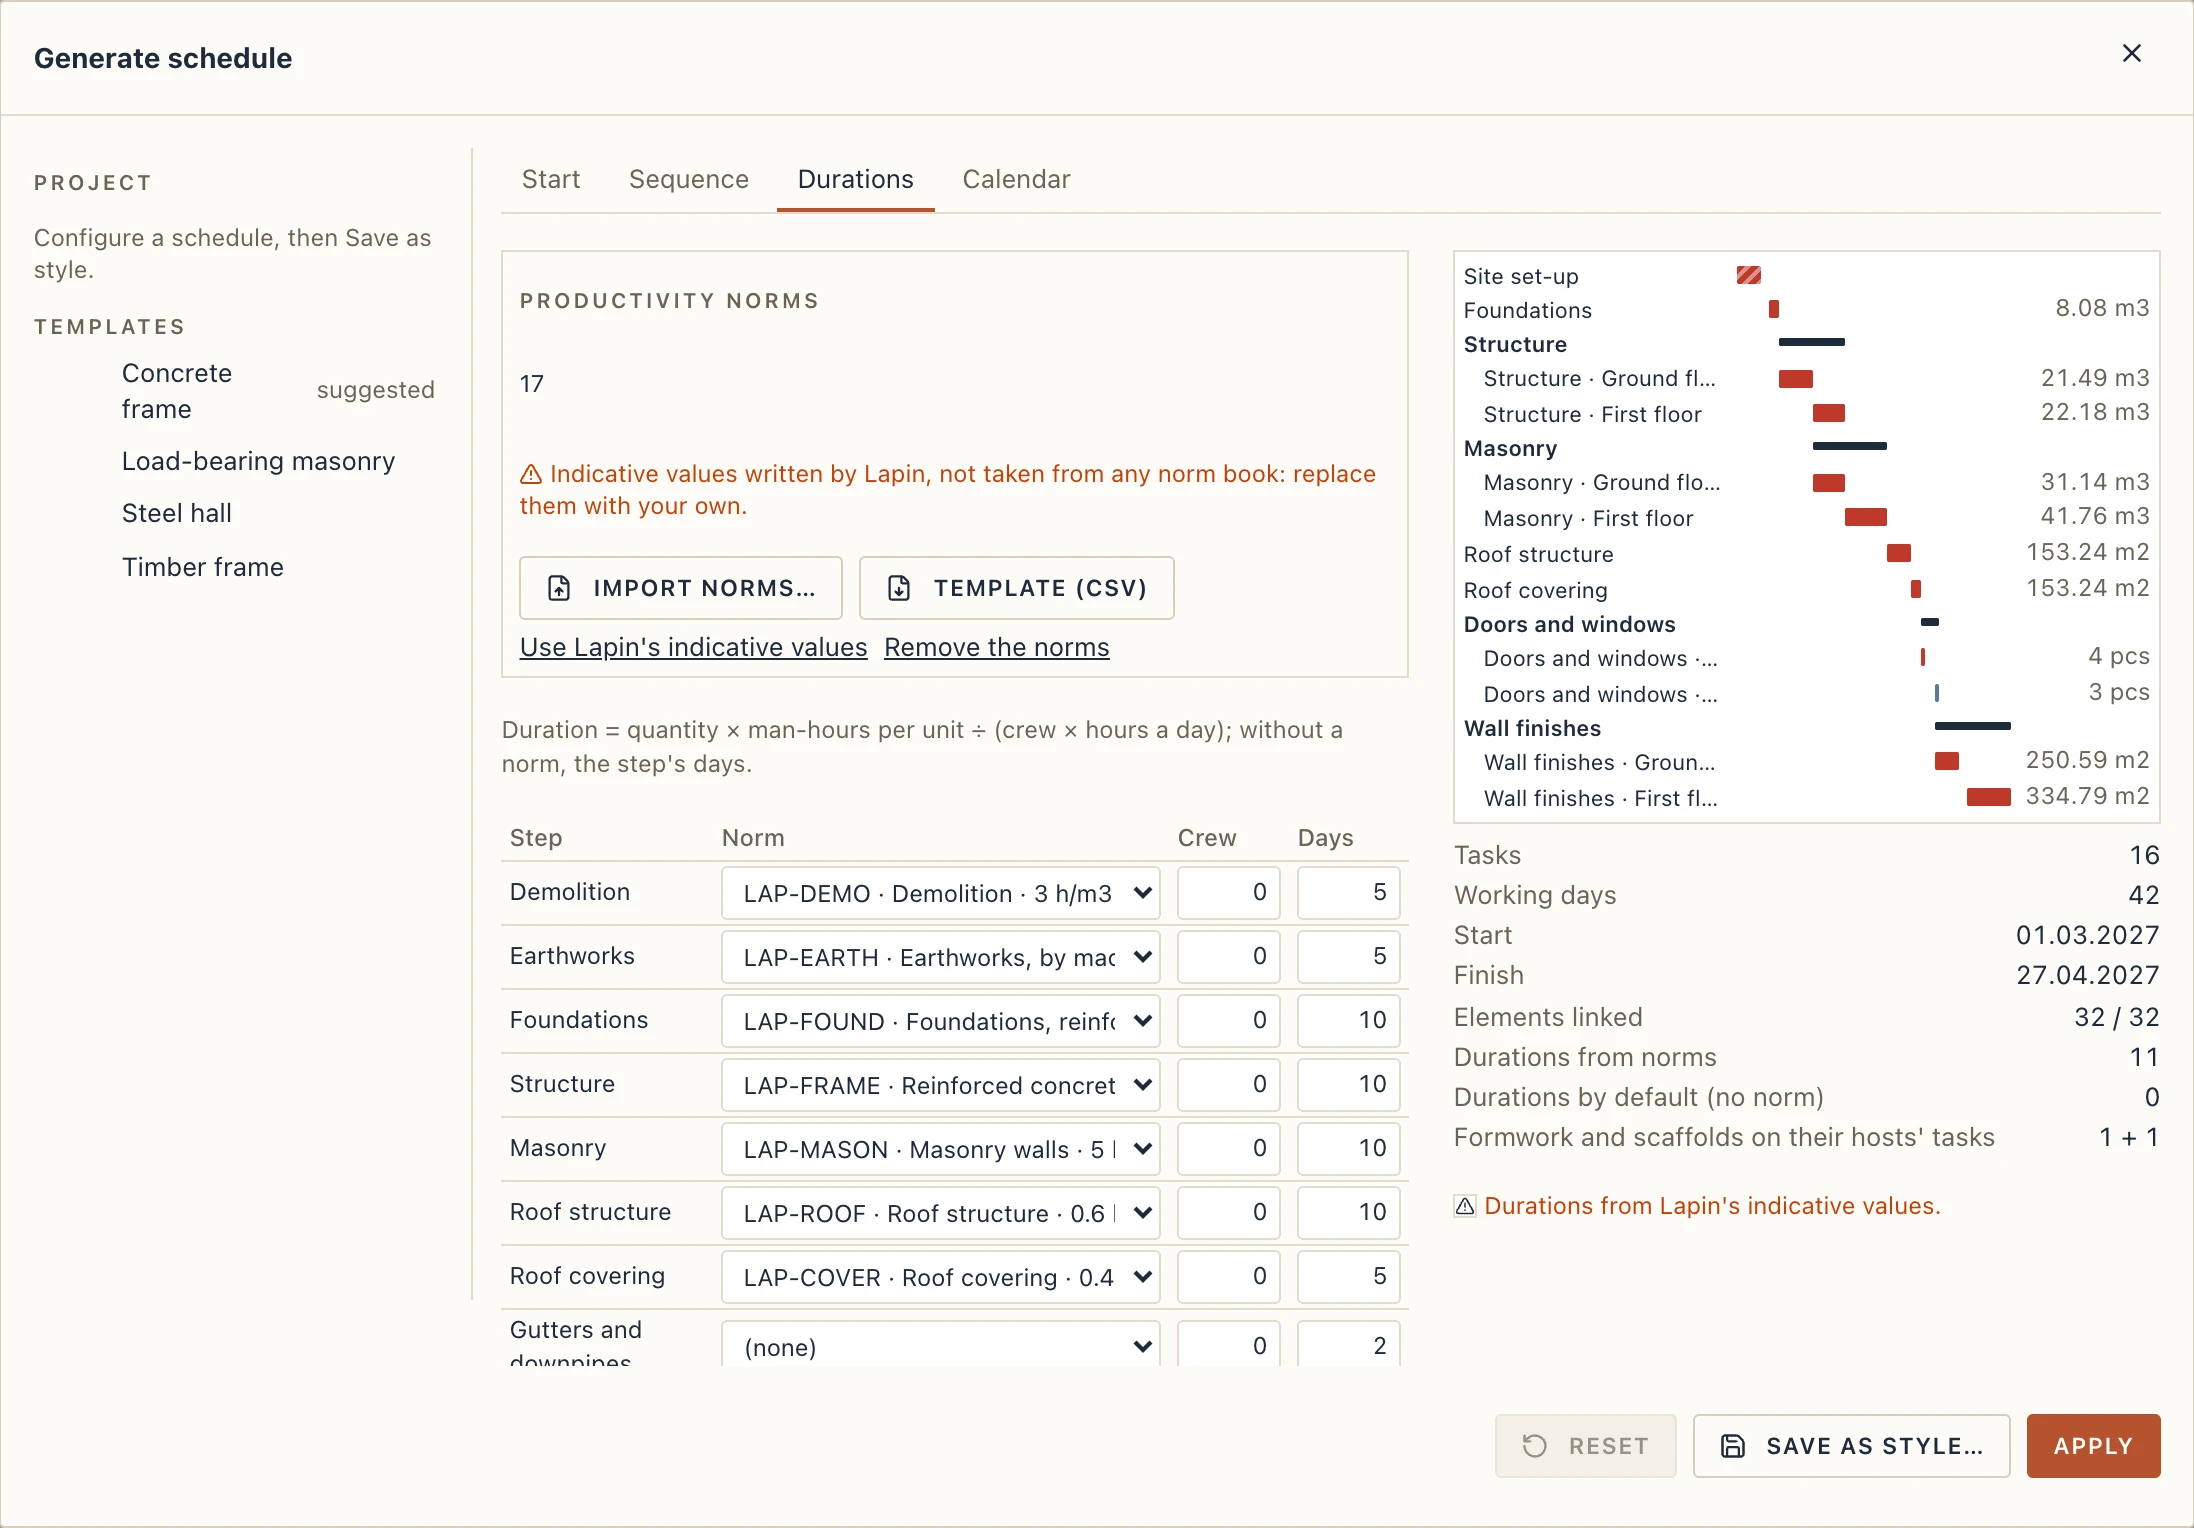
A task's duration comes from its elements' quantity (from the quantity takeoff: the volume of the core, the area of the finishes, the doors and windows by the piece, the steel by its weight) and a productivity norm:
duration = quantity × man-hours per unit ÷ (crew × hours a day), in whole working days. For example 4.5 m³ of masonry at 4 man-hours a cubic metre, with a crew of 2 working 8 hours, is 18 ÷ 16 = 1.125, so 2 days.
The norms are yours. Lapin does not ship any norm book. Import norms… reads your table from a CSV or an XLSX file: a column for the code, one for the text, one for the unit (m3, mc, m2, mp, m, ml, buc, pcs, kg, t…), one for the man-hours per unit (or a productivity in units an hour), and optionally one for the crew. The headings may be in English or Romanian. Template (CSV) saves the columns with a few rows of rough values written by Lapin, each marked indicative. Use Lapin's indicative values puts those rows into the project to try the generator; the dialog then warns that the durations come from indicative values, not from a norm.
Under the norms, each step picks its Norm, its Crew (0: the norm's own) and its Days, used when no norm times it. The Calendar tab shows the calendar the durations count in; its hours a day divide the man-hours.
Generated again
Open the generator again and Apply: the schedule is made again over the same tasks, so their ids stay. What you changed by hand stays:
- a generated task you edited (its name, duration, dates, rule, part) is Kept as edited, ticked in its Properties; untick it to have it made again from its step;
- the elements you added to a task or took out of it by hand stay its exceptions;
- the tasks and the links you made yourself stay; untick Keep the tasks made by hand to have only the generated ones.
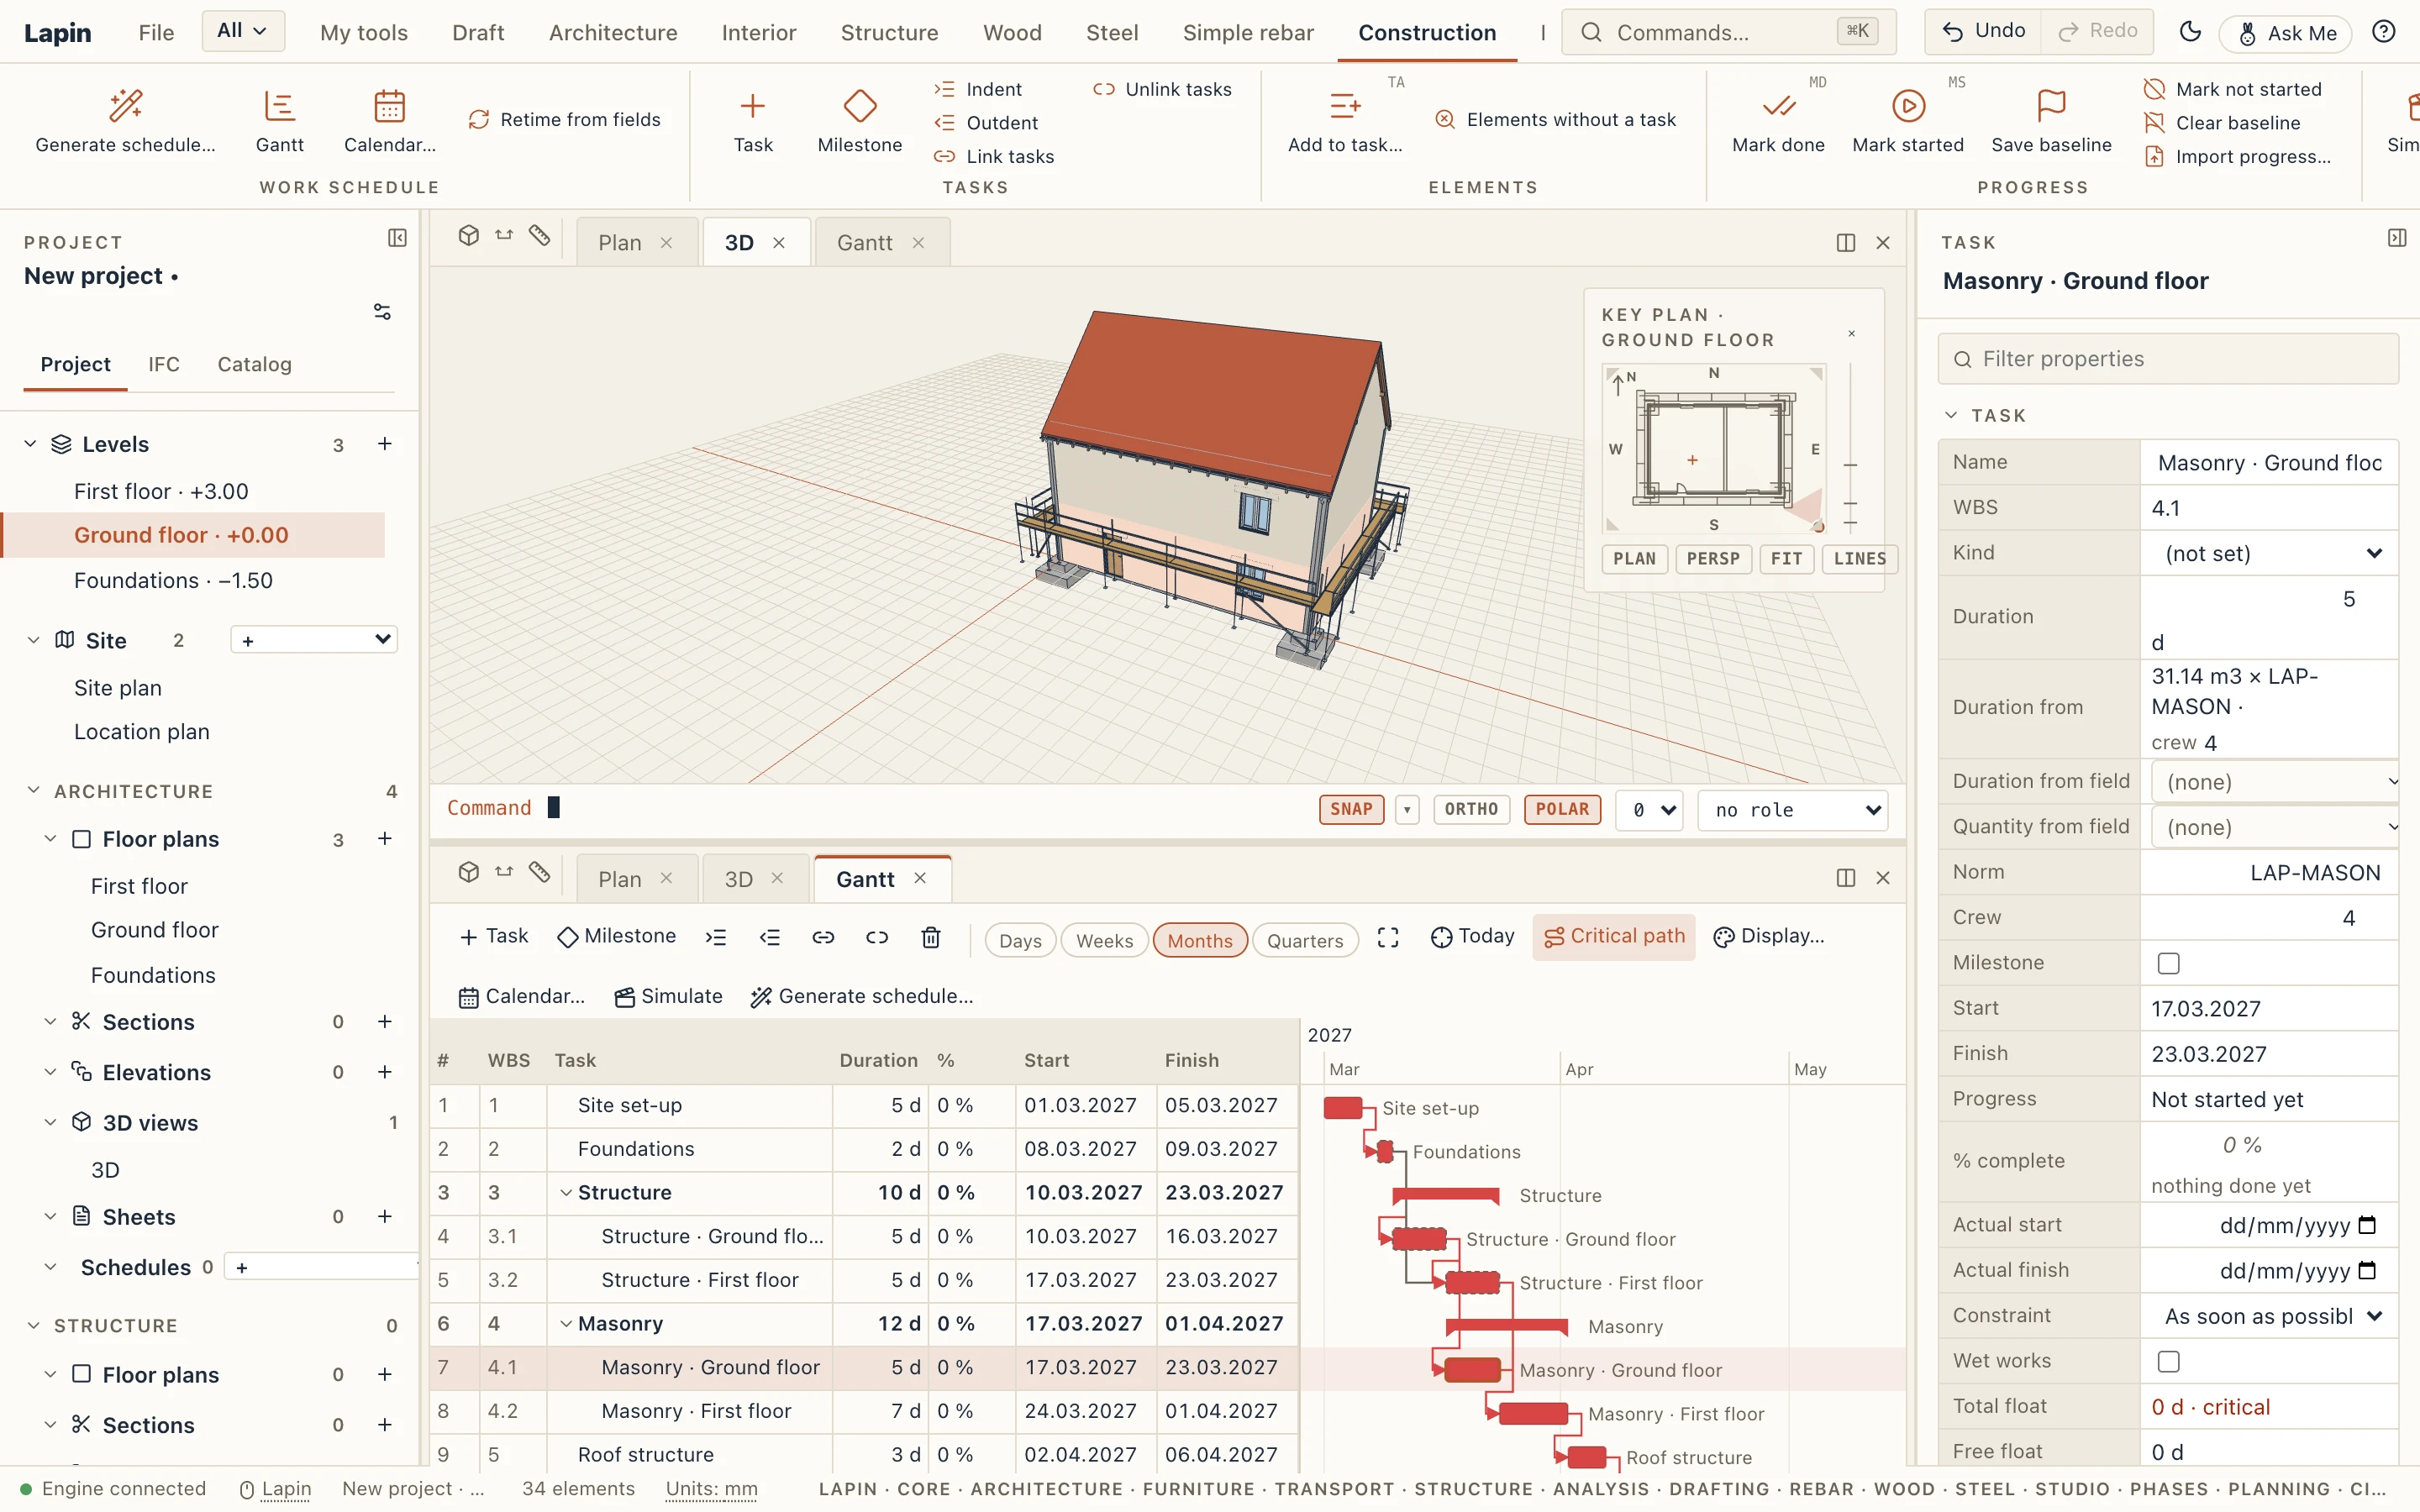
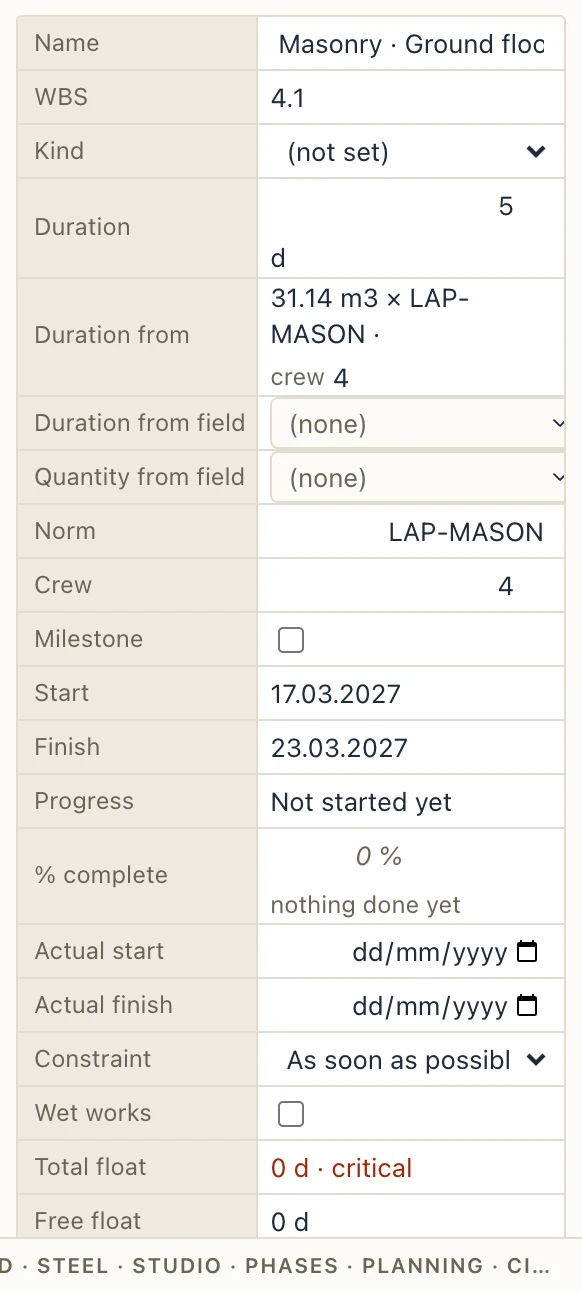
In Properties a generated task says where its duration came from: the quantity, the norm and the crew, or the step's days when no norm timed it.
Formwork and scaffolds
A formwork or a scaffold from Site works has no task of its own: it lives by the tasks of what it serves. A formwork goes up when its floor, beam or wall starts being built, and is struck when the days set on its type have passed after it is finished (Struck after, in working days: 21 for floors and beams, 7 for walls, columns and footings unless the type says otherwise). A scaffold stands from the first task on its walls to the last, their finishes included. Select one and its Properties say when it is On site and which tasks it Lives by.
The Gantt
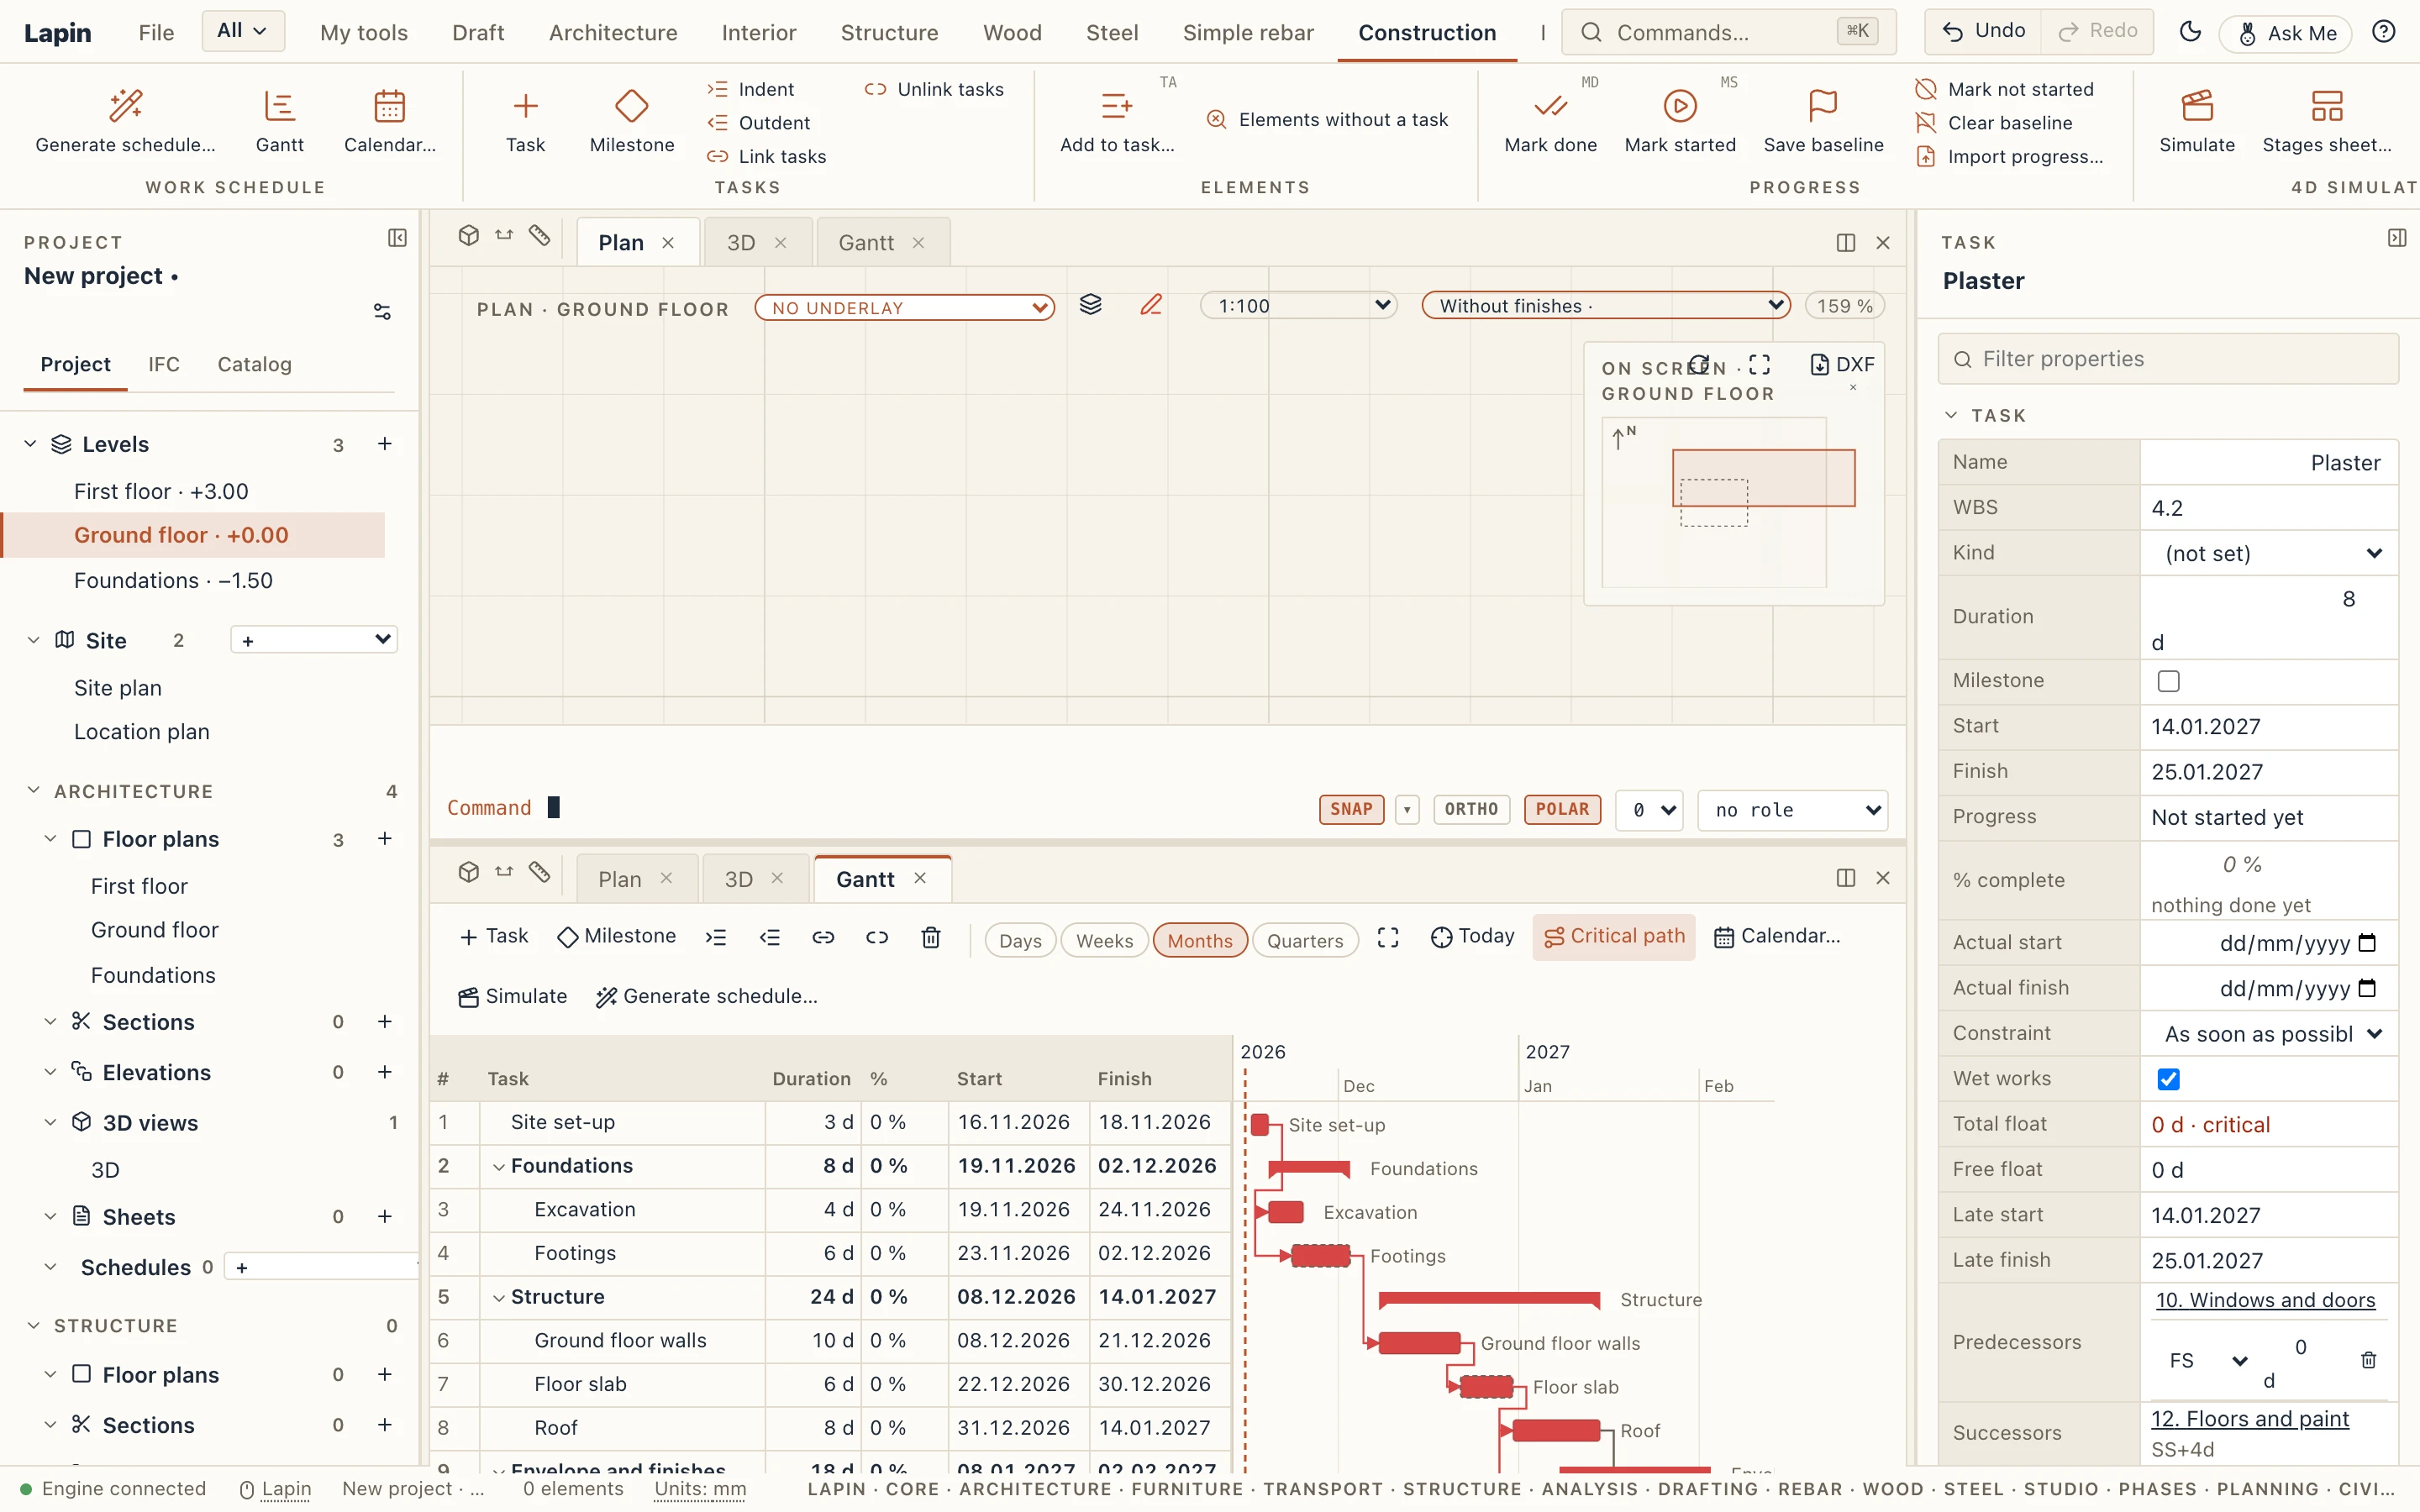
On the left is the task table: the row number, the WBS code, the name, the Duration in working days, the Start and Finish, the Predecessors and the total Float. On the right, each task is a bar on the time scale:
- a task is a blue bar, red when it is on the critical path;
- a summary (a task with tasks under it) is a dark bracket from its first task's start to its last task's finish;
- a milestone is a diamond.
Days not worked are shaded, and today is a dashed line. Days, Weeks, Months and Quarters change the scale, as does Ctrl + the mouse wheel. The four-corners button shows the whole schedule and Today scrolls to today. Critical path turns the red on and off. The arrow next to a summary's name folds and unfolds the tasks under it.
The Gantt is a view like the others: it has a tab, and on the desktop it can open in a window of its own for a second screen.
Editing in the table
Double-click a cell to type in it. Enter keeps the value and Escape gives it up.
- Duration: working days; 0 makes the task a milestone.
- Start: the task starts no earlier than that day (a constraint, see below).
- Finish: the duration becomes the working days from the start to that day.
- Predecessors: as in MS Project, row numbers separated by commas, each with a type and a lag:
3,5SS,7FF+2,2FS-1d.
The keyboard works as in a table: ↑ and ↓ move the selection, Insert adds a task before the selected one (Shift+Insert a milestone), Delete deletes the selected tasks with what is under them, Tab indents and Shift+Tab outdents, F2 renames.
Editing on the chart
- Drag a bar to move the task. It then starts no earlier than the day you drop it on. The date shows while you drag.
- Drag a bar's end to change its duration. The working days show while you drag.
- Link two tasks: hover over a bar, then drag from the small circle at one of its ends onto another bar. Which ends you join gives the type: from the finish to the other's start is finish-to-start (FS), start to start SS, finish to finish FF, start to finish SF.
- Click an arrow to change the link's type and lag (in working days; negative is an overlap), or to remove it.
Every change is one step to undo.
A task in Properties
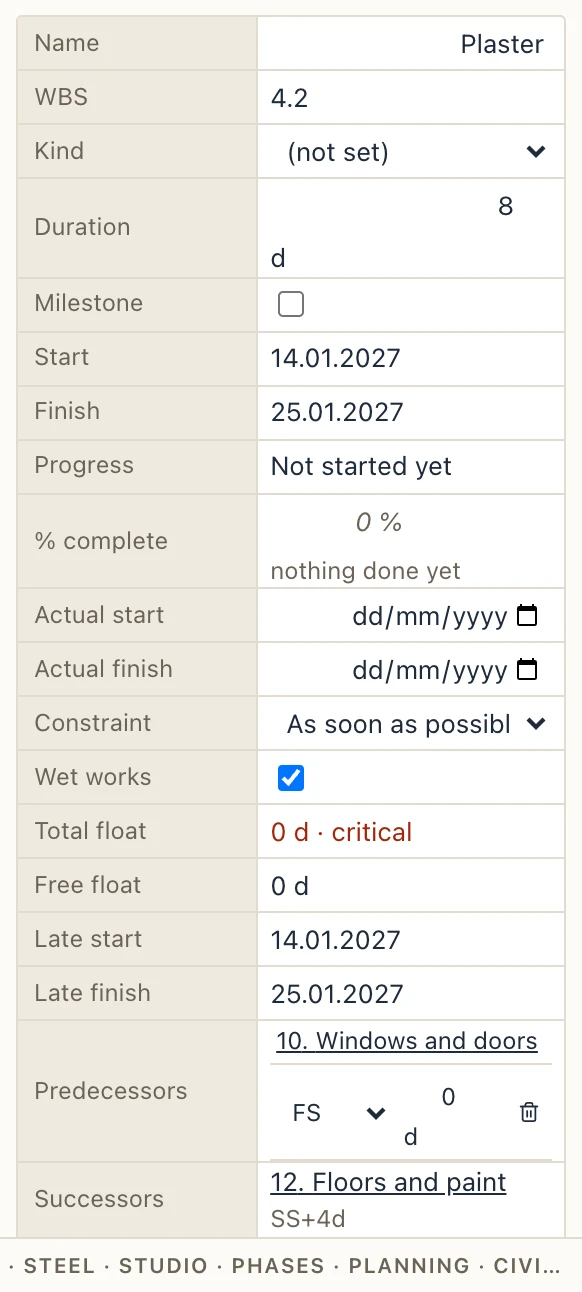
Select a task and Properties shows it: its name, its IFC kind, its duration, whether it is a milestone, its dates, and:
- Constraint: As soon as possible (the default), Start no earlier than a date, or Must start on a date. A task that must start before its predecessors finish takes float away from them. Their float then turns negative and they become critical.
- Wet works: concrete, screeds, plaster. A wet task does not work in the calendar's winter break, when the break is on.
- Total float and Free float: how many working days the task can slip without moving the finish, or without moving what follows it. Late start and Late finish are the latest dates that keep the finish.
- Predecessors: each link in, with its type and lag to change, or removed. Successors lists what follows the task.
Planning by your own fields
Offices name properties their own way, and the schedule follows them. Wherever a task, a step or the Gantt asks for a field, you pick it from the project's fields: the model's own, a property of an imported IFC, Fragments or BOS file (Pset_Firma.Etapa), a quantity, a formula, or one of your office's names (Manage → Field names…, see Schedules). A file's property and your own parameter work the same way.
Rules by any field
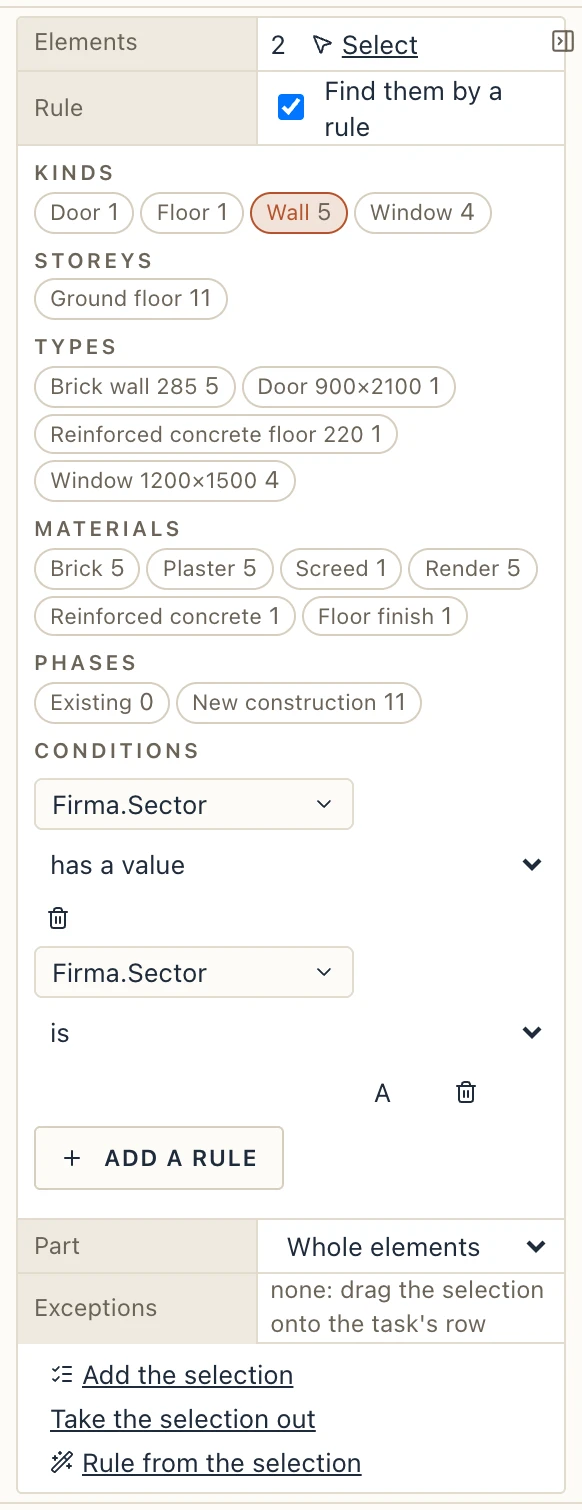
In Elements in Properties, under Find them by a rule, Conditions adds rules in the editor Quick select and the view filters use (see Quick select): a field, an operator (is, contains, starts with, is greater than, is between, is one of, has a value…) and a value, suggested from what the model has. Every condition must hold, together with the kinds, storeys and the others. The rule is kept, not the elements: a wall drawn later with that field joins the task by itself.
Splitting a generated step by a field
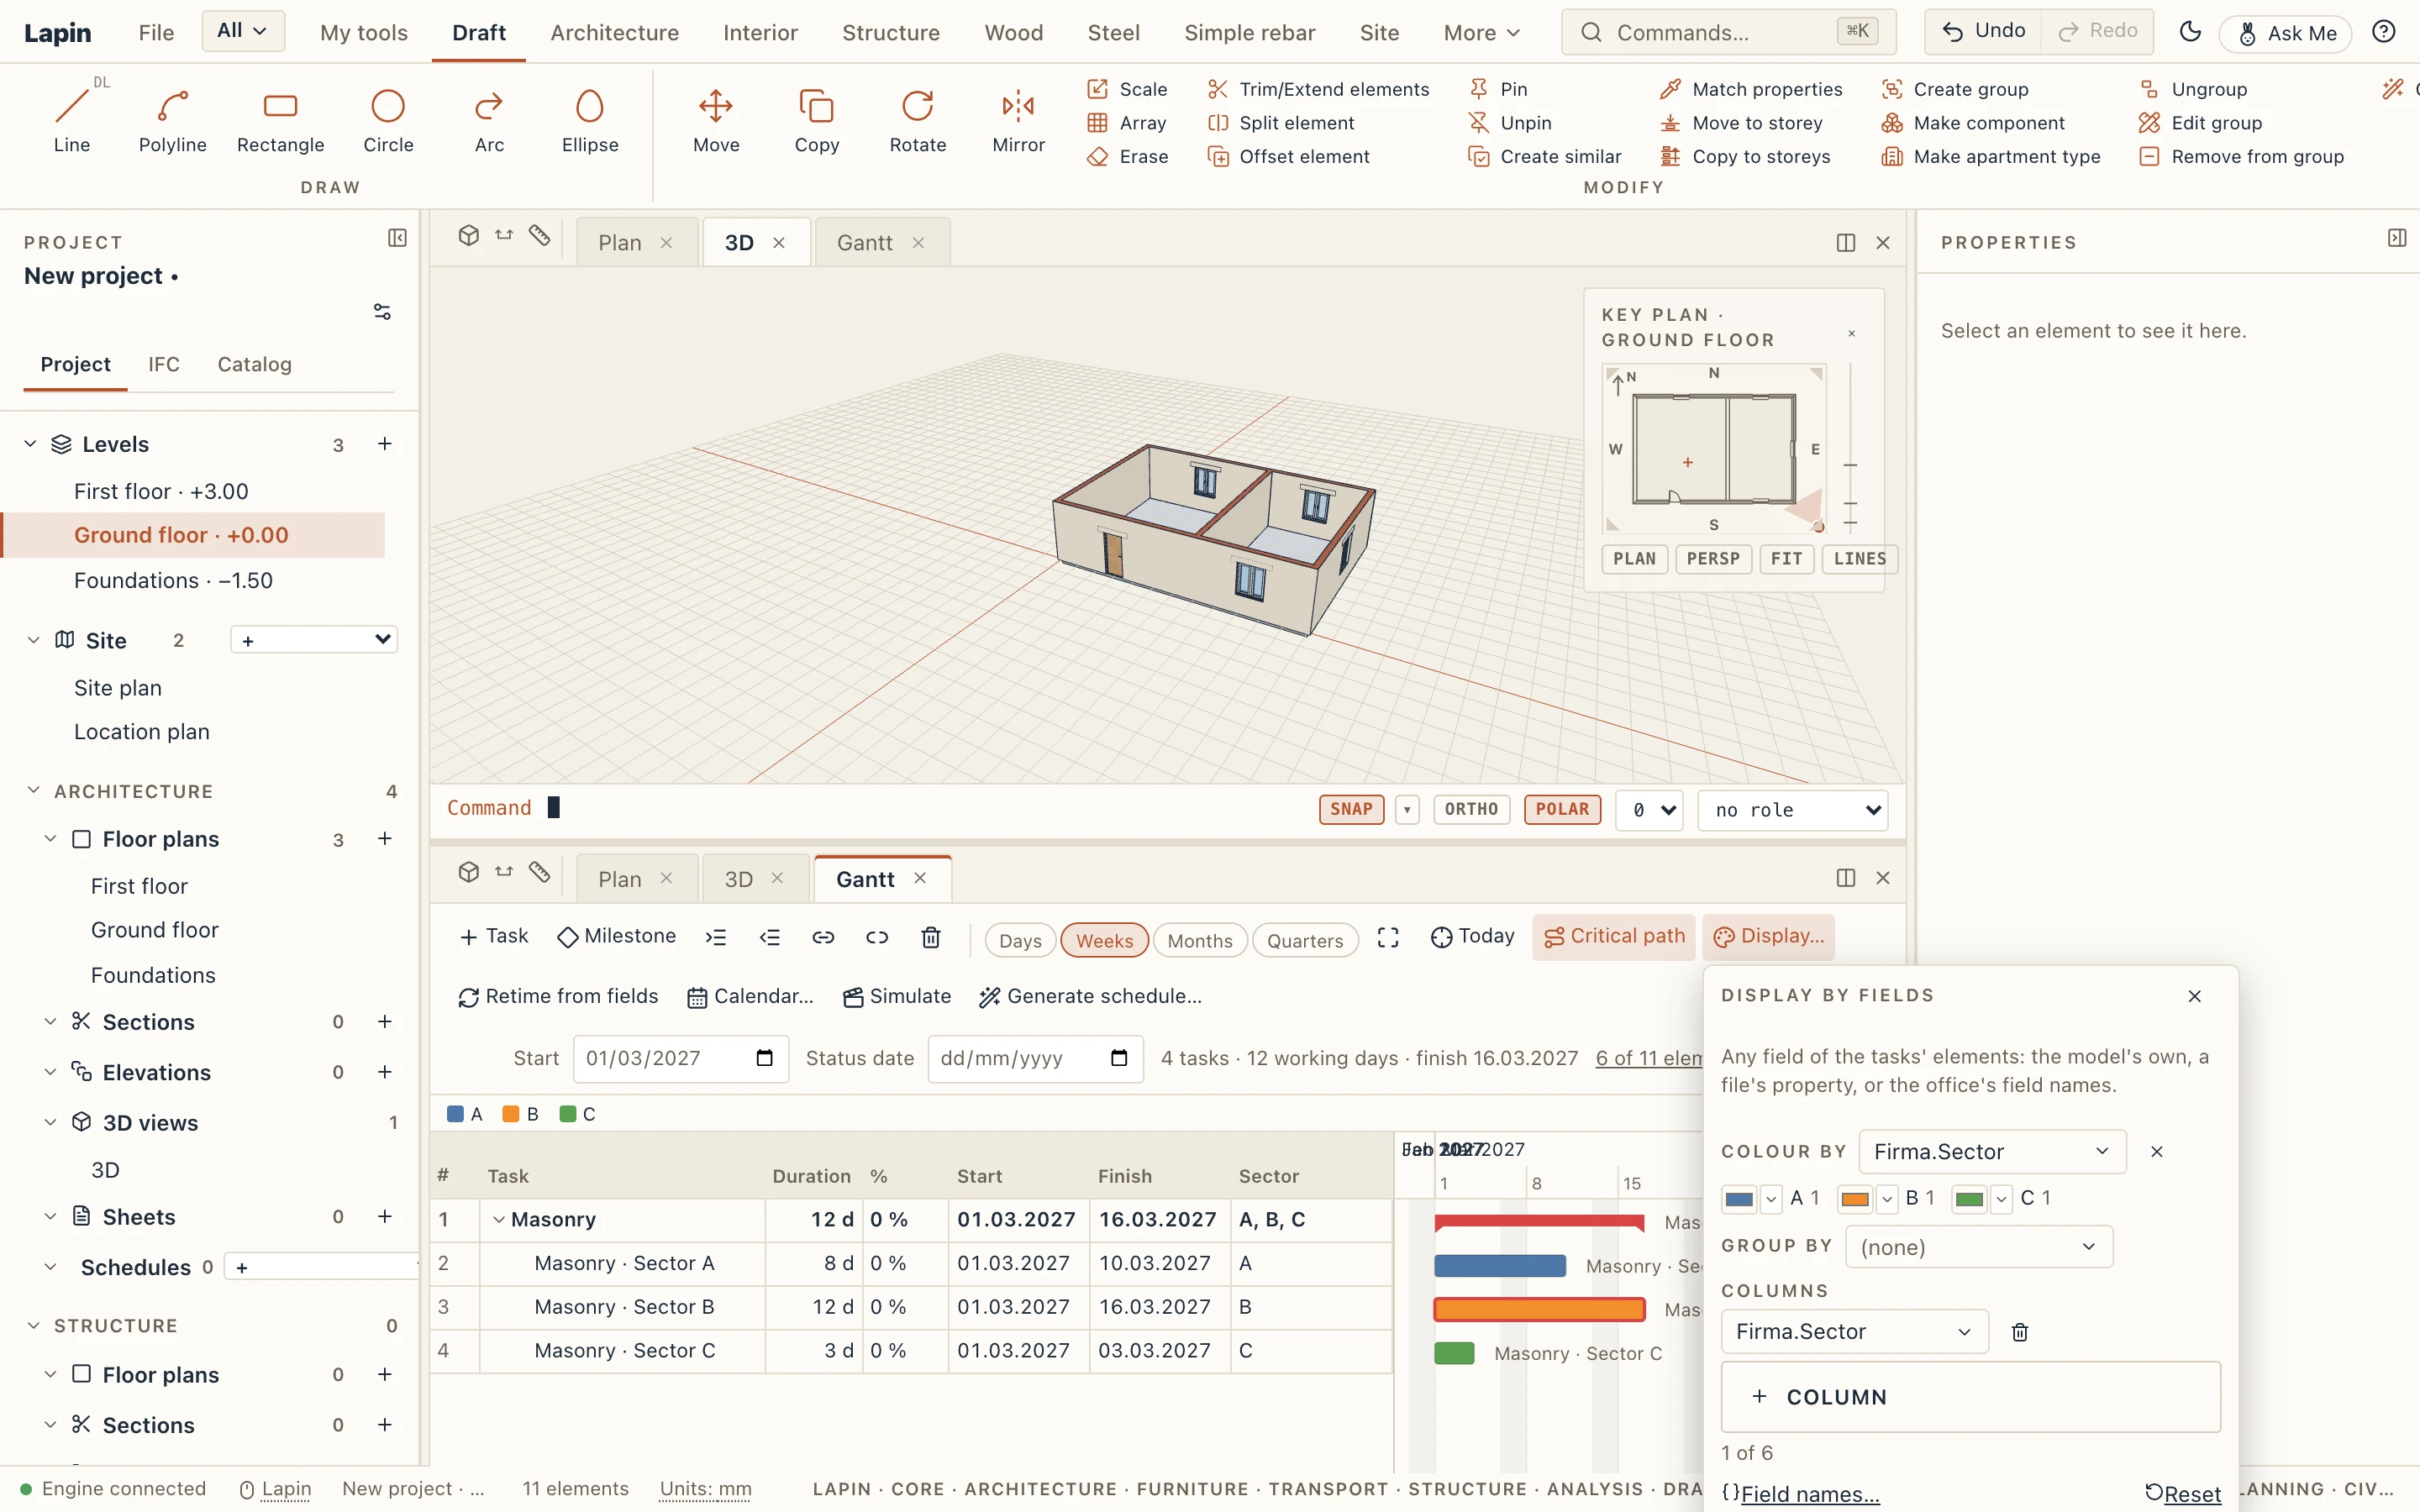
In Generate schedule…, the pencil of a step opens Only the elements with (the same conditions), Split by (up to four fields, in order), Duration from field and Quantity from field. A step split by Sector makes a task for each sector (Masonry · Sector A, Masonry · Sector B, and no Sector for the walls without one), under a summary; the sectors of a storey work in parallel. Generated again, each value keeps its task.
Duration from field takes the days each element carries (a field or a formula such as = Firma.Volum * 2), added up and rounded up. Quantity from field replaces the built-in measure under the step's norm. Both can also be set on a task in Properties, with its Norm and Crew. The duration is kept on the task: after the model changes, Retime from fields (the Gantt's toolbar, or the Construction tab) works every such task out again.
The Gantt by fields
Display… in the Gantt's toolbar:
- Colour by a field colours the bars by value, with a legend under the toolbar. Each value's colour can be changed; the tasks whose elements disagree are grey, and critical bars keep a red outline.
- Group by a field groups the rows under a header for each value, which you fold. Only the tasks that do the work are listed; the window changes, a sheet keeps the WBS order.
- Columns adds up to six field columns to the table, next to the built-in ones.
Reset takes the display off; Field names… opens your office's names. The Gantt on a sheet draws what the window shows.
The critical path
Lapin works out the schedule after every change. A forward pass finds the earliest dates and a backward pass the latest. The tasks with no float make the critical path, and a delay to any of them moves the finish. A link to a summary holds every task under it. A link from a summary starts at its first task's start and ends at its last task's finish. Lapin refuses a link that would make a loop.
The model's elements in the tasks
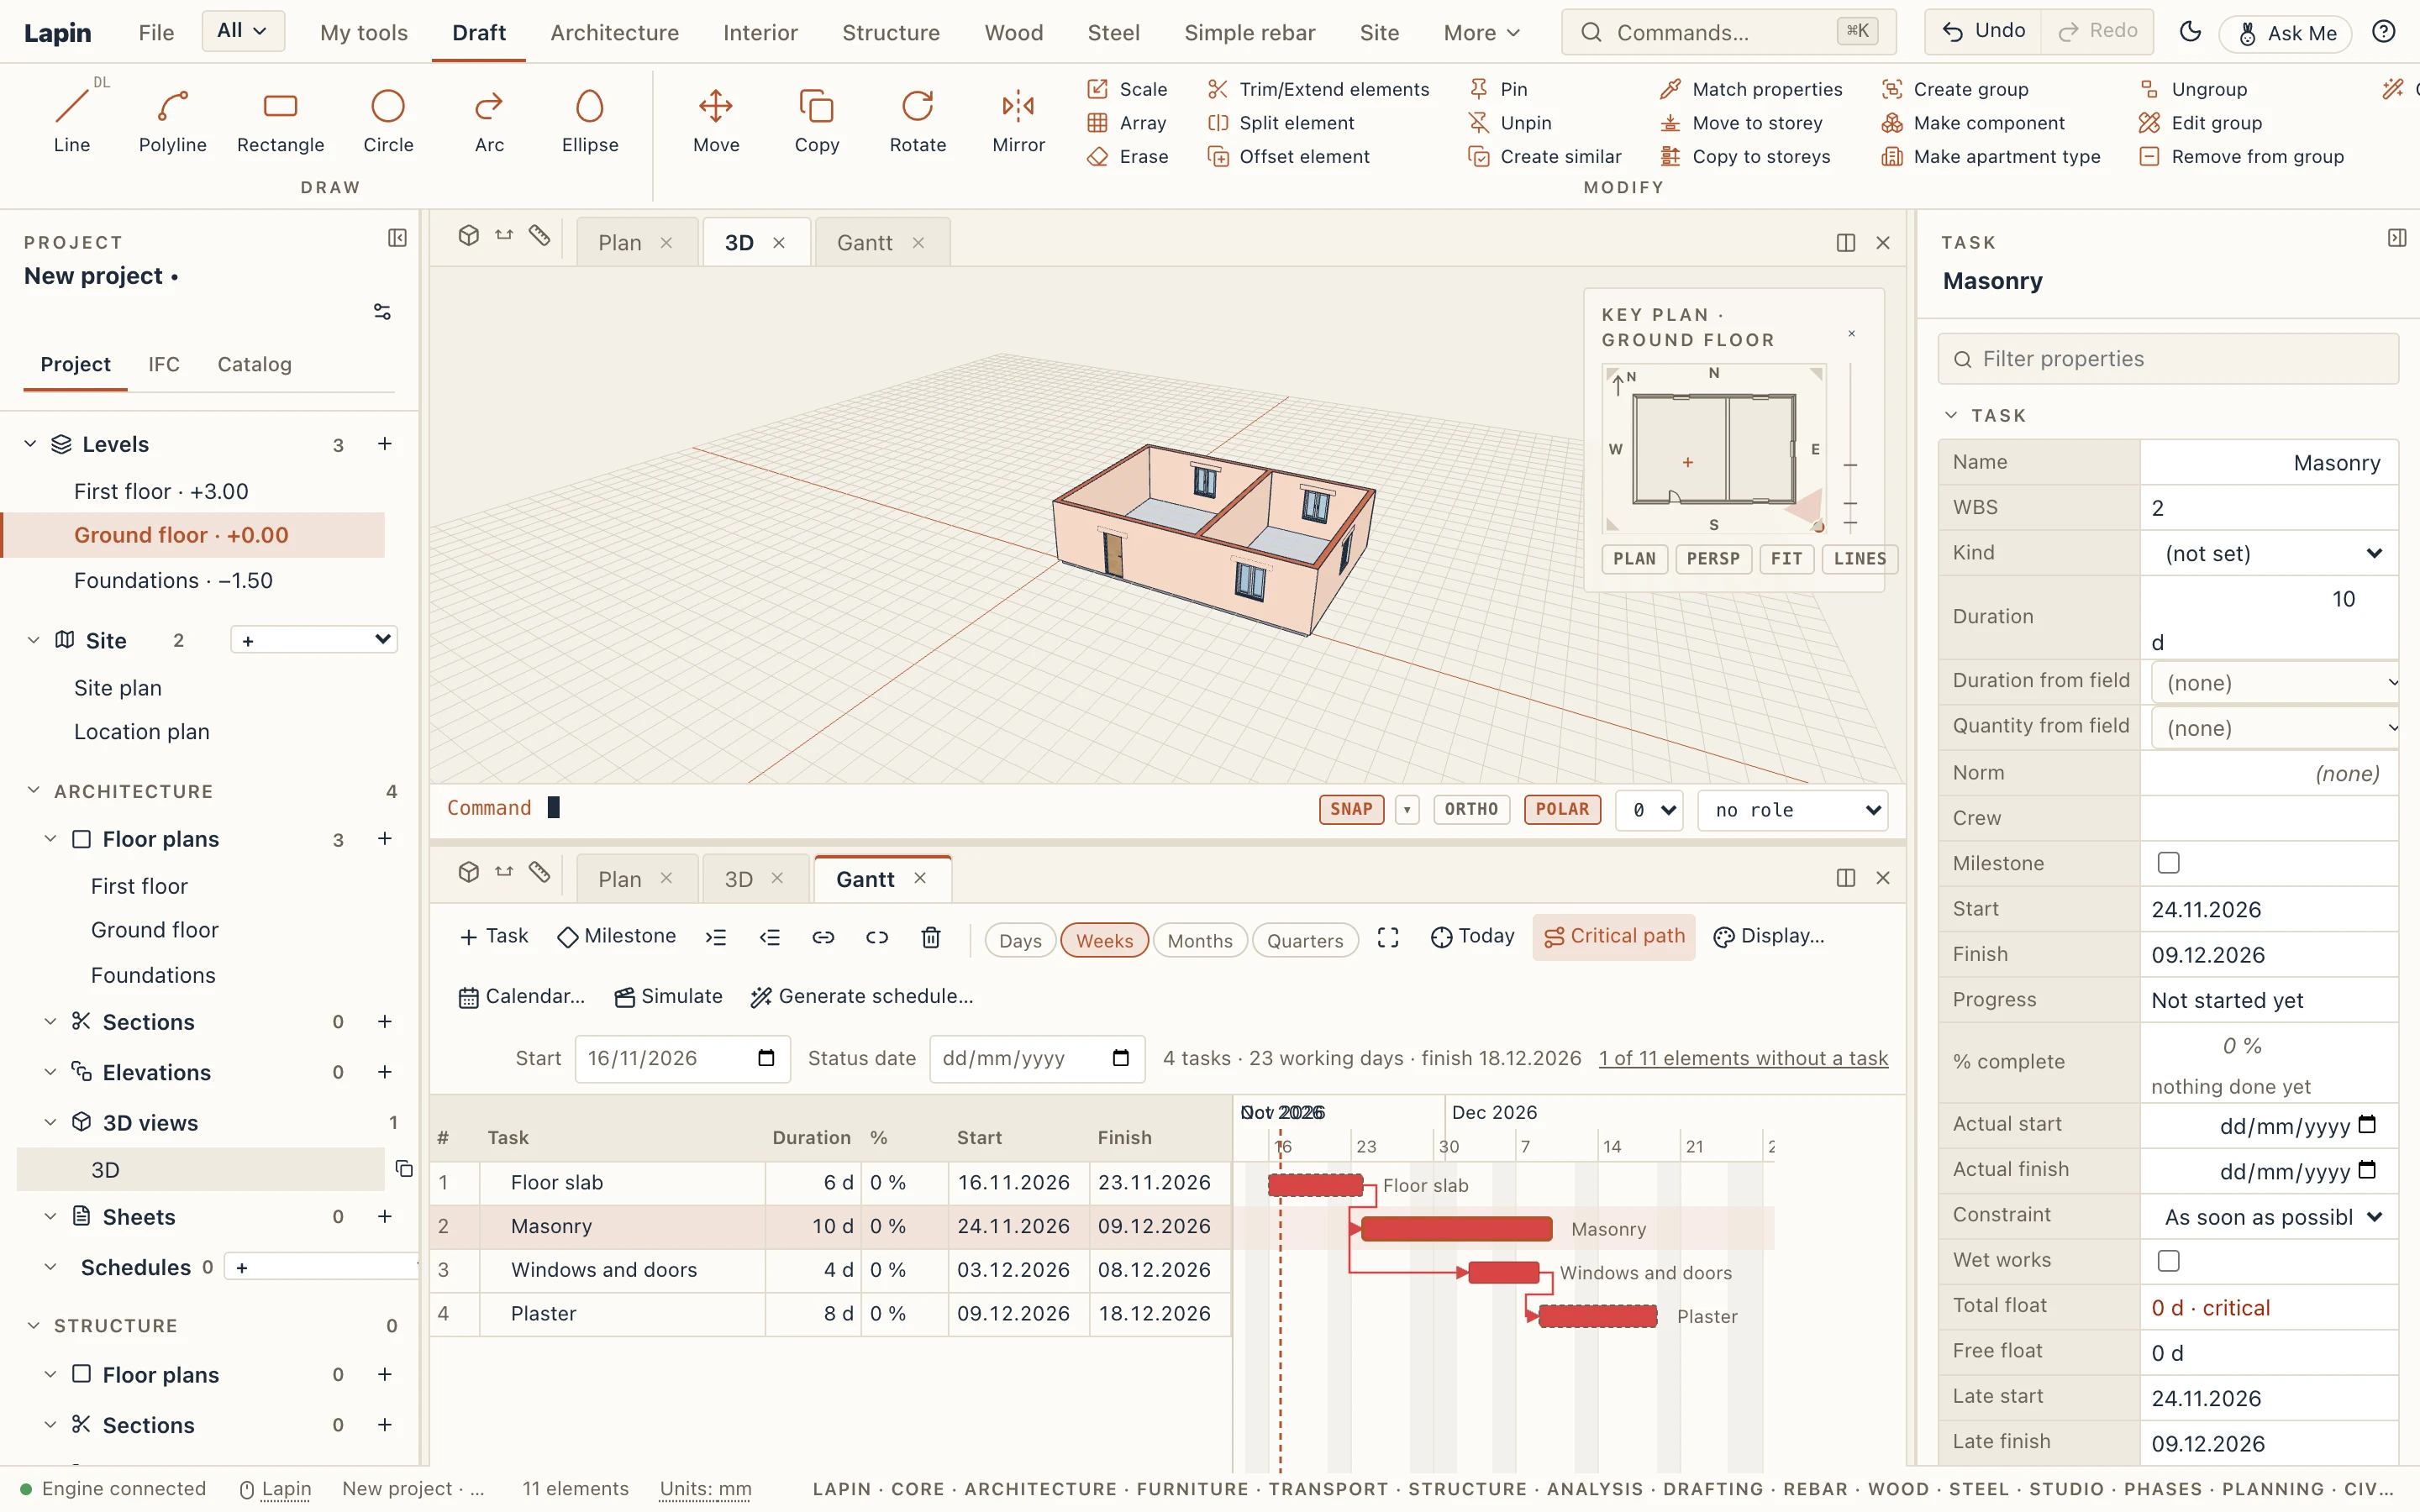
A task takes elements of the model, so the schedule knows what is built when. Select a task and its elements are drawn selected in 3D and in the plans; double-click its bar to select them and frame them. Select elements in a view and the rows of their tasks are marked in the Gantt. The Elements column counts each task's elements (a summary's with those of the tasks under it).
A rule
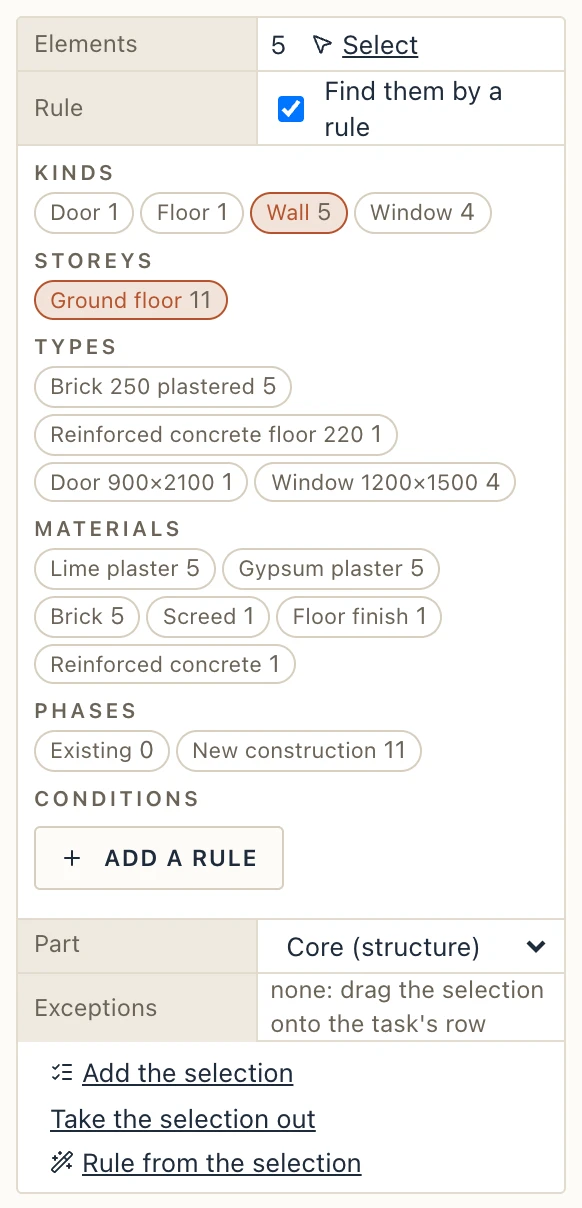
Under Elements in Properties, tick Find them by a rule and pick what the task takes, as in a schedule's filter: Kinds, Storeys, Types, Materials, Groups and Phases, each value with how many elements have it. Every condition you set must hold; one left empty lets everything through. The rule is kept, not the elements: a wall drawn tomorrow on the ground floor joins the task "Masonry ground floor" by itself. Rule from the selection makes a rule of the kinds and storeys of the elements selected.
A part of the elements
Part says what the task takes of each element: the whole elements, their core (the structural layer), their finishes (every layer but the core), the layers of one material, or those of a material category (Finish, Insulation…). So a layered wall is built in a Masonry task (its core) and plastered in a Plaster task (its finishes). An element without layers is its own core and has no finishes.
A roof is built in layers too: its structure (the deck of a flat roof, a vault or a roof without framing; the rafters or trusses of a framed one) is its core, its covering (with the dormers' roofs) and its battens its finishes. A Roof structure task (core) and a Roof covering task (finishes) each take their part, a rule by material finds the deck by its concrete, and the simulation and a view at a date show the covering only once it is laid. The generator's templates build a roof in these two steps, each timed by its own part's area, and the downpipes in a step of their own (Gutters and downpipes); a steel hall's Roof cladding stays one step.
By hand
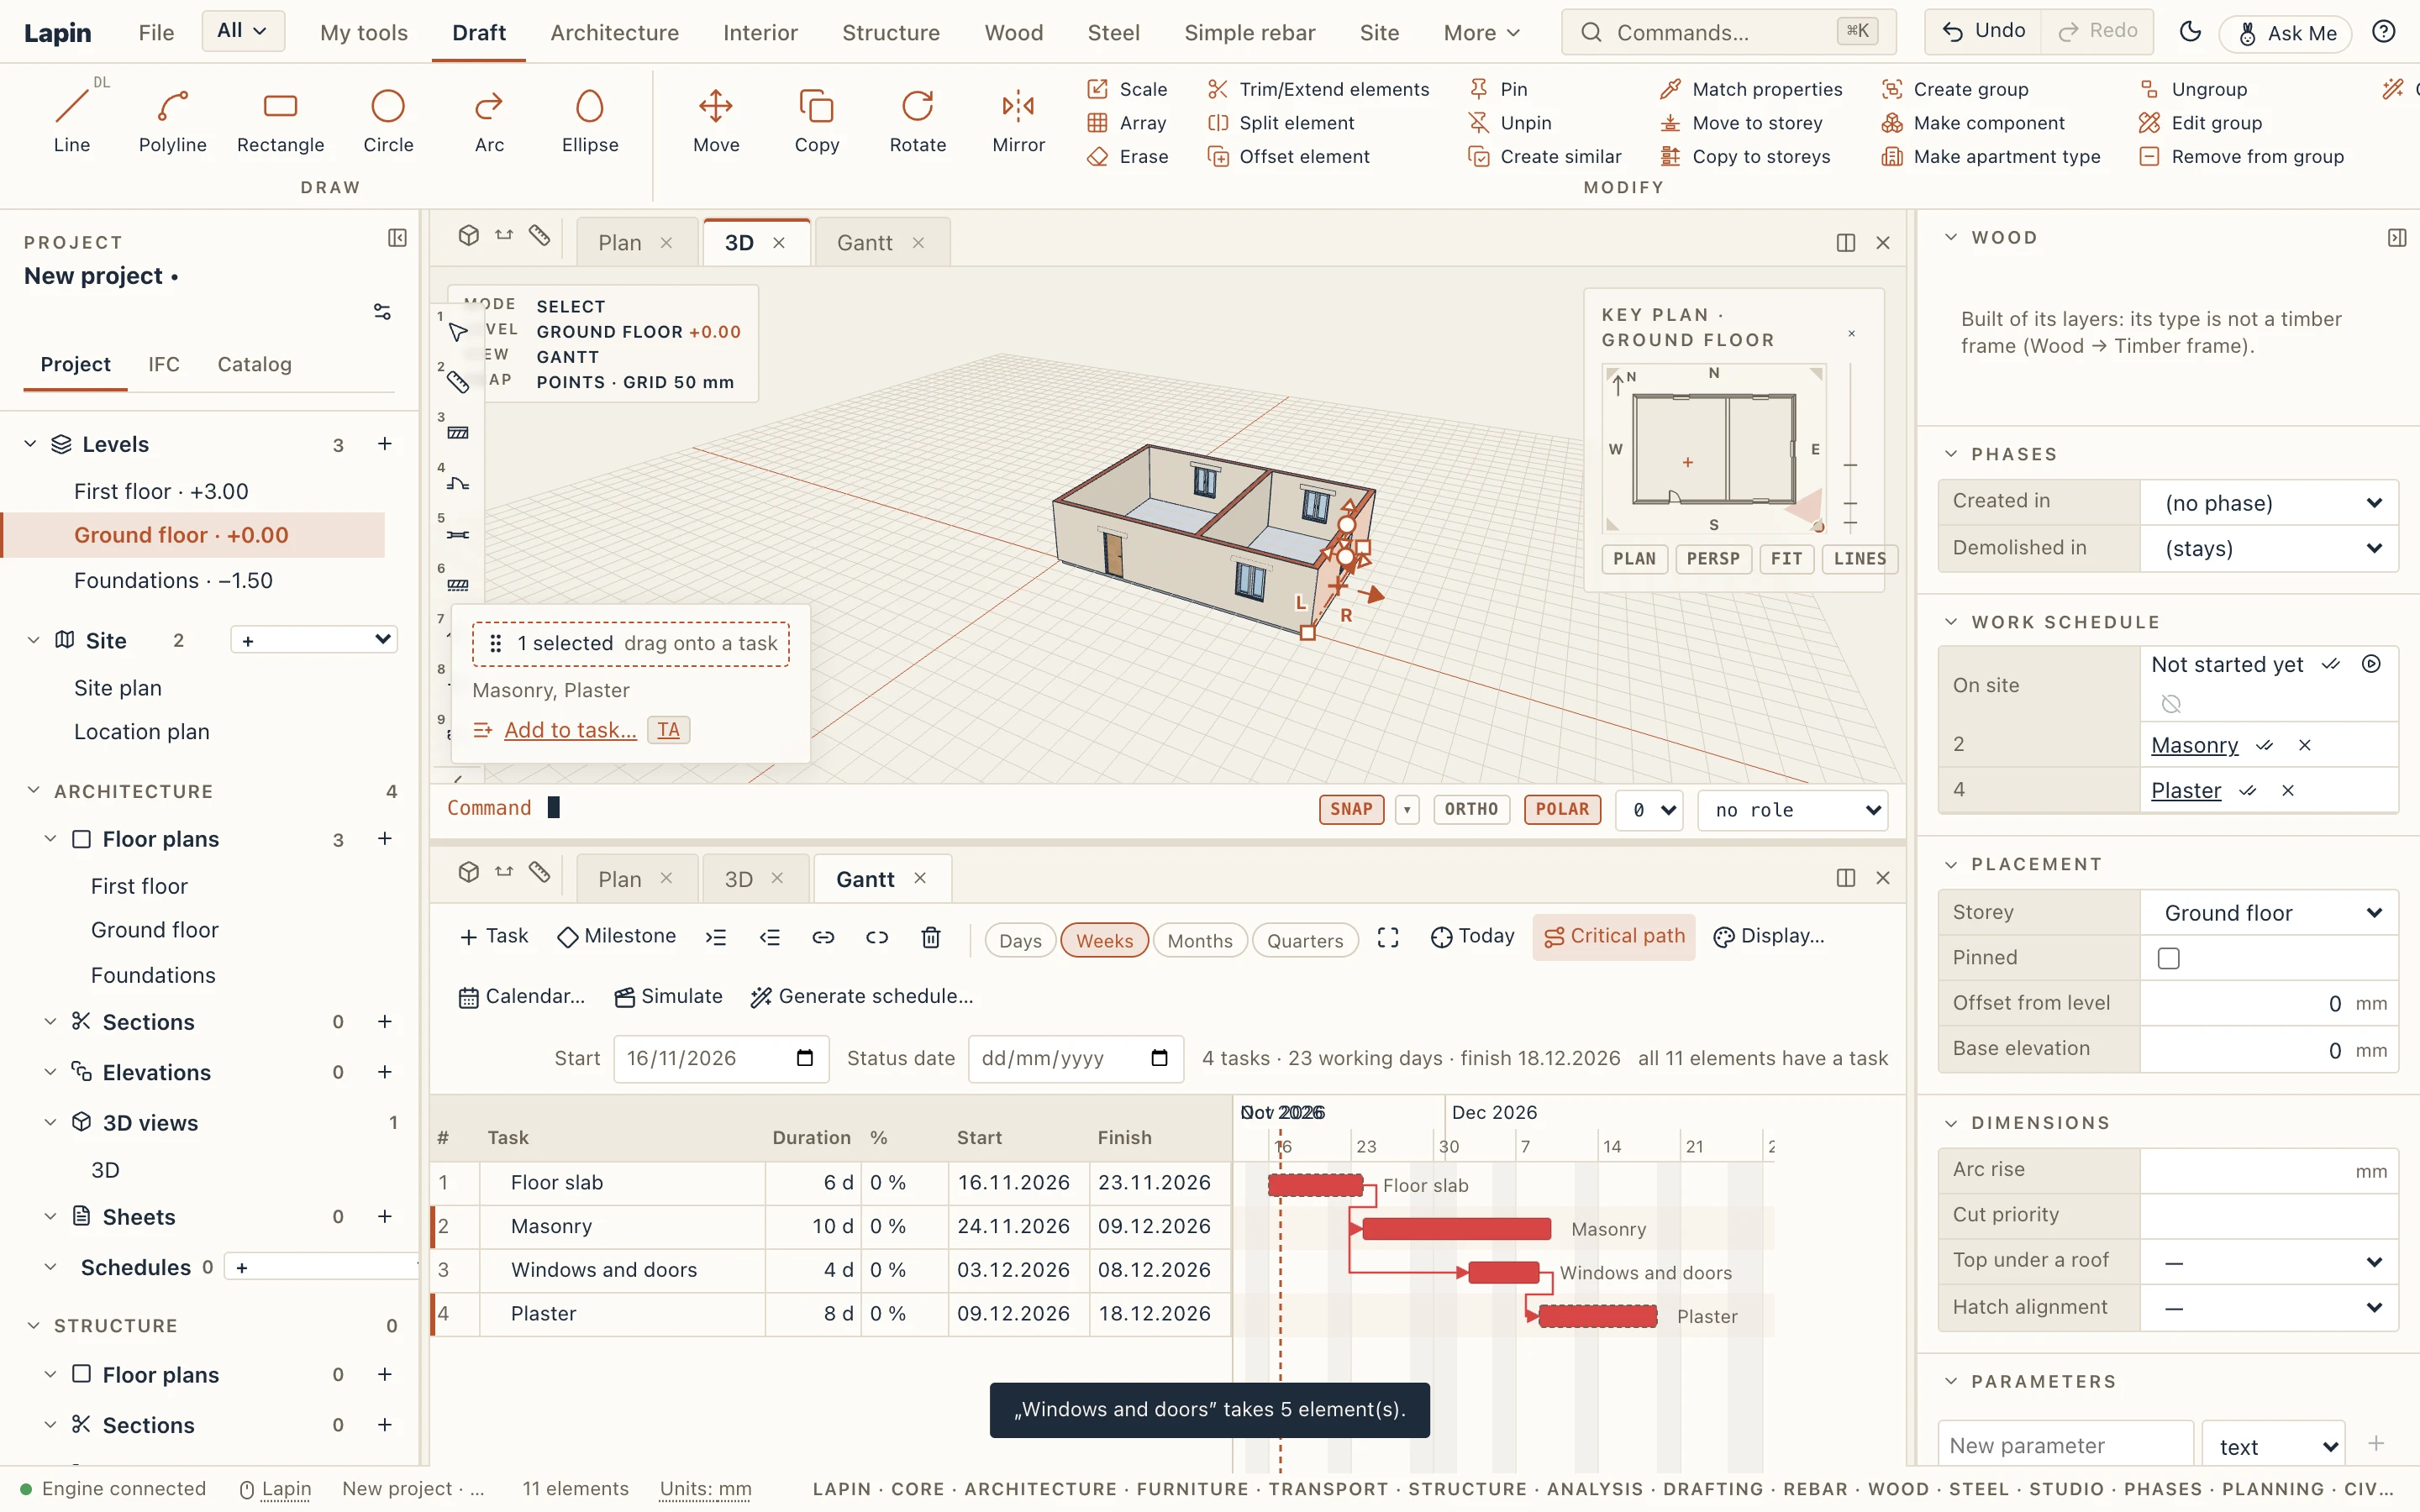
While the Gantt is open, a card over the model view says how many elements are selected and which tasks they are in. Drag it by its handle onto a task's row: the elements go into that task. Hold Shift when you drop to take them out of it. Add to task… (T A, also on the Construction tab) picks the task from a list.
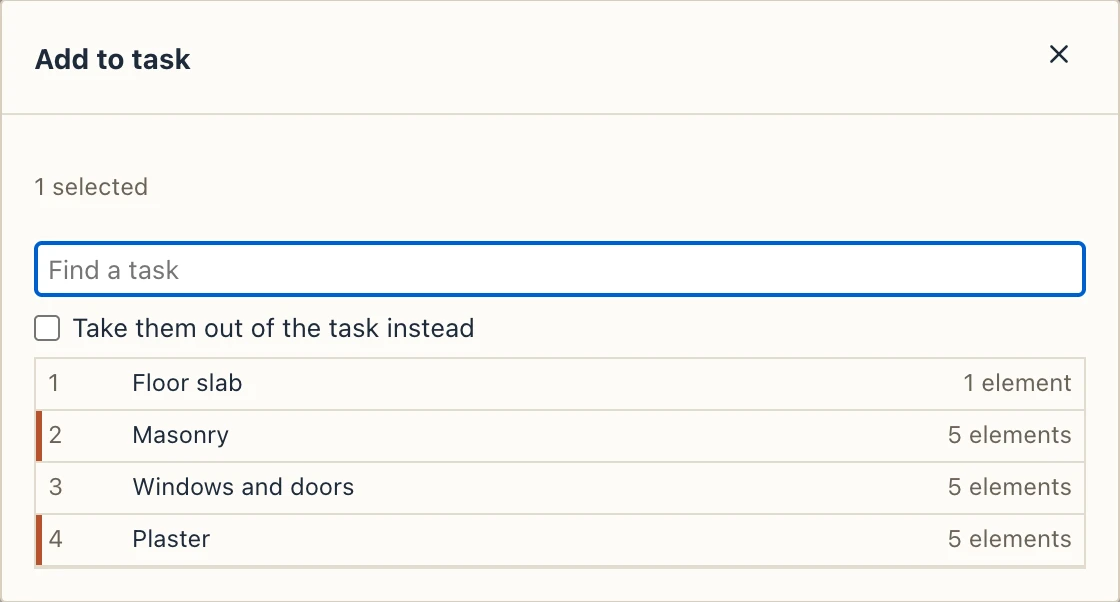
What you add or take out by hand are the task's exceptions: the rule stays as it is. Properties counts them, and the × next to each forgets them. An element's own Properties lists its tasks under Work schedule, each with a × to take it out. Every change is one step to undo.
Elements without a task
Once a task takes elements, the Gantt's toolbar says how many elements have no task, or have layers no task takes; a click selects them, ready to drag onto a task. Construction → Elements without a task does the same. Manage → Check lists them too, under Elements with a task: a warning for each, a click selecting it. Existing elements that stay need no task.
In IFC and MS Project
The IFC export writes what each task builds as an IfcRelAssignsToProduct (the element, with the tasks building it), and what a demolition, removal or dismantling task acts on as an IfcRelAssignsToProcess. The rule, the part and the exceptions travel in Lapin_Task, so Lapin reads the rule back; a file from another program gives tasks holding the elements it assigns to them. MS Project XML carries them in the field Text1, named Lapin elements. The workbook has an Elements and a Rule column.
The 4D simulation
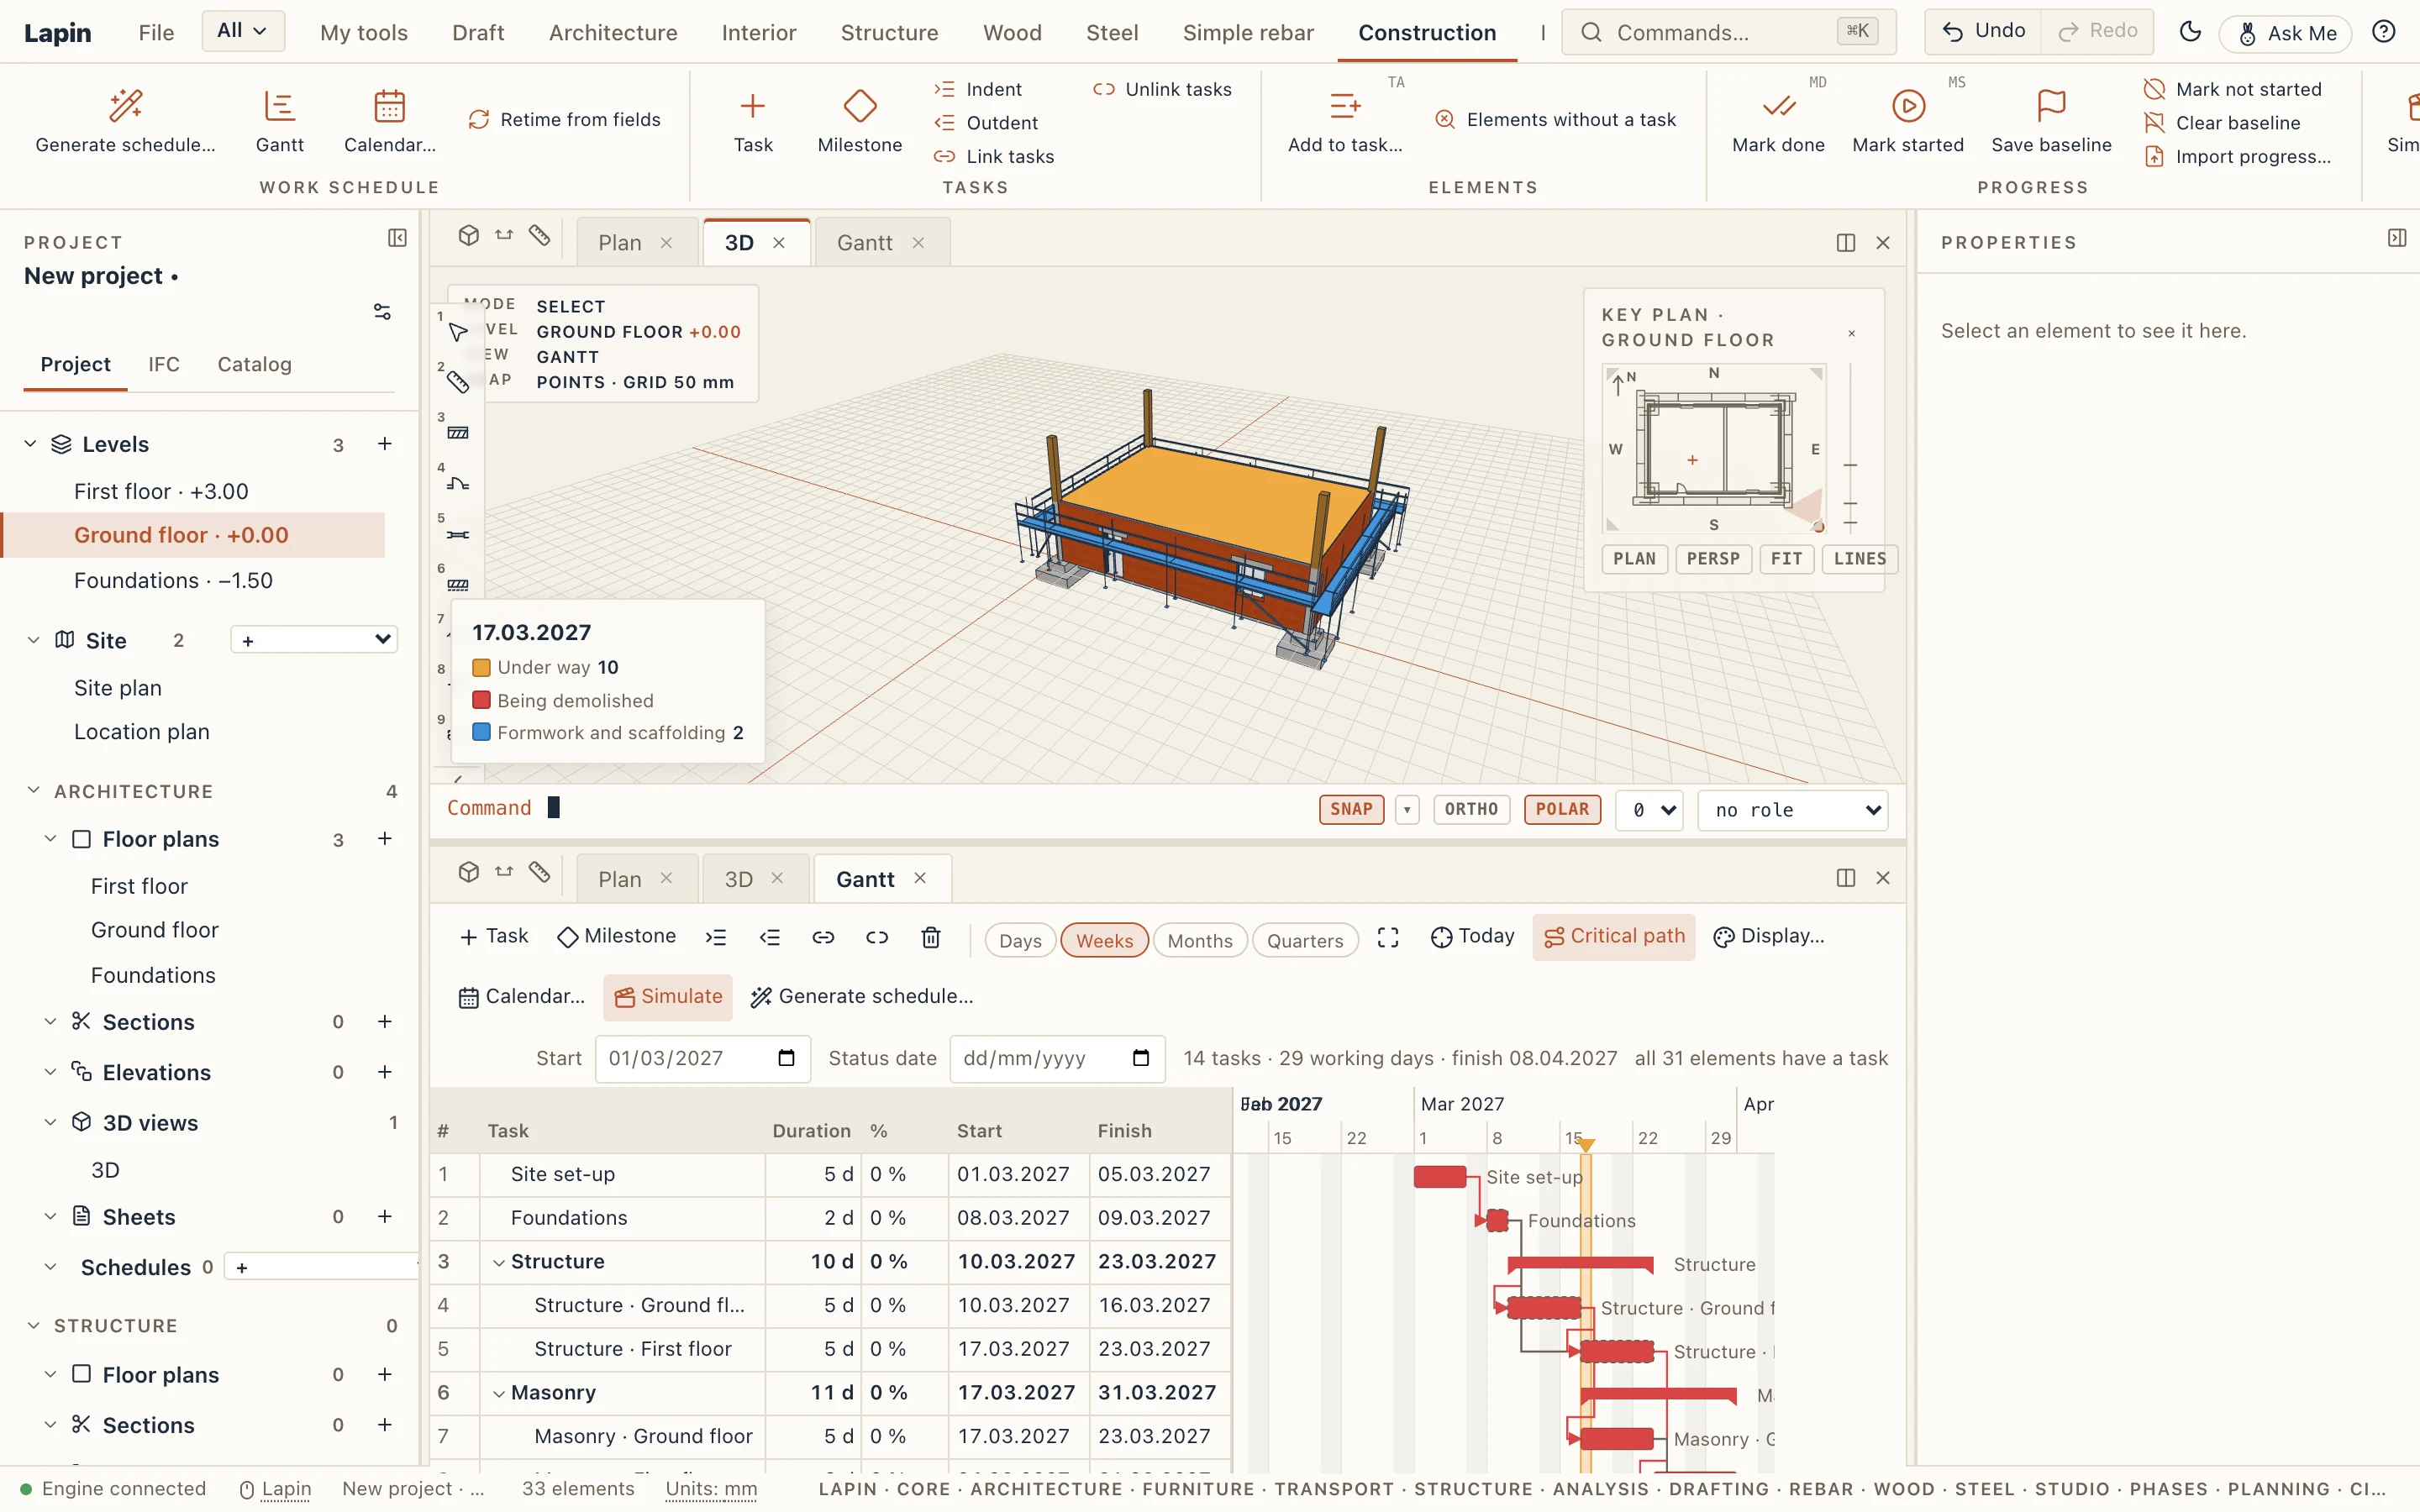
Construction → Simulate (also Simulate in the Gantt's toolbar) shows the model as the schedule has it on a day. The Gantt opens under the view if it is not open, with the player at its top and the day as a band over its chart:
- what is not started is hidden (or shown as a pale ghost, in the settings);
- what is under way is drawn in its colour (amber);
- what is built is drawn as it is;
- what is being demolished is red while its task runs, then it is gone;
- the formwork and scaffolding stand, in their colour (blue), only between the days their hosts' tasks give them: a slab's formwork from the start of its casting to its striking, a scaffold from the first task on its walls to the last.
A layered wall built in one task and plastered in another grows in two steps: its core first, its plaster later. Elements no task takes stay as they are. A card over the model view says the day, what each colour means and how many elements are in each state.
Playing it

- Play (▶) runs the days at the speed chosen (1 to 60 days a second) up to the finish; Pause stops it.
- The arrows on each side step back or on by a day or a week.
- Drag the slider, type a date, or click and drag on the Gantt's time scale: the band over the chart and the model follow.
- Beside the date: the tasks under way that day.
Only the elements' colours and visibility change from one day to the next: nothing is built again, so a large model plays as smoothly as a small one.
Its colours
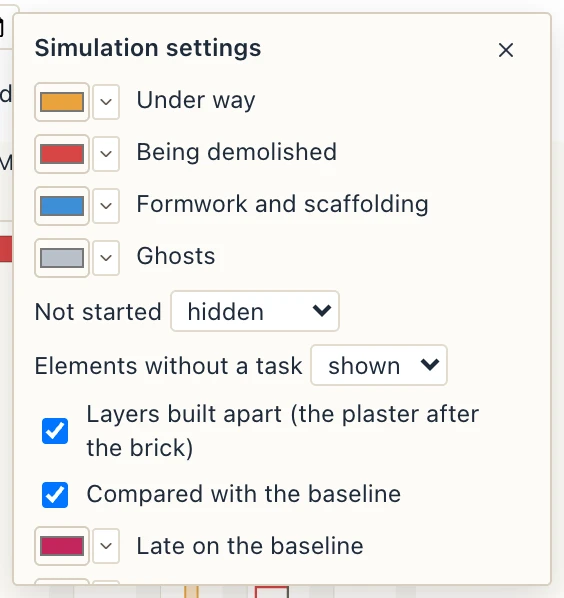
The gear opens the simulation's settings, kept in the project: the colours of what is under way, being demolished, of the formwork and scaffolding and of the ghosts; whether what is not started is hidden or shown as ghosts; whether the elements without a task are shown or hidden; and whether layers built apart show apart. Default colours brings Lapin's back.
State at date on views and sheets
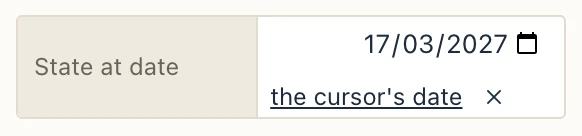
A plan, a section, an elevation or a saved 3D view has State at date in its properties: the view then draws the model as the schedule has it that day, in the same colours, and its sheets print it so (the PDF shows what the screen shows). With the simulation running, the cursor's date takes its day. A view at a date draws the schedule's states, not its phase's. The × beside the date brings the model back as it is. A 3D view with a date shows that day even with the simulation off.
The stages sheet
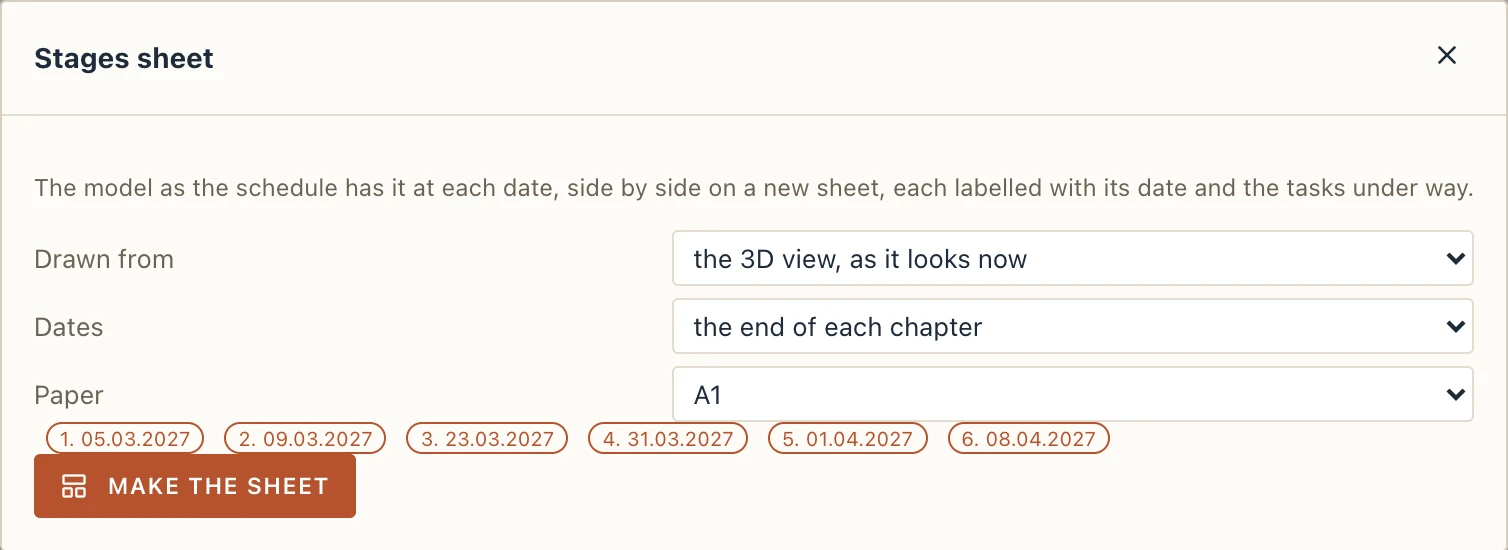
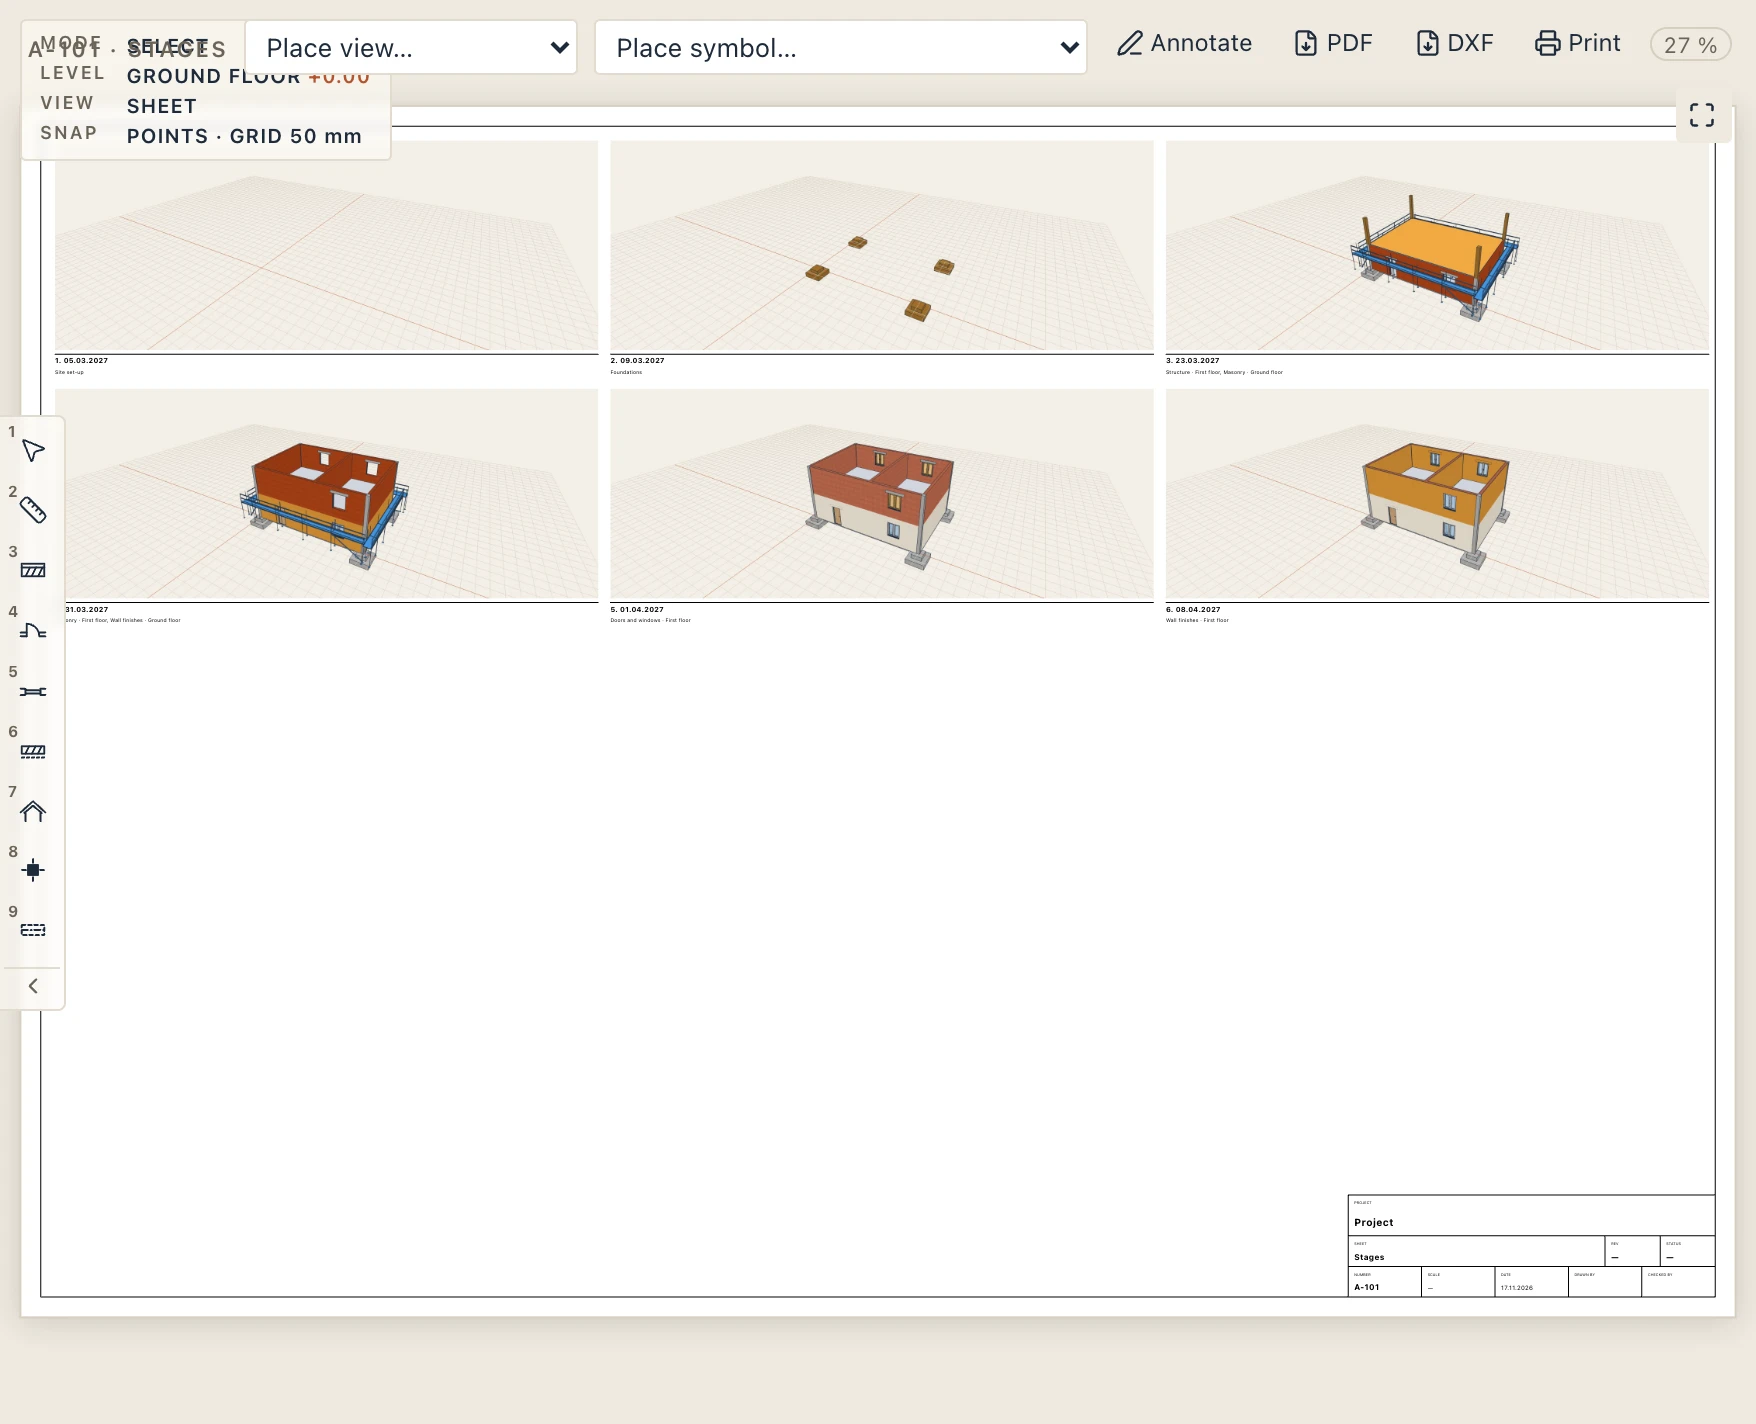
Construction → Stages sheet… (also in the player) puts the model at several dates side by side on a new sheet. It is drawn from the 3D view, as it looks now (a picture at each date) or from a plan, a section or an elevation, which the engine draws at each date. The dates are the end of each chapter (each task at the top of the WBS), the end of each month, or chosen ones. Each frame is labelled with its date and the tasks under way.
The Gantt on a sheet
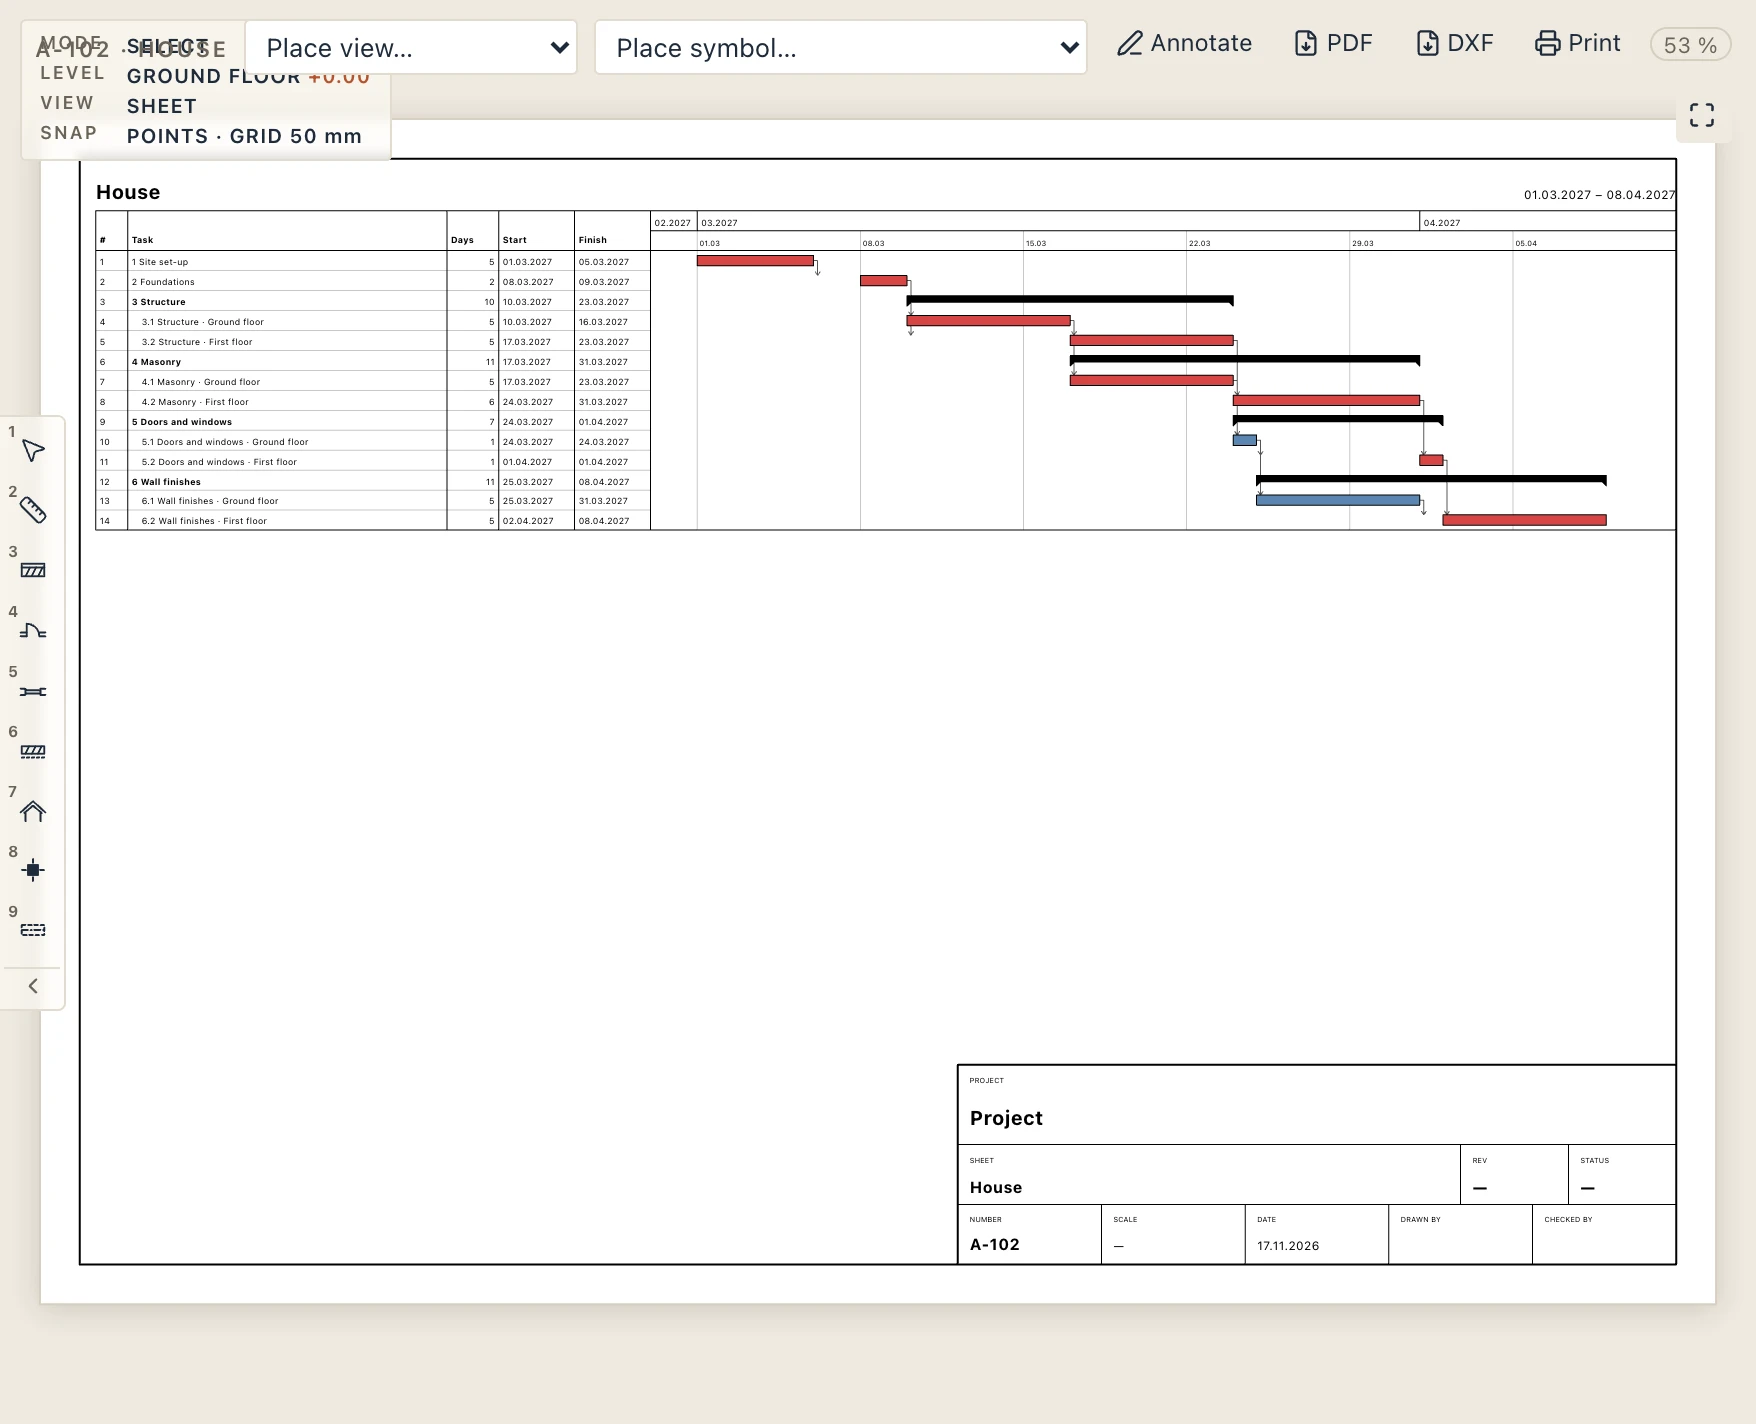
Construction → Gantt on sheet puts the schedule on a new sheet: the table (row, WBS and task, days, start, finish) and the bars on a time scale, the critical tasks in red, the summaries as brackets, the milestones as diamonds, the links. A schedule taller than the sheet goes on as many sheets as it needs, its header on each. It is drawn as vectors, like the views, and prints in the PDF.
Export video
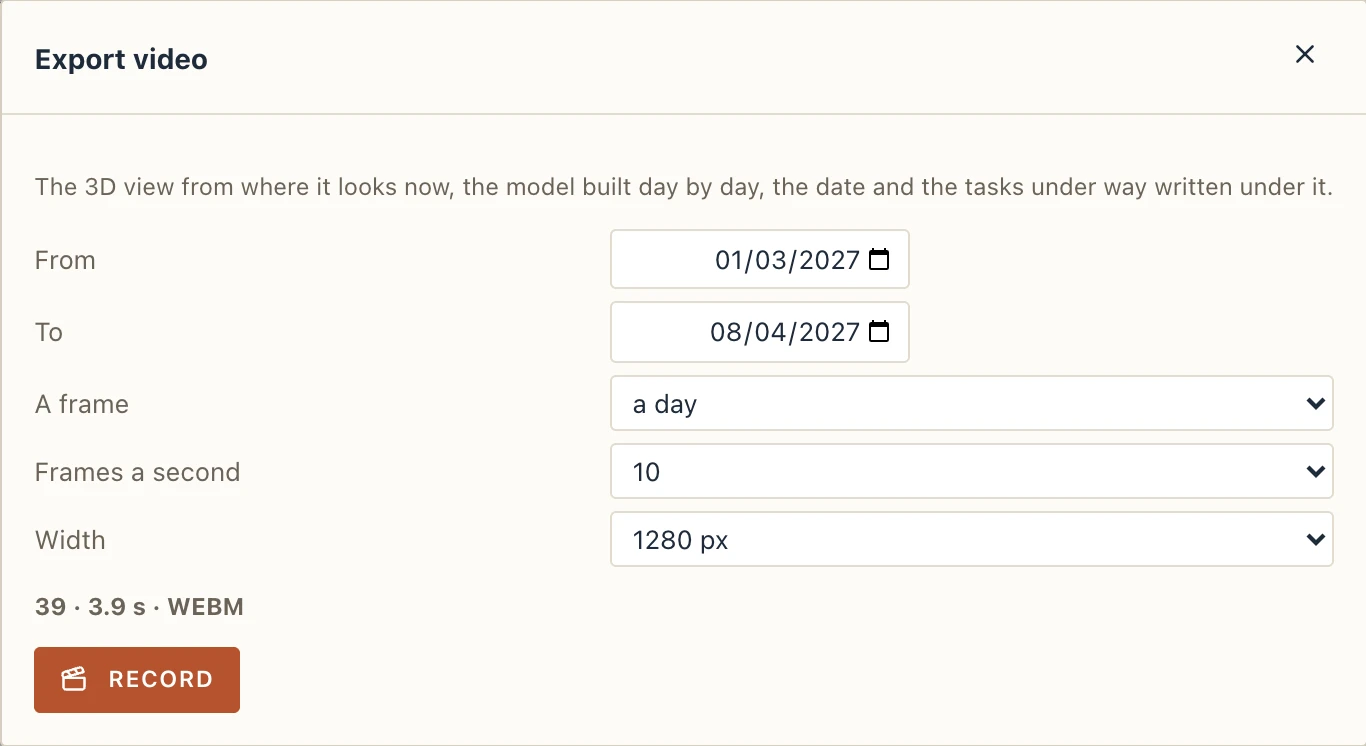
Construction → Export video… (also in the player) records the 3D view, from where it looks now, from one day to another, a day or a week a frame, with the date and the tasks under way written under it. The file is a WebM video, or MP4 where the system offers only that (the macOS app). A browser that records no video saves the frames as PNG files in a ZIP instead.
Progress
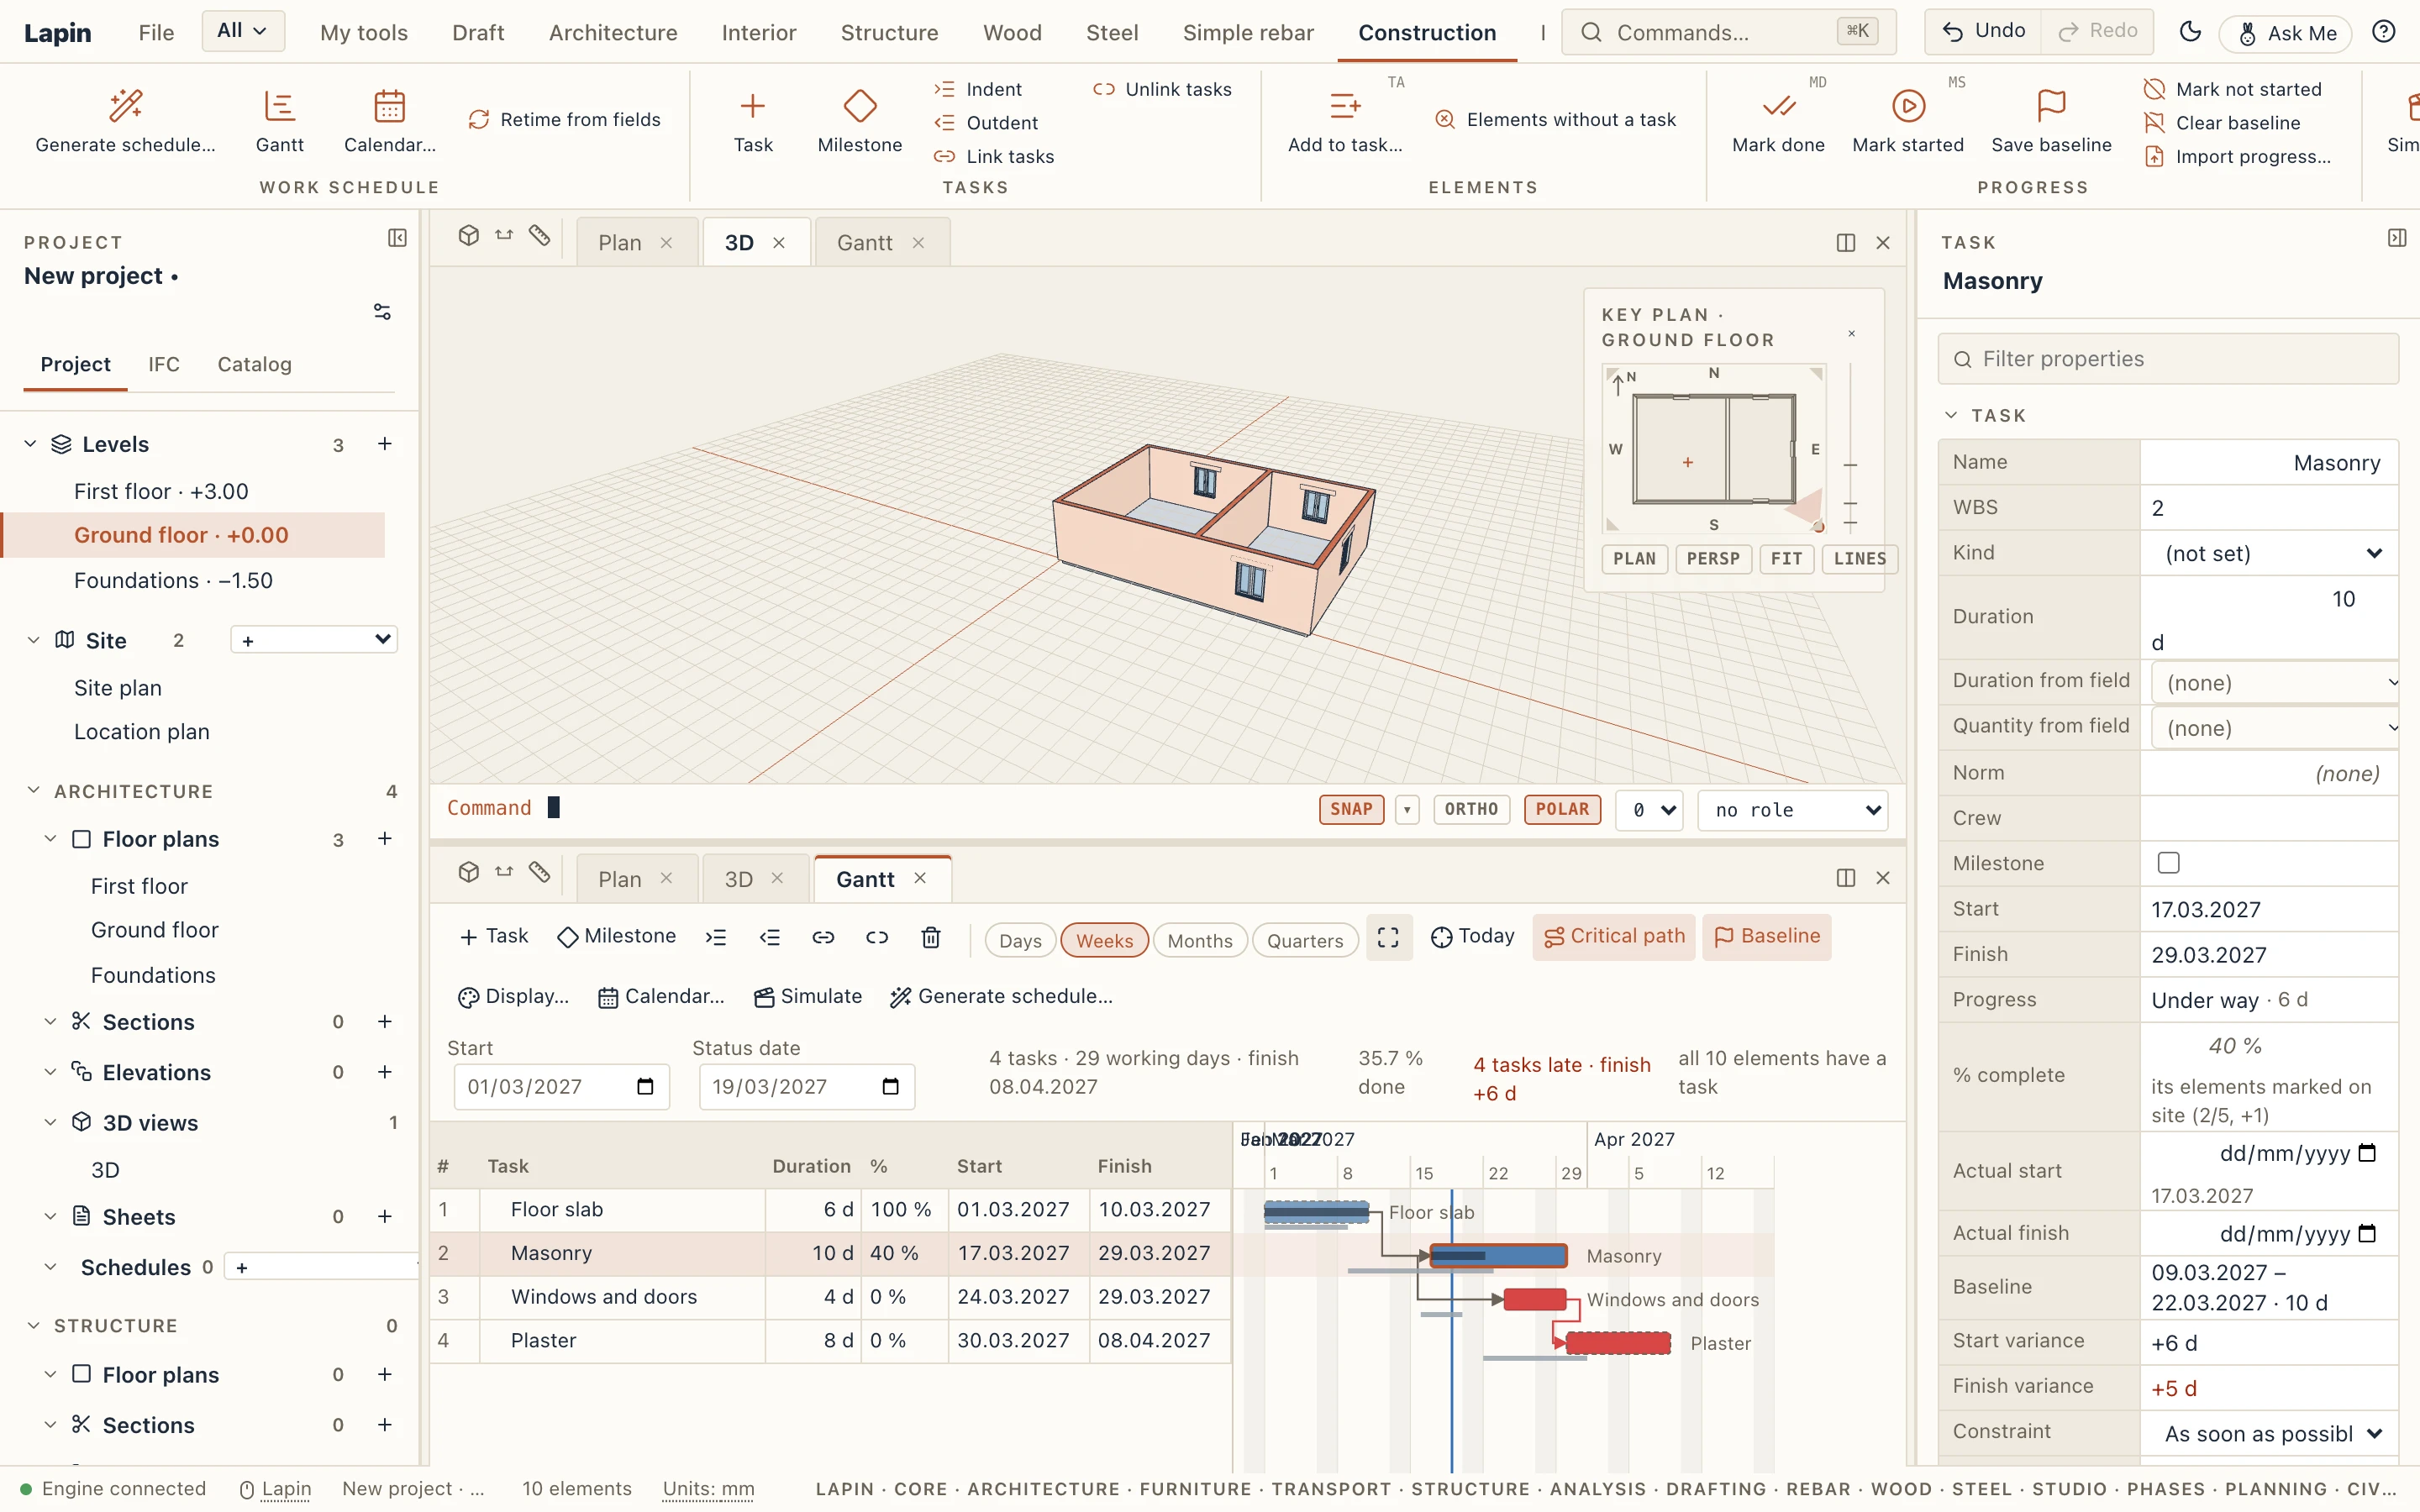
As the works go on, the schedule says how far they are and moves what is left:
- The status date, in the Gantt's toolbar, is the day the progress is reported through. The work left starts the working day after it: a task not started cannot start earlier, and one under way does what is left of it from then on. The chart draws it as a blue line.
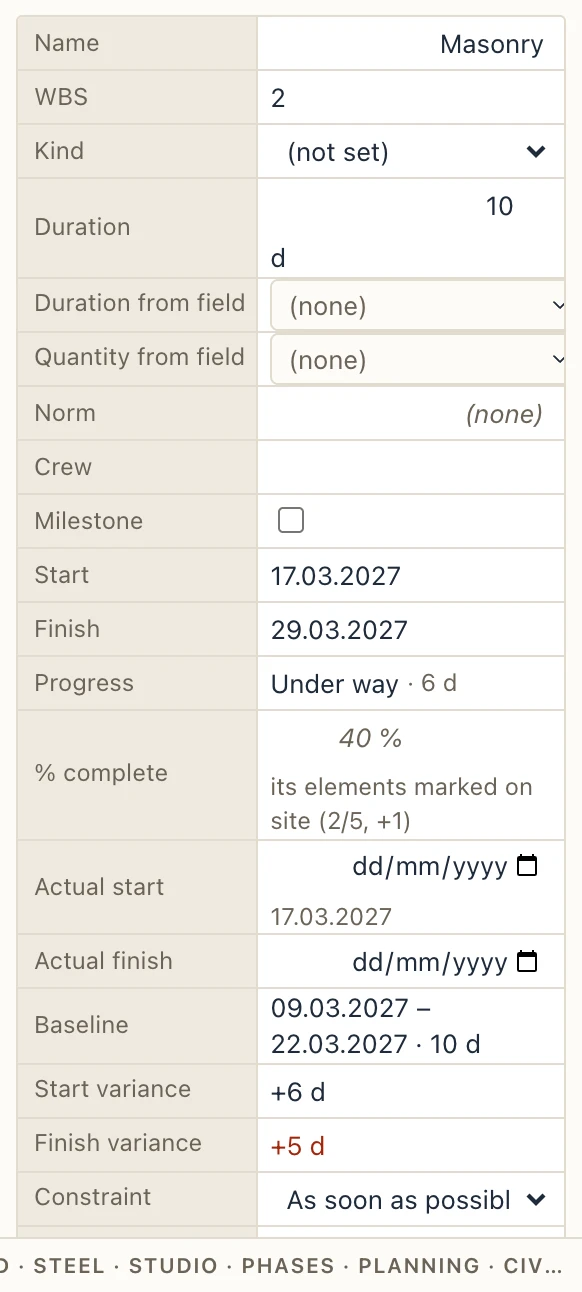
- A task's % complete is typed in its column or in Properties. Without one, it comes from its elements marked on site: the quantity done out of the task's quantity (in its unit, when the generator gave it one), else their count. A summary's comes from its tasks, weighted by their durations.
- A task's actual start and actual finish are typed in Properties. Left empty, they come from the marks: the first day an element was marked, and the last element's day once all are done. A finished task stands on its actual dates, off the critical path.
- A task under way keeps its actual start and does the part of its duration not done yet (rounded up) after the status date; the tasks after it move with it.
The bars show the part done darker. Properties says where a percentage came from and how many working days are left.
Marking elements on site
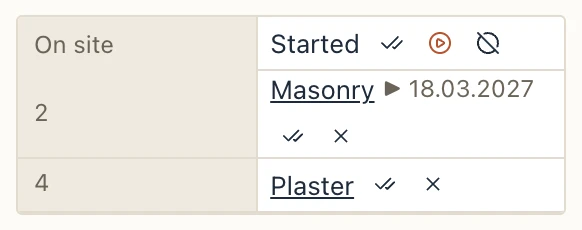
Construction → Mark done (MD) and Mark started (MS) mark the elements selected in 3D or in a plan, on the status date (today when there is none), in every task that takes them; Mark not started takes the marks off. A selected element's properties show its state on site with the same three buttons, and in each of its tasks the day it was done or started, with a button to mark it done in that task alone. A layered wall in a masonry task and a plaster task is marked in both, or in one from its row.
On site, from a phone: join the project's shared session from the browser (File → Share session… on the computer that has it open). A guest who joined only to look may still mark elements and set a task's progress: marking is the only edit open to every guest. Photos and reports on tasks are for the premium edition.
The baseline
Construction → Save baseline keeps every task's dates and duration as they are now; saved again, it is replaced (one baseline: several baselines and scenarios are for the premium edition). The Gantt then draws it as a thin grey bar under each task's bar (Baseline in the toolbar hides it), adds the Variance column (the working days the finish moved: positive is late, the row marked in red), and says in its toolbar how many tasks are late and how far the finish moved. Properties gives the baseline's dates and the start and finish variances. Clear baseline takes it off.
Late and ahead in the simulation
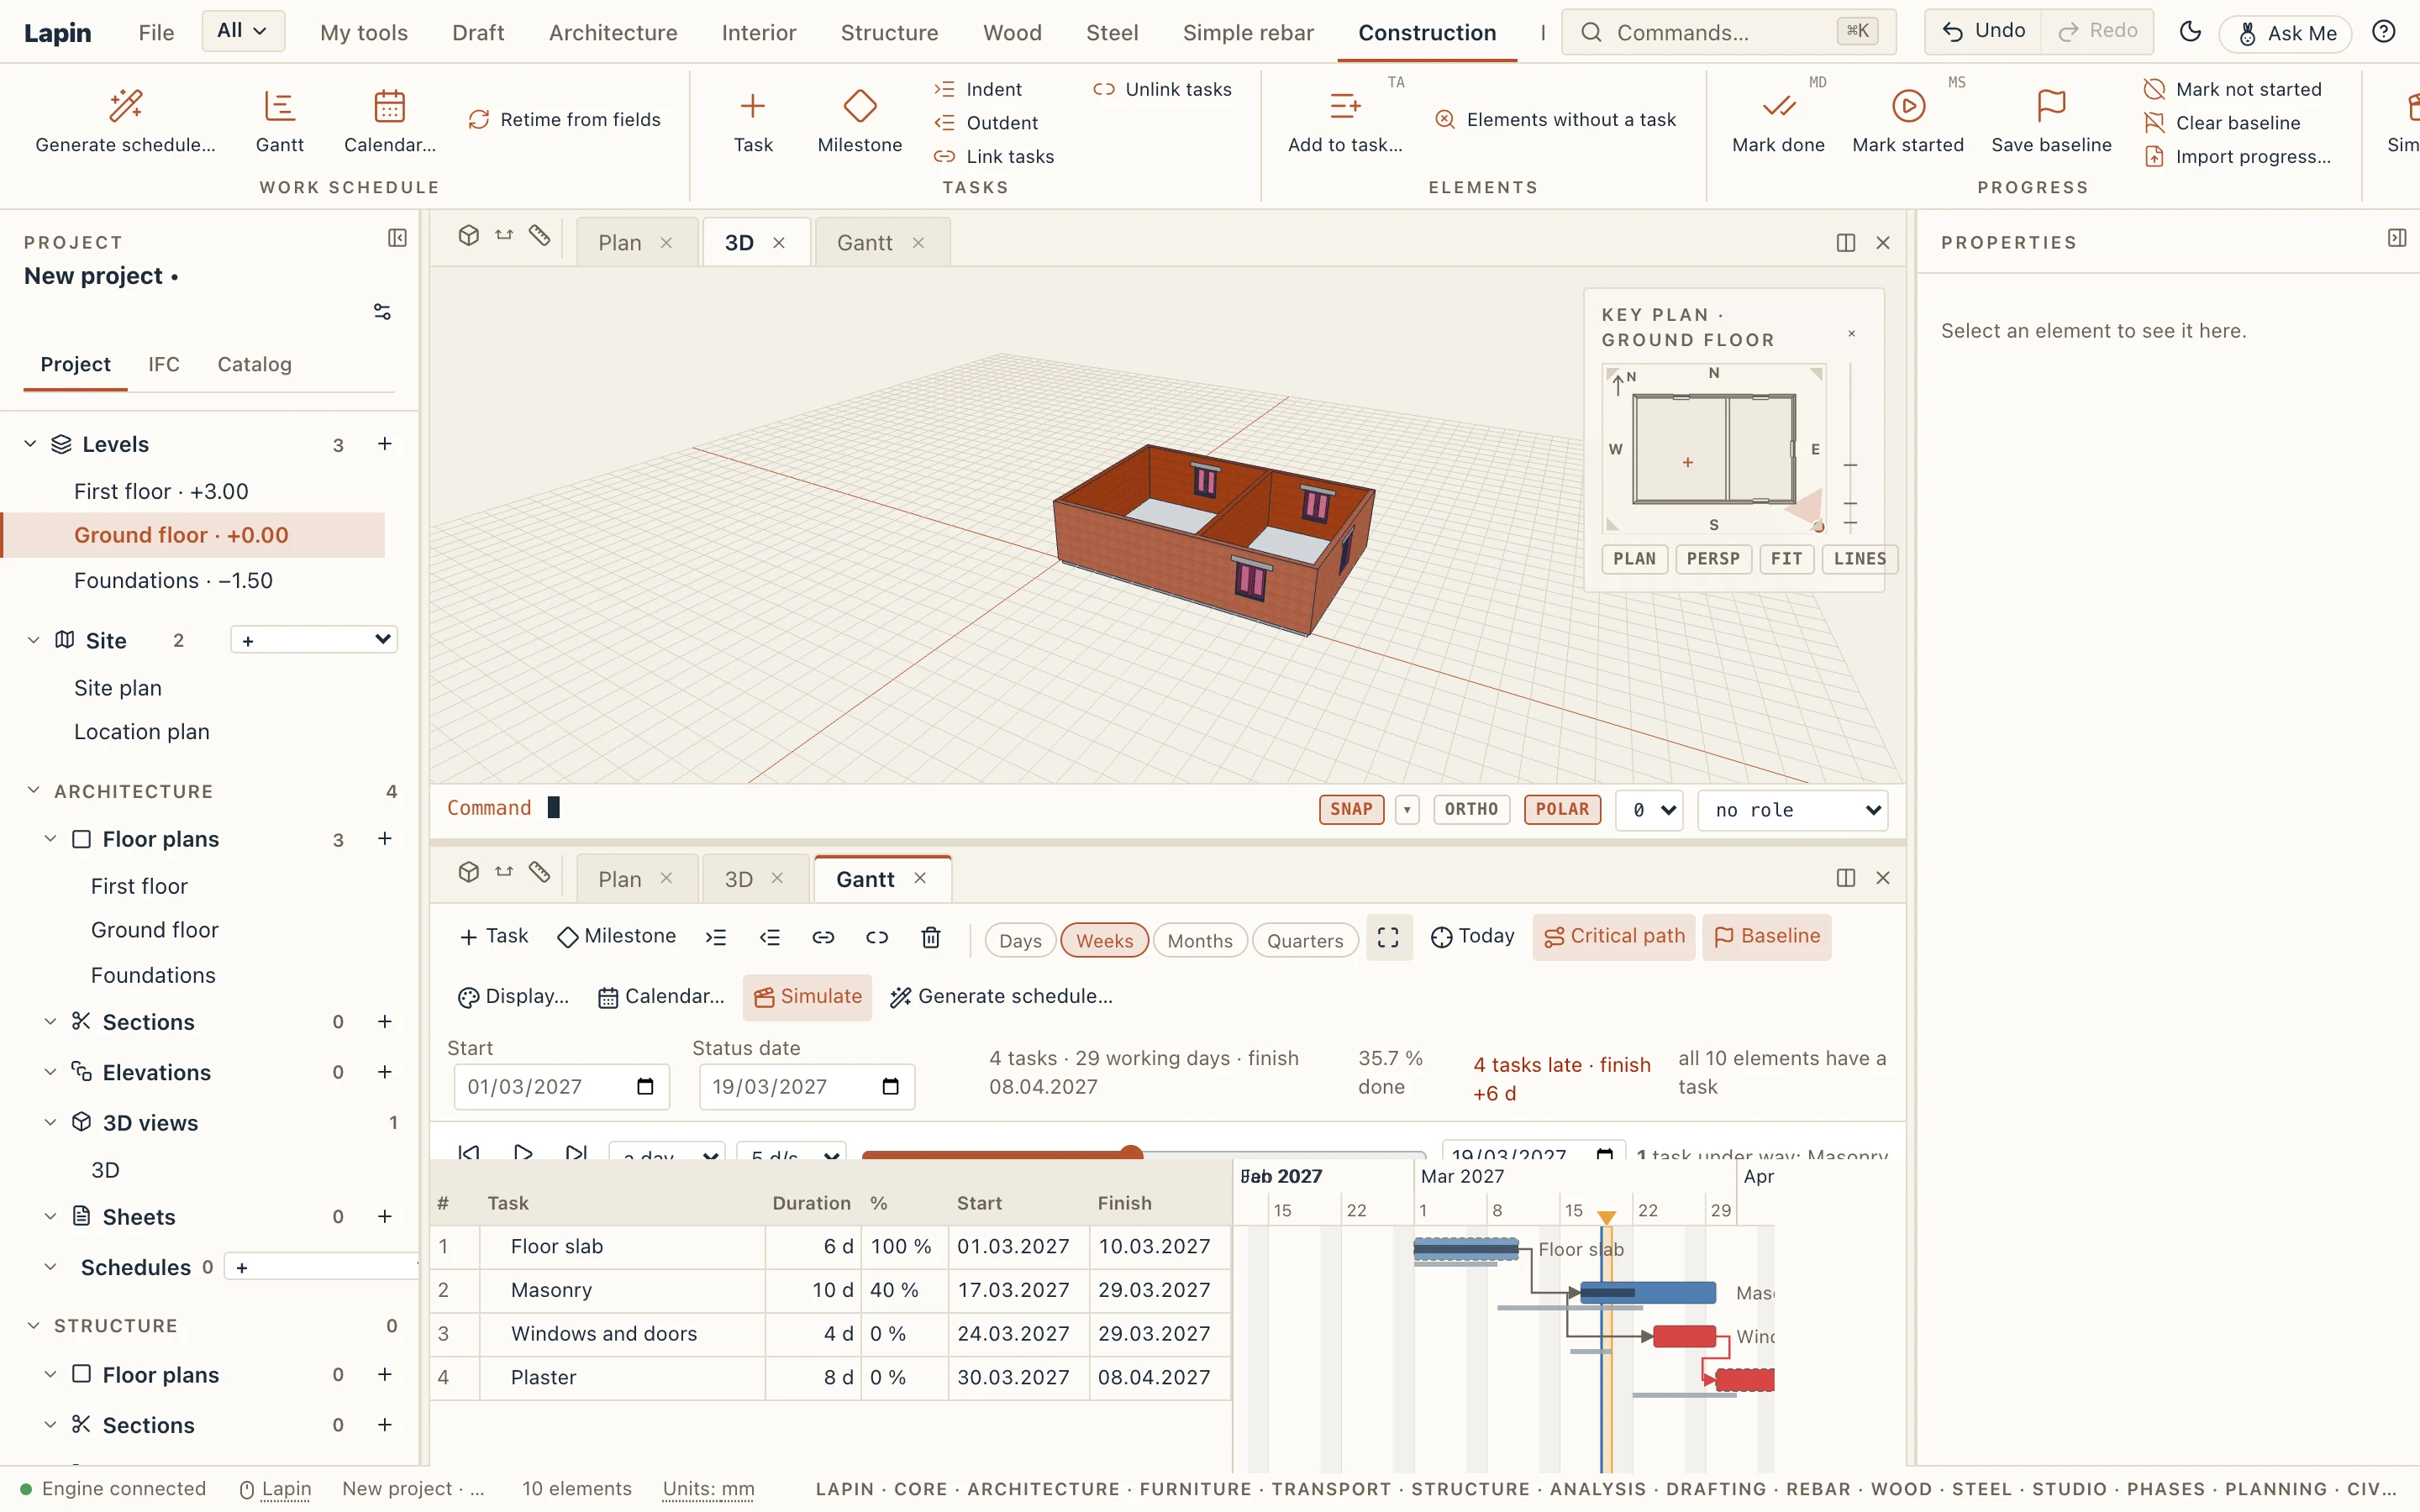
With a baseline, the simulation compares: an element not built (or not started) on a day the baseline had it so is late (crimson), and one under way or built before the baseline had it start is ahead (green). Up to the status date the elements stand on their actual days: one marked done is built on the day it was marked. Compared with the baseline, in the simulation's settings, switches it off; its two colours are set there too. Views and sheets at a date show the same.
Progress in the files
- Export XLSX adds the columns % complete, Actual start, Actual finish, Baseline start, Baseline finish, Finish variance and GlobalId. Fill them in on site and read them back with Construction → Import progress…: the rows are found by GlobalId, WBS or ID, and a Status date written above the table sets the status date. A CSV works too.
- MS Project XML carries the status date, each task's percentage, actual start and finish, the duration left and the baseline (Baseline 0); the elements' marks travel with the elements in Lapin elements.
- IFC writes them in each task's IfcTaskTime (the status time, the actual start and finish, the time left, the completion), and the baseline as a second IfcWorkSchedule of type BASELINE; Lapin's own fields (the percentage typed, the marks) go in
Lapin_Task. Both come back to the same dates. - Manage → Versions → Compare says, beside the elements, what changed in the schedule: the finish, the working days, the status date, and the tasks added, removed, moved (by how many working days), whose duration changed or whose progress changed.
The cost of the tasks
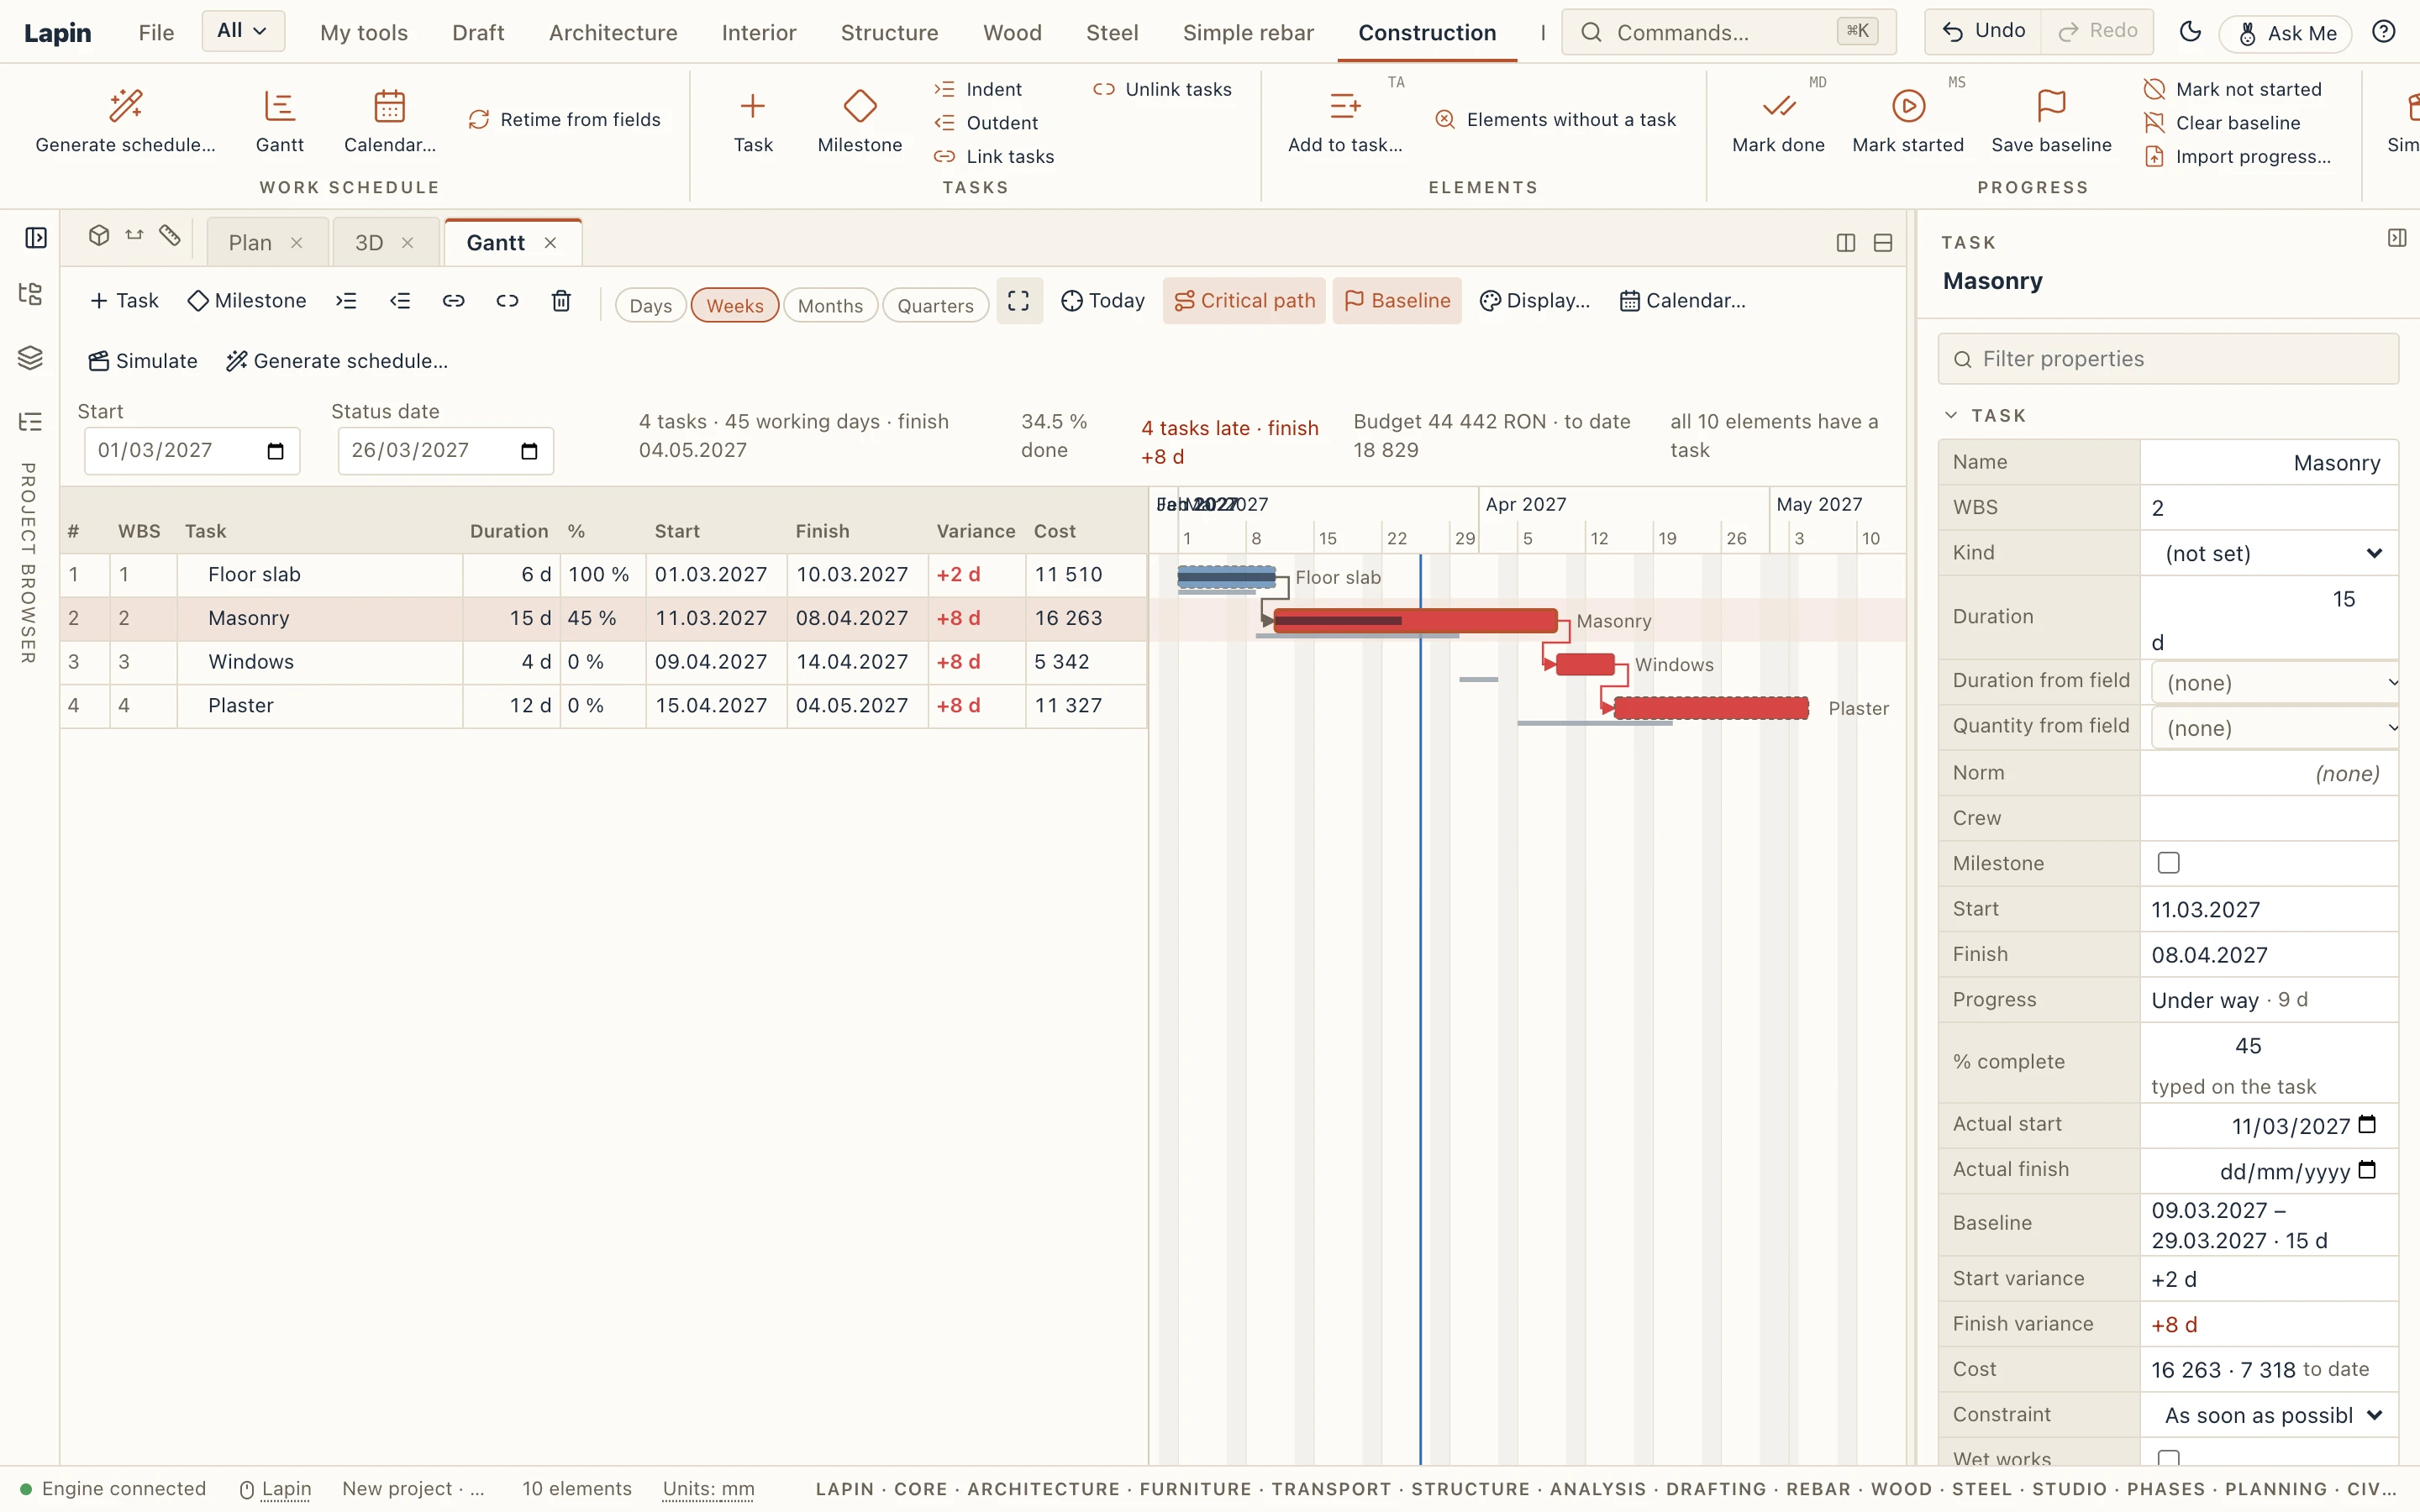
With an estimate (Construction → Estimate…), the Gantt gets a Cost column: each task's share of the estimate, from the lines that price its elements (a summary's is its tasks'). The toolbar shows the budget (the estimate's direct costs) and the cost to date (each task's cost times its % complete); Properties shows a task's cost and the part done. Construction → Cost over time draws the S-curve and the month table (see Cost estimate).
The calendar
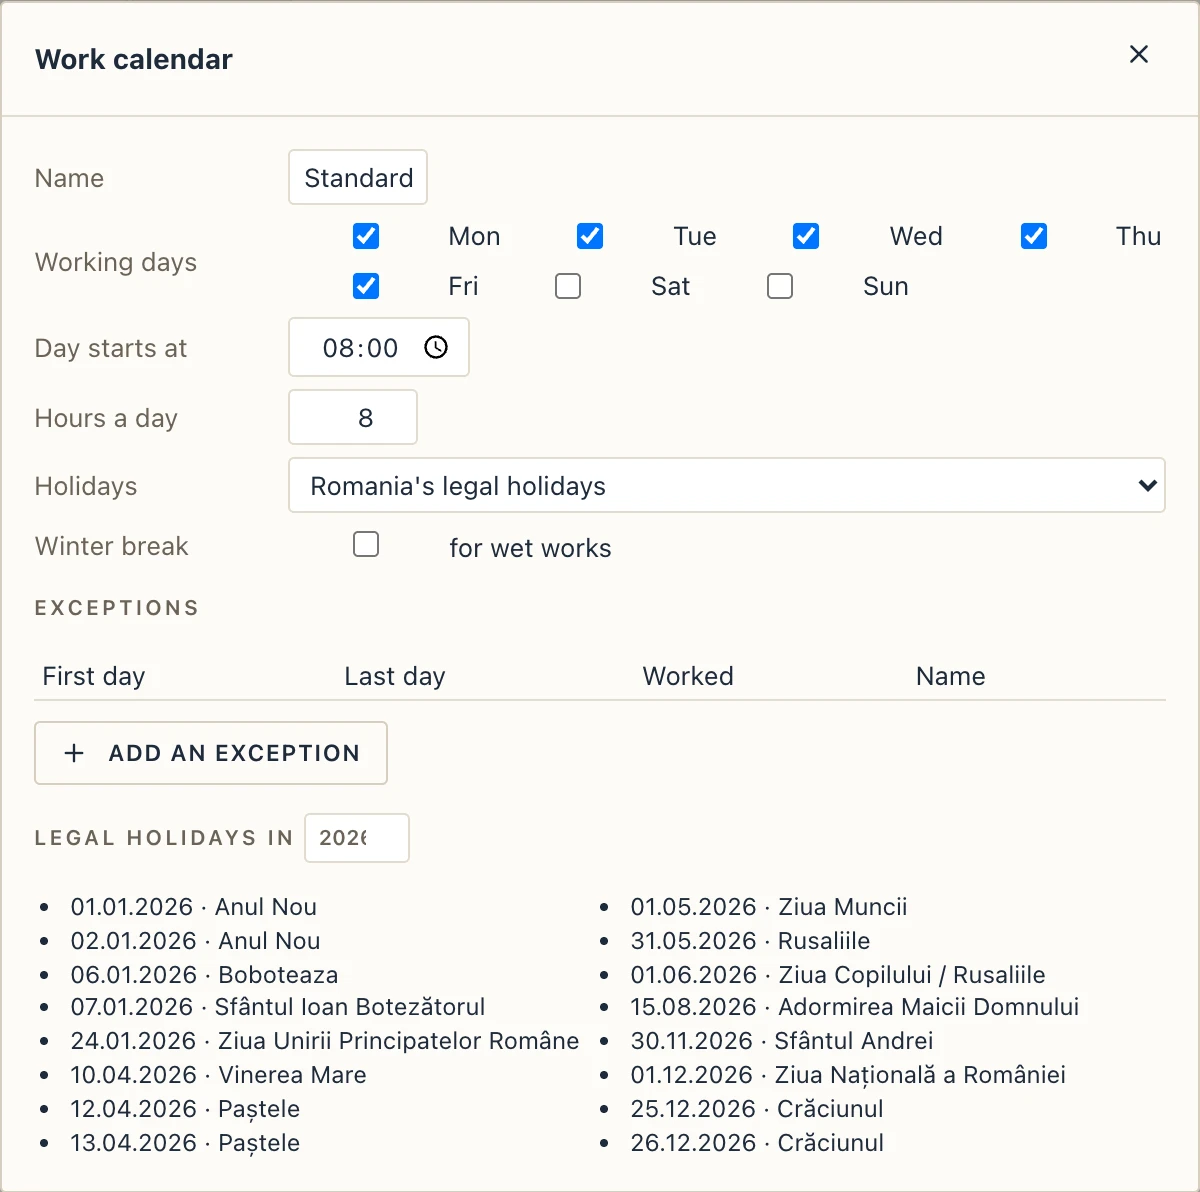
Construction → Calendar… sets:
- the working days of the week (Monday to Friday by default) and the hours of a day (8 from 08:00);
- the holidays: Romania's legal holidays, worked out for every year (Orthodox Good Friday, Easter and Pentecost included), or none. The list under them shows a year's holidays to check;
- the winter break for wet works, off by default: from 15 December to 1 March unless you set other days;
- exceptions: days off for the project (a site closed), or days worked that would not be (a Saturday).
Durations and lags count working days of this calendar.
Exchanging the schedule
- Export MS Project… writes an MS Project XML file. MS Project, ProjectLibre and GanttProject open it, and Primavera P6 imports it. It holds the tasks with their WBS, durations, dates, constraints and floats, the links with their types and lags, and the calendar with every holiday as an exception. Import MS Project… reads such a file in place of the project's schedule. A schedule written by Lapin and read again keeps its tasks' ids and dates.
- Export IFC… (also under File) writes the schedule into the IFC file with the model: an IfcWorkSchedule, its IfcTasks with their times, the IfcRelSequence links and the IfcWorkCalendar. Importing an IFC file that has a schedule brings it in too.
- Export XLSX writes a workbook: the Gantt's table and the calendar's days off.
Lapin's own fields that other programs have no place for (a task's constraint, whether it is wet, the winter break) travel in IFC as the property sets Lapin_Task and Lapin_Calendar. MS Project has no wet tasks, so the winter break stays in Lapin.
What comes next
The cost over time is in Cost estimate. Resource levelling, earned value, monthly progress billing and several baselines and scenarios are for the premium edition.