User guide
Schedules and charts
List doors, windows, lintels, rooms and anything a module counts; add rows and columns of your own, type over the model's values, and chart the table.
Getting quantities
Everything Lapin models is measured from its geometry: a wall's length, height, gross and net side area and volume, each layer's area and volume, a floor's areas and volume, a room's area and perimeter, a door's count. There are three ways to get the numbers:
- One element. Select it: the Quantities section of the Properties panel lists what it measures, then each of its layers or parts.
- The whole model. Construction → Quantity takeoff makes (or opens) the takeoff: every element the model measures, added up row by row, with the count, length, gross and net area, gross and net volume and weight. Its toolbar chooses what is added up together: By kind and type (the default: the walls of each wall type, the floors of each floor type…), By material (each layer under its own material: the brick, the plaster and the insulation of the walls apart, the lintels' concrete), by storey, or a mix of them. All elements chooses which kinds it lists (only walls and floors, say). The takeoff follows the model like any schedule, and takes rows and columns of your own (a provision, a unit price).
- Any other list. Construction → Schedules… makes any schedule this edition offers: rooms, room finishes, joinery, type assemblies, timber, rebar, formwork, steel… The same list is under + beside Schedules in the project browser.
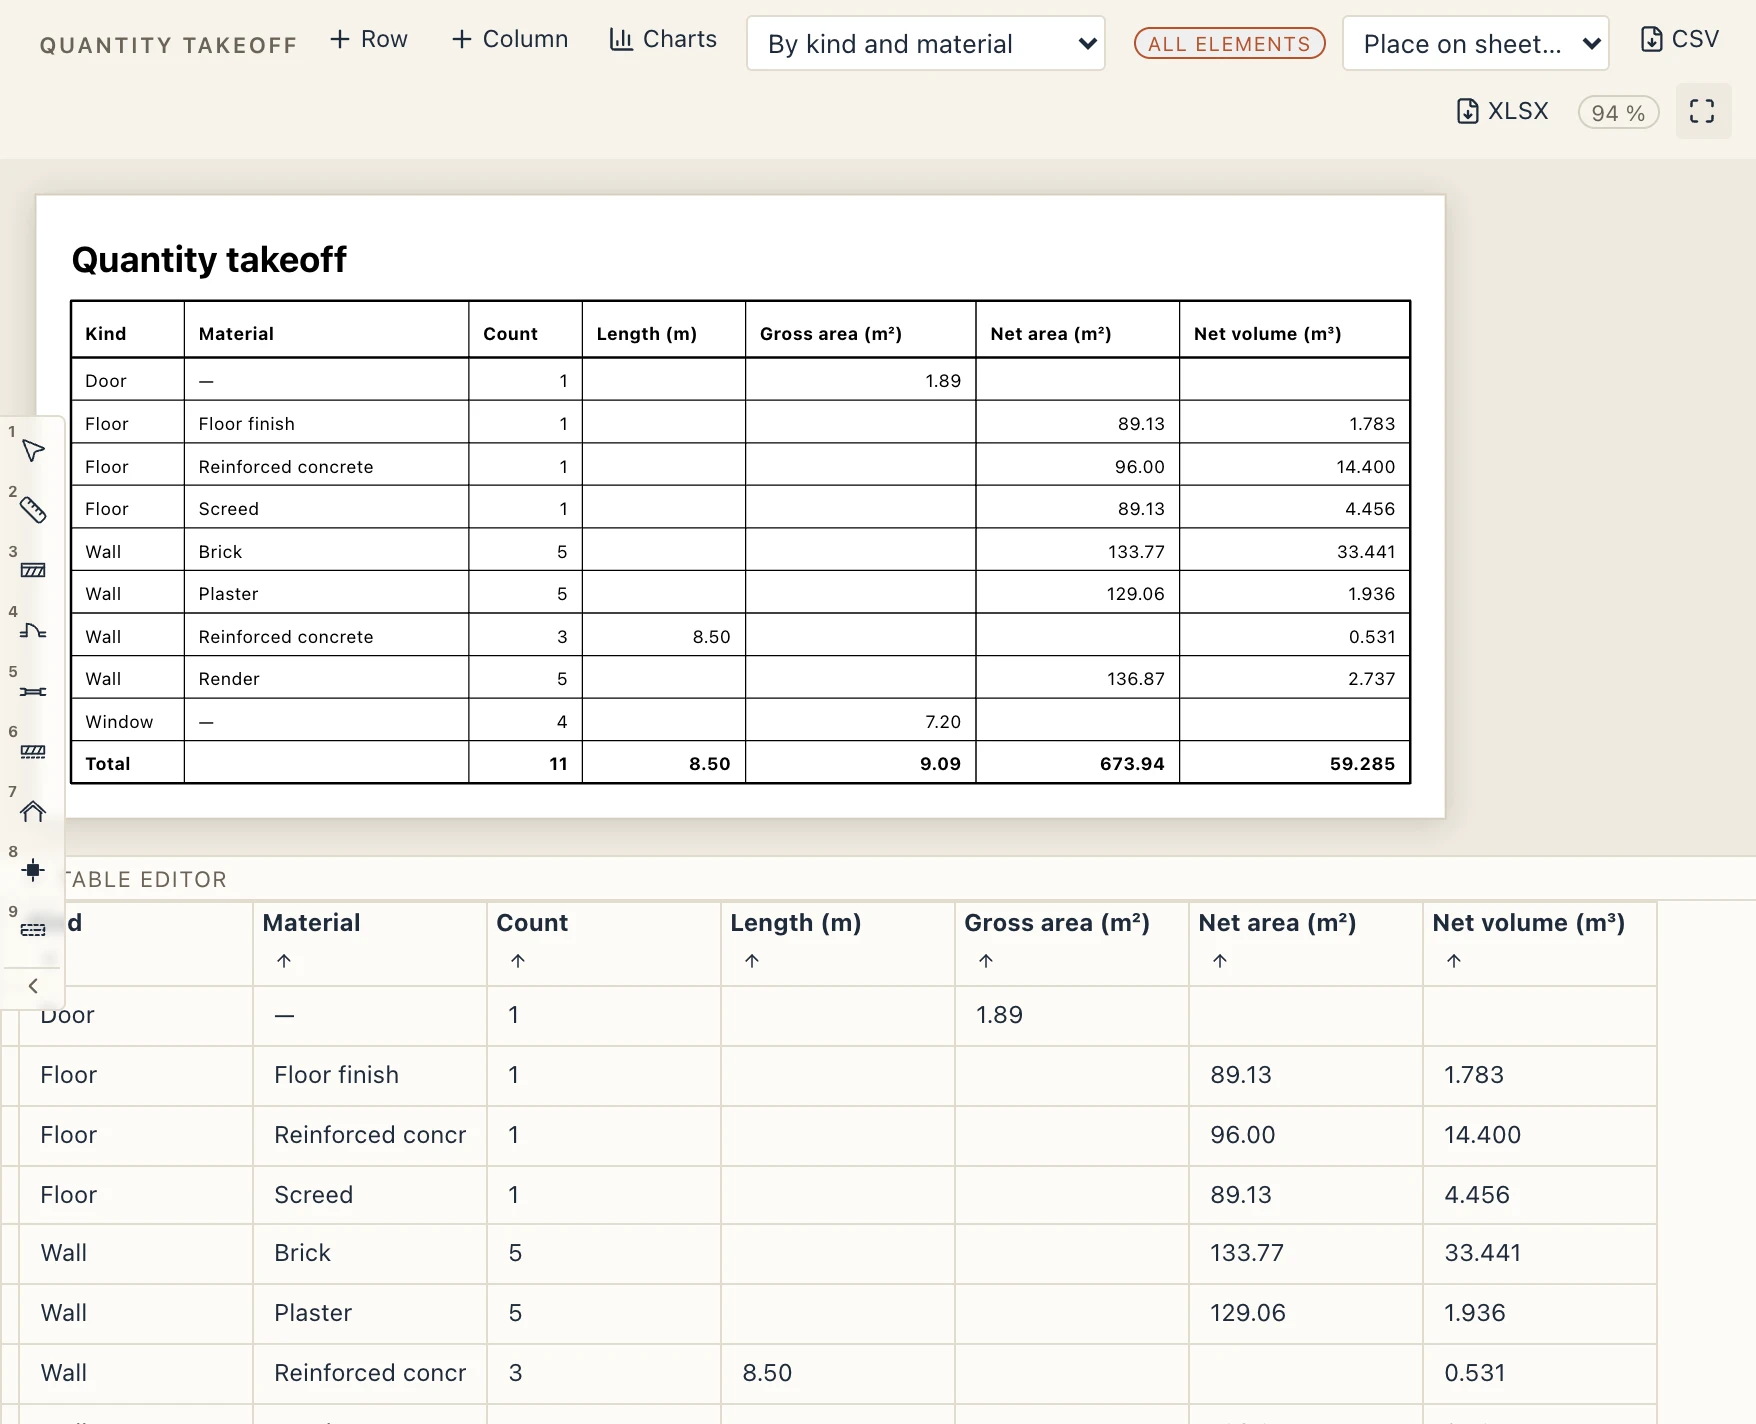
By material, a material measured by area (see Materials) gets a row for each thickness it is laid in, with a Thickness (mm) column: Mineral wool 150 mm: 84.20 m², Mineral wool 200 mm: 31.00 m². One measured by volume gets its m³ only, by mass its kg, by count its Pieces. A Note column says when a layer is not one of the material's catalogue thicknesses. The estimate does the same: an article on a material is measured as the material says, a line per thickness. A material without a rule is measured as before.
Construction → Export XLSX saves the takeoff as a workbook straight away (downloaded in a browser).
Quantities of imported elements
An element imported as a reference (from IFC, Fragments or BIM Open Schema) keeps the body its file gave it, not Lapin's axis and layers, so it is not measured as a native wall or floor is. It takes its file's own quantities instead: the quantity sets the file gave it (Qto_WallBaseQuantities, Qto_DoorBaseQuantities…), converted from the file's units to metres, square metres and cubic metres. What the file does not give is measured on its body: its volume when the body is closed, and the count. Nothing else is made up: a reference whose file has no lengths or areas has none in the takeoff. Its type is the one its file gives it, so the takeoff lists it under that type's name and an estimate article set on that type prices it (see Cost estimate). A project imported before this came in without its file's quantities: import the file again to get them.
Quantities on a sheet
A schedule goes on a sheet like a view, and is drawn there with all its rows and values, its totals and its charts:
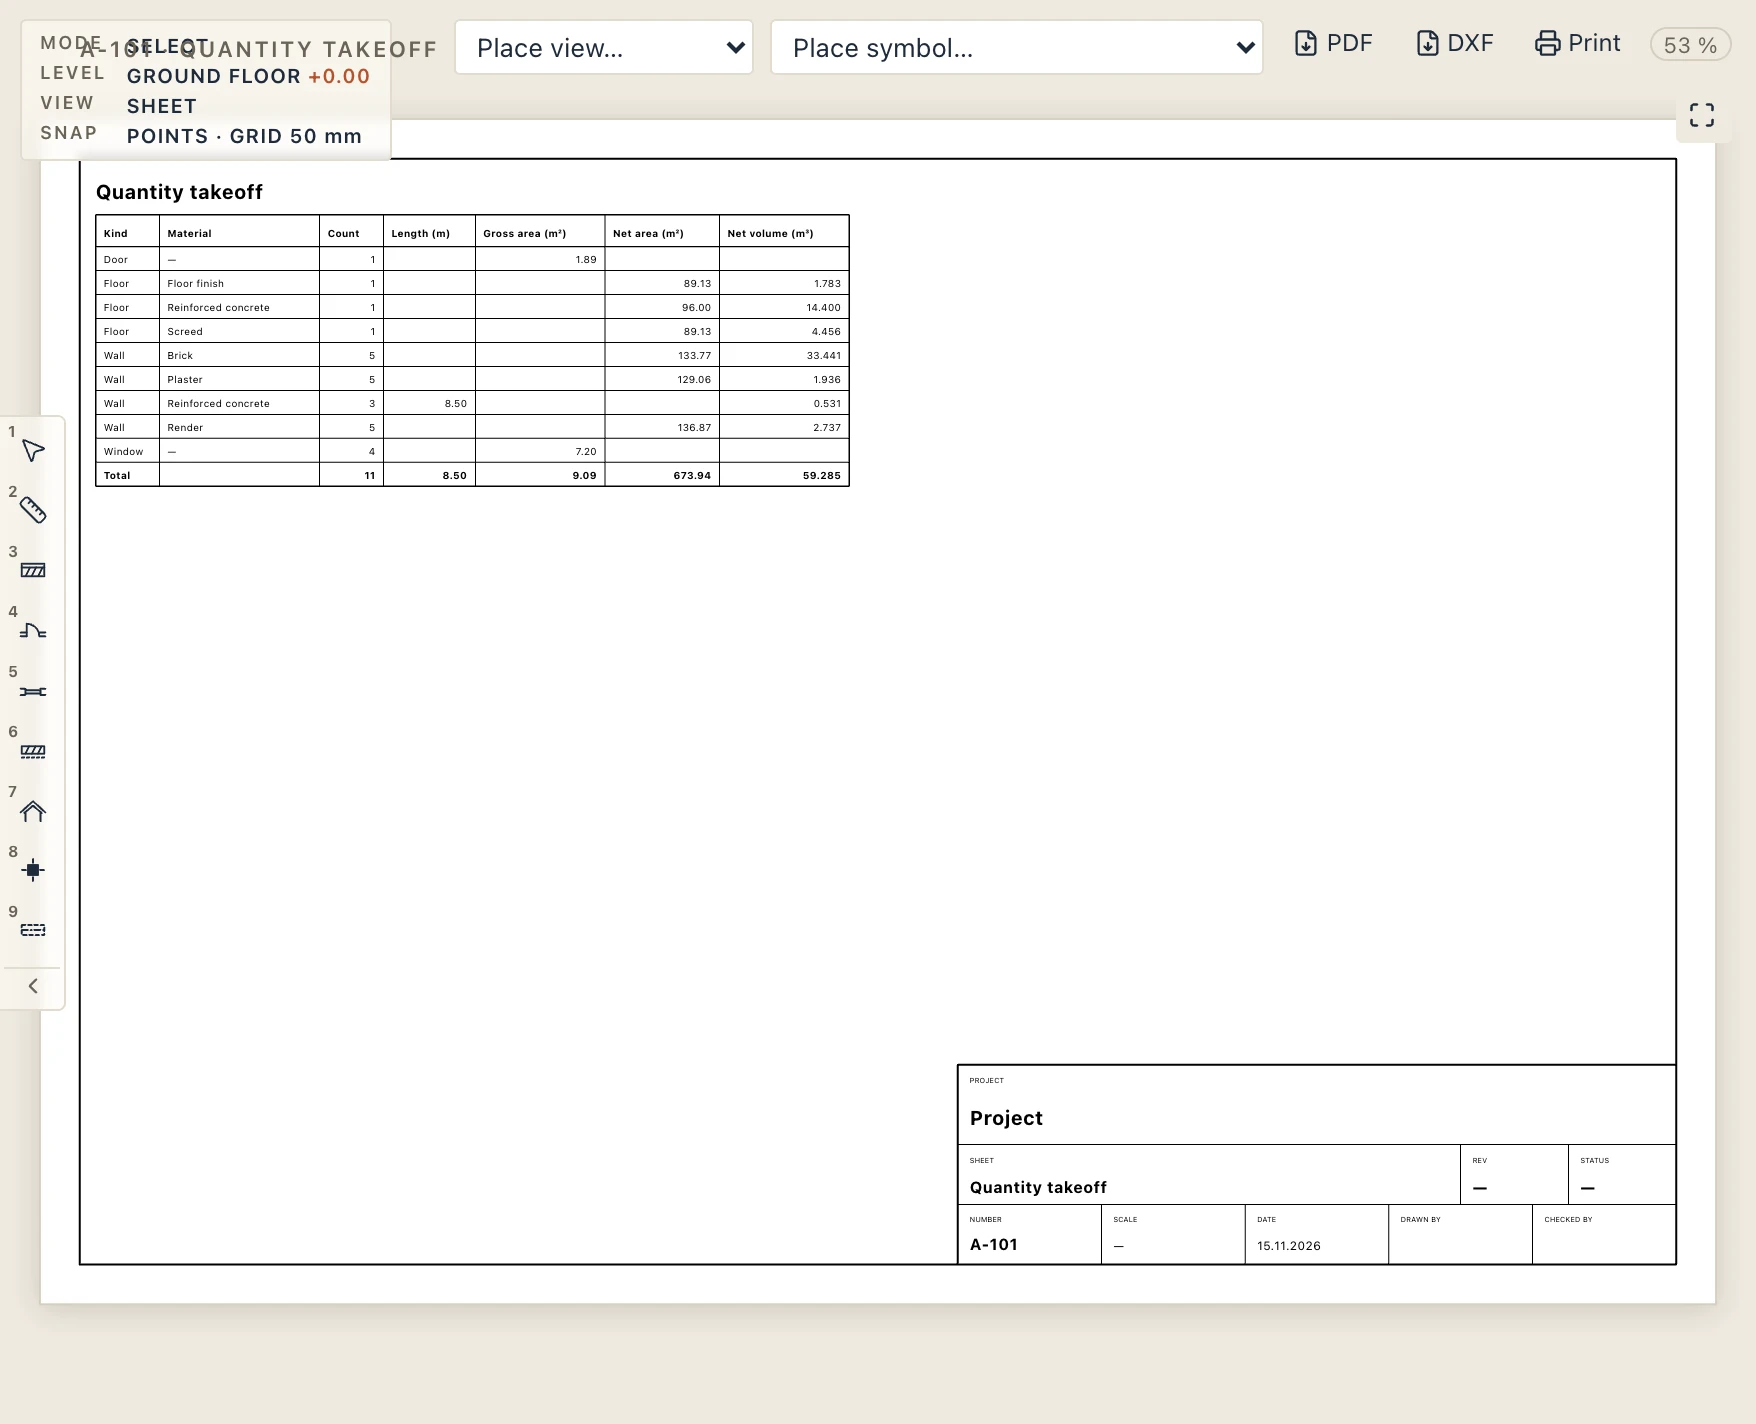
- Place on sheet… in the schedule's toolbar: New sheet makes an A3 sheet with the table on it and opens it, or pick a sheet you have.
- Or drag the schedule from the project browser onto an open sheet: it lands where you drop it. Plans, sections and elevations are dragged the same way.
- Or Place view… in the sheet's own toolbar.
On the sheet, drag the table to move it; a table longer than the frame goes on over more pages (the sheet says so, and place it on a new sheet continues it). The table follows the model: add a wall and the sheet's numbers change. It prints with Print and goes into the sheet's PDF and DXF exactly as it is drawn.
Making a schedule
A schedule is a table the model fills: doors and windows, lintels, rooms, rebar, timber, formwork and more. Click + beside Schedules in the project browser and pick what it lists, or use a module's tool (Wood → Timber schedule, Site → Formwork schedule…). Double-click it in the browser to open it in a tab. A schedule follows the model: move a wall, add a window, and the table changes with it.
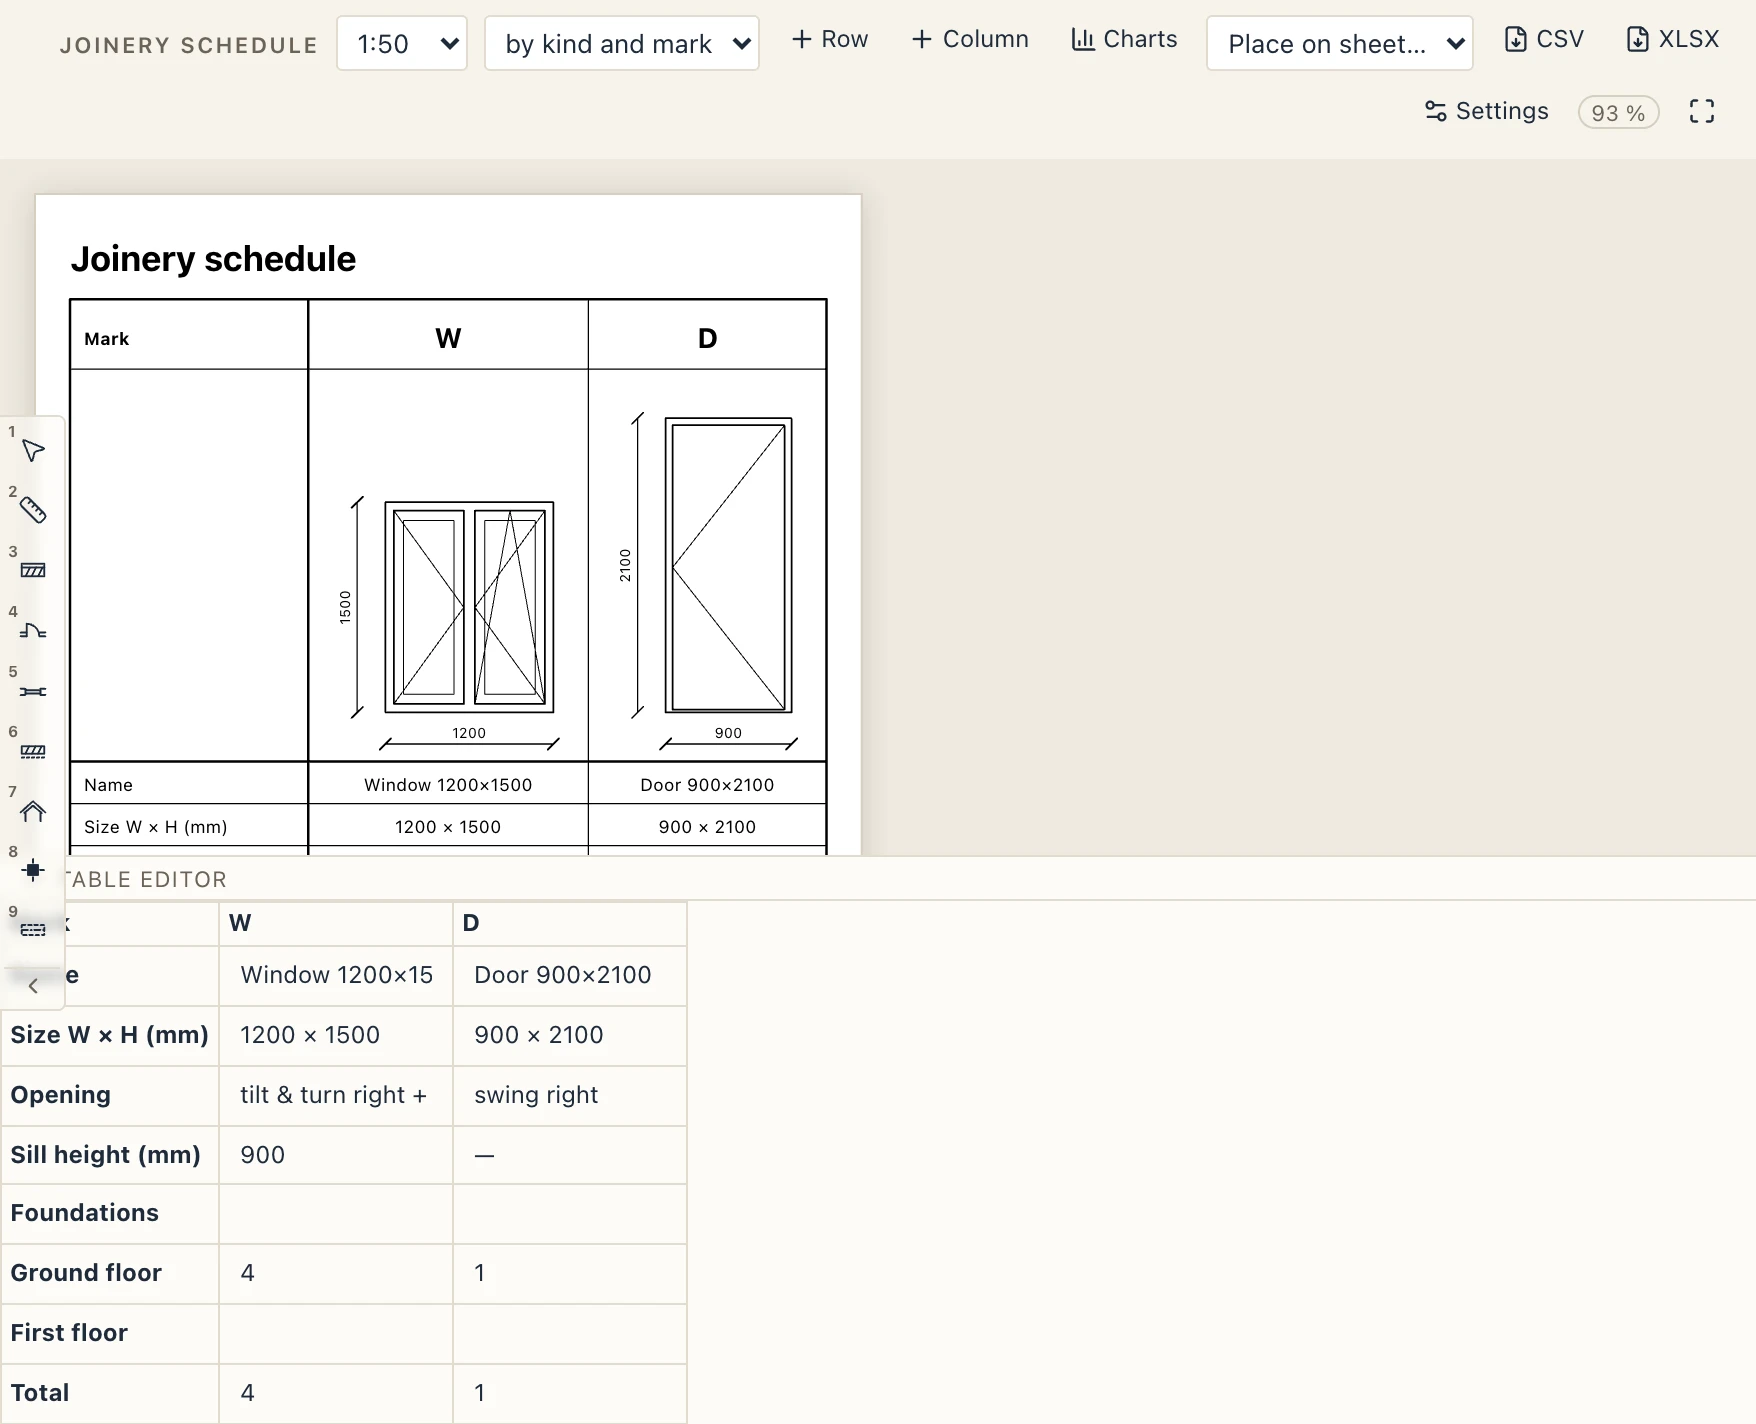
Joinery, door, window and lintel schedules show a card for each type, with its drawing (the interior view by default) and its values row by row. Other schedules are a plain table, one row per item and a totals line at the end.
A door or window flipped to the other hand of its type (Hand, or one flip arrow; flipped both ways it is only turned round) is the mirror image of its type, and gets a card of its own: its mark ends in -M (D-M), its name in "(mirrored)", and its Opening row, drawing and counts are those of the other hand. Flip it back and it returns to its type's card. A door's Opening row names its swing as the plan shows it: looking from the handle towards the hinges, a leaf that opens to the left is swing left, one that opens to the right swing right; a pair of leaves is double swing. A window's left and right are seen from inside, the side its sashes open to: Side hung right (hinges at left) in the configurator, whose grid is seen from outside. IFC writes the same window as left-handed. The drawings show each door as it stands in the model, seen from the interior, the side it opens to. A note under the cards says this.
Fire ratings, manufacturers and other parameters
A door's or a window's parameters go into the joinery schedule by themselves:
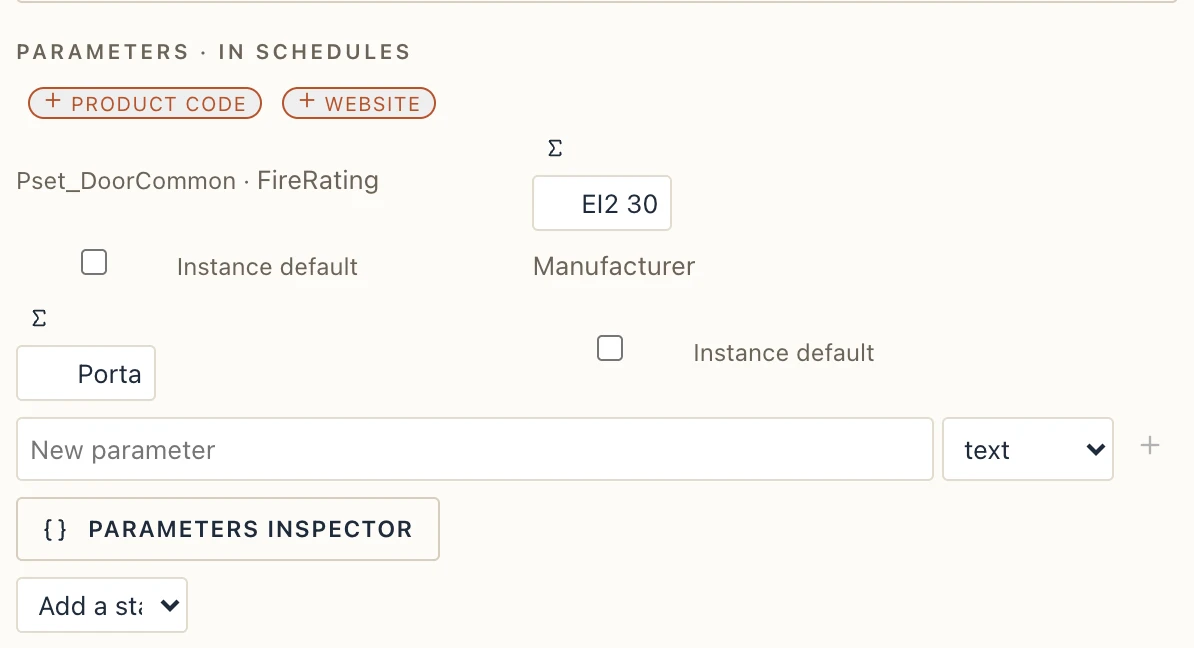
- Fire rating. The Fire rating row reads a parameter named Fire rating, Fire Rated, FireRating or Fire resistance. Put it on the type, so every door of the type has it. In Architecture → Doors & windows, Parameters · in schedules → + Fire rating adds the type's FireRating to Pset_DoorCommon (Pset_WindowCommon for a window), which is where IFC keeps it. A parameter you add yourself to one door, in its properties, shows too.
- Any other parameter. + Manufacturer, + Product code, + Website, or a parameter of your own, becomes a row of its own in every joinery schedule. A door's own value shows next to its type's, when the doors of a type differ.
- Typed in the schedule. A value typed in a parameter's row (in italics) goes into the type, and every door of the type follows. Empty it to take the parameter off the type.
Unused types. A type no door or window in the model uses is left out of the schedule. Unused types in the schedule's toolbar shows them again, with how many there are.
Rows and columns of your own
Every schedule can be filled by hand, as a spreadsheet would be:
- Row adds a row of your own. In a joinery schedule it has a label, and you type its value for each type (Supplier, Delivery date…). In any other schedule it is a whole row, typed cell by cell (a terrace not modelled, a provision); it sits above the totals line.
- Column adds a column of your own. In a joinery schedule it is a card with no type behind it, every value typed (a garage door ordered apart). In any other schedule it is a column after the model's (Floor finish, Notes…).
- Any cell of the table under the drawing can be typed over. A value typed over the model's is marked; ↺ gives the model's value back. What you type stays with its row: a room's notes follow the room when the list is sorted or the room is renamed. In a Rooms schedule, a number, name, function, department, floor finish or height typed in a room's row goes into the room itself, as if typed in its properties; the plan's stamp and every other schedule follow.
- × beside a row or a column of your own removes it, with what was typed in it.
- The arrows in a table's header sort its rows by that column: once for rising, again for falling, a third time for the model's order. The totals line stays last.
All of it prints: on a sheet, in the PDF and DXF, and in the CSV and XLSX exports.
Charts
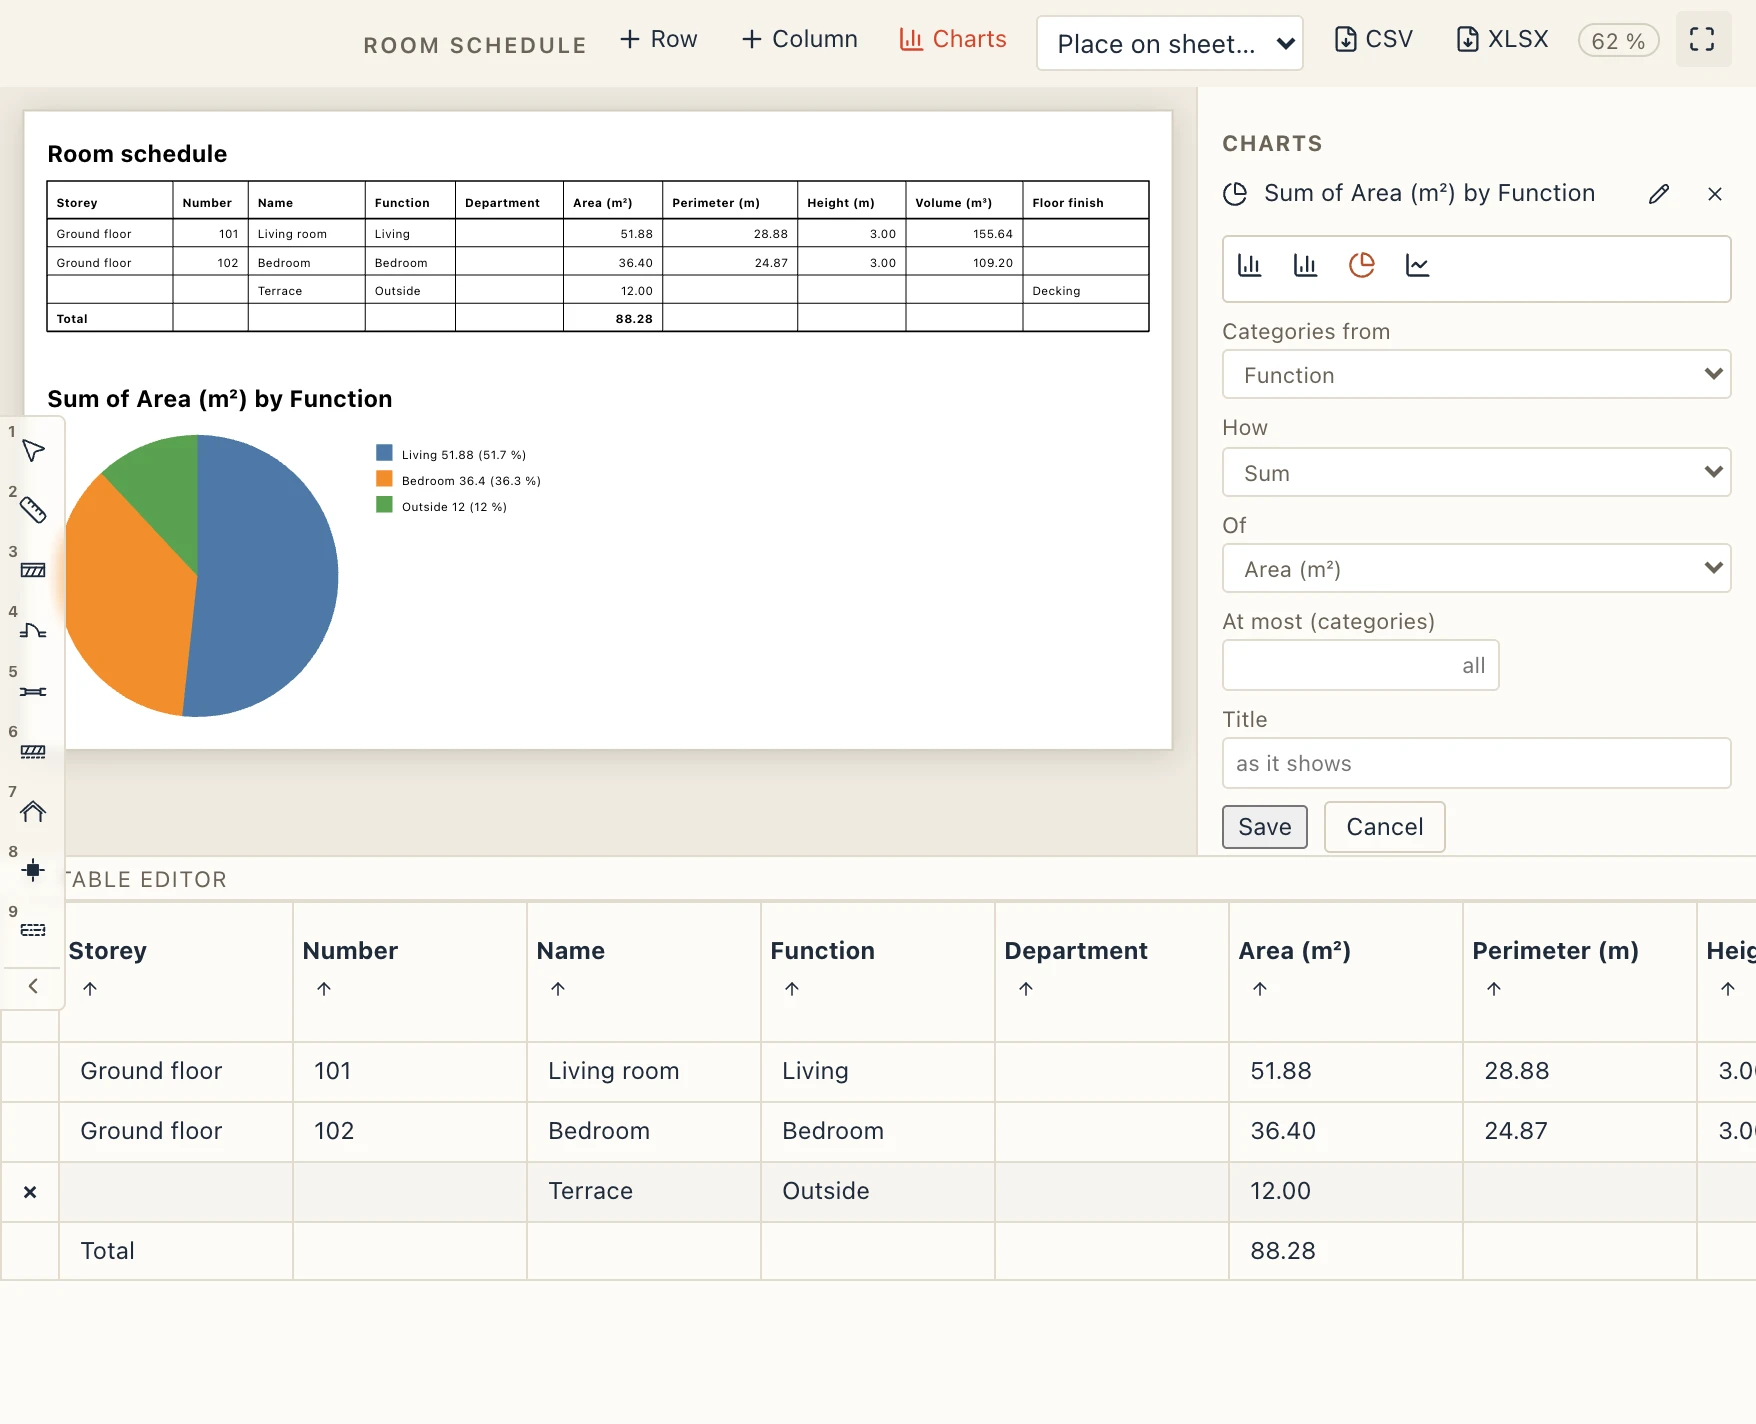
Charts in the schedule's toolbar opens the charts beside the table. New chart makes one from the table:
- Columns, Bars, Pie or Line.
- Categories from: the column that names each bar or slice (Function, Name, Mark, Storey…).
- How: Sum, Average, Least or Most of a column (Area, Total, Volume…), or Count of rows.
- At most: keeps only the largest categories, and adds up the rest as Other.
- Title: its own title, or the one it makes (Sum of Area by Function).
The engine draws each chart after the tables, so it shows in the schedule, on a sheet that places the schedule, and in the PDF, exactly the same. It follows the model, and what you typed: change a room's area or add a row of your own, and the chart changes with it. ✎ changes a chart, × removes it.
Type assemblies
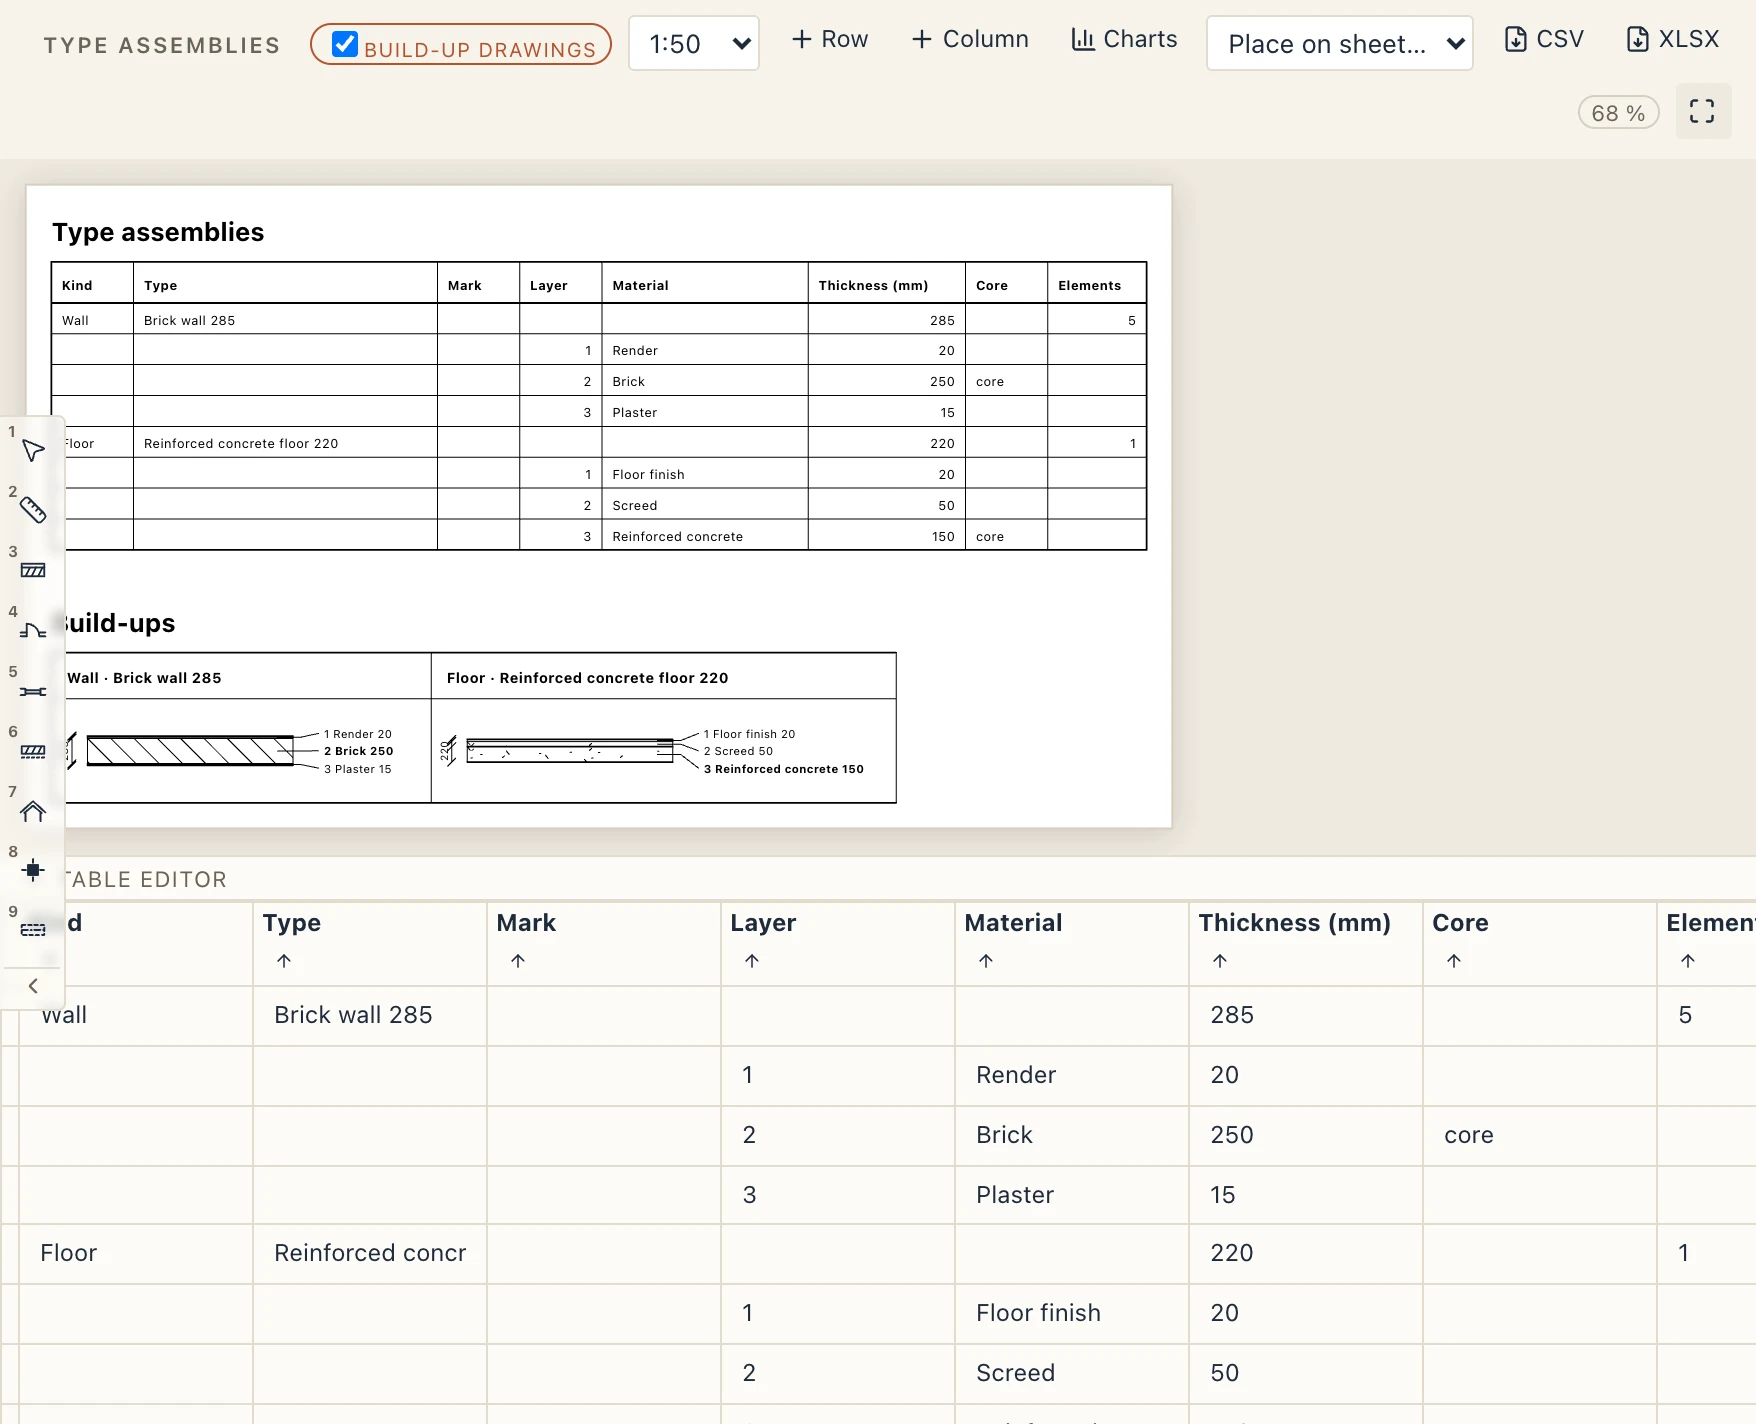
The Type assemblies schedule (+ → Type assemblies) lists every wall and floor type: its mark, its total thickness, how many elements use it, then its layers in order with their materials and thicknesses.
Build-up drawings, in its toolbar, draws each type after the table, cut through its layers at the schedule's scale (1:50 unless you pick another): a wall as a plan cuts it, a floor as a section does, layer 1 on top. Each layer is filled and hatched as its material is in sections, the core's faces are drawn heavier, the total thickness is dimensioned, and each layer is named beside it as the table names it. The drawings print with the table, on a sheet and in the PDF. A new type assemblies schedule draws them; untick Build-up drawings to keep the table alone.
The drawings On each card (interior view, exterior view, plan, section), in a schedule's Settings, belong to the cards of the joinery schedules; a plain table has no cards, so they are not offered there.
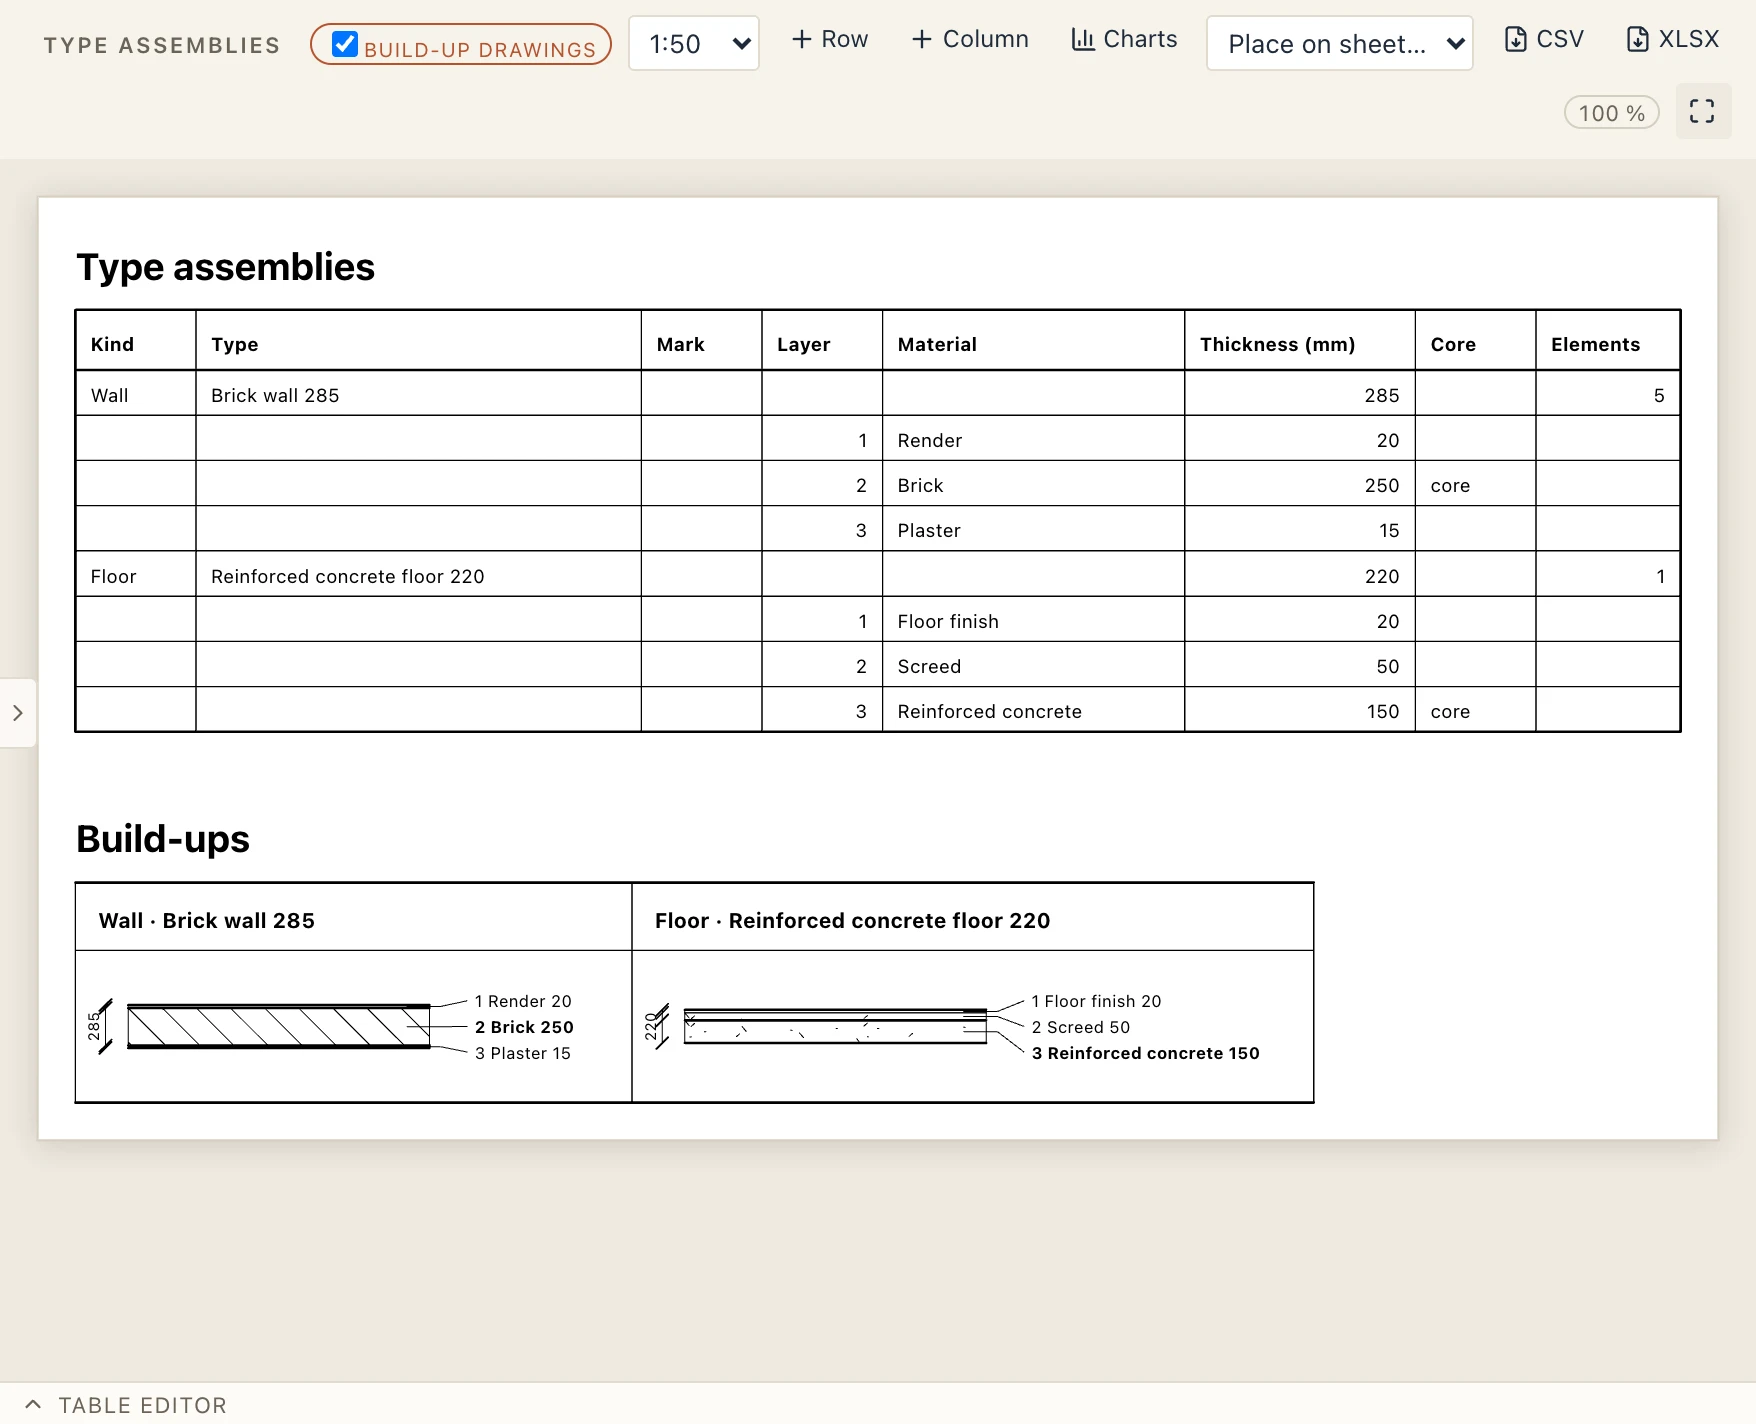
When only the result is wanted, click Table editor over the editing table under the schedule: it folds into a strip at the bottom of the view, and the schedule takes the whole view. Click the strip to open it again. Lapin remembers the choice on this computer. The arrow at the end of the quick tools hides them over sheets and schedules too (see The interface).
Wall sweeps
The Wall sweeps schedule (Architecture → Wall sweeps schedule, or Construction → Schedules… → Wall sweeps) adds up the project's wall sweeps and reveals by profile, kind and material: how many there are, their pieces (a sweep the openings cut is several), their length along the faces and their volume; for a reveal, the volume it takes out of the wall. A total for the sweeps and one for the reveals close the table. Its toolbar adds them up by profile, by storey or by wall type first. Returns count in the volume, not in the length.
Schedules of any field
A Field schedule lists any field of the elements: the model's own (name, type, storey, length, area…), the quantities and properties a file brings (a Pset_ property of an imported IFC, Fragments or BOS file) and your own parameters. Click + beside Schedules in the project browser and pick Field schedule (or Construction → Schedules…); its editor opens. Configure… in the schedule's toolbar opens it again.
- Rows. One row for each element, or for each part of the elements: the plants of the plantings, the timber members of framed roofs, timber-frame walls and joisted floors, the CLT panels (with the Wood module), the steel members and the connections' plates, bolts, anchors and welds (Steel), the reinforcing bars drawn on views or laid by the types (Rebar). A part has fields of its own (a plant's species, a member's section, grade and length) and reads every other field from its element (its name, its storey).
- Which elements. Narrow by kind, type, storey, material, group or phase (type a value or pick one of the project's), then Add a rule, in the editor Quick select and the view filters use (see Quick select): a field (one of the project's, or an element's type, storey, material and the others), an operator (is, contains, starts with, is greater than, is between, is one of, has a value…) and a value; all the rules or any of them, and Add a group for rules of their own inside. The field picker is searchable and shows, for each field, how many elements have it and a few of its values, grouped as the model has them: Lapin's own, the type's, quantities, parameters, each property set of the files, and your field names.
- Group by. One or more fields, in order: one row for each different value (each storey, each stage). With none, a row for each element. Untick Show the grouping fields as the first columns to show only the columns, a group's value in a column added up as first.
- Columns. A field or a formula (=, for instance
NetSideArea * 1.1), with a heading of its own, an aggregate (sum, average, smallest, largest, count, count of different, first, list of values, number of items; the default is sum for numbers and the list for texts), a unit (m, cm, mm, m², m³, l, kg, t… converted for you) and the decimals, or a Format in their place (0.##: at most two decimals;0.00: always two). Move columns up and down, remove them. - Sort by. The fields the rows are put in order by, each ascending or descending; rows equal on them stay in the model's order. With none, the rows go by their cells, left to right.
- Subtotals by. A totals line for each value of these fields after the rows (each section and grade of timber, for instance).
- Total row and Count column can be turned off; Total row under a single row too keeps it when there is only one row.
Apply changes the schedule in one step (one undo). The schedule follows the model, like any other: charts, a place on a sheet, CSV and XLSX all work.
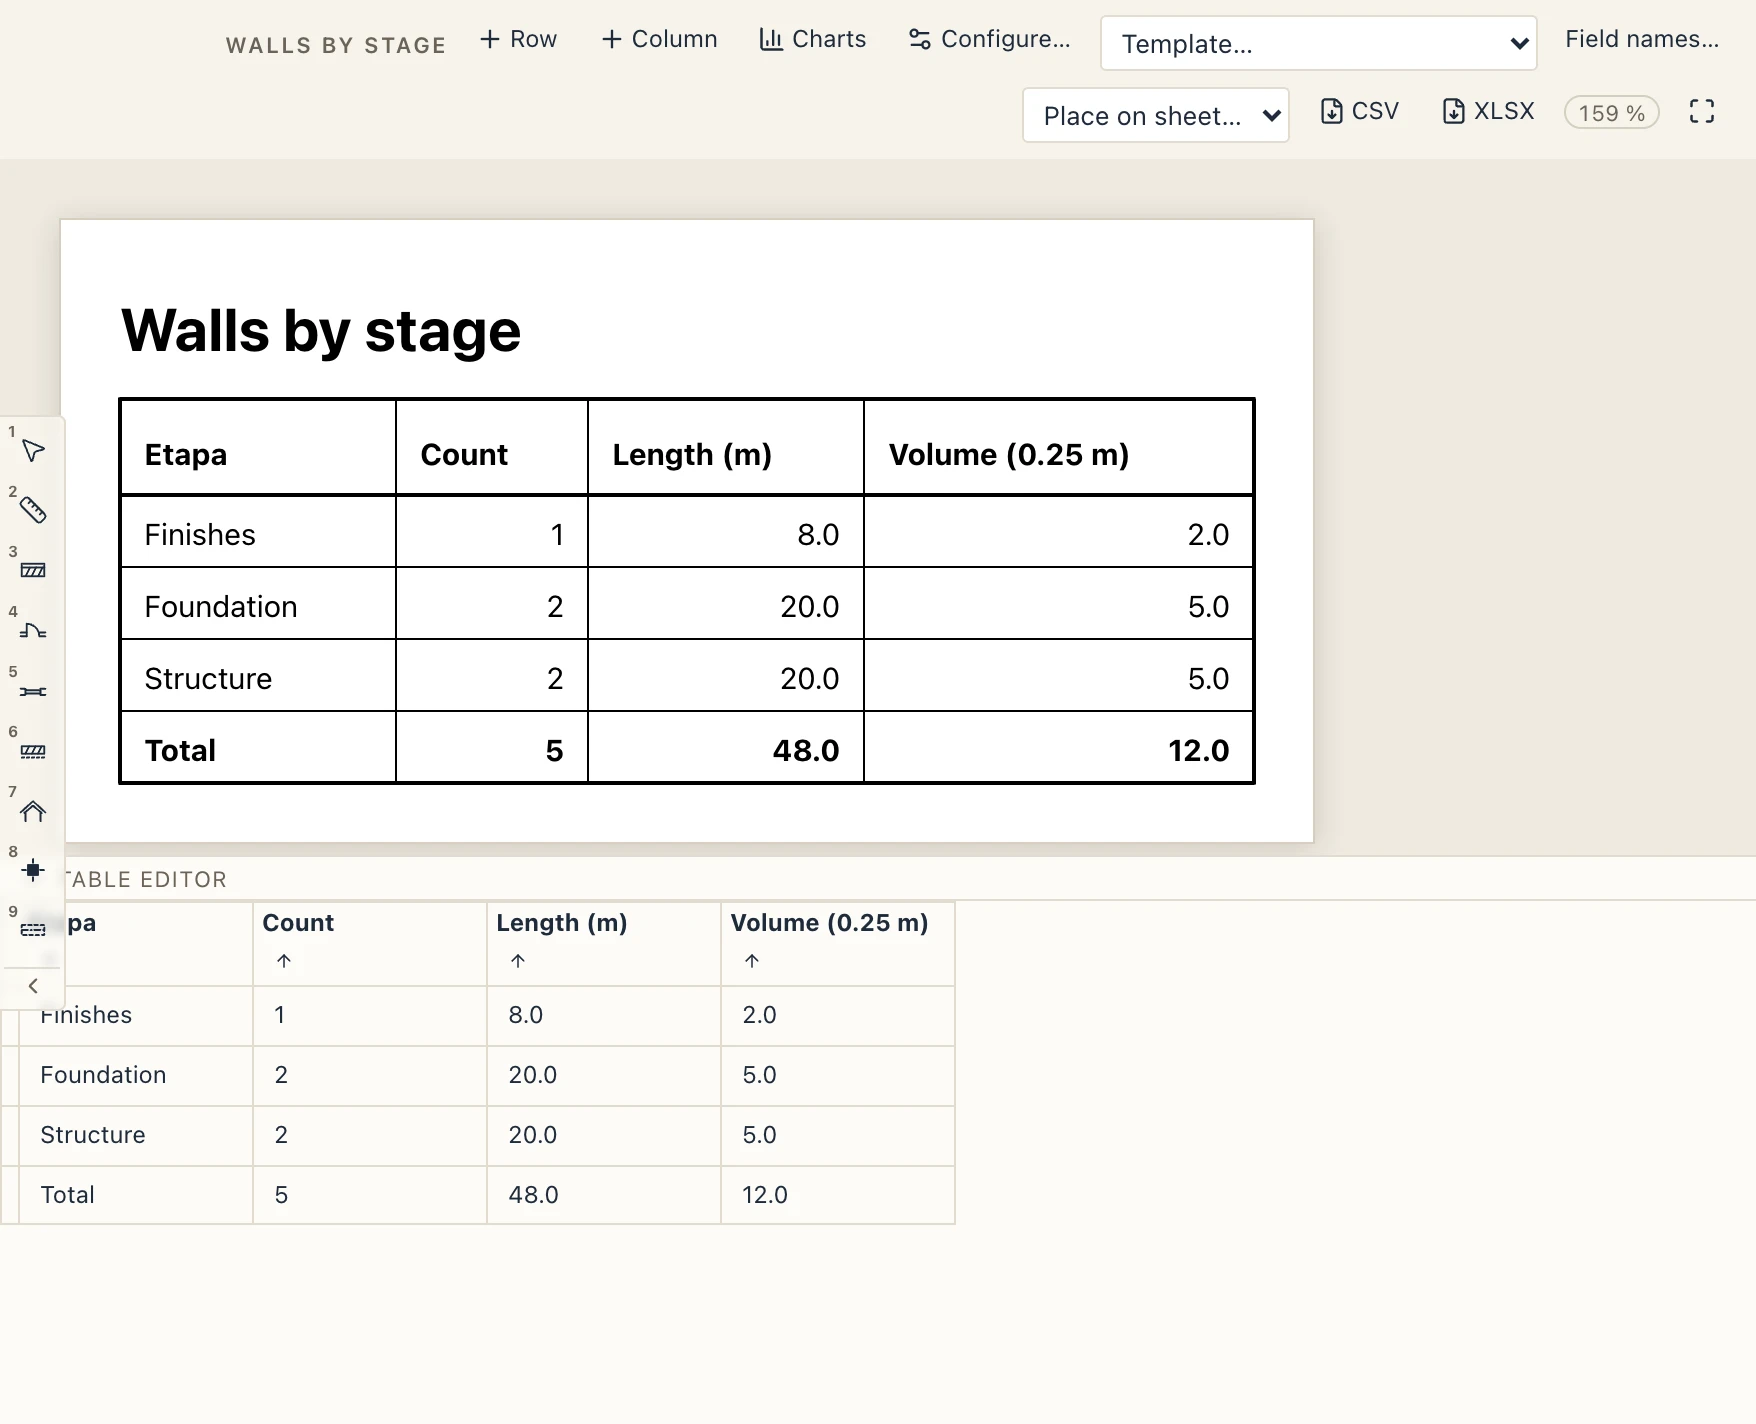
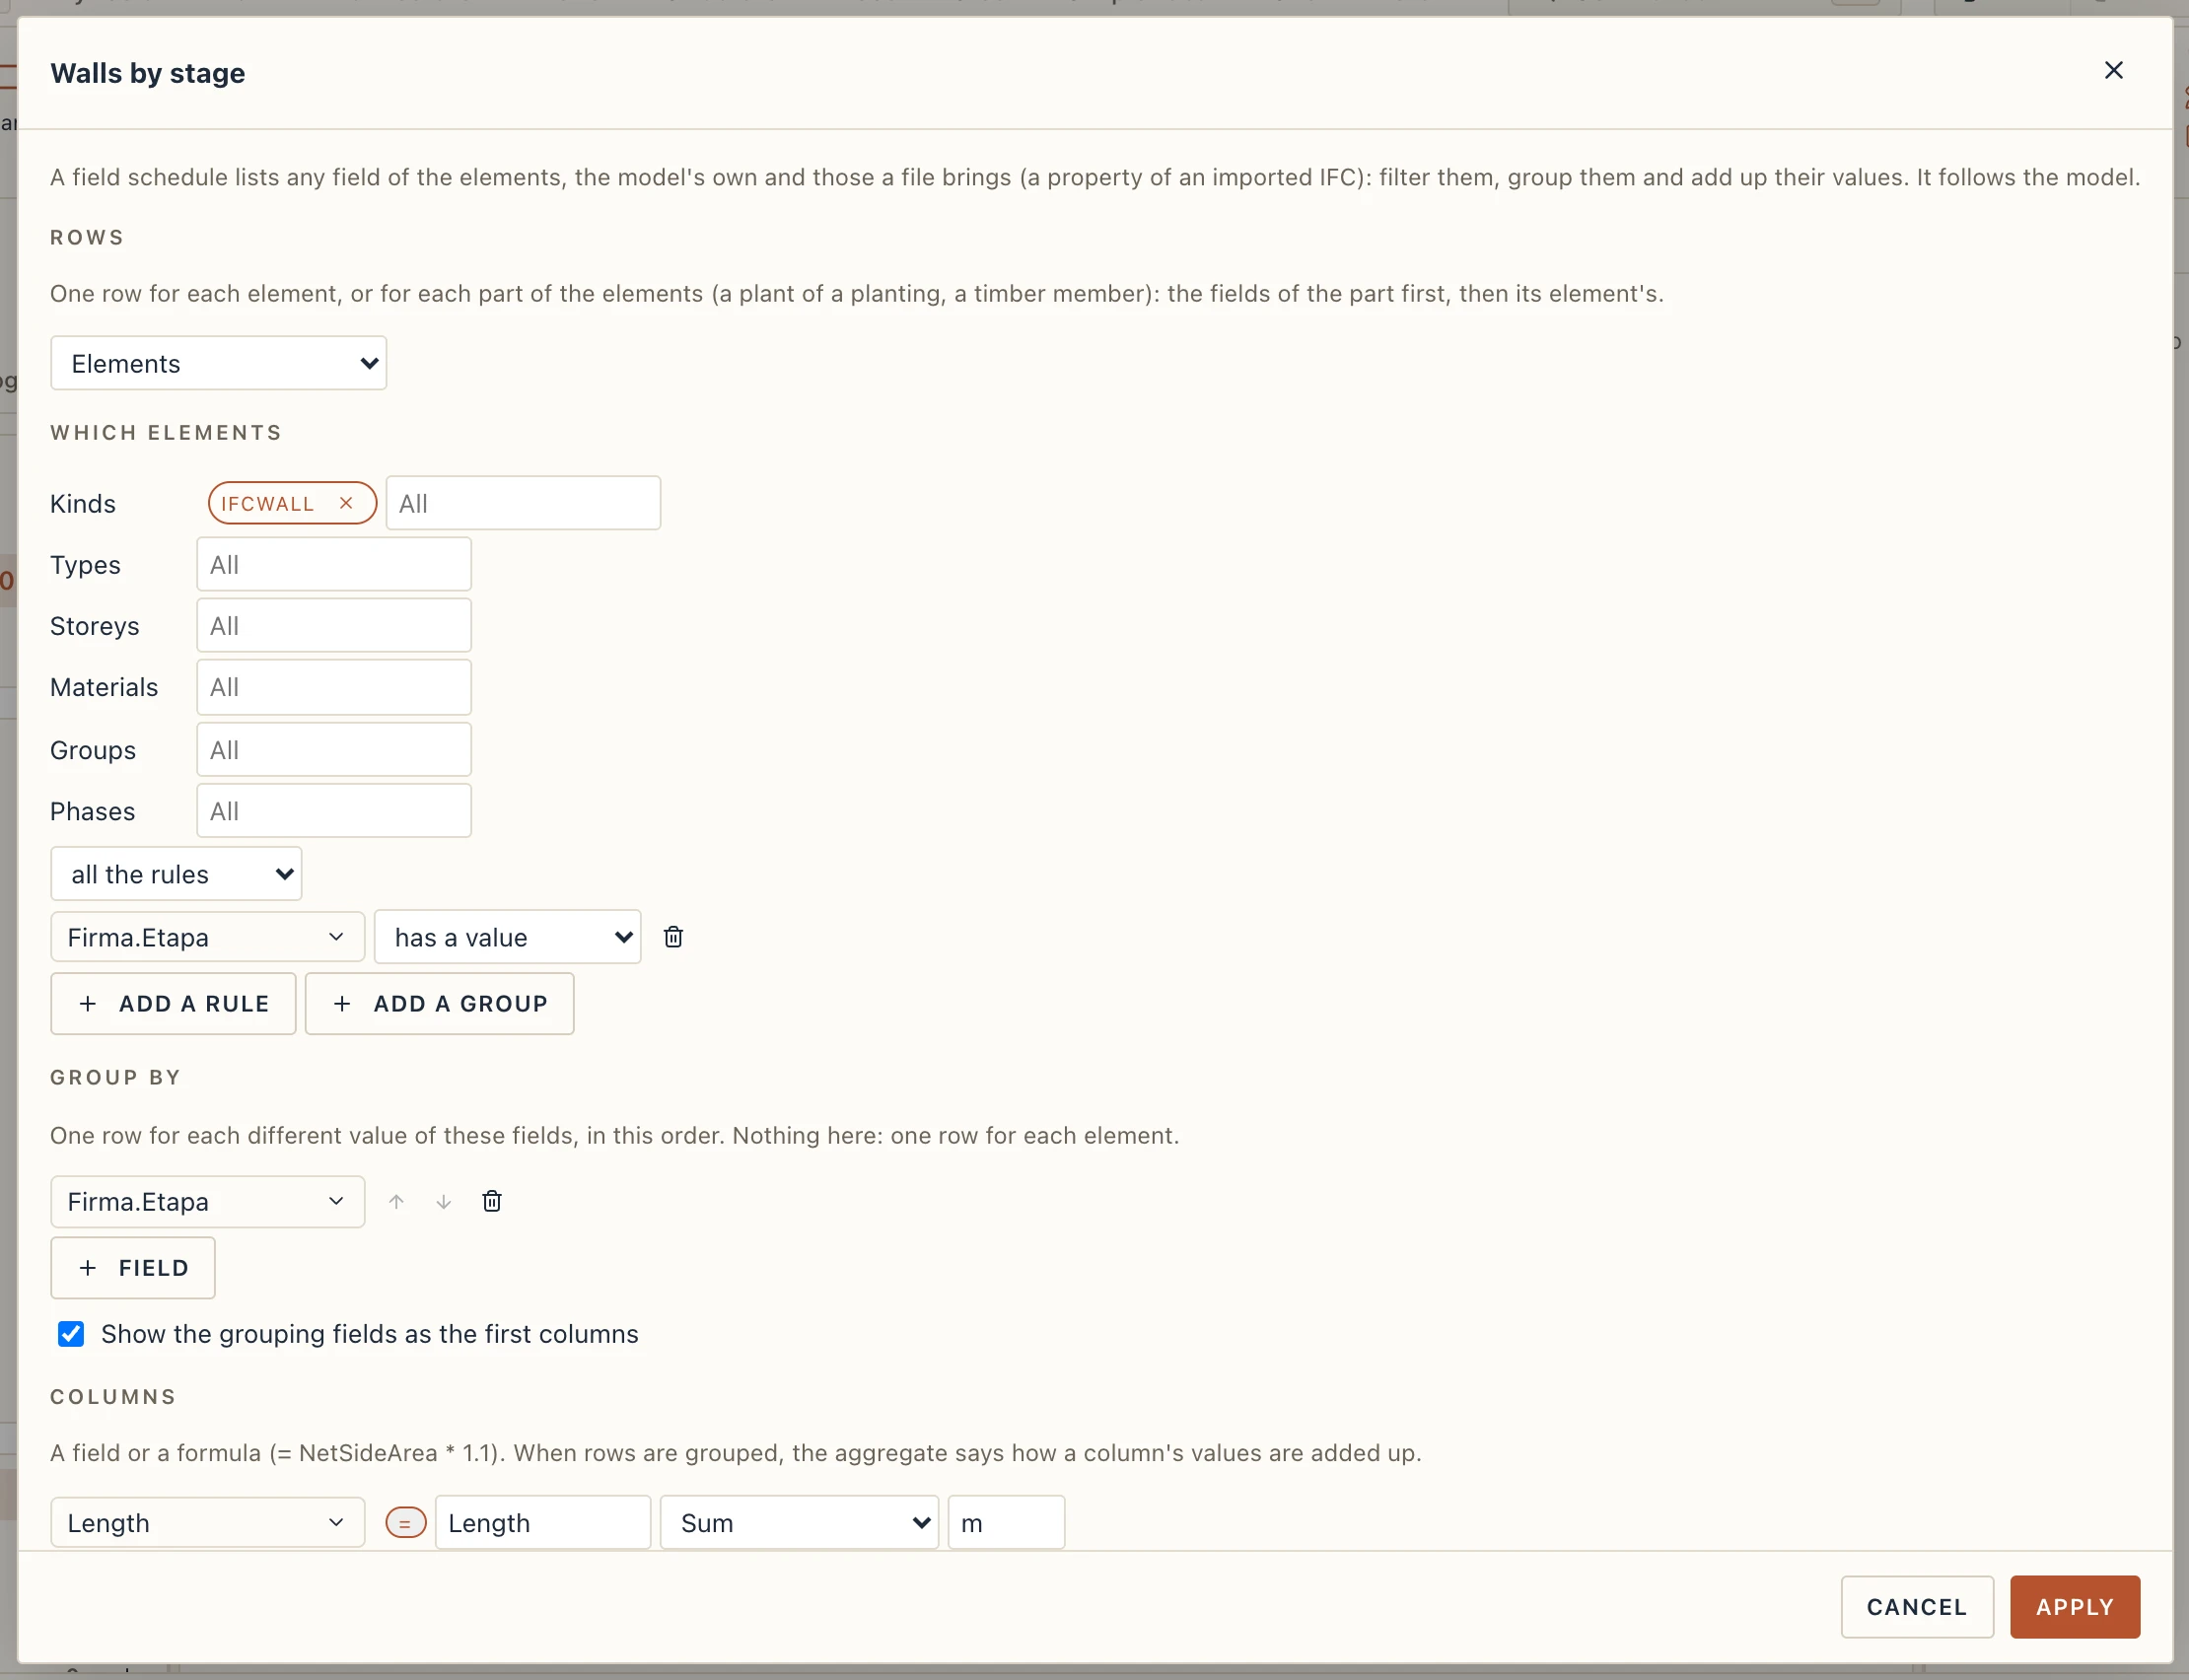
To total an imported IFC by one of its properties, make a field schedule, add the condition Pset_Firma.Etapa exists, group by that field, and add the Length (or NetSideArea) column as a sum. Numbers are in metres, square metres, cubic metres and kilograms; a Unit column converts them for display.
The quantity takeoff can group by any field as well: in its toolbar, the grouping list ends with Other field….
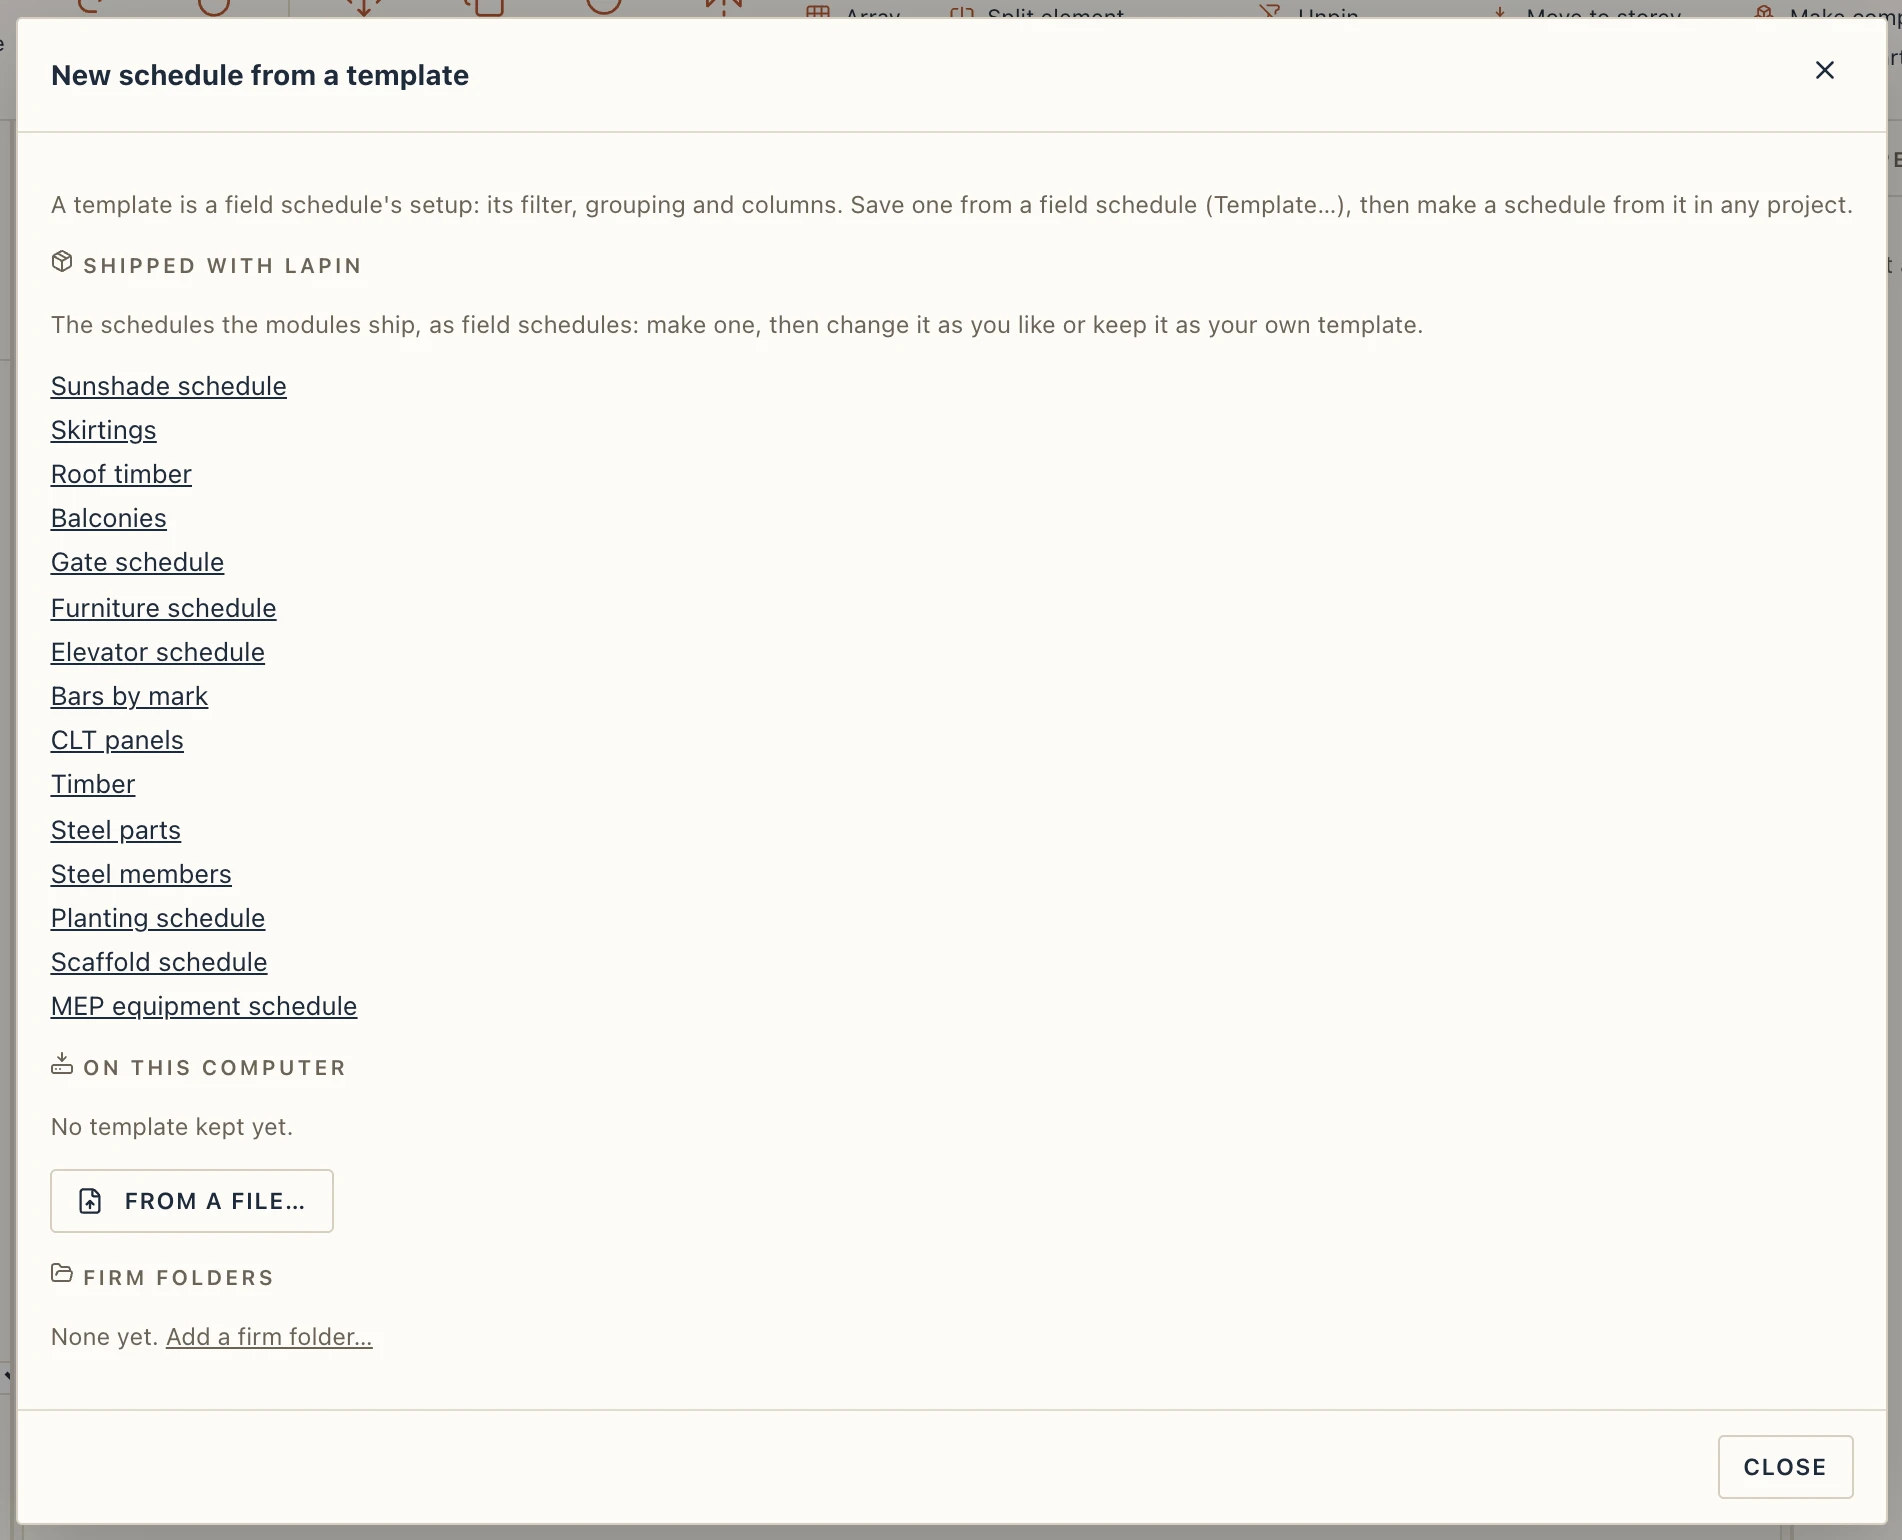
Templates. Template… in a field schedule's toolbar saves its setup (filter, grouping, columns) as a .lapinschedule file, or keeps it in this computer's library. From template… in the + list (or in Construction → Schedules…) makes a schedule from one kept on this computer, from a file or from the firm's folders (see The interface). A template names types, storeys, materials, groups and phases, not ids, so it works in another project. When the project already has a field schedule of the template's name set up otherwise, the Import preview asks, as for every library file: keep both (the new one „Name (2)”), replace it (its filter, columns and charts updated in place) or skip; one set up the same is simply opened.
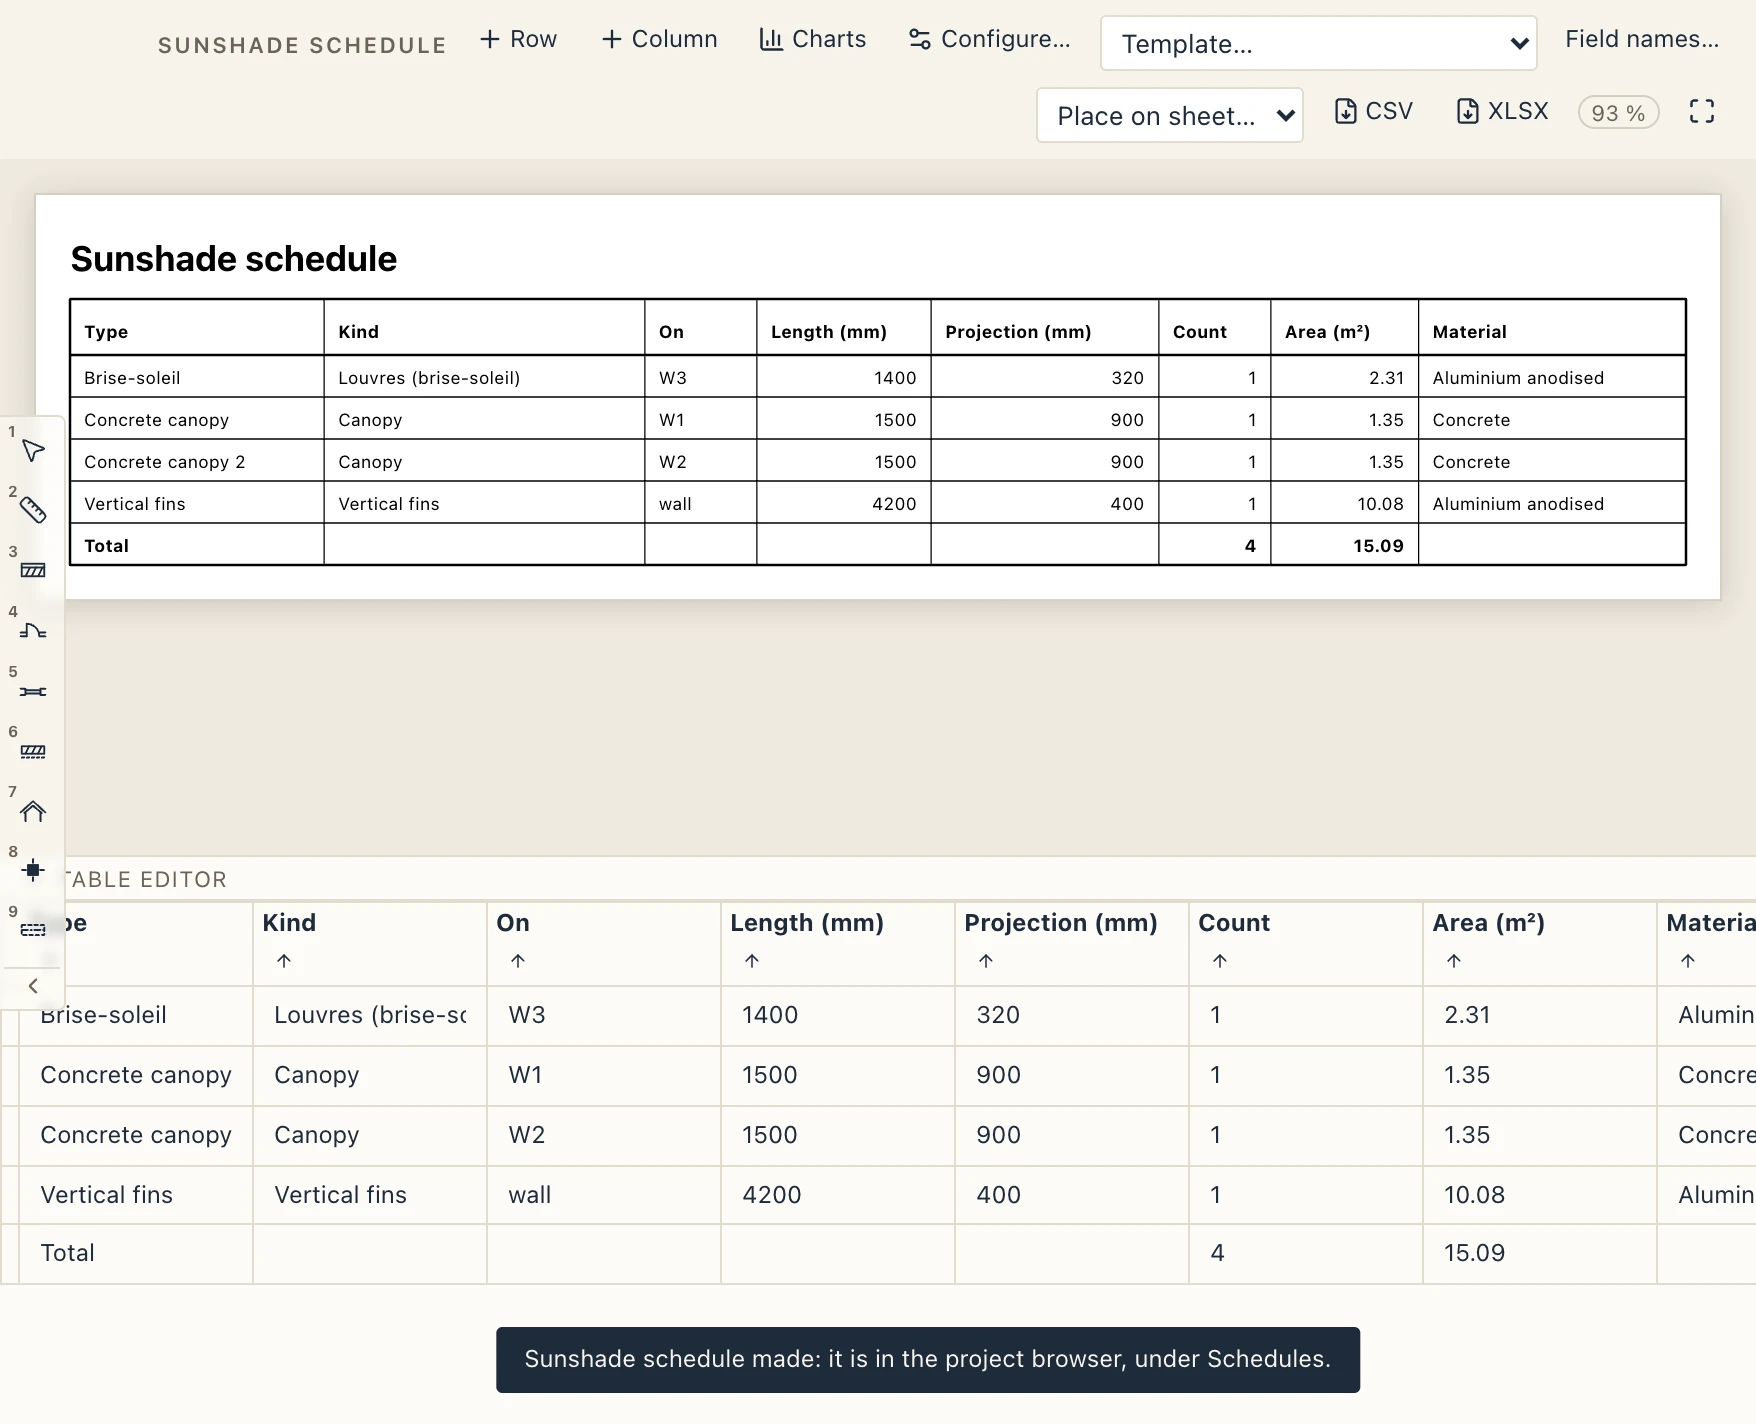
Shipped templates. The schedules of the modules that list one row per element or per part are field schedules made from templates Lapin ships: sunshades, gates, balconies, skirtings, elevators, furniture, MEP equipment, scaffolds, plantings, roof timber, timber and CLT panels. Their ribbon buttons (Sunshade schedule, Gate schedule, Timber schedule…) and the + list make the field schedule, with the same columns, order and totals as before; Configure… then changes it like any other, and Template… keeps your version as a template of your own. From template… lists them under Shipped with Lapin. Schedules made by an earlier version keep opening as they were. Three more templates are offered beside schedules that stay as they are: Steel members (the fixed list adds a total under each hall), Steel parts (its totals line also counts the welds) and Bars by mark (the bar bending schedule's rows, with a totals line per diameter; the fixed schedule keeps its notes and partition column). The joinery cards, the bar bending schedule, the formwork and the cost estimate forms stay as they are.
Field names of your office
Offices name the same thing differently: Phase may be Pset_Firma.Etapa in one file and ArchiCADProperties.Faza in another. Manage → Field names… (or Field names… in a field schedule's toolbar) holds your office's names: each one has a name, its sources in order and a description. A name reads the first source an element has, so a schedule, a tag, a formula or a filter asks for Phase and gets the right property whichever file the element comes from. A name that is also a standard quantity (Length, NetSideArea…) fills in that quantity for imported elements whose file has none, so the takeoff and the estimate see it.
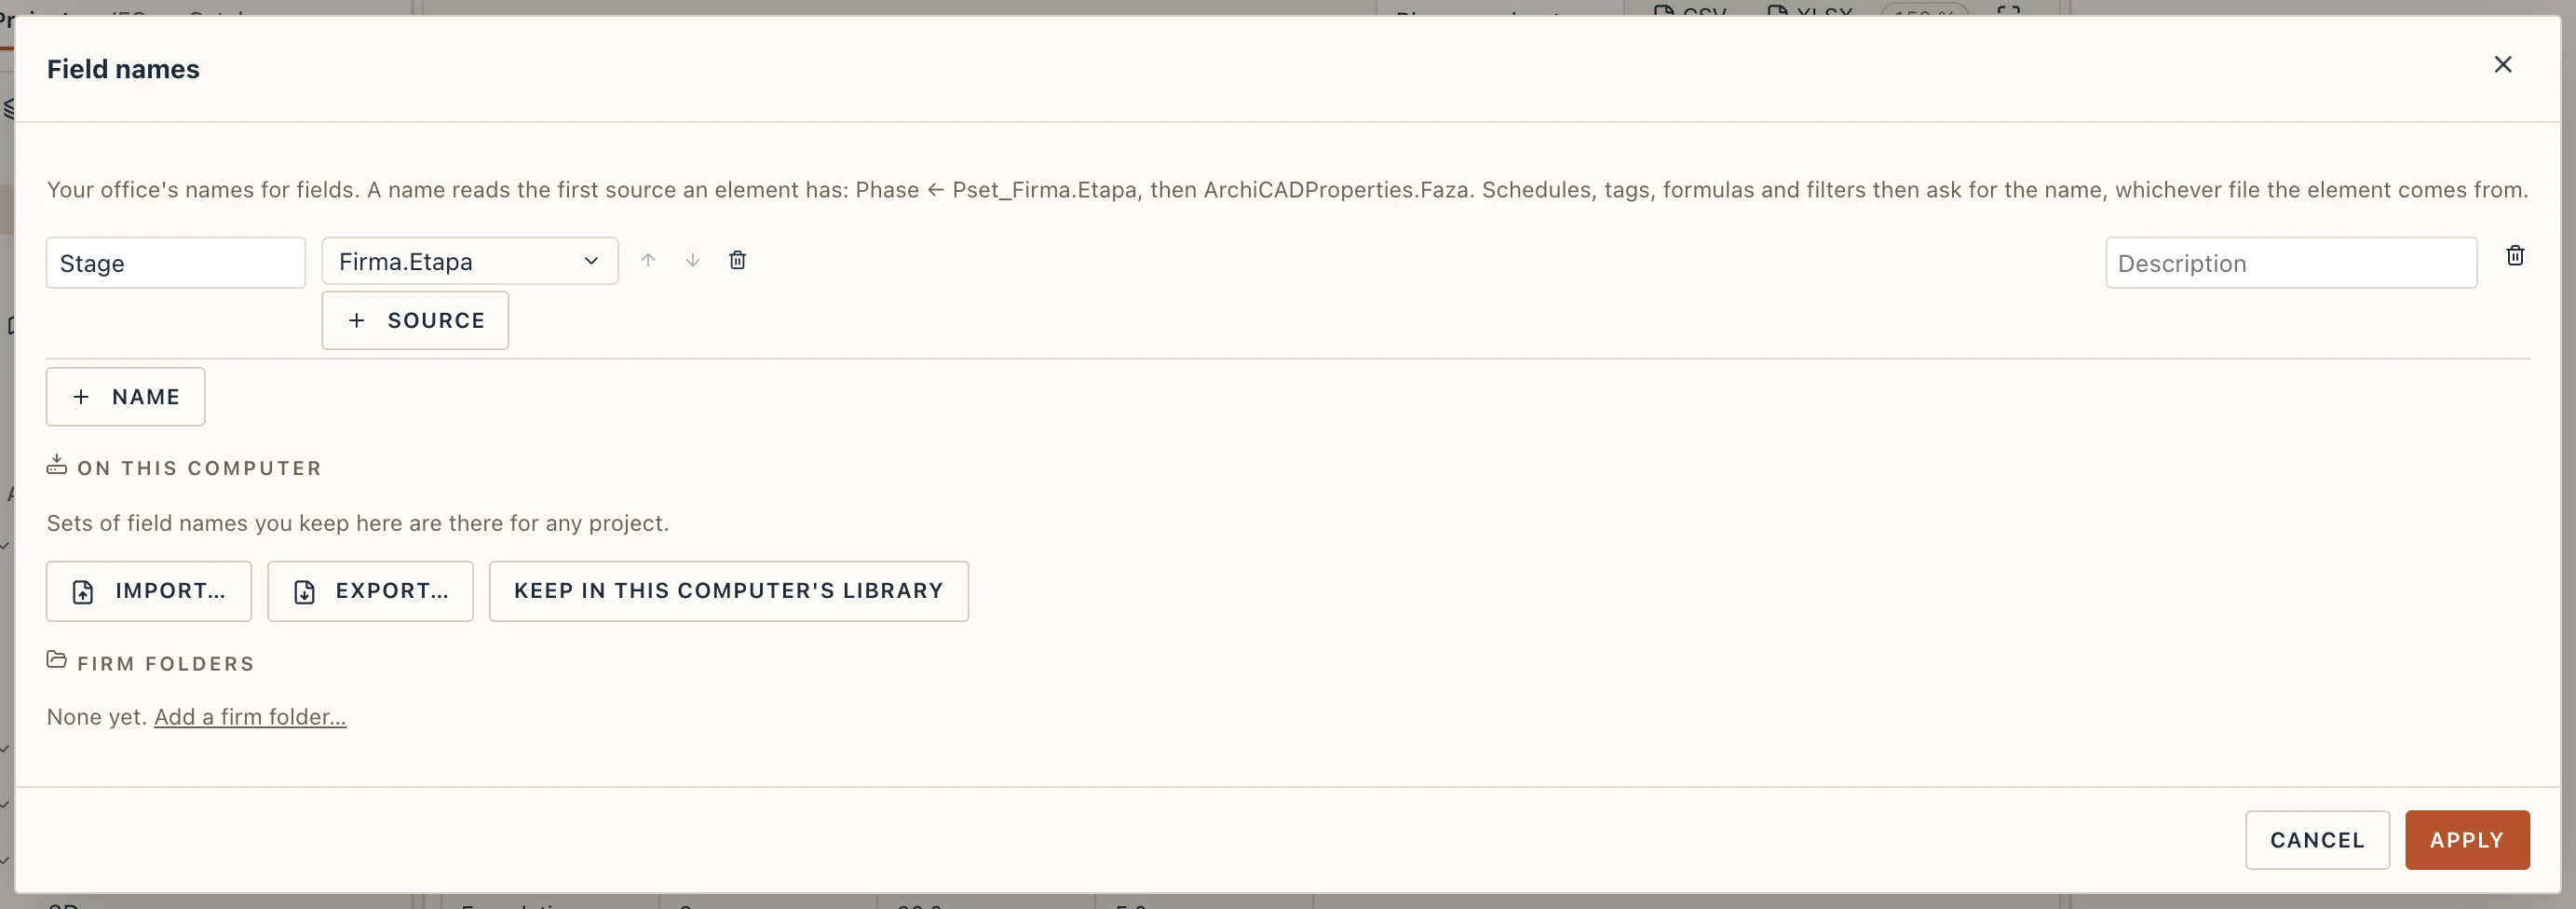
Apply replaces the table in one step. Import… and Export… read and write a .lapinaliases file; Keep in this computer's library keeps the set for other projects, and the dialog also reads and writes the firm's folders.
Exporting
CSV and XLSX in the toolbar export the schedule as a spreadsheet (an XLSX has one sheet for each table). In the desktop app Lapin asks where to save the file and offers the schedule's name; in a browser the file is downloaded. Exported wall and floor types are saved the same way.