User guide
Rooms and room colours
Place rooms with a click inside walls, name and number them, and colour or hatch them on a plan by function or department, with a legend.
Placing a room
Choose Architecture → Room (RM) and click inside a space closed by walls. Lapin finds the room's outline between the faces of the walls, curtain walls and columns around the point. Doors do not open the room: it closes across them. A column standing in the room is left out of its area.
The room keeps up with its walls. Move a wall and the room grows or shrinks with it. If a wall is deleted and nothing closes round the room any more, it keeps the outline it had, and its stamp turns red. Architecture → Update rooms stores the outlines the rooms find now.
For a space without walls all round, such as a terrace or one end of an open-plan area, use Room by outline and click its corners. That room keeps the outline you draw.
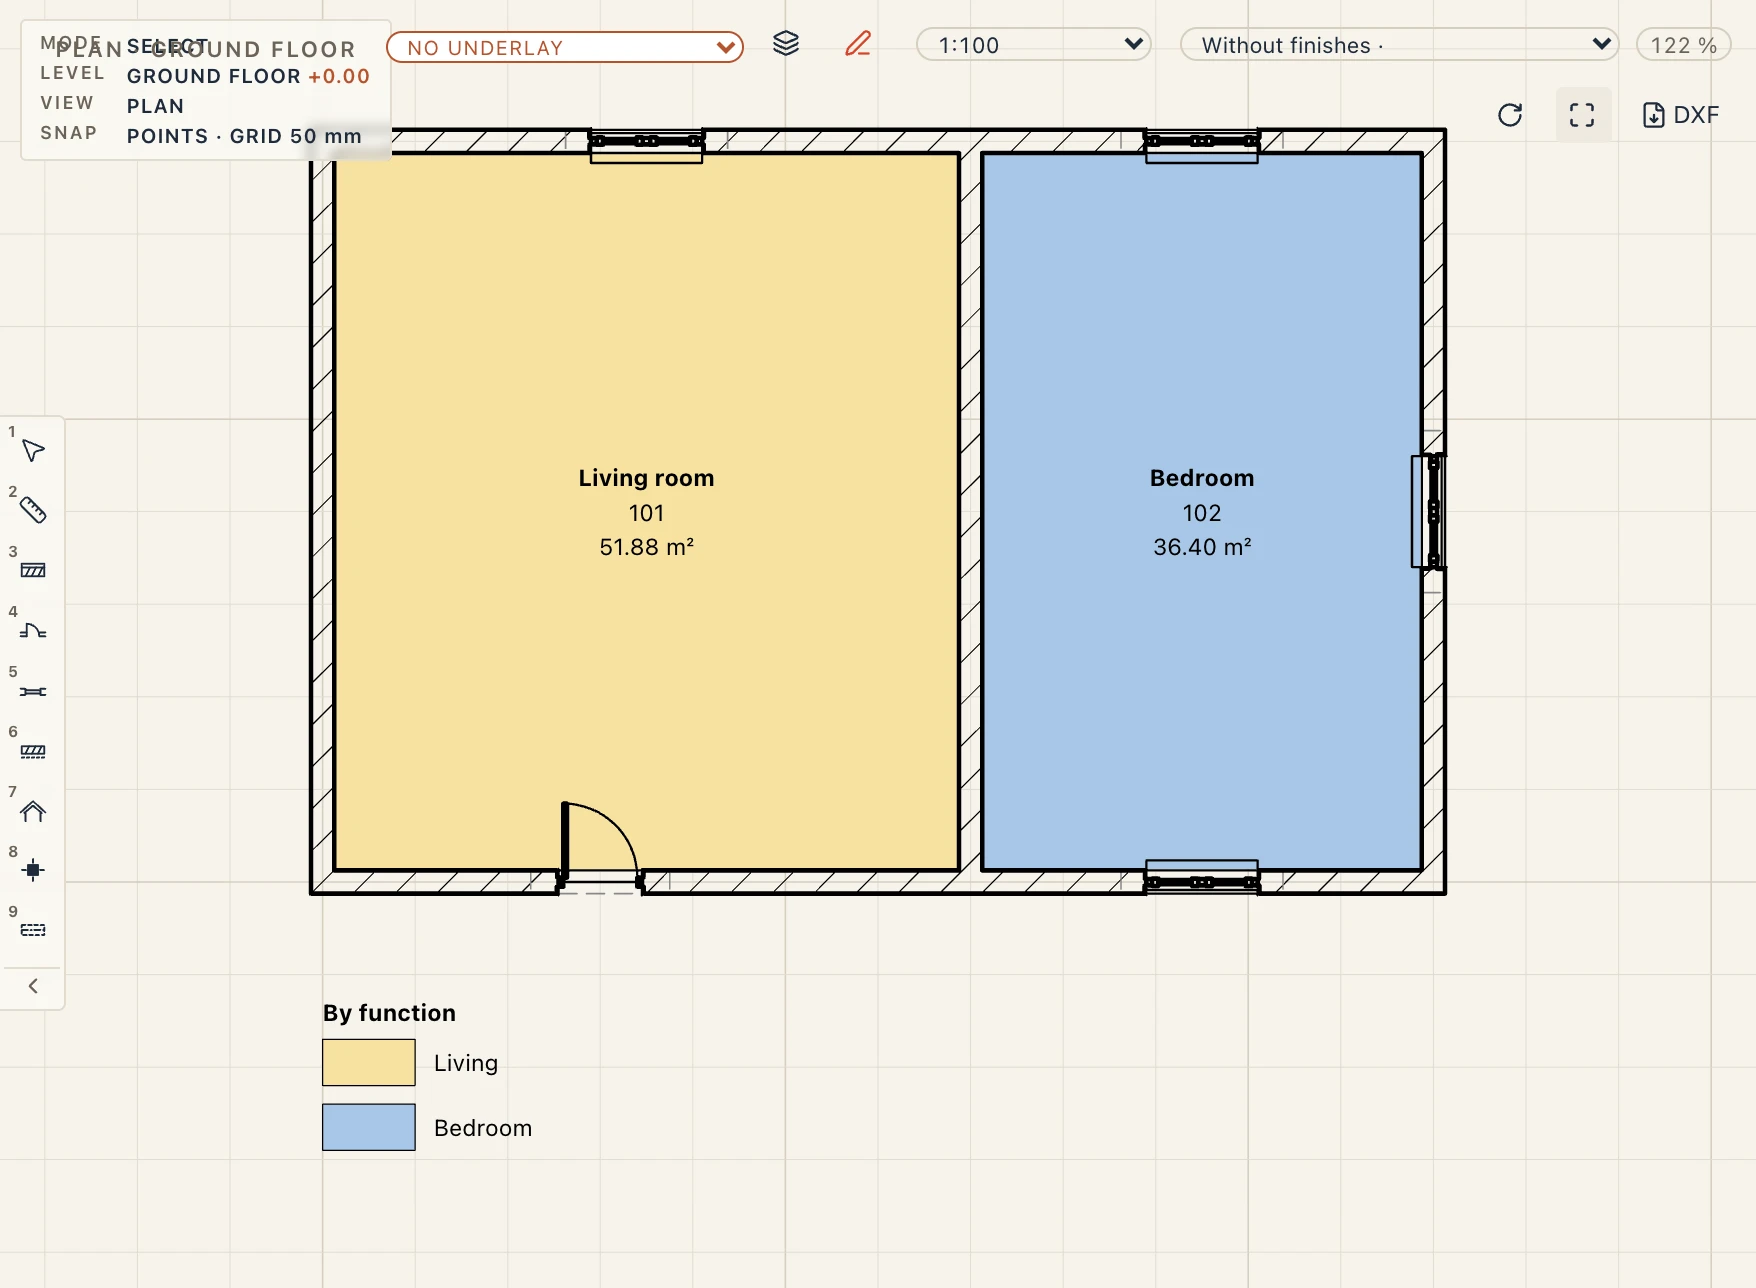
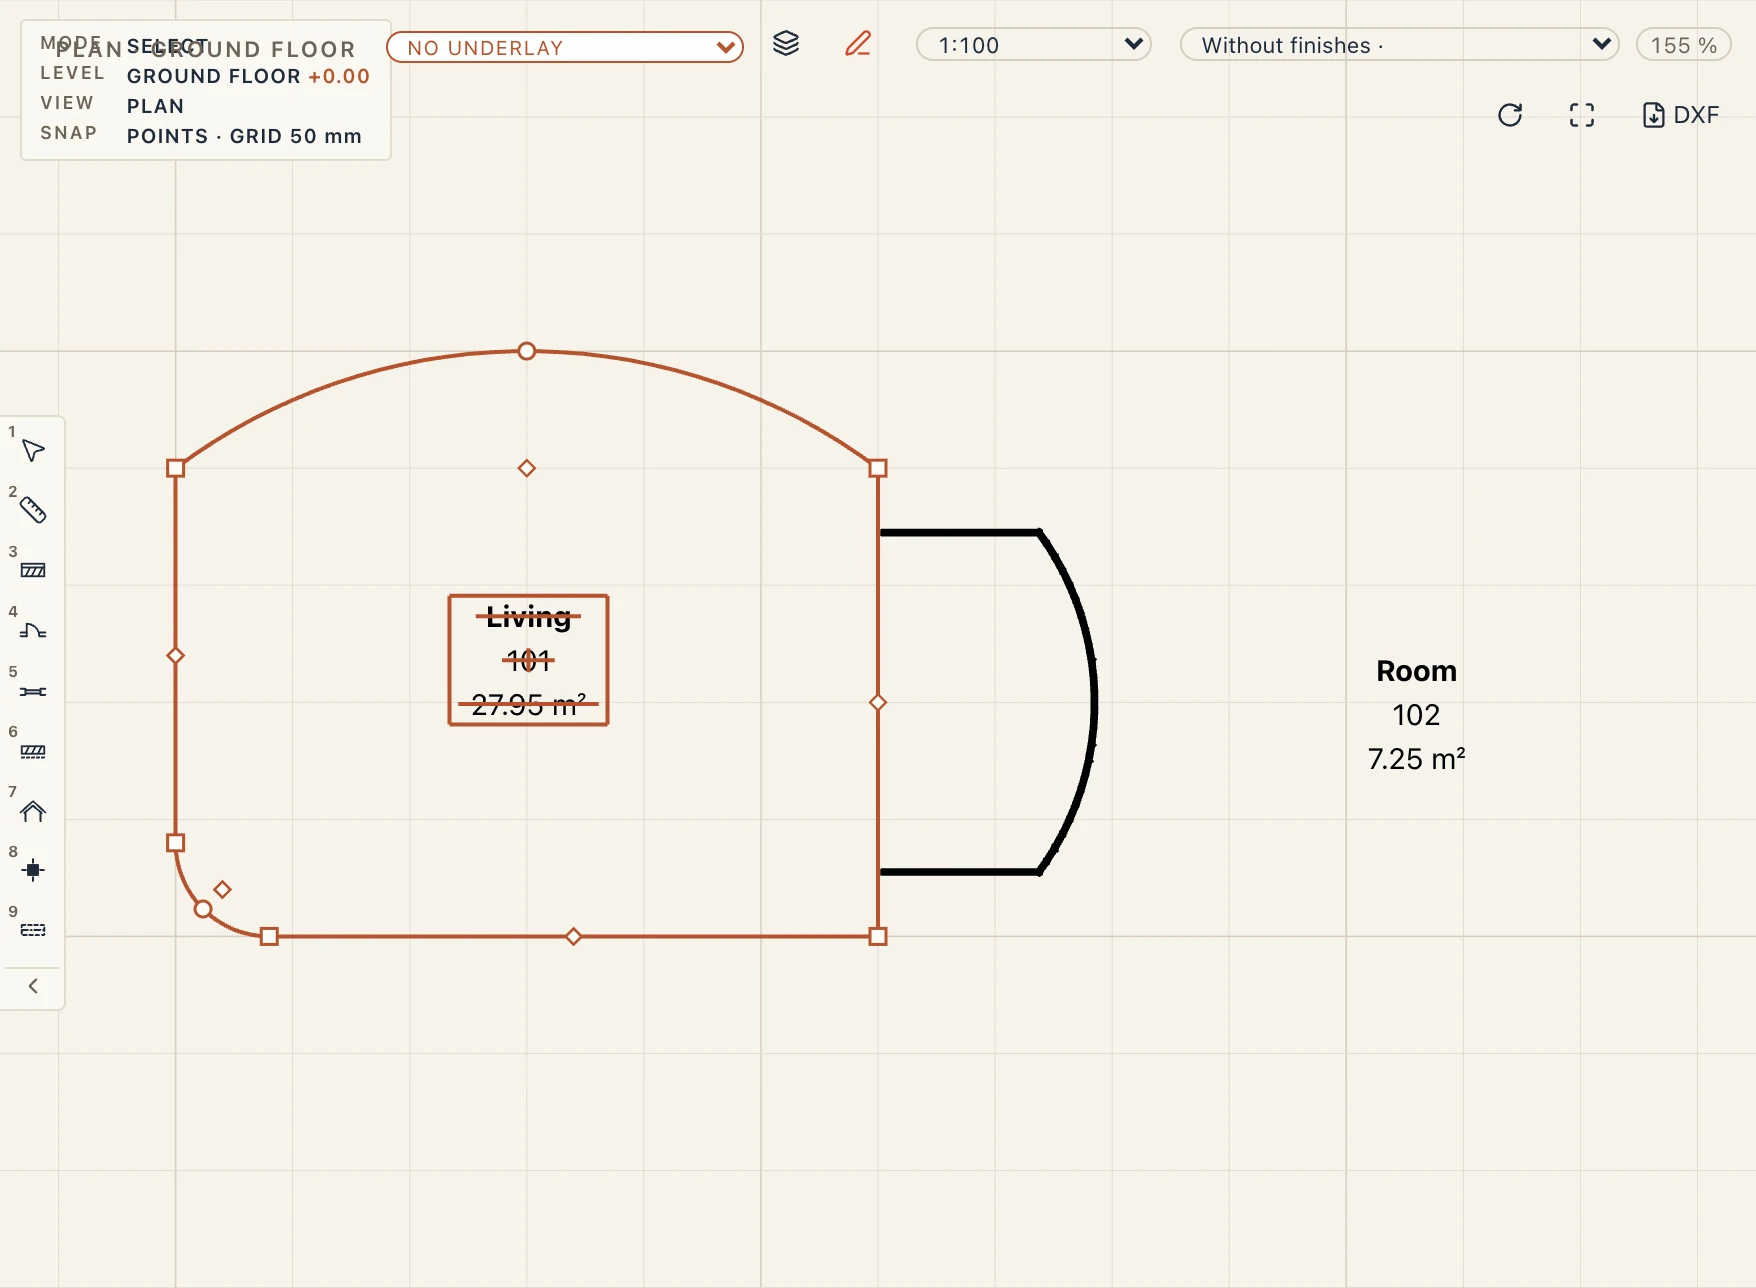
A drawn room's edges can be curved, as a floor's: the Room by outline bar draws a Polygon whose edges may be arcs (Arcs (Space)), a Rectangle or a Circle, and the selected room's right-click offers Make arc, Make straight, Fillet corner… and Chamfer corner…. Its area and perimeter are measured on the true arcs, and in IFC its space's profile is the true curve. A room found from its walls follows them, so its outline is not edited this way.
Modify → Split element cuts a drawn room in two along a line of two points: the part you click keeps the room, the other is a new room with the storey's next number, and their areas add up. Modify → Trim/Extend elements trims it by a straight boundary. A room found from its walls is divided by a room separation line instead.
Room separation lines
An open-plan kitchen and living room, the two ends of a hall, a gallery's landing: spaces with no wall between them that should still be rooms of their own. Architecture → Room separation (LS for a line) draws a line that bounds rooms as a wall would, with no body: a line (chained, each click the start of the next; set to Arc in the command line's bar it is an arc: its start, its end, a point it passes through), a polyline (its corners, then Enter), a rectangle (two opposite corners: the zone inside it becomes a room of its own), or a circle (its centre, a point on it). Draw it from wall to wall; an end a hair short of a wall's face still closes on it.
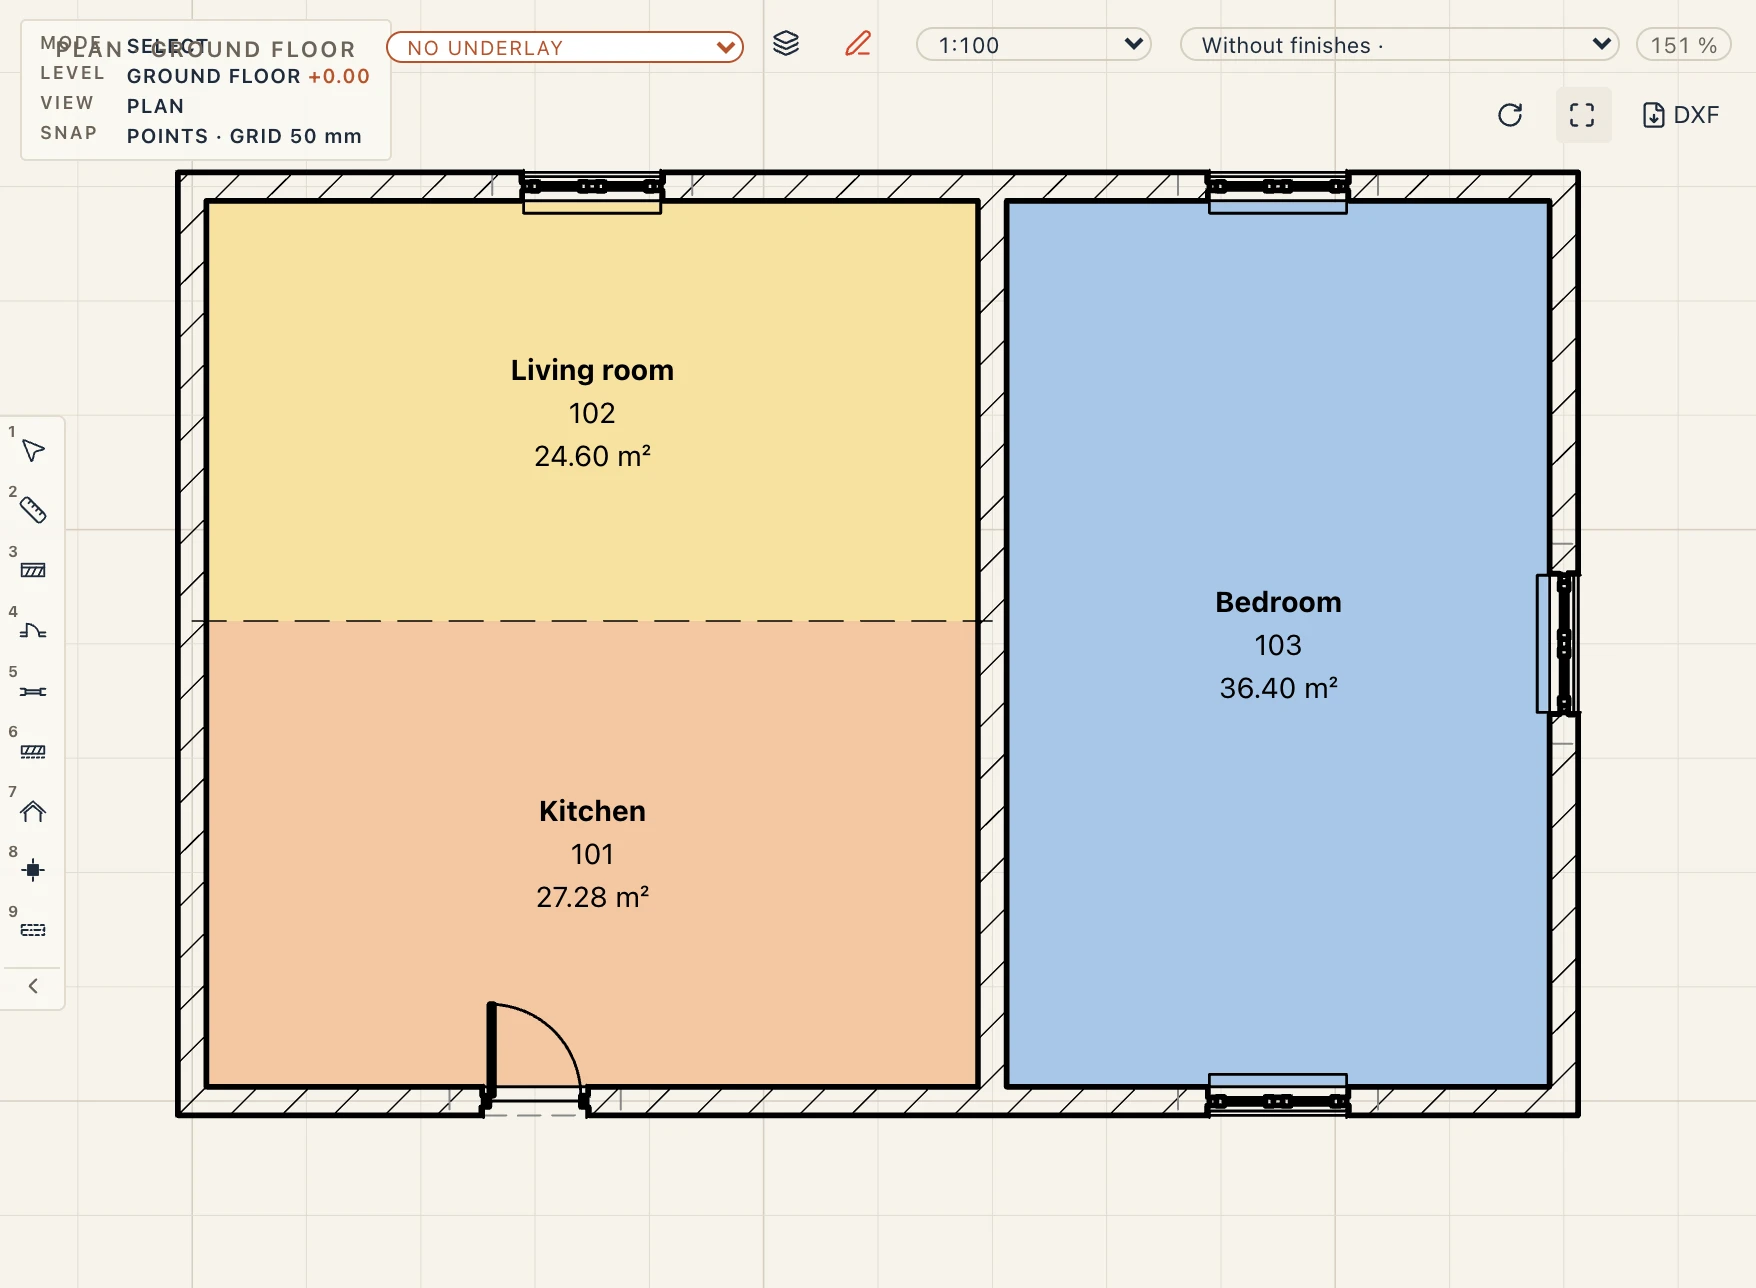
The rooms around it find their outlines again at once, with no Update rooms: a 6 × 4 m room split by a line down its middle is two rooms of 3 × 4 m, each with its own area, stamp and finish; place a room on the other side with Room. Move the line (draw it again) or delete it and the rooms follow: deleted, the room is whole again. The rooms on either side meet exactly on the line, so their areas add up to the whole room. A line that stops in the middle of a room bounds nothing and changes nothing.
On plans of its storey it is drawn as a thin dashed line; it has no body, so the 3D view, sections and quantities of the building leave it out (its length is in its quantities). Drafted linework becomes room separation lines too: Draft → Convert → Convert to…, Room separation lines. In IFC it is an IfcVirtualElement (BOUNDARY in IFC 4.3) with its line as a FootPrint curve, which Lapin reads back as a room separation line.
A room's properties
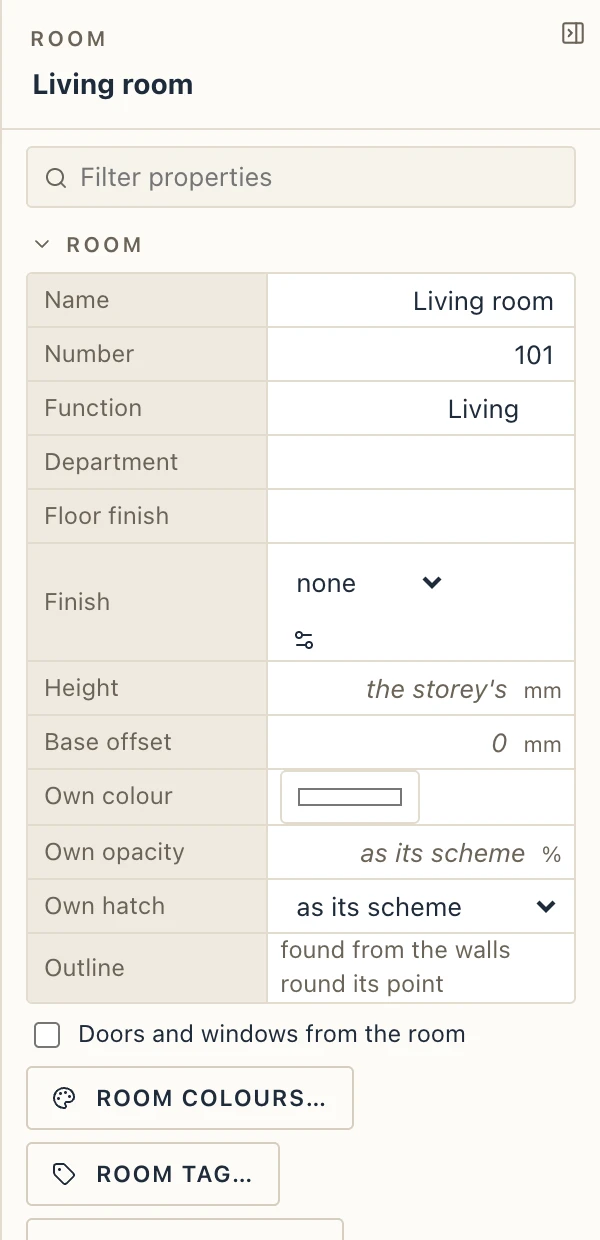
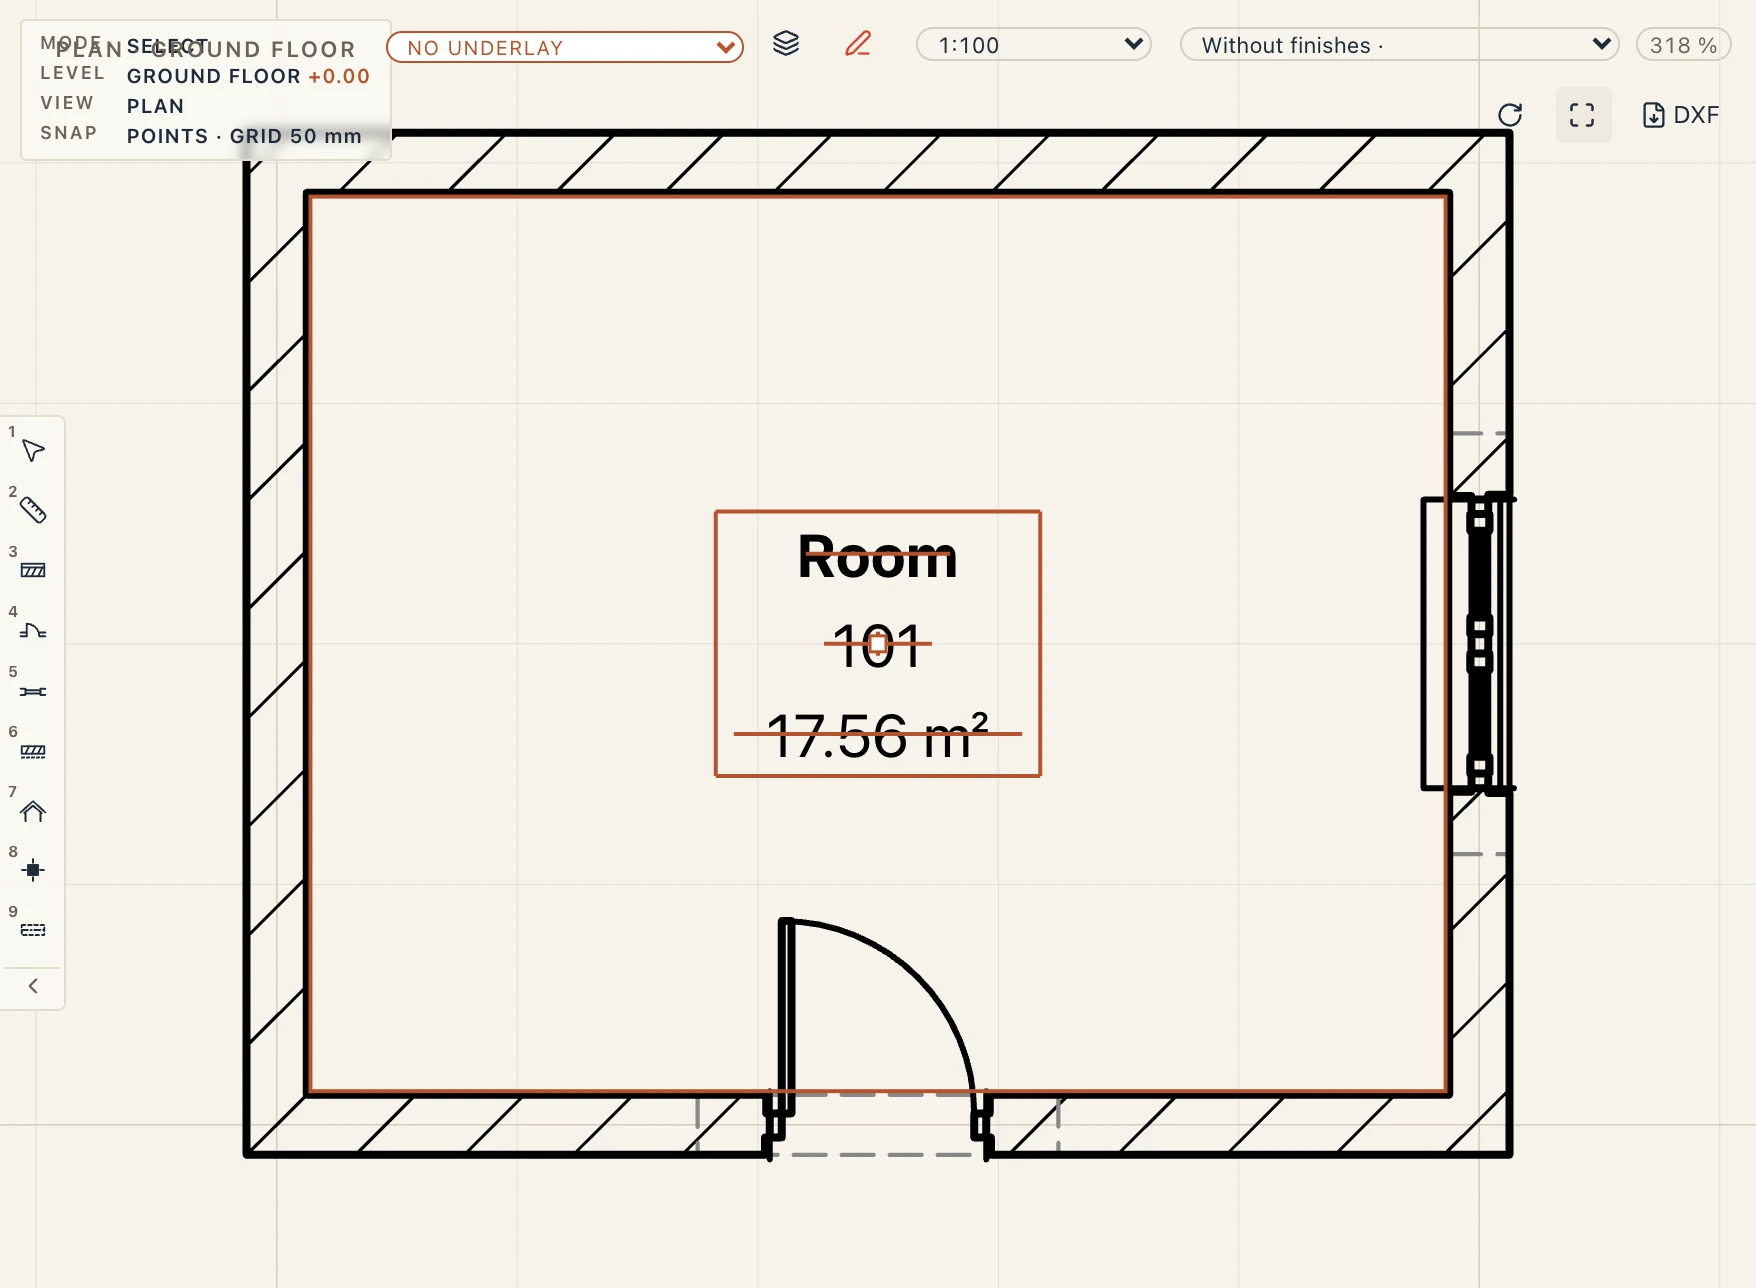
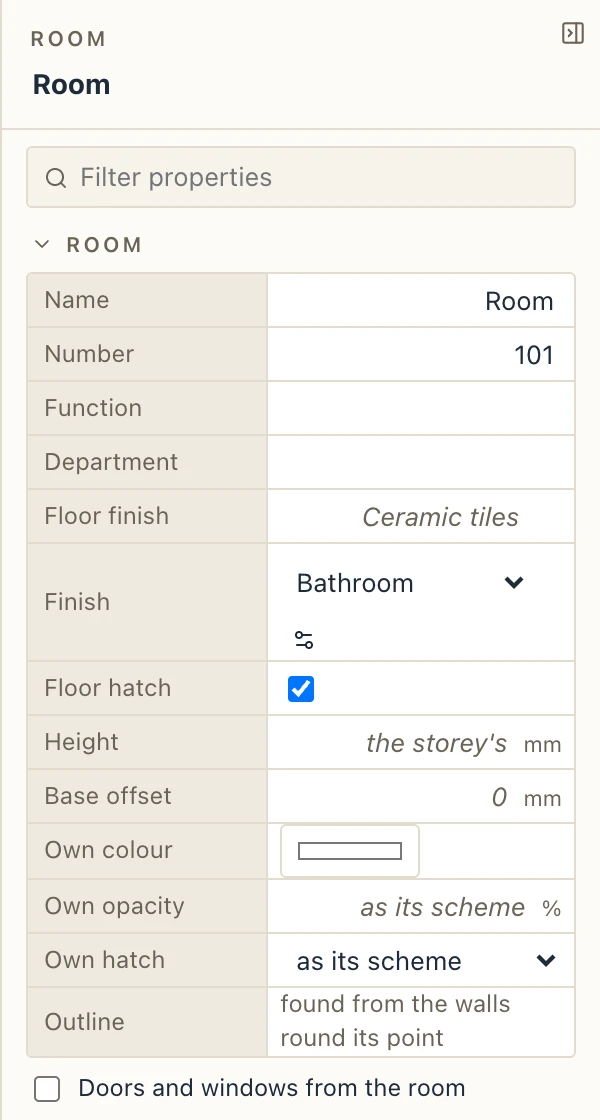
Select a room by clicking its stamp or anywhere inside it. In the properties panel:
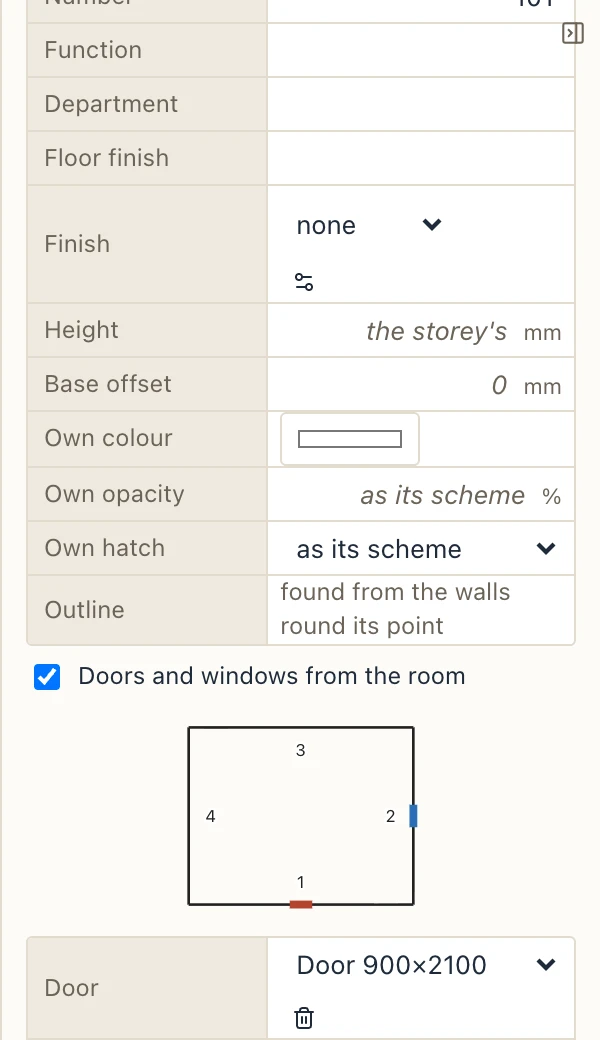
- Name and Number. New rooms are numbered by level: 101, 102… on the ground floor. A room's name is its function's until you give it one of your own; emptied, it goes back to the function.
- Function, Department and Floor finish. Type anything, or pick a value other rooms already have.
Left empty, a finished room's Floor finish is its finish's floor (the material of its top layer, shown greyed in the field): its tag, its formulas and documents read
{finishFloor}as that until you type one of your own. - Height. Empty means the level's height.
- Own colour and Own hatch override the colour scheme for this one room, and Own opacity its colour's opacity (empty: as its scheme).
The quantities below show the room's net area (without the columns; with a finish, to the finish: see Room finishes), its perimeter and its volume. Drag the grip on the stamp to move the stamp.
Doors and windows from the room
You can choose a room's doors and windows from the room itself. Tick Doors and windows from the room in its properties, which is off by default. A small plan numbers the room's sides. Add door or Add window adds a row where you pick the type, the side and the Offset from the middle of that side, and a window's Sill.
Each row makes an ordinary door or window in the wall on that side: it is selected, flipped, scheduled and exported like any other, and placing doors on walls works as before. A door opens into the room. Untick the option and the room takes its doors and windows away, keeping the list; tick it again and they come back. Only straight walls take them for now.
In an apartment type these doors and windows go with the room: every instance has its own in the wall on that side, whether that wall belongs to the apartment or to the building. Where no wall can take one, its row says so.
Room tag
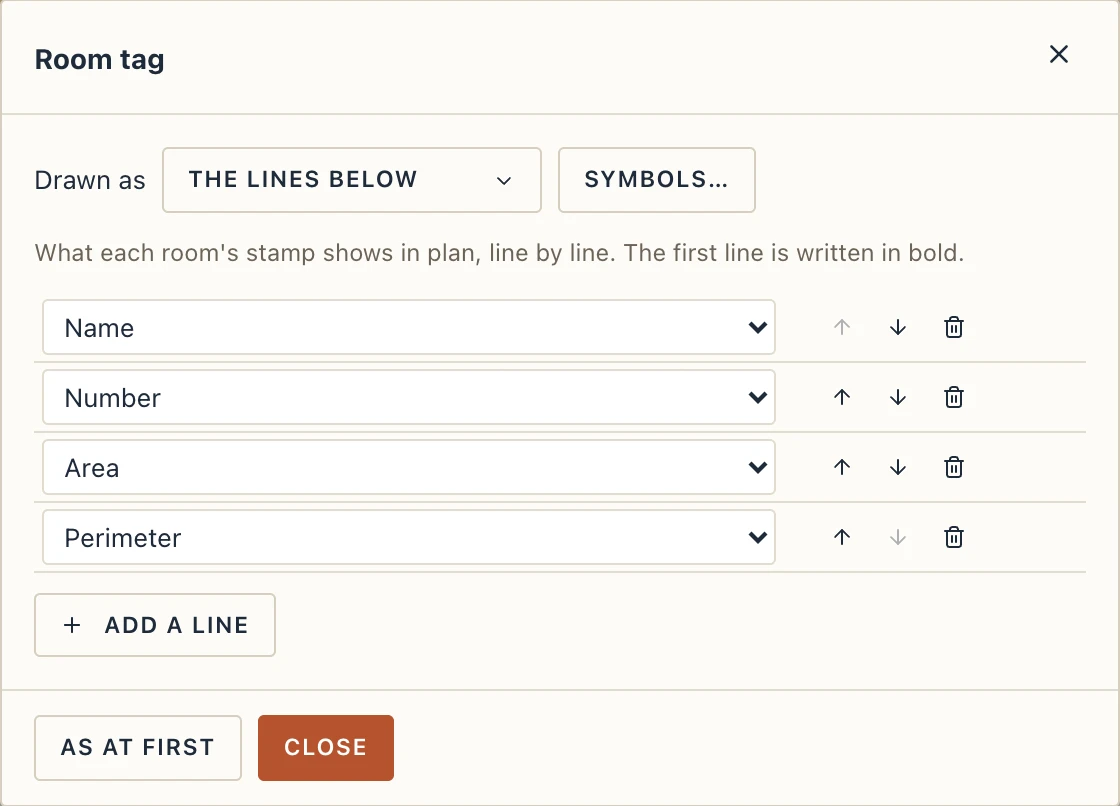
Architecture → Room tag (or Room tag… in a room's properties) sets what every room's stamp shows on plans, line by line: the name, number, function, department, area, gross area, perimeter, height, volume or floor finish, or a text of your own. The first line is bold. Drafting standards → Tags shows the same tag as text: {name}|{number}|{area}.
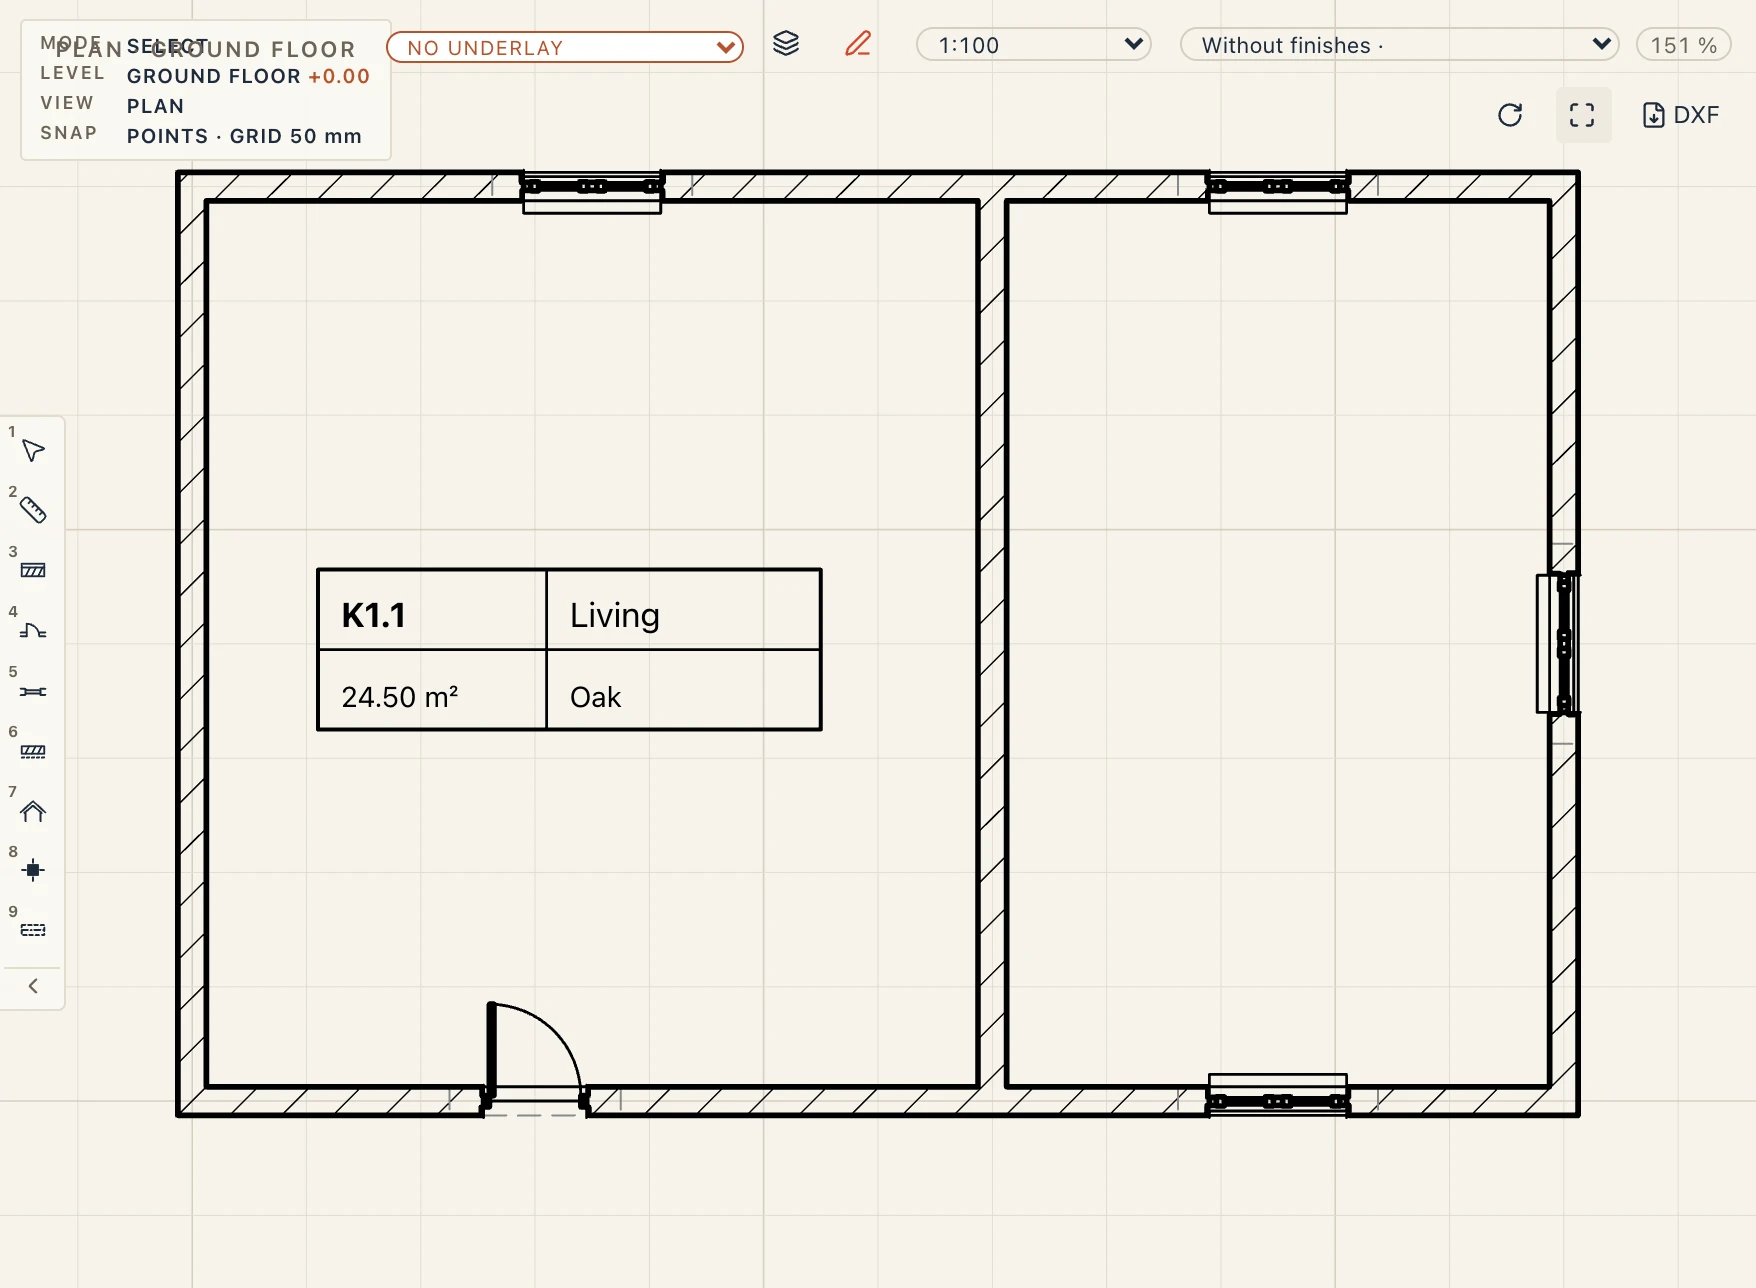
A line may also show the room's own parameters, its storey's and the project's: the list offers them under Parameters, Its storey and The project once a room has them. A storey's parameter is read by every room on it: give the storey a parameter code = K1 and a room's line {storey.code}.{number} writes K1.1; change it to K2 and every stamp follows. A room's parameter may be worked out by a formula from them (Room index = {storey.code}.{Hall}.{Flat}.{number}), and the room schedule has a column for each room parameter: see Parameters worked out by formulas.
Drawn as a symbol of your own, the stamp looks as you drew it: boxes, lines, and texts that hold the fields ({storey.code}.{number}, {name}, {area}, {Floor finish}). Draw it in Symbols…, then choose it in Drawn as; The lines below goes back to the lines. See A tag drawn by a symbol.
Area rounding
Rooms show their area to the hundredth of a square metre. Manage → Drafting standards → Project → Area rounding rounds it instead to 0.1 m², 0.5 m² or 1 m², half up, as the Nordic countries write room areas (12.27 m² becomes 12.5 m² at 0.5, and 12 m² at 1). It applies to every room area Lapin shows: the stamps on plans and sheets, the colour legend and the Room colours dialog, the room schedule, the floor areas in a room's quantities, and the areas a document fills in. Each room is rounded on its own and a total adds up the rounded rooms, so the schedule's column sums to its total. The model keeps the exact area: the IFC file, the volumes and the other quantities are never rounded. In a project in feet the step is in square feet.
Room colours
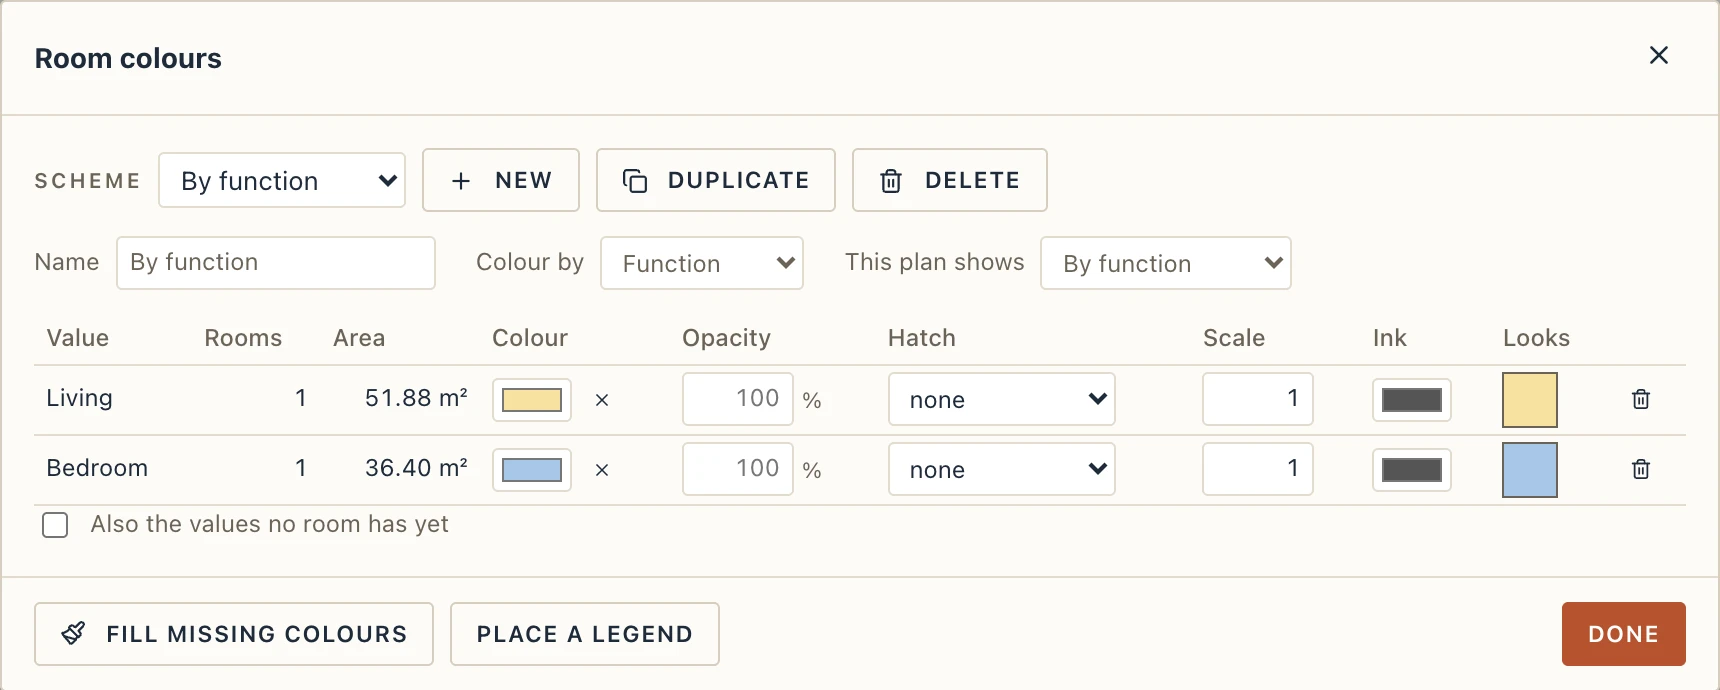
View → Room colours colours the rooms of a plan. Pick a scheme, choose what it colours by (Function, Name, Department, Number or Floor finish), and set This plan shows to the scheme. Each value the rooms have gets a row with:
- a Colour, and its Opacity (0–100 %; empty is opaque): below 100 % the plan's lines show through it, which keeps a plan readable on the dark theme's background,
- a Hatch from the project's patterns, with its Scale and Ink colour,
- and a preview of how it looks.
Fill missing colours gives every value without a colour one from a soft palette. New and Duplicate make more schemes, for example one for a client presentation and one by department.
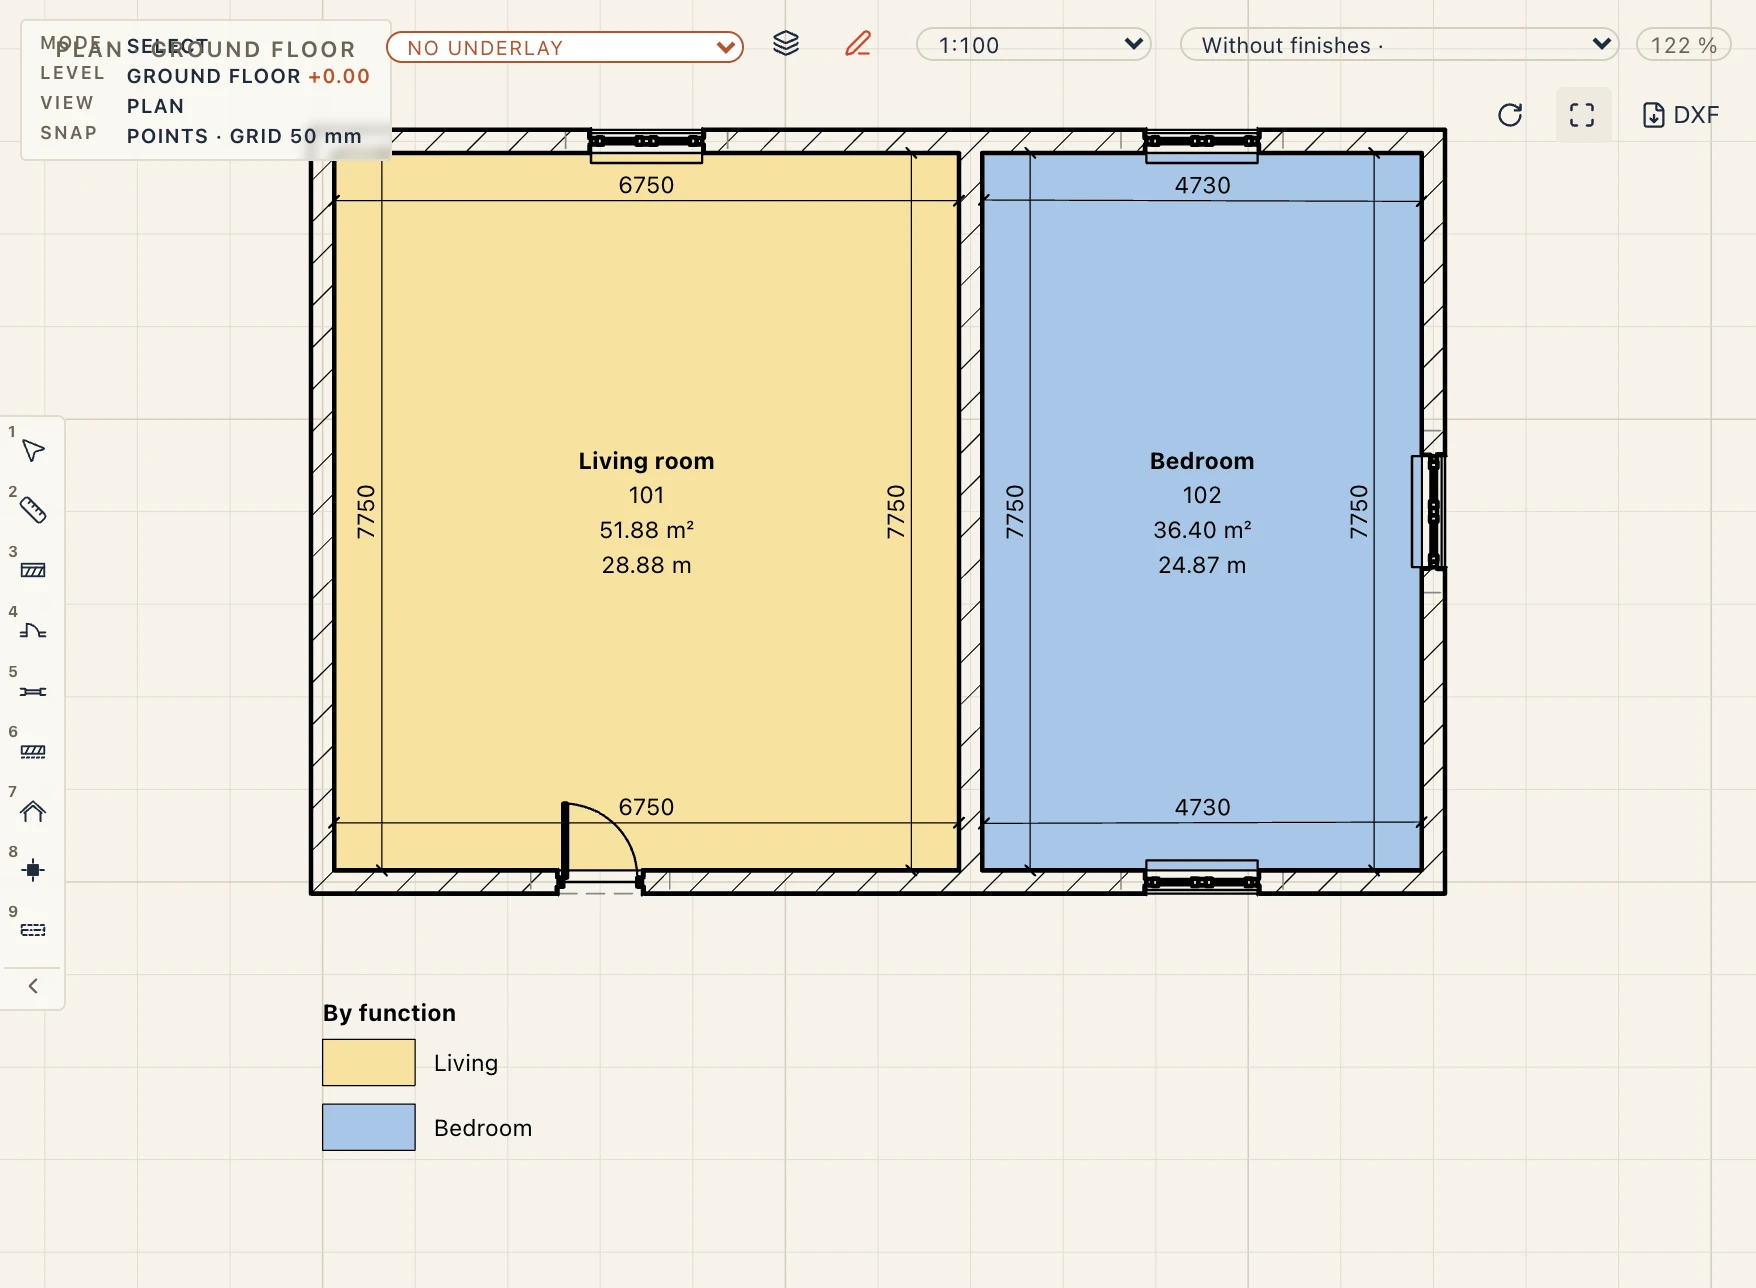
The colours are drawn under the walls, the furniture and the door swings, so the plan stays readable. They print on sheets and go into PDF and DXF exports; the PDF keeps their opacity, the DXF draws them opaque. A new plan shows no room colours until you choose a scheme for it, in Room colours or in the plan's properties.
Colour legend
Annotate → Colour legend: click where the legend goes on the plan. It lists the colours the plan's rooms use, with their names, and follows any change to the scheme. Move it with Move.
Room dimensions
Annotate → Room dimensions (ID) dimensions the inside of the rooms on a plan at once. Each side of a room gets an aligned dimension string just inside it. The string has a point at each corner of the side and at the jambs of each door and window in it.
- With rooms selected, only those are dimensioned. With nothing selected, every room of the plan's level is.
- Asked on a site plan, which sees the whole model from above and cuts no wall, the strings go to the level's floor plan instead. A dimension's text height can be set on its own in Properties (Text height, mm on the paper; empty: its dimension style's). Text heights are on the paper, so on a 1:500 site plan the same text is five times larger in the model than on a 1:100 plan.
- The points hold on the walls, like any dimension's. Move a wall and the strings follow it.
- Run it again on a room to make its strings anew, for example after adding a door. The old strings are replaced, not doubled.
- Very short sides, under 30 cm, are left out. Edit or delete any string as you would one you drew.
- Which strings are made, their order, offset, spacing and style are set in Annotate → Dimension rules…; see Exterior dimensions and dimension rules. The outside of the building has its own tool, Exterior dimensions.
Room finishes
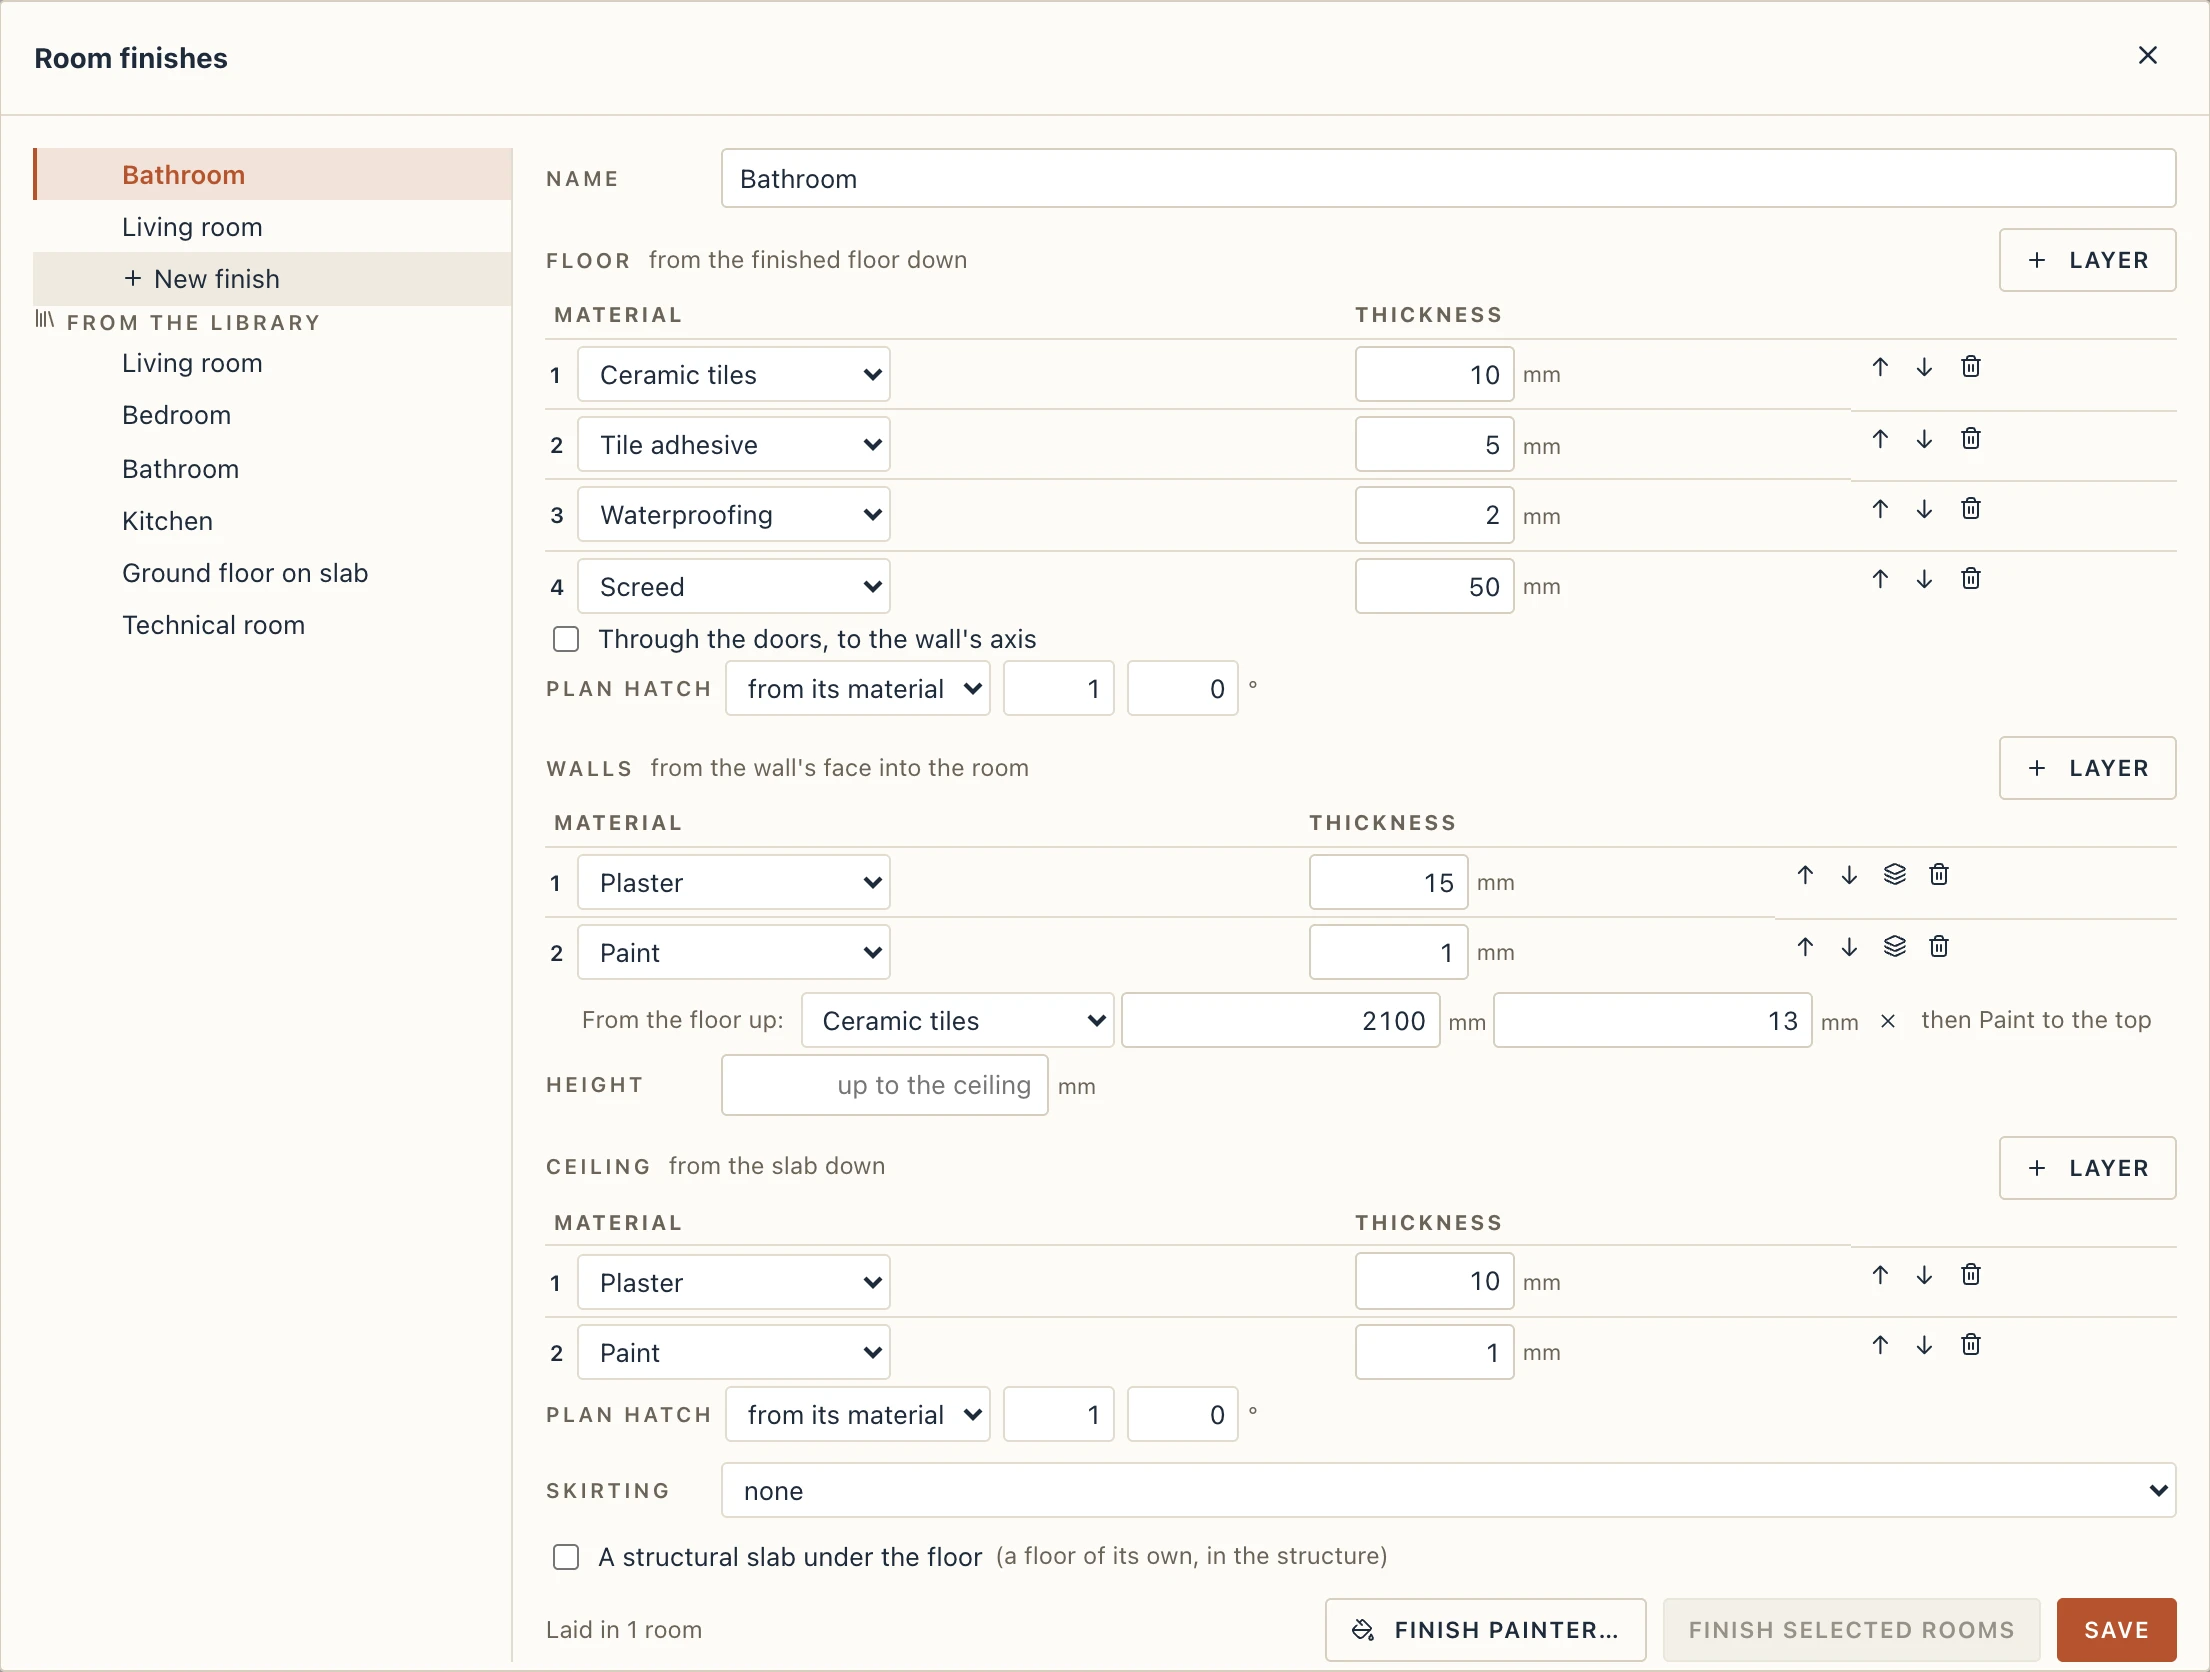
Interior → Finish room (FR) lays a finish in the room you click: its floor, its walls' finish and its ceiling, each following the room's outline as the room does. Move a wall and the finishes go with it. Interior → Room finishes edits the finishes; From the library brings in ready-made ones: Living room, Bedroom, Bathroom, Kitchen, Ground floor on slab and Technical room. While the tool is on, the properties panel shows the finish it lays, to choose before the click. A room's Finish, in its properties, lays another one or takes it off.
A finish has:
- Floor, its layers from the finished floor down (tiles, adhesive, screed…). The floor's openings in the room (a stairwell) are taken out. Through the doors, to the wall's axis carries the floor on under each door, so the next room's floor meets it at the wall's axis.
- Walls, its layers from the wall's face into the room, round the room's islands too. Each layer may change material up its height, as a wall type's layer does: in the Bathroom, paint above ceramic tiles up to 2100 (13 mm thick, tiles and adhesive); in the Kitchen, a band of tiles from 900 to 1500. A piece with no material leaves nothing there. The doors and windows of the walls round the room are cut out, and their reveals lined with the same layers, from the room's face to the frame (a bare opening's to the wall's axis); a window's bottom too, unless a sill board covers it on the room's side. Height: empty, up to the ceiling.
- Ceiling, its layers from the slab above the room down (from the room's height when there is no slab), its openings taken out.
- Skirting: a skirting type laid round the room, broken at its doors (see Skirtings, under Floors and roofs).
- A structural slab under the floor: a reinforced concrete floor of its own under the floor's layers, its thickness and how far past the room's outline it goes (under the walls). It is a floor like any other, in the structure, and its schedule.
Save changes the finish, and every room that has it is laid again. Finish selected rooms lays it in the rooms selected.
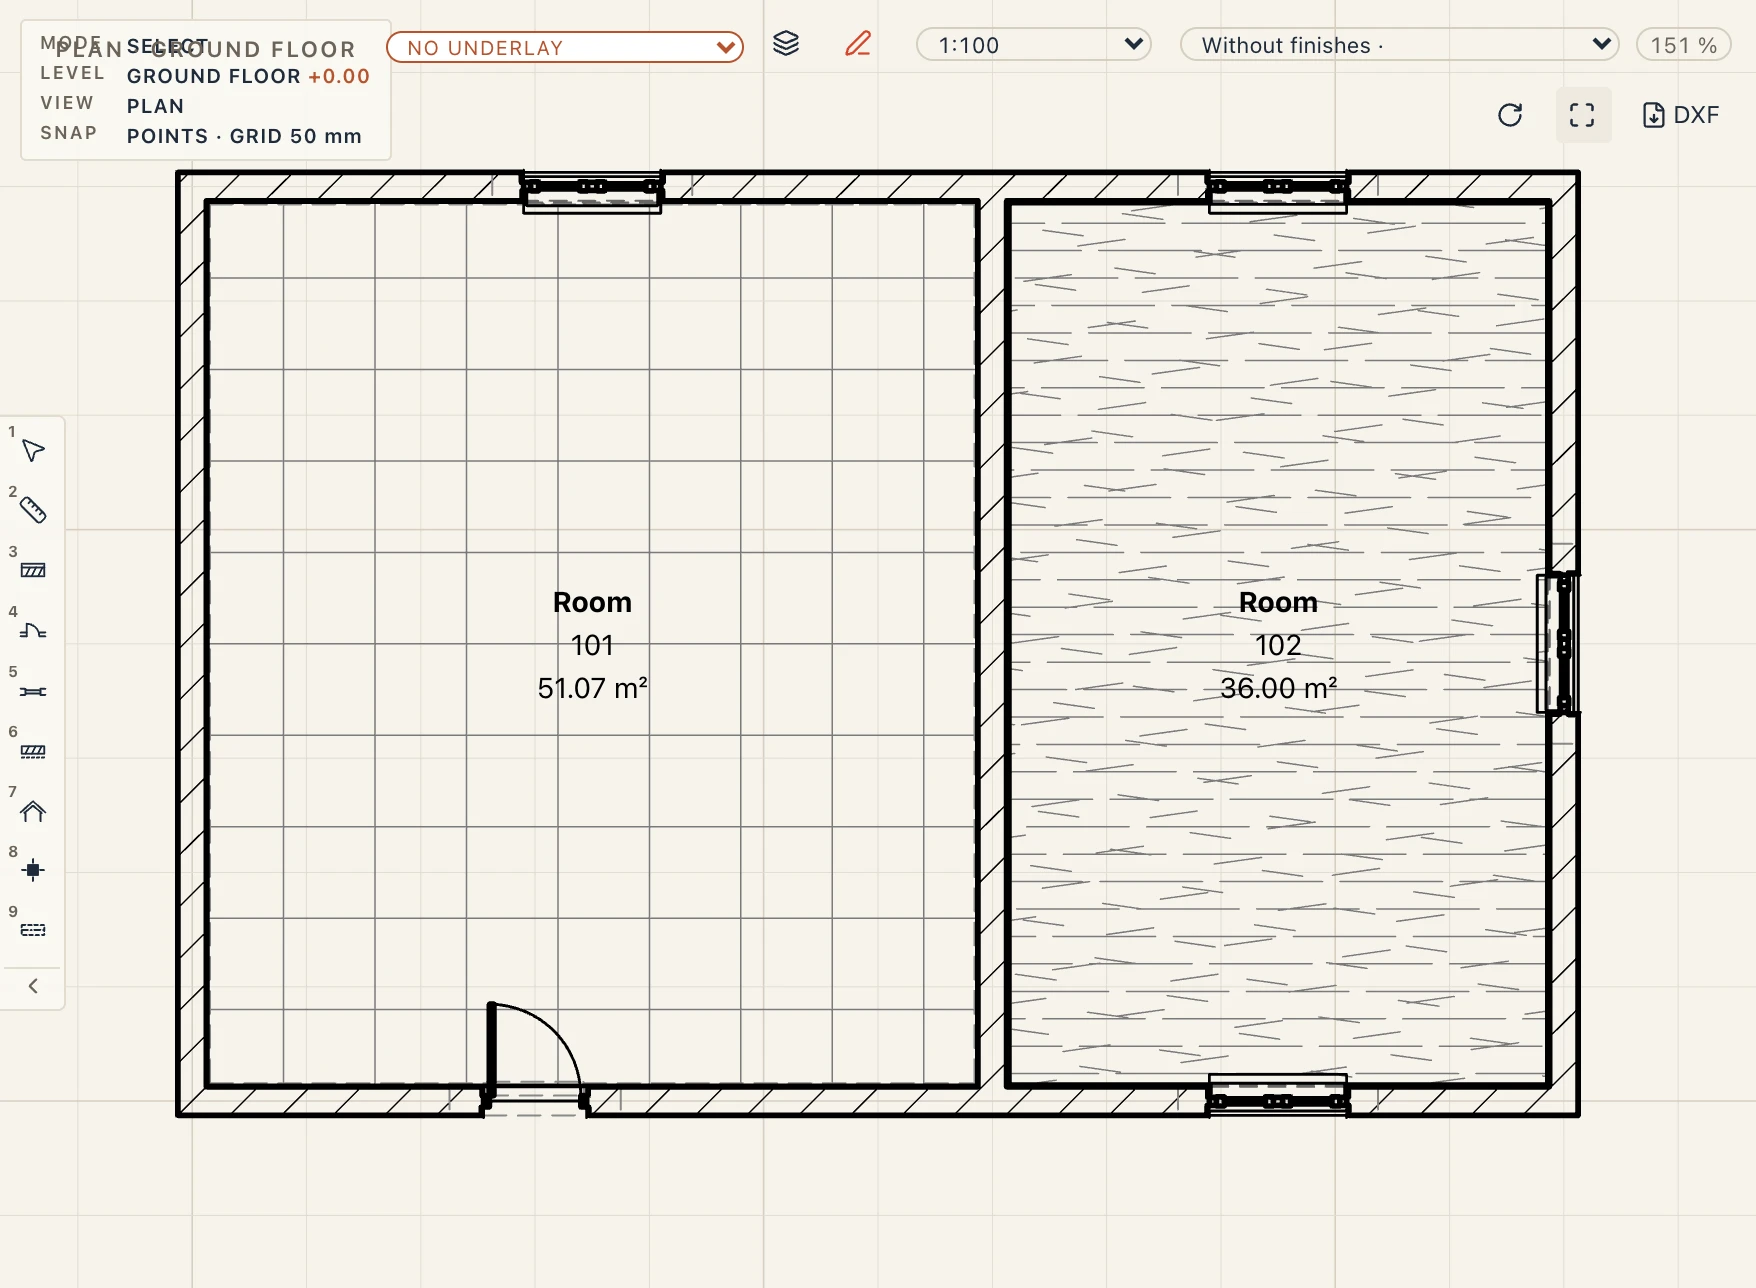
Plan hatch. On plans, a finished room's floor is hatched as its finish says, under the walls, so sheets, the PDF and DXF print it (layer FINISH-HATCH). In the finish's Floor, Plan hatch chooses from its material (the default: the top layer's surface pattern, its hatch for elevations, where it is seen, in Manage → Materials, else one its name suggests: tiles, boards for parquet and laminate, a cross for carpet, lines for vinyl, speckles for a poured floor, else diagonal lines), an own pattern (any pattern of the project, with its scale, angle and colour) or not hatched; a scale and an angle apply to the material's pattern too. A plan seen from below (a reflected ceiling plan) hatches the ceilings instead, by the Ceiling's Plan hatch the same way. A room's Floor hatch, in its properties, turns it off for that room. A view style's Floor finish hatches (View → View settings, Manage → View styles) turns it off for whole views: it is on in Architectural, off in Structural, MEP and Coordination. With room colours on the plan, the colour fills the room and the hatch is drawn over it.
Each finish measures, by material, its gross area (the room's outline, nothing deducted: the floor's area, the walls' perimeter times each piece's height) and its net area (what is built: the doors, windows and floor openings taken out, the reveals and the floor through the doors added; the reveals' share is in the quantities, as RevealArea), and its volume. Interior → Finishes schedule lists every finished room by part and material, with the totals by material at the end; like any schedule it charts, exports and goes on a sheet. In IFC a finish is an IfcCovering: FLOORING, CLADDING or CEILING.
A finish lines what the room's walls already have: if the wall types carry their own plaster, give the room's walls only what goes over it (paint, tiles), or use wall types of the core only.
A room's fields from its finish. A tag, a schedule's formula or a symbol's text reads what the room's finish shows: {finish.name} the finish's name, {finish.floor} its floor's top layer (Ceramic tiles), {finish.walls} and {finish.ceiling} the layer facing the room. Room tag offers them as Finish, Finish: floor, Finish: walls and Finish: ceiling. They are worked out every time, never stored: lay another finish and the stamps follow. A door reads its room's through {room.finish.floor}.
A finished room is measured to its finishes. Its area, perimeter and volume, in its quantities, on its stamp, in the room schedule, the colour legend and a document's usable area, are measured to the finished face of its walls: the walls' finish at the floor (the tiles on the adhesive, say 1.5 cm) is taken in along every side, so a 4 × 5 m room finished so has 3.97 × 4.97 m. The volume goes up to the finished ceiling (the ceiling's layers under the slab above, else under the room's height). The doors' gaps are not the room's: the finished face runs on across them, even when the floor runs on through the doors. The measures to the walls stay in the quantities as the gross floor area, the perimeter and the gross volume. Change the finish or take it off and the room's area follows at once, with no Update rooms.
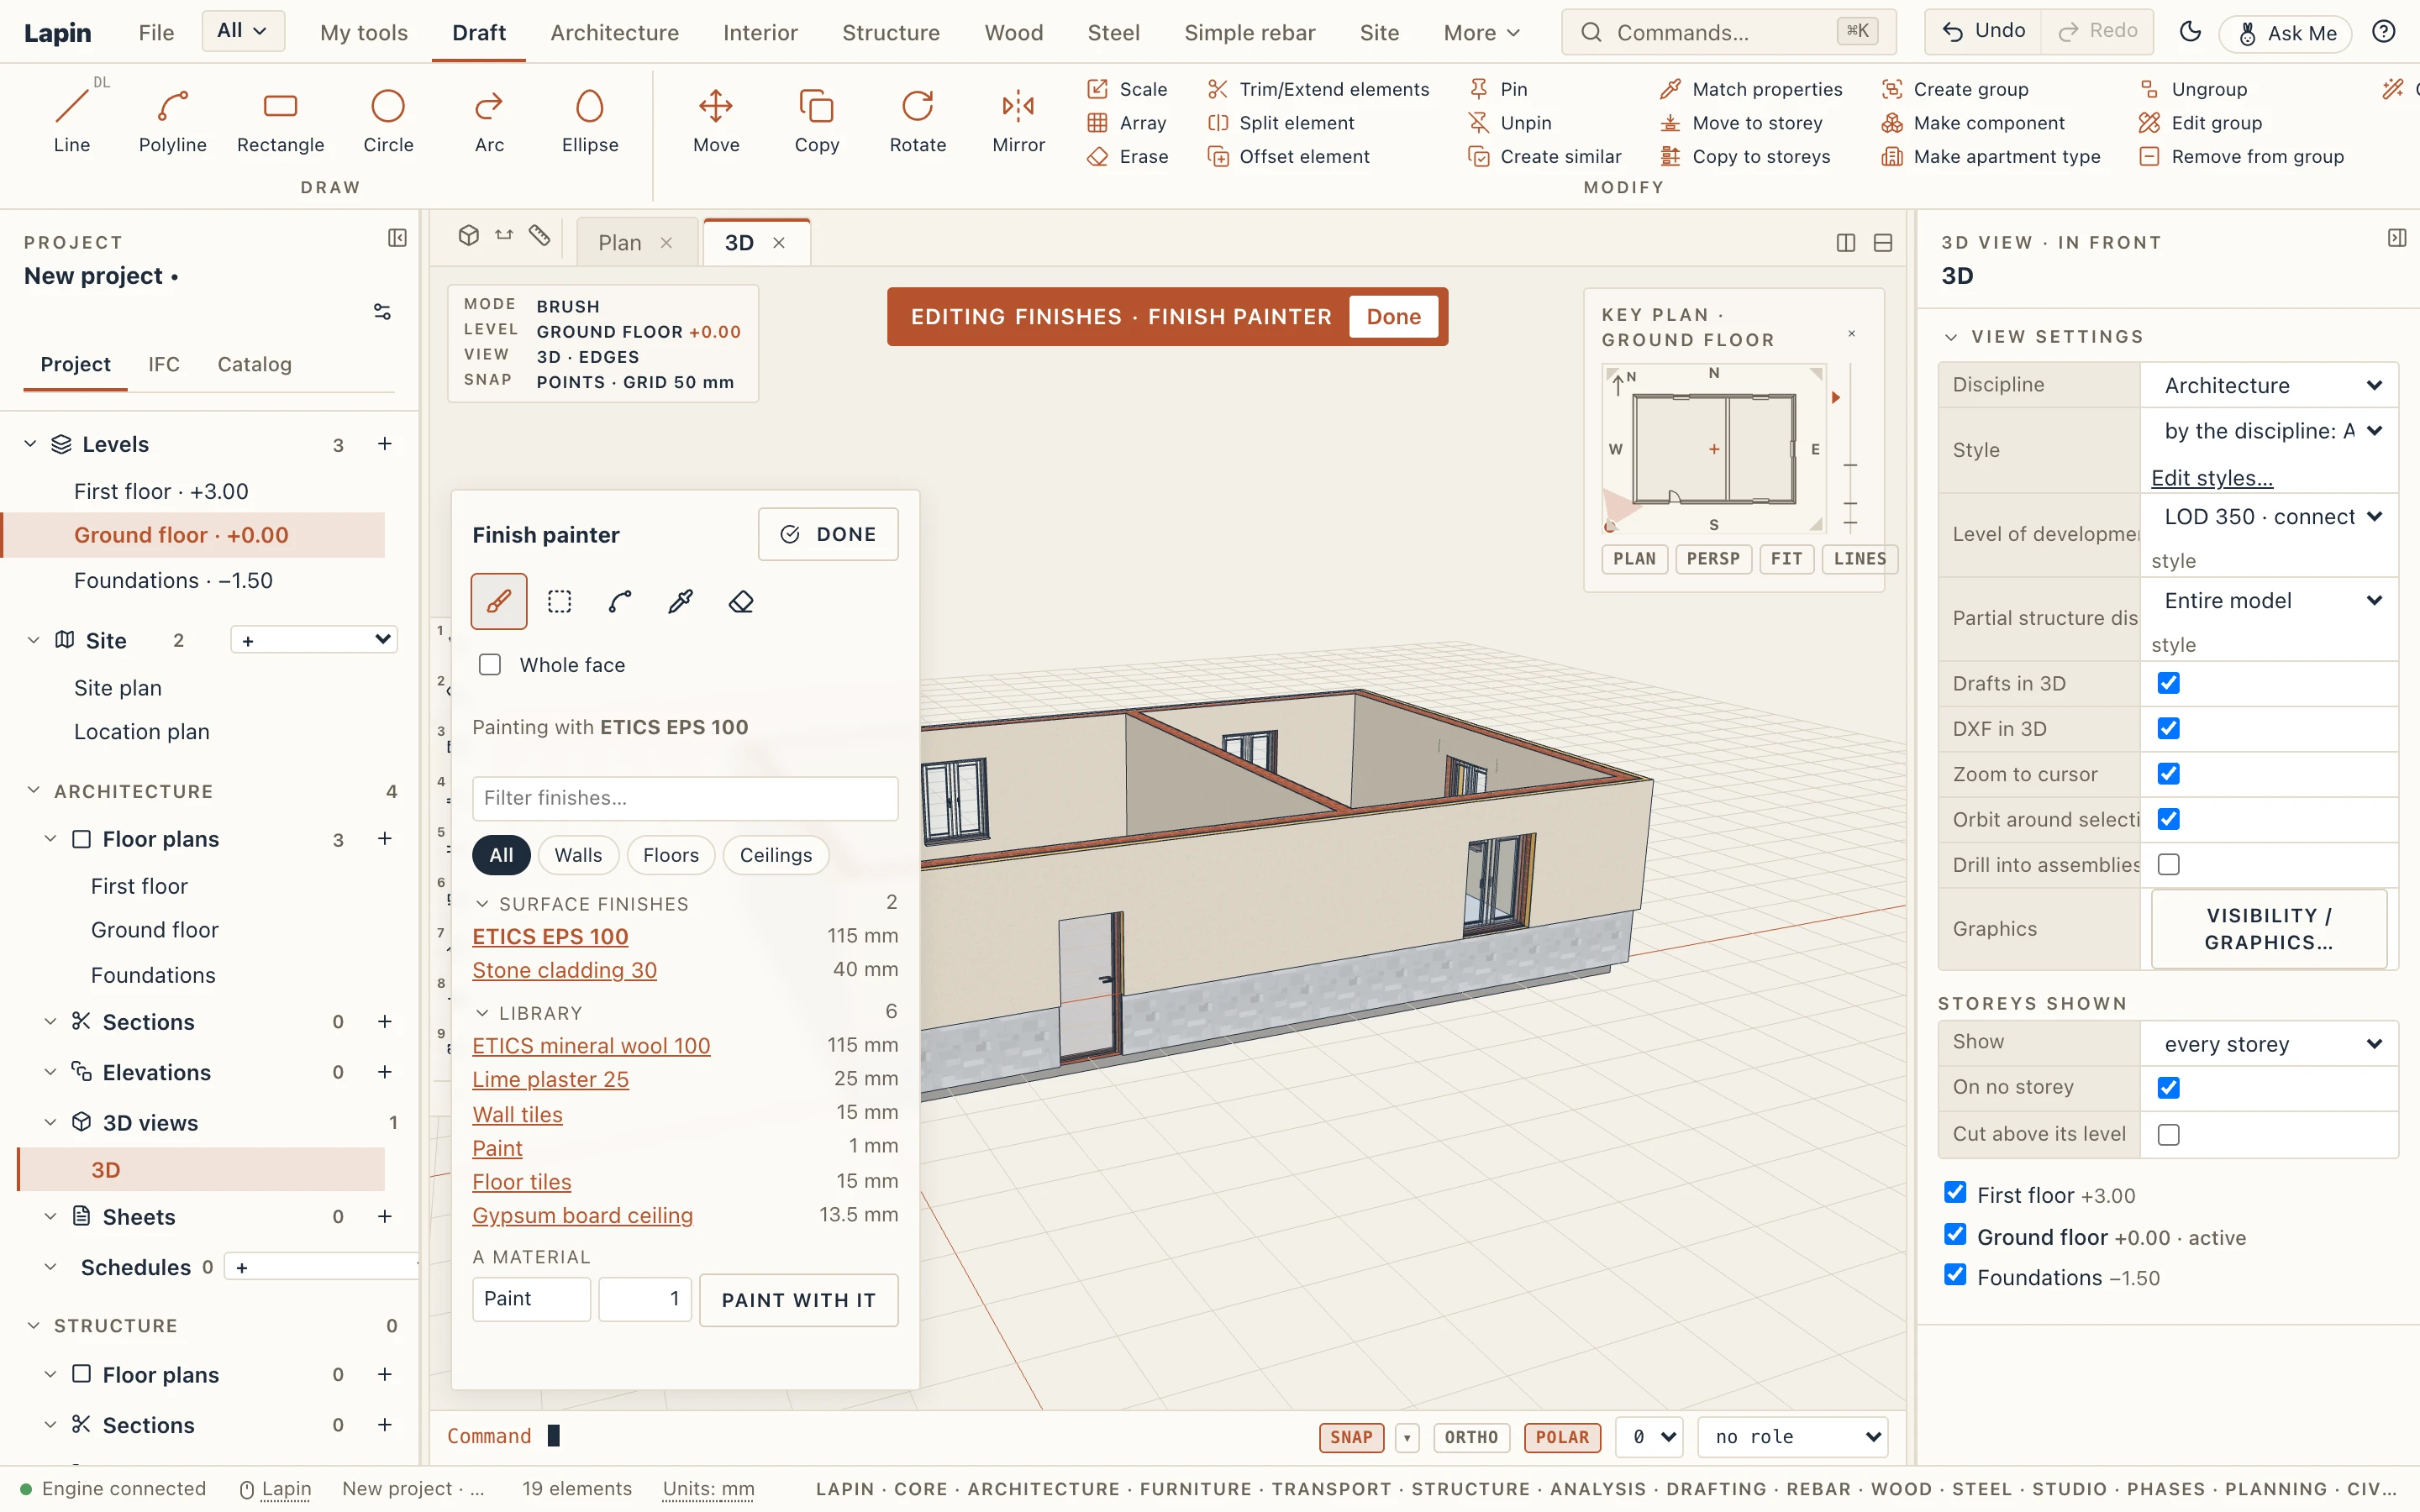
Finish painter
Room finishes line rooms whole. The finish painter paints faces: a wall's sides, inside and outside (a facade's ETICS, a plinth of stone), a floor's top and its underside (a ceiling), a floor's edges, a column's sides, each whole or in parts you divide it into. Interior → Finish painter (FP), or Finish painter… in Room finishes, enters it as an edit mode: walls, floors, columns, beams and what is painted stay, the rest is faded, and Done (Esc) leaves it. Its panel holds the tools and the palette:
- Surface finishes: the project's own, each its layers from the face outward. The Library brings in ready-made ones (indicative build-ups): ETICS EPS 100 (adhesive, 10 cm EPS, render), ETICS mineral wool 100, Lime plaster 25, Wall tiles, Stone cladding 30, Paint, Floor tiles, Gypsum board ceiling.
- Room finishes: each room finish of the project split into its walls, floor and ceiling (the floor's layers turned over, from the slab up). Change the room finish and the faces painted with it follow. Its pieces up the height (tiles to 2100) are not used on a face: split the face instead.
- A material: one material and a thickness in millimetres, Paint with it.
The tools:
- Brush: click a face and the region under the cursor is painted with the finish chosen; in 3D the region lights up as the cursor moves over it. With Whole face on, the whole face is painted, replacing what was on it. A click on a finish already painted paints the face under it. In a plan the brush paints a wall's side (the one nearer the click) or a floor's top.
- Split by rectangle, Split by line: draw right on a face in 3D, as Studio's Rectangle and Line do (the same inferences, a typed size); the face is divided along it, and each part is painted on its own. A rectangle inside a face is a panel of its own, taken out of the part round it. A split drawn after painting divides what was painted: the region under the brush gets the new finish.
- Eyedropper: click a face and its finish is chosen in the palette.
- Clear: click a region and its finish is taken off (with Whole face, the face's; its splits stay).
Every click is one undo step. What is painted belongs to the face, kept in the face's own coordinates: move, lengthen or retype the wall and its finishes go with it; delete it and they go too. A flipped wall keeps its finishes on the same side of the building.
Each painted region is built: its layers are bodies of their own material from the face outward, the face's doors and windows cut out of them, so plans and sections cut and hatch them by material (a style that leaves the finishes out of plans leaves them out too), elevations and the 3D show them, and IFC exports each as an IfcCovering (CLADDING on a wall, FLOORING on a floor's top, CEILING under it) related to the element it covers (IfcRelCoversBldgElements). At a building's outer corner the layers of two facades are mitred and meet (right-angled corners). Each measures, by layer and material, its net area (openings out), its gross area and volume; Interior → Surface finishes schedule lists them by element, face and material with the totals, and the cost estimate takes them as finishes.
A room keeps being measured to its room finish: a face painted inside it does not change its area.
Rooms in 3D and in IFC
Rooms are hidden in the 3D view, so they do not cover the building. Visibility / Graphics in the 3D view can show them.
In an IFC export each room is an IfcSpace, with its number, name, function, areas and volume.
Rooms from an IFC file
File → Import IFC… brings the file's spaces in as rooms, whichever program wrote them (Revit, ArchiCAD, Allplan, Bonsai…):
- each goes on its own level, the one the file puts it in;
- its outline comes from its shape (an extrusion, a B-rep or a mesh, or the footprint drawn beside it); it keeps that outline, it does not follow walls;
- its name is the space's long name and its number its name (as Revit and ArchiCAD write them); its height, and its base offset when it starts above its level (a gallery, a raised floor), come from its shape;
- its function, department and floor finish come from the file where it says them (the object type or the space category, a Department property, the floor covering), so a colour scheme by function or by department colours them at once;
- everything else the space had in the file, its property sets and quantities (Pset_SpaceCommon, BaseQuantities, the program's own sets), is kept and listed, read-only, under IFC properties in its properties, with a filter when there are many.
The import's message says how many rooms came in. Look for them on their levels' plans (each shows its stamp), in a Rooms schedule (+ under Schedules in the browser) or in the browser's IFC tab; the 3D view hides rooms.
A space whose shape gives no outline still comes in, with its name and properties, as a room without an outline: it is listed in the schedule but drawn nowhere. Select it (the browser's IFC tab), open its level's plan, then Find by a click (click inside its walls) or Draw outline in its properties.