User guide
Furniture
Sofas, corner sofas, armchairs, chairs, beds, wardrobes, chests, bookcases, sideboards, tables, desks and kitchens in six layouts, from parametric types, placed against walls with a click.
Placing furniture
The Interior tab has, after the finishes, one tool, Place furniture, for every kind of piece: the kind is chosen in the command line's bar (grouped as seating, beds, storage, tables and models), and each kind keeps its own letters: Sofa (SO), Corner sofa, Armchair (AC), Chair, Bed (BD), Bedside table, Wardrobe (WD), Chest of drawers, Bookcase, Sideboard, Table (TB), Coffee table and Desk. Choose the kind and click in the plan.
Click near a wall and the piece backs onto it. Its back sits on the face of the wall (on the plaster, not the core), its front faces the room, and it slides along the wall until it no longer runs into the wall across a corner. Click further from any wall and the piece stands where you clicked.
While a tool is on, the command line's bar shows:
- the type the tool puts down, chosen from the project's types of that kind (if there is none yet, the first is made as you place the piece);
- the turn, 0°, 90°, 180° or 270°, for a piece standing free;
- Against walls, which you can switch off to place a piece exactly where you click, even next to a wall.
The properties panel shows the same type before you click, with its size and Edit types….
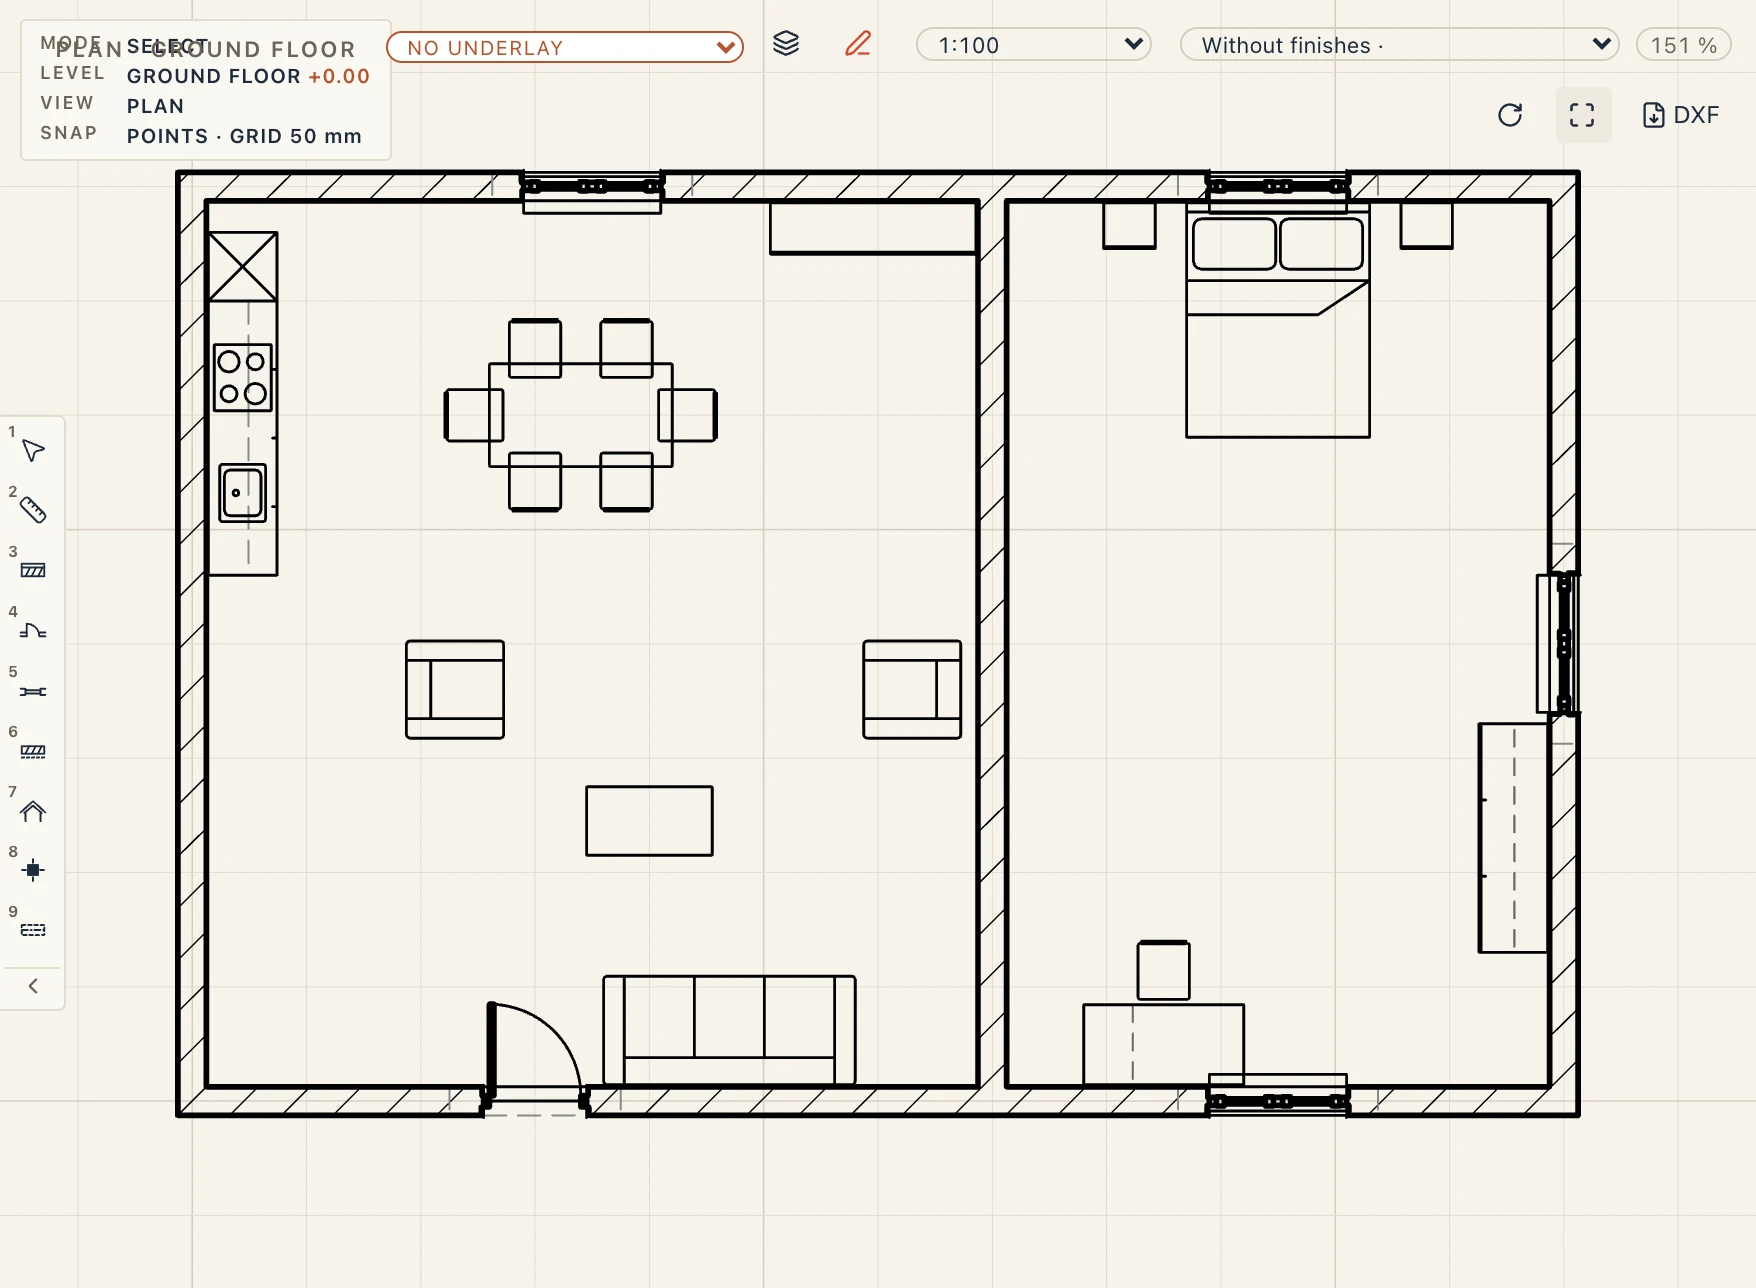
Plans draw furniture by its symbol, as a drawing convention, not cut:
- a sofa with its back, arms and cushions;
- a bed with its headboard, pillows and turned-down duvet;
- a wardrobe with its hanging rail and its doors;
- a kitchen with its sink and hob, and its wall units dashed.
Elevations and sections draw the bodies, with their materials' hatches. In 3D the pieces are low-poly bodies made by Lapin.
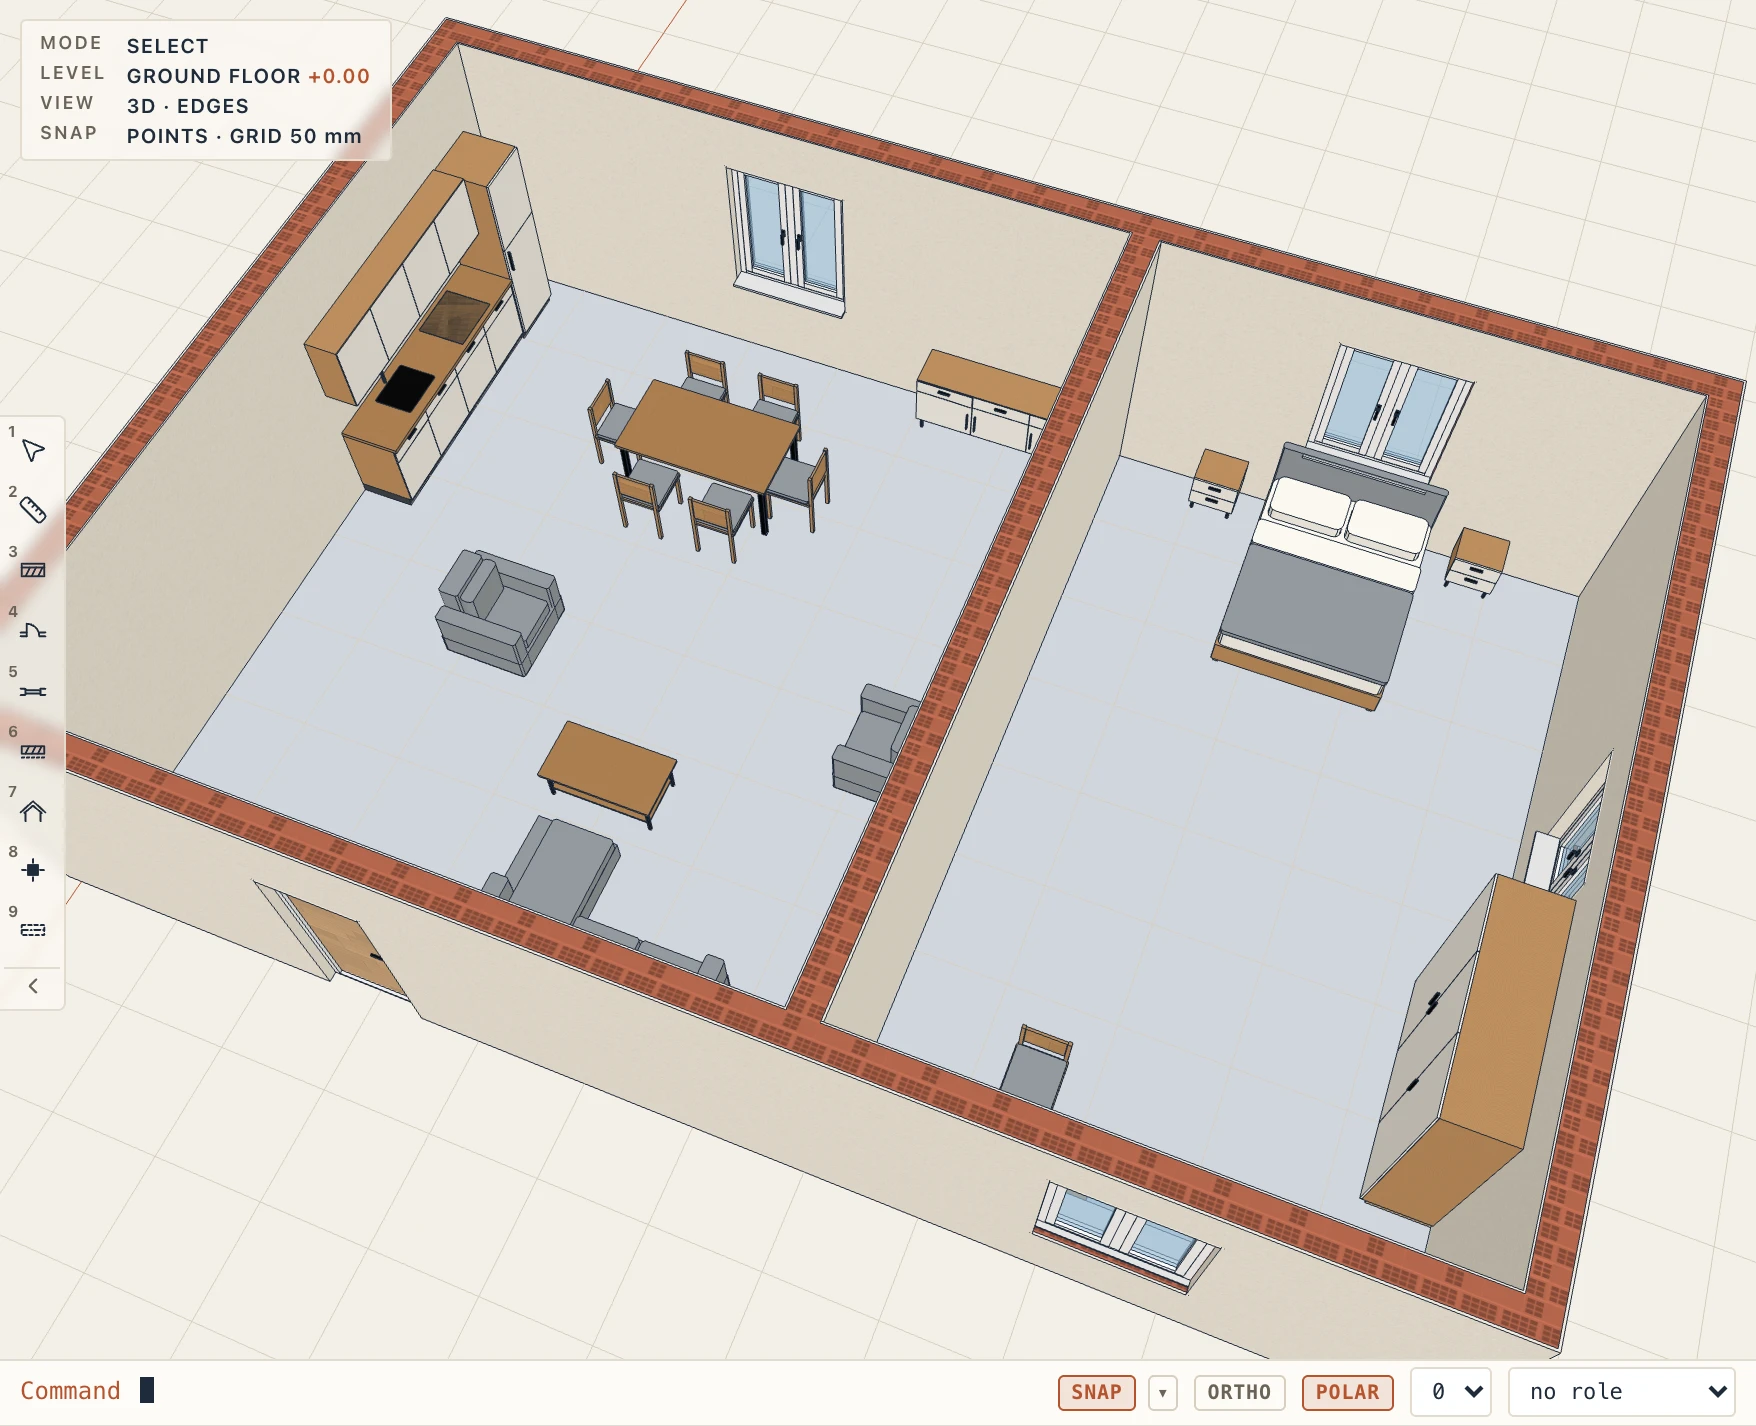
Chairs round a table, and the kitchen
Chairs round a table: click a table or a desk. Chairs go along its long sides, about one every 600 mm, and one at each end when the end is wide enough; a round table gets them in a circle. Each chair faces the table. A desk gets chairs on its front side only. The chairs are of the type chosen for the Chair tool.
Kitchen (KT) is drawn with two points along a wall:
- the line's length is the kitchen's length, and its back sits on the wall's face;
- the base units are split evenly at about 600 mm;
- it has a worktop, a sink and a hob (where they stand along the run is set on the type), wall units above, and a tall unit for the fridge at one end.
A kitchen's Length stays editable in its properties; the units are split again.
Kitchen layouts
A kitchen type has a Layout: One wall (the straight run), Galley (two parallel runs with an aisle between), L-shaped, U-shaped, Island (a run on the back wall and a separate island with its aisle) or Peninsula (an L with a run reaching out from its leg, its worktop overhanging for stools). Choosing one starts the type from that layout’s sizes, and each stays editable beside the preview: the leg lengths from the back wall, the aisle between runs, the opposite run’s length, the island’s length, depth and place, the peninsula’s length and overhang, and for an L or a peninsula the corner on the left or the right.
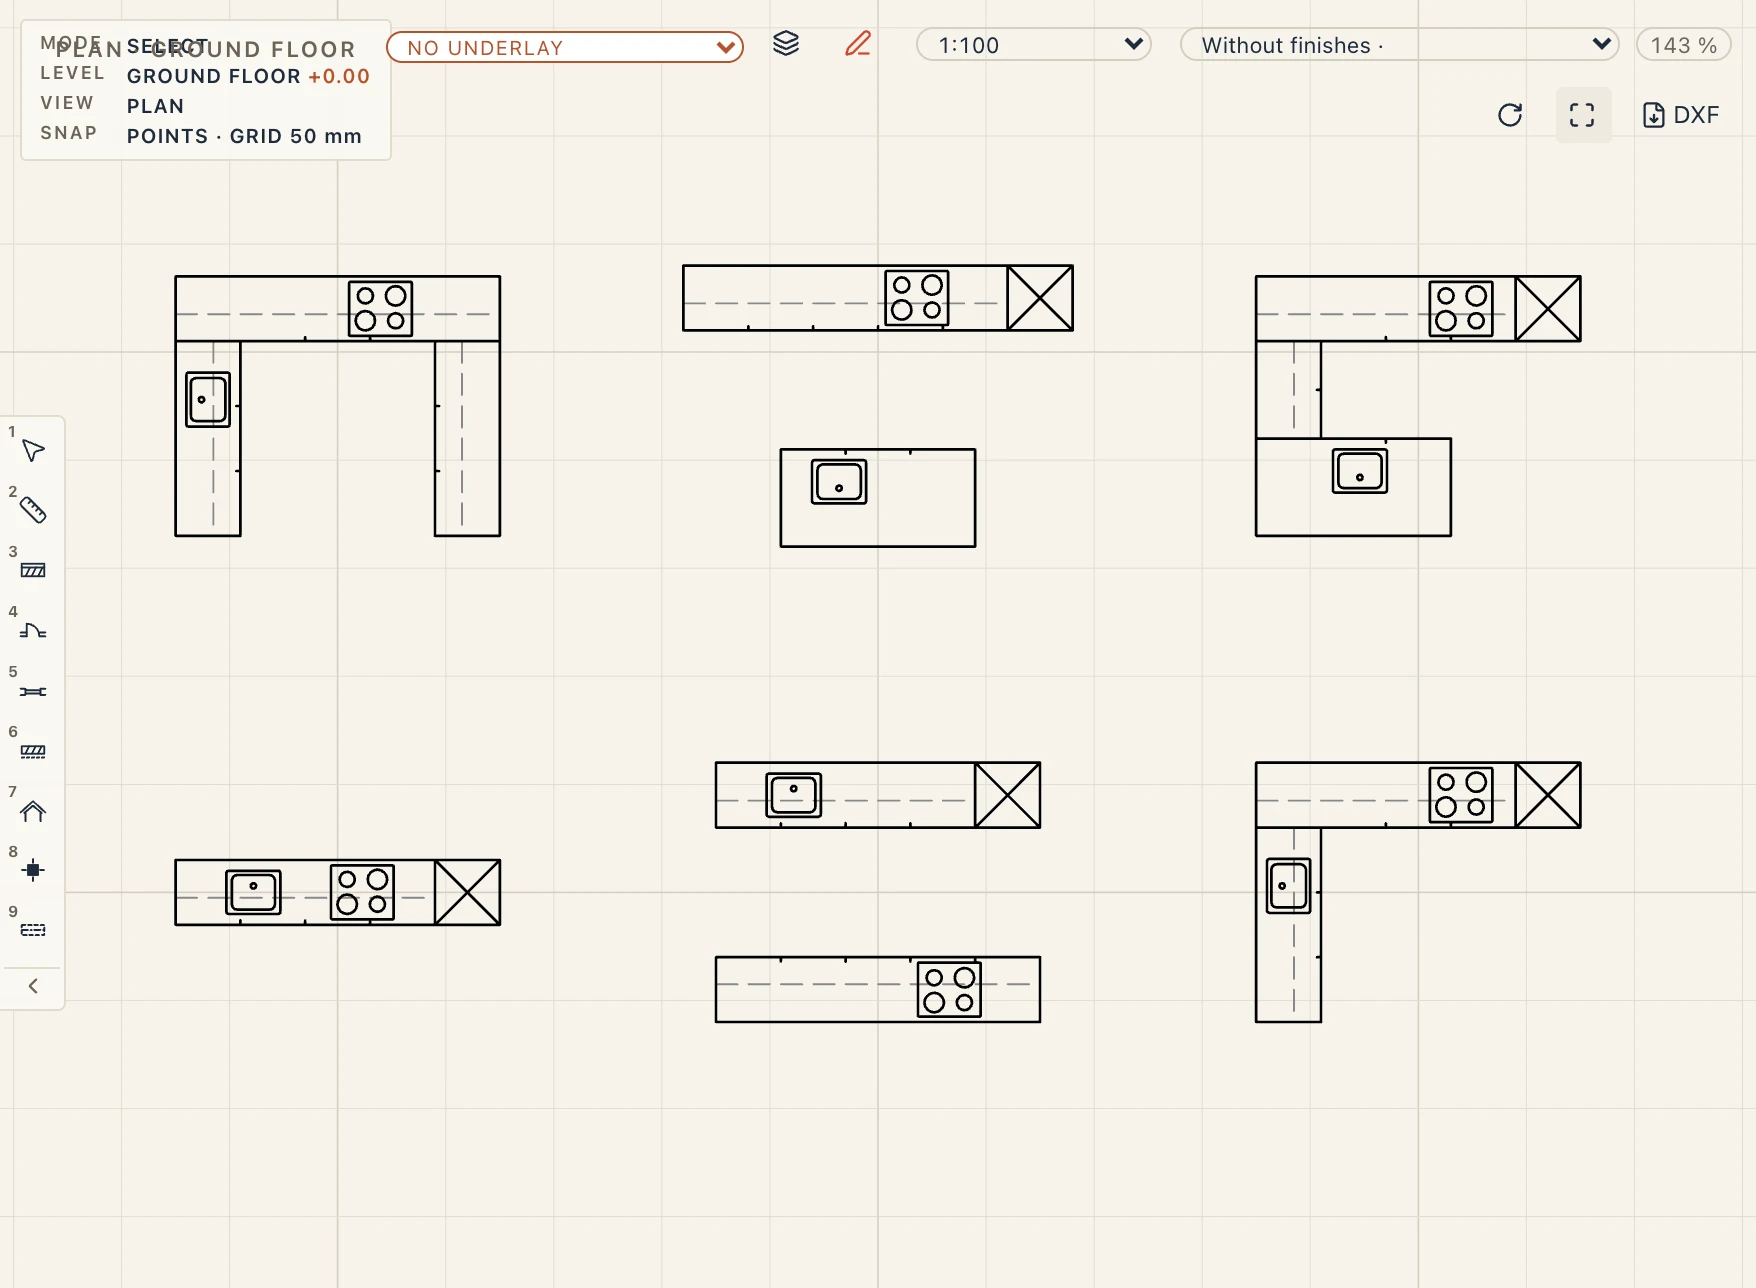
Sink on and Hob on put them on the main run or on the other part (the leg, the opposite run, the island, the peninsula), Sink at and Hob at say where along it, and the Tall unit (fridge) stands at a free end. The corner units are blind; wall units are only on runs against a wall, not on an island or a peninsula.
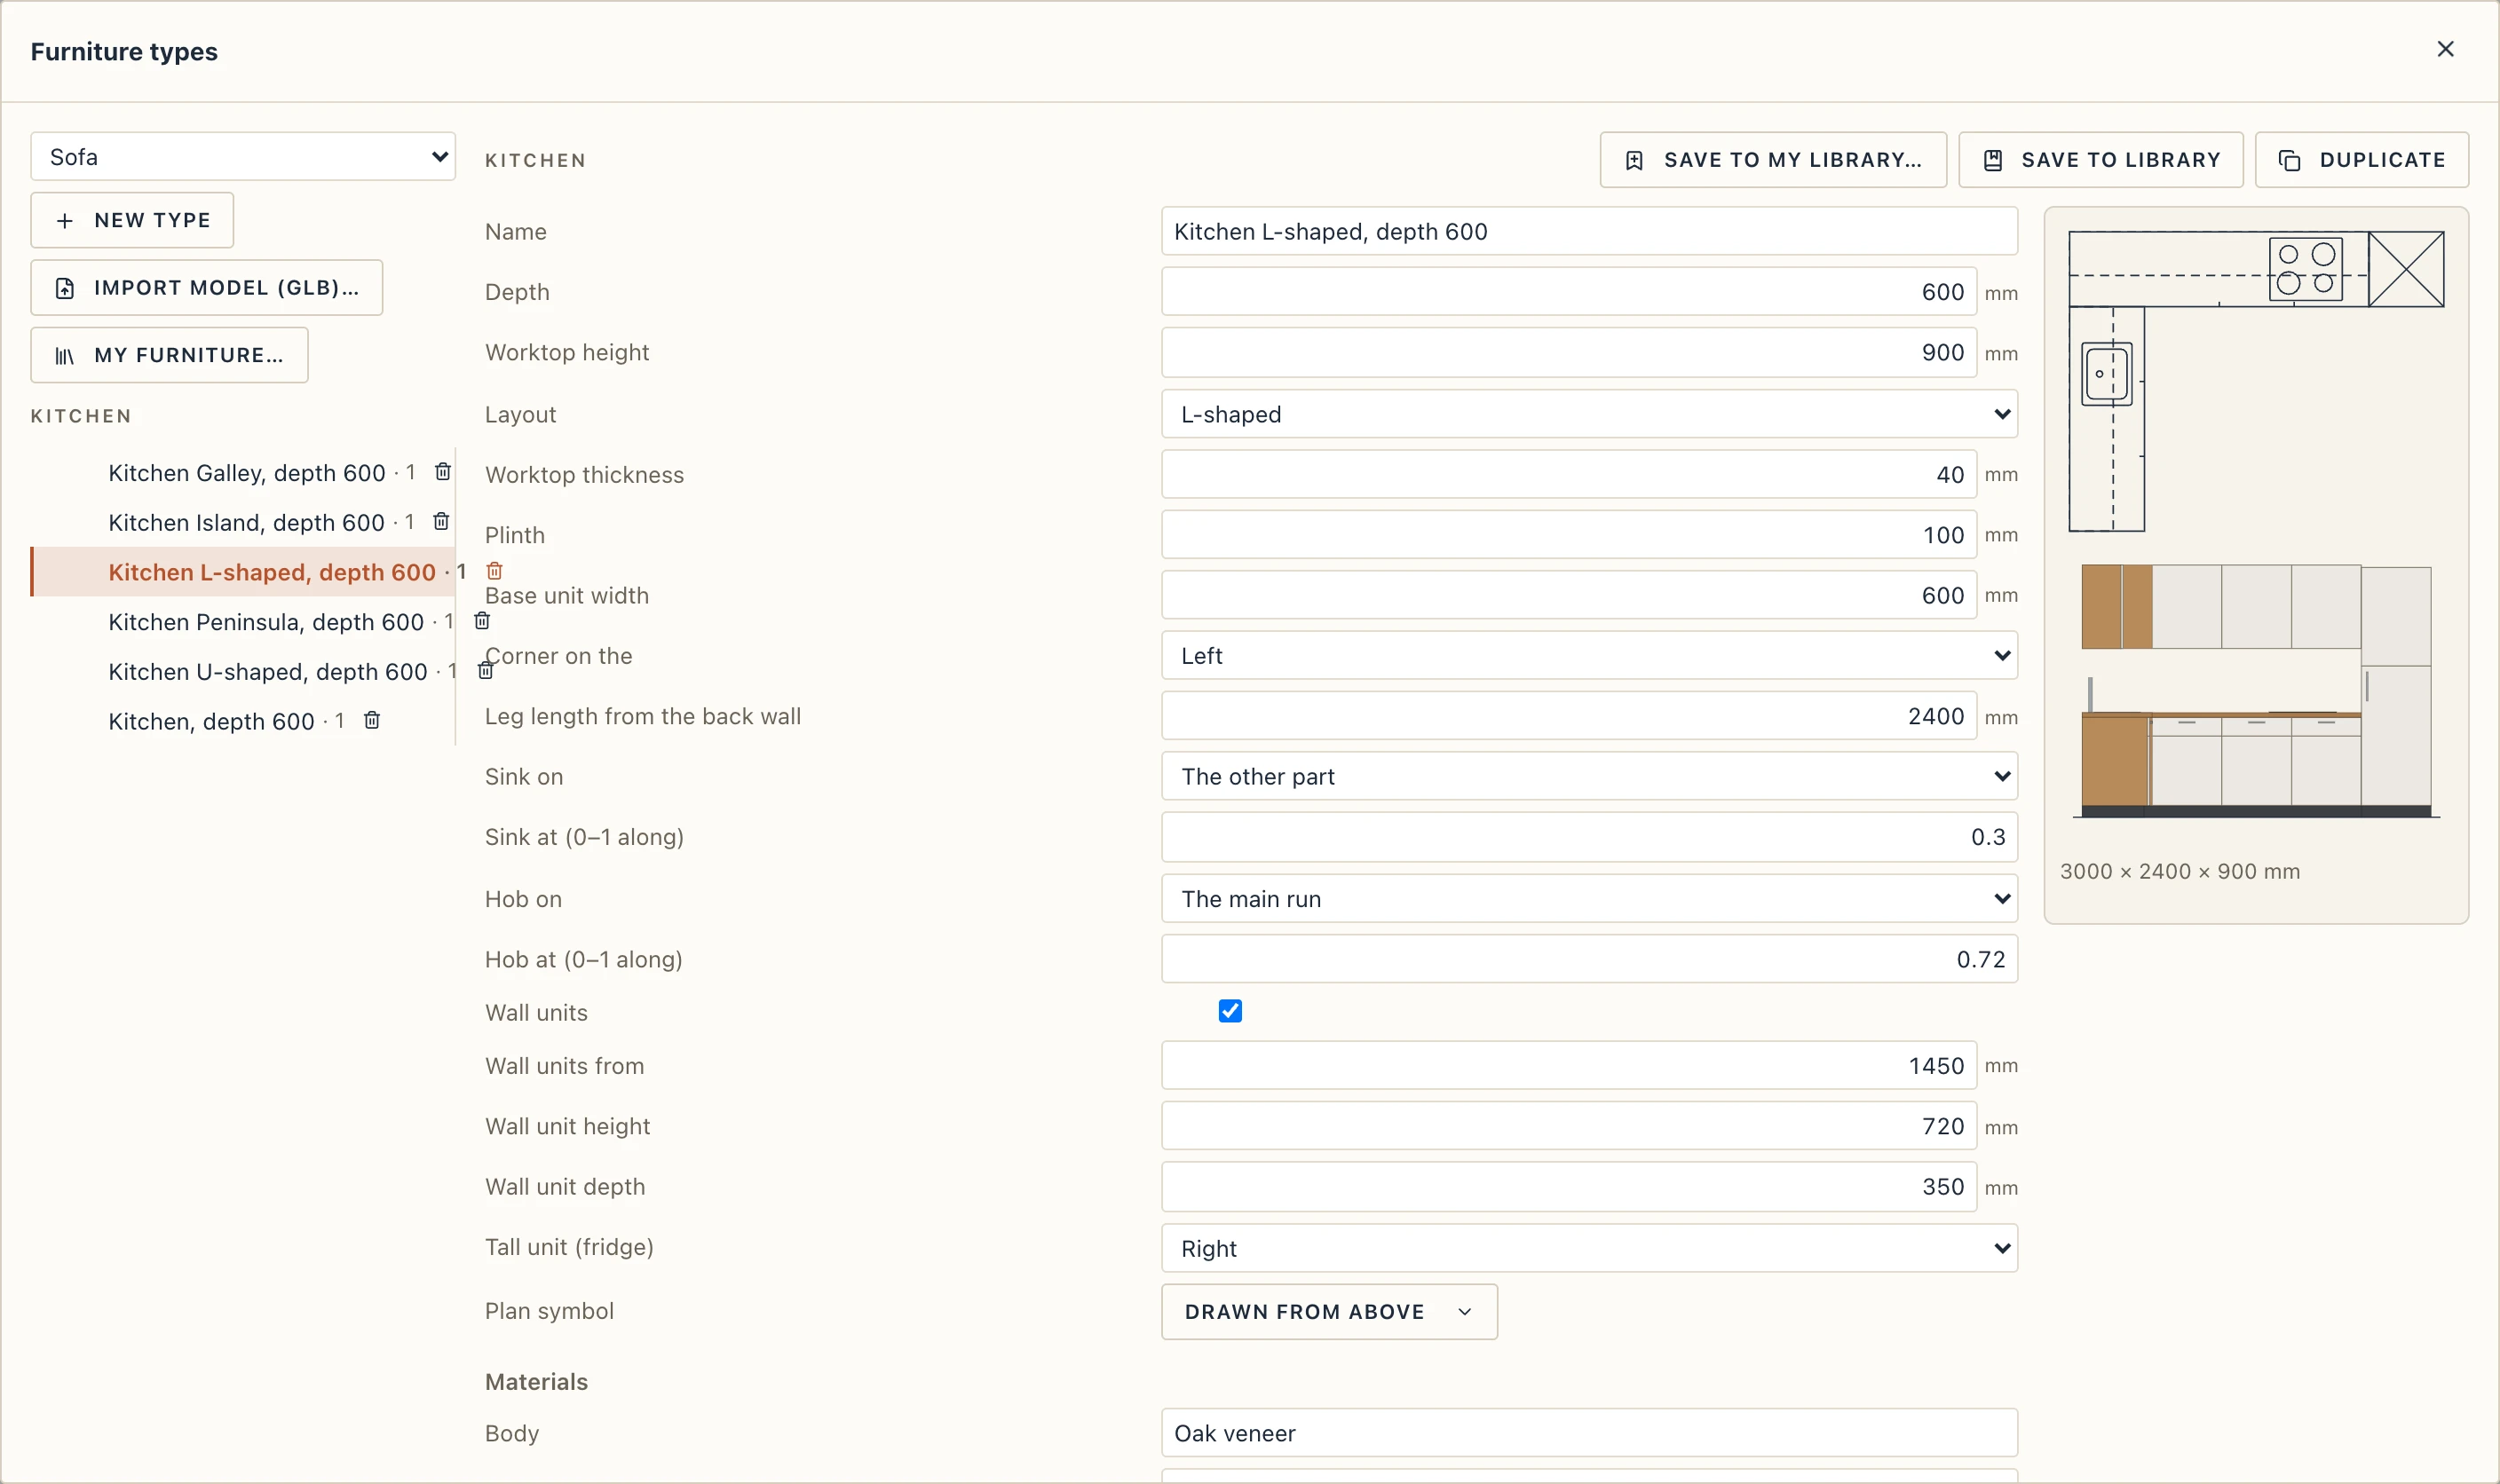
Kitchen (KT) draws any layout with two points along the wall the main run is against: the line is its length, its back on the wall’s face, and an L, a peninsula, a U or a galley is slid into the corner or between the walls it is drawn near. Flip gives an L or a peninsula its corner on the other side. The furniture schedule names the layout and lists the footprint’s depth. In IFC it stays an IfcFurniture of a user-defined Kitchen type.
Kitchen units and appliances
A kitchen type can list its own units under its parameters in Furniture types, in two lines:
- the Base line: the main run's units from the left as seen from the front (after a blind corner);
- the Wall line: the units hung above it.
Add puts a unit of the chosen kind at the end of a line. Typical run starts the base line from a sink, a dishwasher, a unit of drawers and a hob over an oven. The arrows move a unit left or right, and the bin takes it out.
Each unit has a width. A cabinet takes any width from 100 to 800 mm: choose 150, 200, 300, 400, 450, 500, 600 or 800, or type another. An appliance takes the sizes it comes in. The units on the base line are:
- Base unit, whose Front is a drawer over a door, doors (one or two, with the side a single door is hinged on), drawers (1 to 4), pan drawers (a shallow drawer over two deep ones) or open shelves;
- Sink unit: a single sink, a 1½ bowl sink, a double sink (from 800) or a corner sink, with a standard tap, a pull-out tap or none. A corner sink reaches into the blind corner when it stands next to it.
- Hob over an oven, 600, 800 or 900 wide, induction or gas, with or without the oven under it;
- Freestanding cooker, 500, 600 or 900 wide, induction or gas. The worktop stops on either side of it.
- Dishwasher, integrated, 450 or 600 wide, behind a full-height front that matches the others;
- Fridge: under the counter, tall and integrated (a fridge door over a freezer door), or freestanding;
- Oven tall unit, with drawers under the oven and a door above it;
- Tall unit, with doors or open shelves;
- Filler and Gap.
A tall unit, a fridge or an oven unit has its own Height. On the wall line, a Wall unit has doors, glazed doors or open shelves, its own Height and its own height From the floor. Leave either empty to take the run's values. A Hood is a chimney hood (650 above the worktop, with its flue up to the wall units' top) or an integrated hood in a wall unit. A Gap leaves the wall bare. Wall units step past a tall unit.
With no wall line listed, each base unit gets a wall unit of its width, and a hob or a cooker gets a chimney hood. On an island or a peninsula, Hood over the hob there hangs a hood over the hob that stands on it.
What the units leave of the run is split evenly as before, and less than 100 mm becomes a filler. Units that do not fit the run are left out, and the preview and the element say so. Fit to units in a kitchen's properties sets its length to what its units need: theirs, plus a blind corner and the tall unit at its end. A type with no units of its own is built as before.
In plan, each unit has its own symbol:
- base doors' swings, dashed and only at the finest detail;
- the sink's bowls and its tap;
- the hob's zones or burners;
- tall units crossed;
- DW on the dishwasher, F on a fridge and OV on an oven unit;
- wall units and hoods overhead.
Elevations and 3D show each front, handle and appliance.
The materials have two more roles: Plinth and Handles, besides the fronts, the carcass (body), the worktop (top), metal and glass. A kitchen type made before this takes its body's material for the plinth and its metal's for the handles.
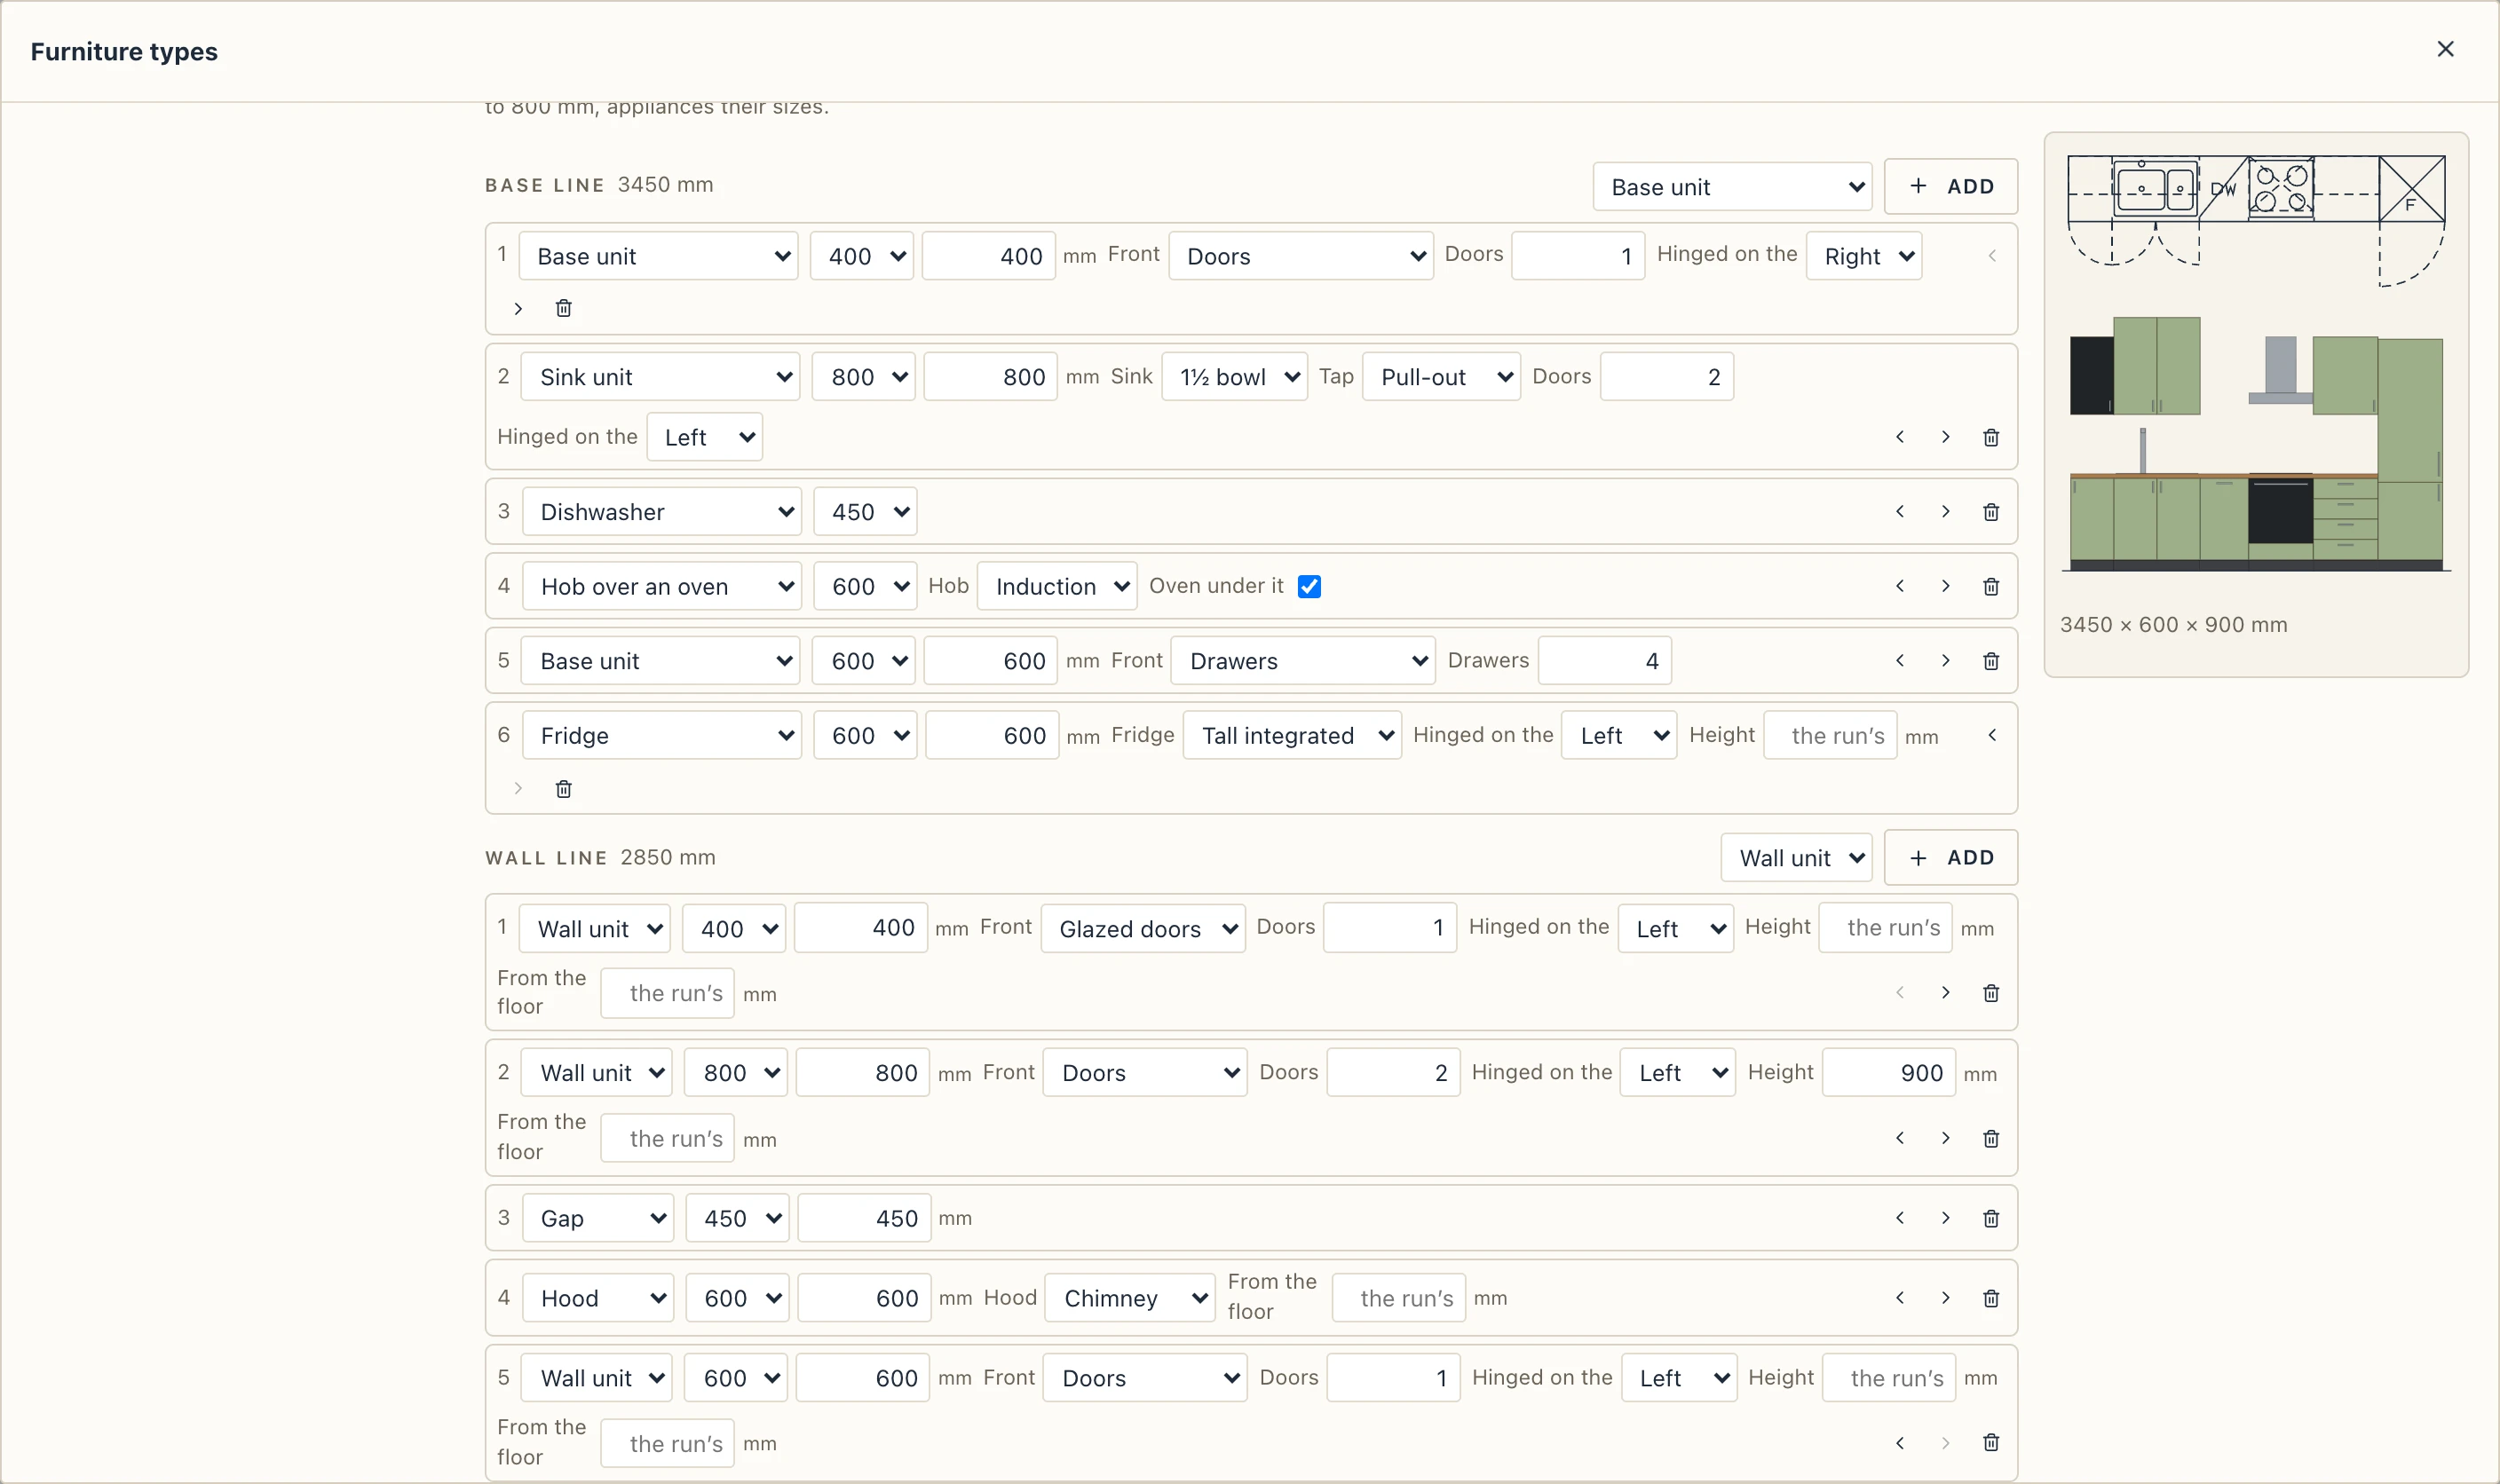
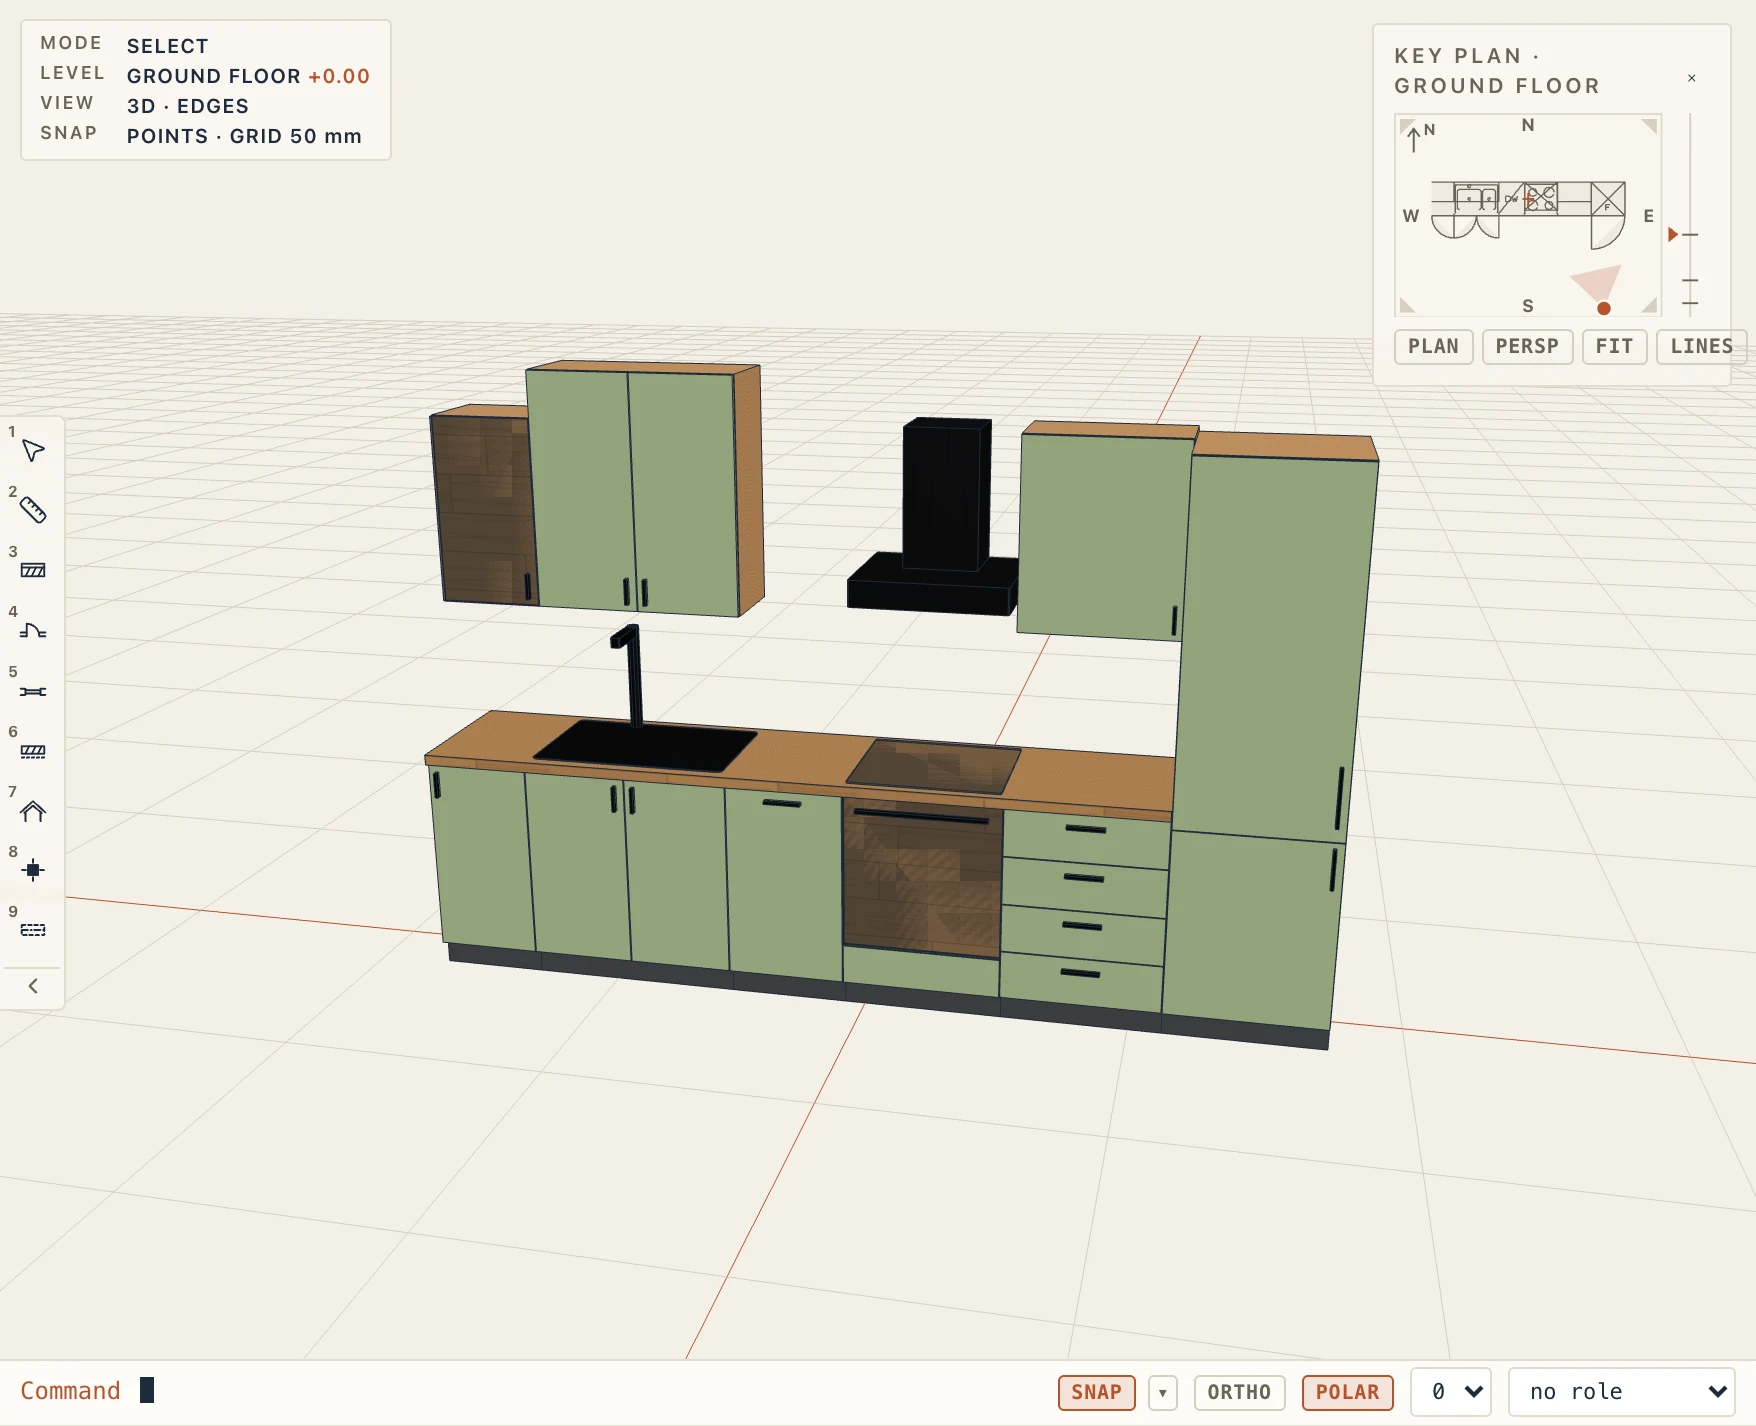
Interior → Kitchen units makes a schedule of each kitchen's units, from the left, base line then wall line, with their width, height and front or appliance. In IFC the kitchen stays one IfcFurniture of its type, and the units travel with the type, so Lapin reads them back.
Casework and modern furniture
Interior → Casework places furniture made of boards: wardrobes, bookcases, sideboards, TV units, chests of drawers, bathroom vanities, desks, hall units, beds and nightstands. You configure each one in Furniture types. Choose Casework and a Preset there, then New type. The preset sets the sizes, the base, the top and the carcasses, and every value stays editable. Choosing another preset later starts the type again from that preset's values and keeps its materials.
A casework piece is one or more carcasses side by side, listed from the left as seen from the front:
- Carcass adds one at the end, the split button divides one into two halves, the arrows move one, and the bin takes it out.
- A carcass with a Width keeps it. Carcasses with no width share what the others leave of the piece's width. Fit width makes the piece as wide as its carcasses when they all have widths. Carcasses that do not fit are left out, and the preview says so.
- A carcass with its own Height is lower than the piece, like the low part of a hall unit.
- A Knee space is a carcass with no box, such as the space under a desk. The top runs over it, and a gable holds the top up at the end of the piece.
Each carcass holds zones stacked from the bottom, with a divider between each two. The list shows them as they stand, the top one first. The arrow adds a zone over the top one. A zone has its own Height, or a Share of the rest, and its Front:
- Open;
- Doors: 1 to 4, a single door Hinged on the left or right, Glazed or not;
- Drawers: 1 to 6, each with its box behind it. Heights by ratio, from the top sets their heights: 1:1:2 makes the bottom drawer twice as high as the others. Empty makes them all alike.
- Flap, which lifts up or drops down.
Behind open fronts, doors or a flap, a zone can have Shelves (adjustable unless you clear Adjustable shelves) and a Hanging rail. Behind doors it can also have Inner drawers at the bottom. Drawers under doors are two zones in one carcass: drawers at the bottom with their height, and doors over them.
The sections under the preset set the rest:
- Construction: the thickness of the carcass boards, the back panel, the shelves and the fronts; the top and bottom between the sides or over the sides; the back set in (10 mm in from the back) or laid on the back.
- Base: a Plinth, with its height and how far it is set back; Legs (slim metal, tapered wood or a sled frame), with their height; Hung on the wall, with the height of its underside; or None. On a plinth or legs the piece's height is to its top. Hung on the wall, the piece's height is its own and Hung at is where its underside is.
- Top: None (the carcasses' own tops), Overhanging (past the front and the ends by its overhang) or a Worktop (past the front only), with its thickness. Basin cut-out in the top cuts a placeholder for a vanity's basin and draws it with its tap.
- Fronts: Slab, Framed (stiles and rails round a panel set back) or Fluted (upright grooves cut into the front). The handles are None (push to open), a J-profile grip milled into the fronts' edge, a Bar, a Knob or an Edge pull. Sliding doors across it puts that many sliding doors on two tracks in front of all the carcasses, as on a wardrobe.
A bed made from the Bed preset has a frame, a headboard as high as the type, a base board, the mattress and pillows. It has the Top of the mattress and drawers under it on both sides, the left or the right.
The Styles buttons apply a modern look over the type's values in one step:
- Handleless, push to open;
- J-profile grip;
- Slim metal legs;
- Floating, hung on the wall;
- Fluted fronts;
- Two-tone, wood and colour: an oak carcass and top with sage fronts;
- Framed fronts, knobs.
The materials have their roles: body (the carcass), fronts, top, back, plinth, legs, handles, glass, metal (the rail, the tap) and linen (a bed's mattress). The materials Lapin starts with are indicative: name your own.
Every board is a solid of its material. In plan the piece shows its outline, the line of its fronts, the joints between its carcasses and, at the finest detail, its doors' swings dashed. A piece hung above 1.2 m is drawn overhead. Elevations and 3D show the boards, fronts and handles.
The preview lists the type's Cut list: each part (sides, bottom, top, back, dividers, shelves, plinth, drawer boxes, then the fronts apart) with its carcass, its length along the grain × width × thickness and how many. Interior → Cut list makes the cut list of every casework type in the project, multiplied by its pieces. It lists boards only: runners, hinges, legs and handles are hardware.
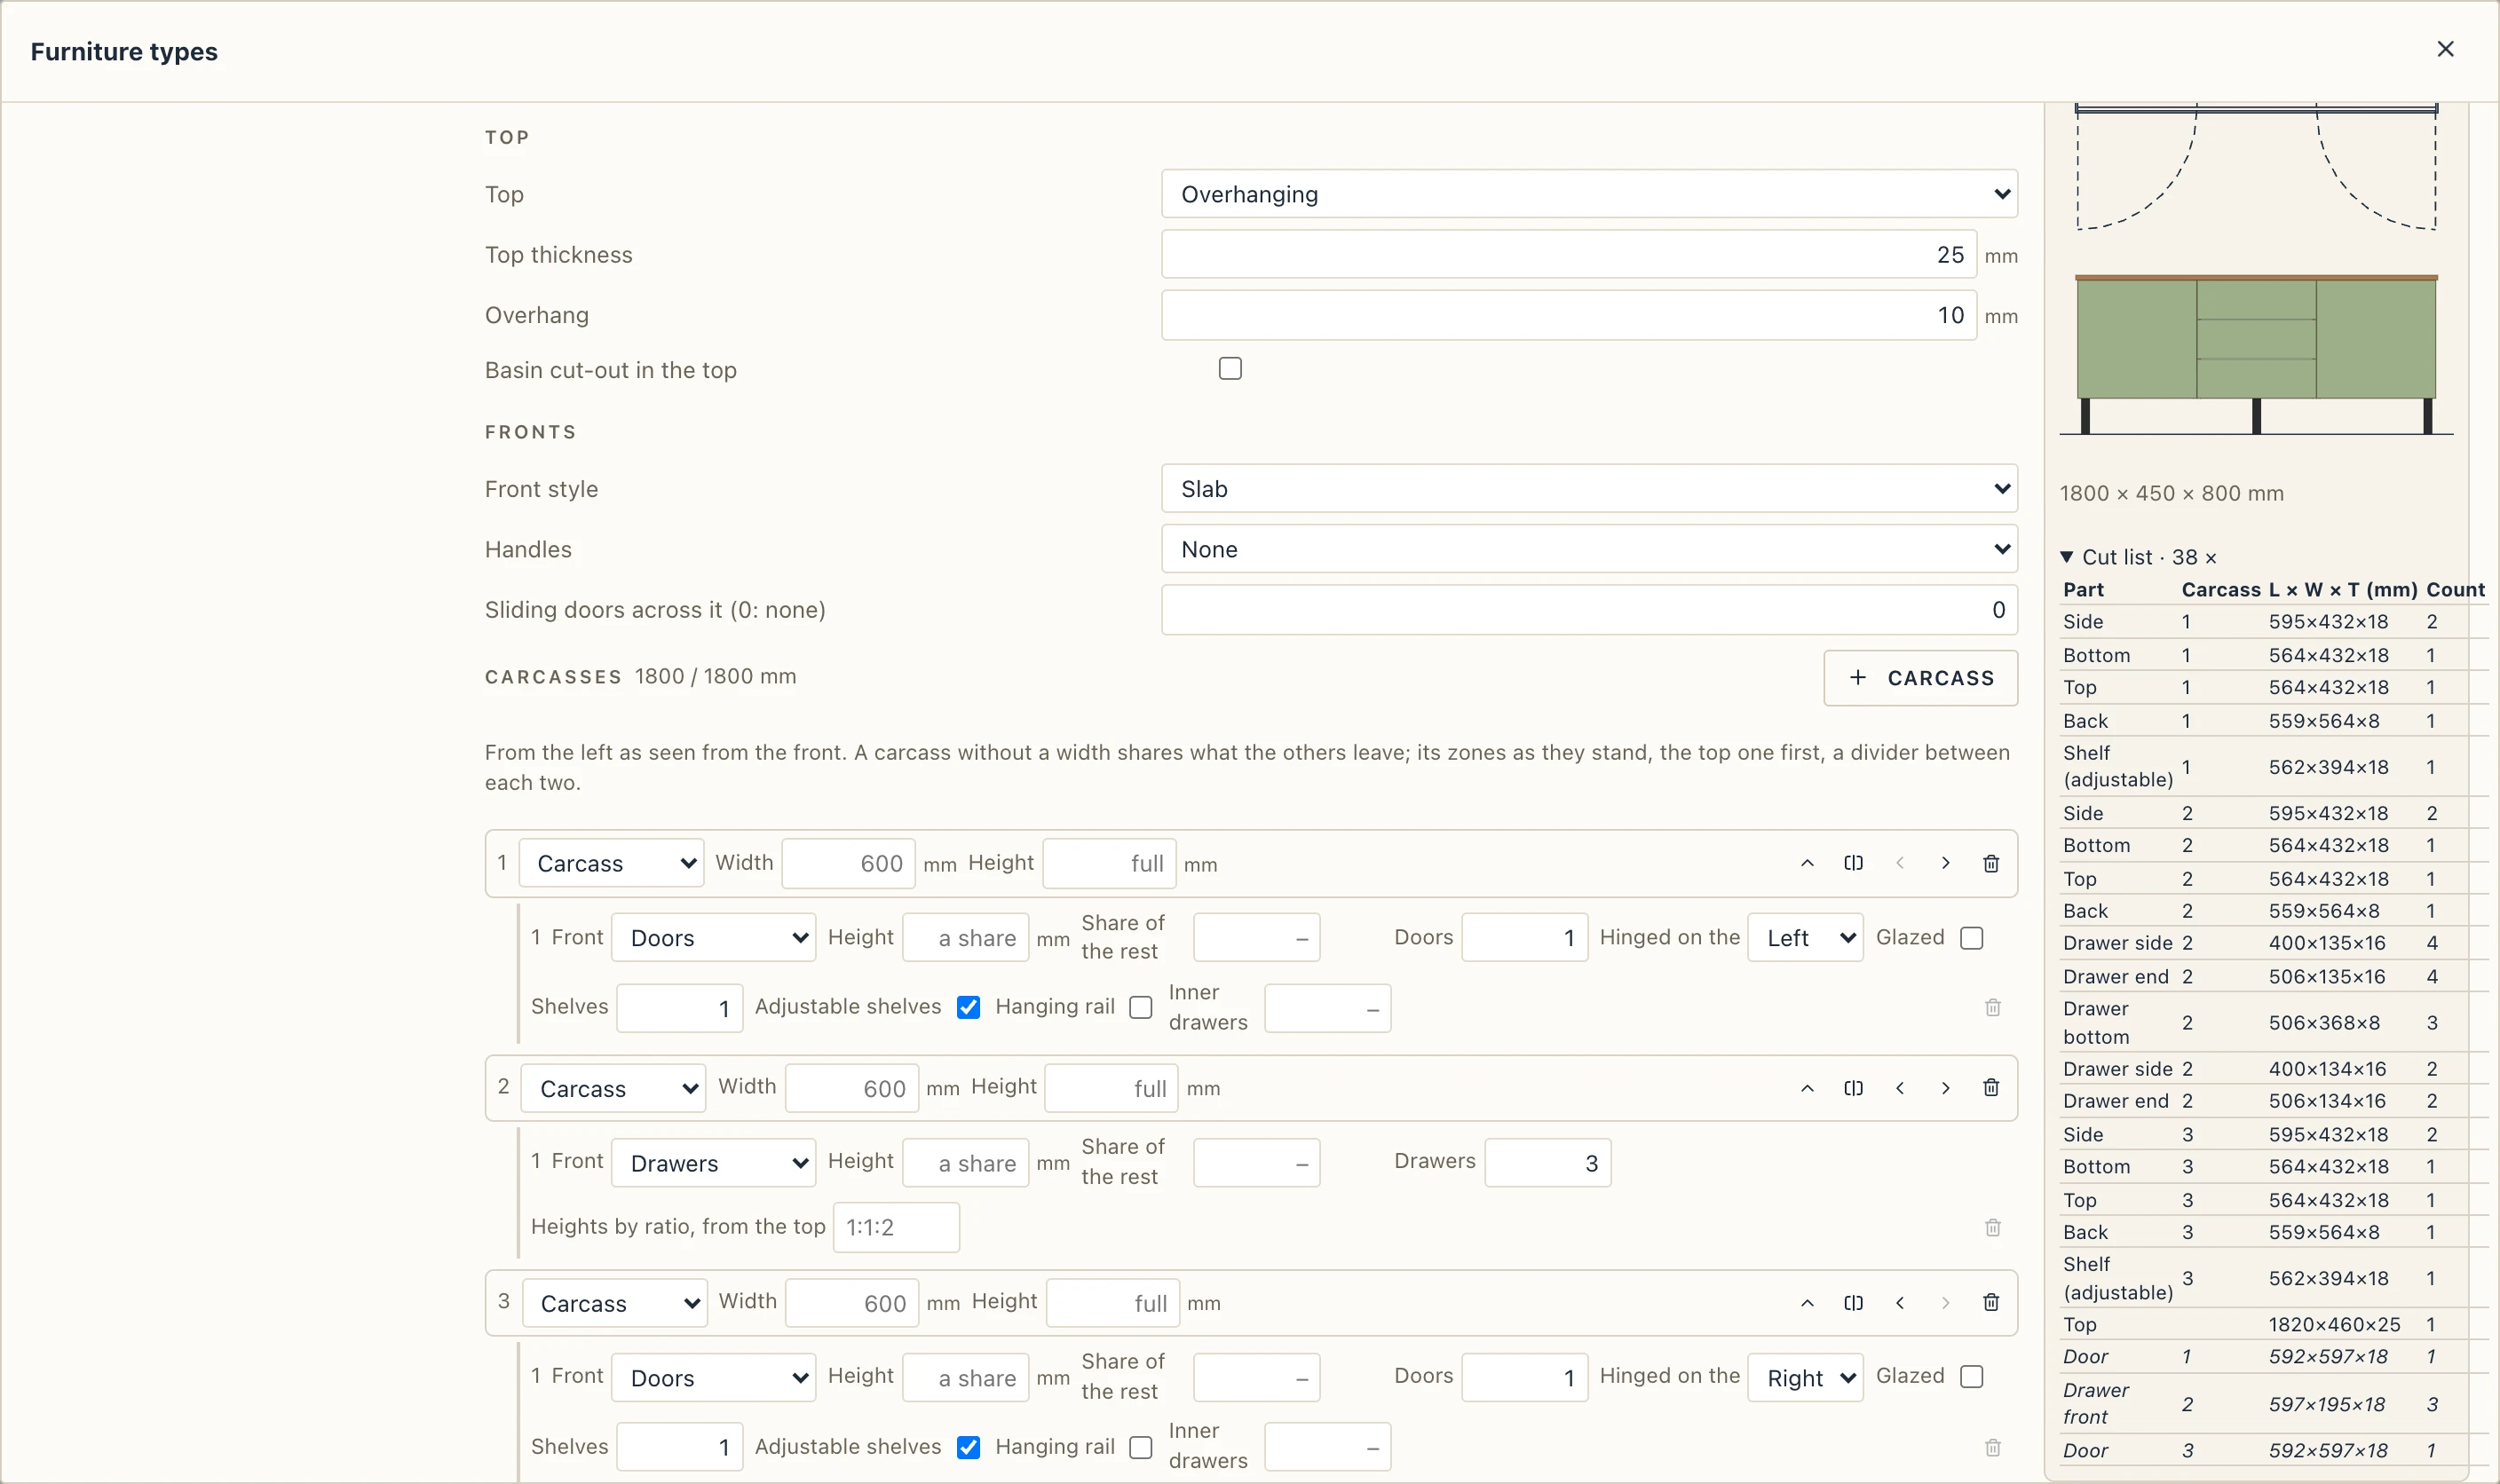
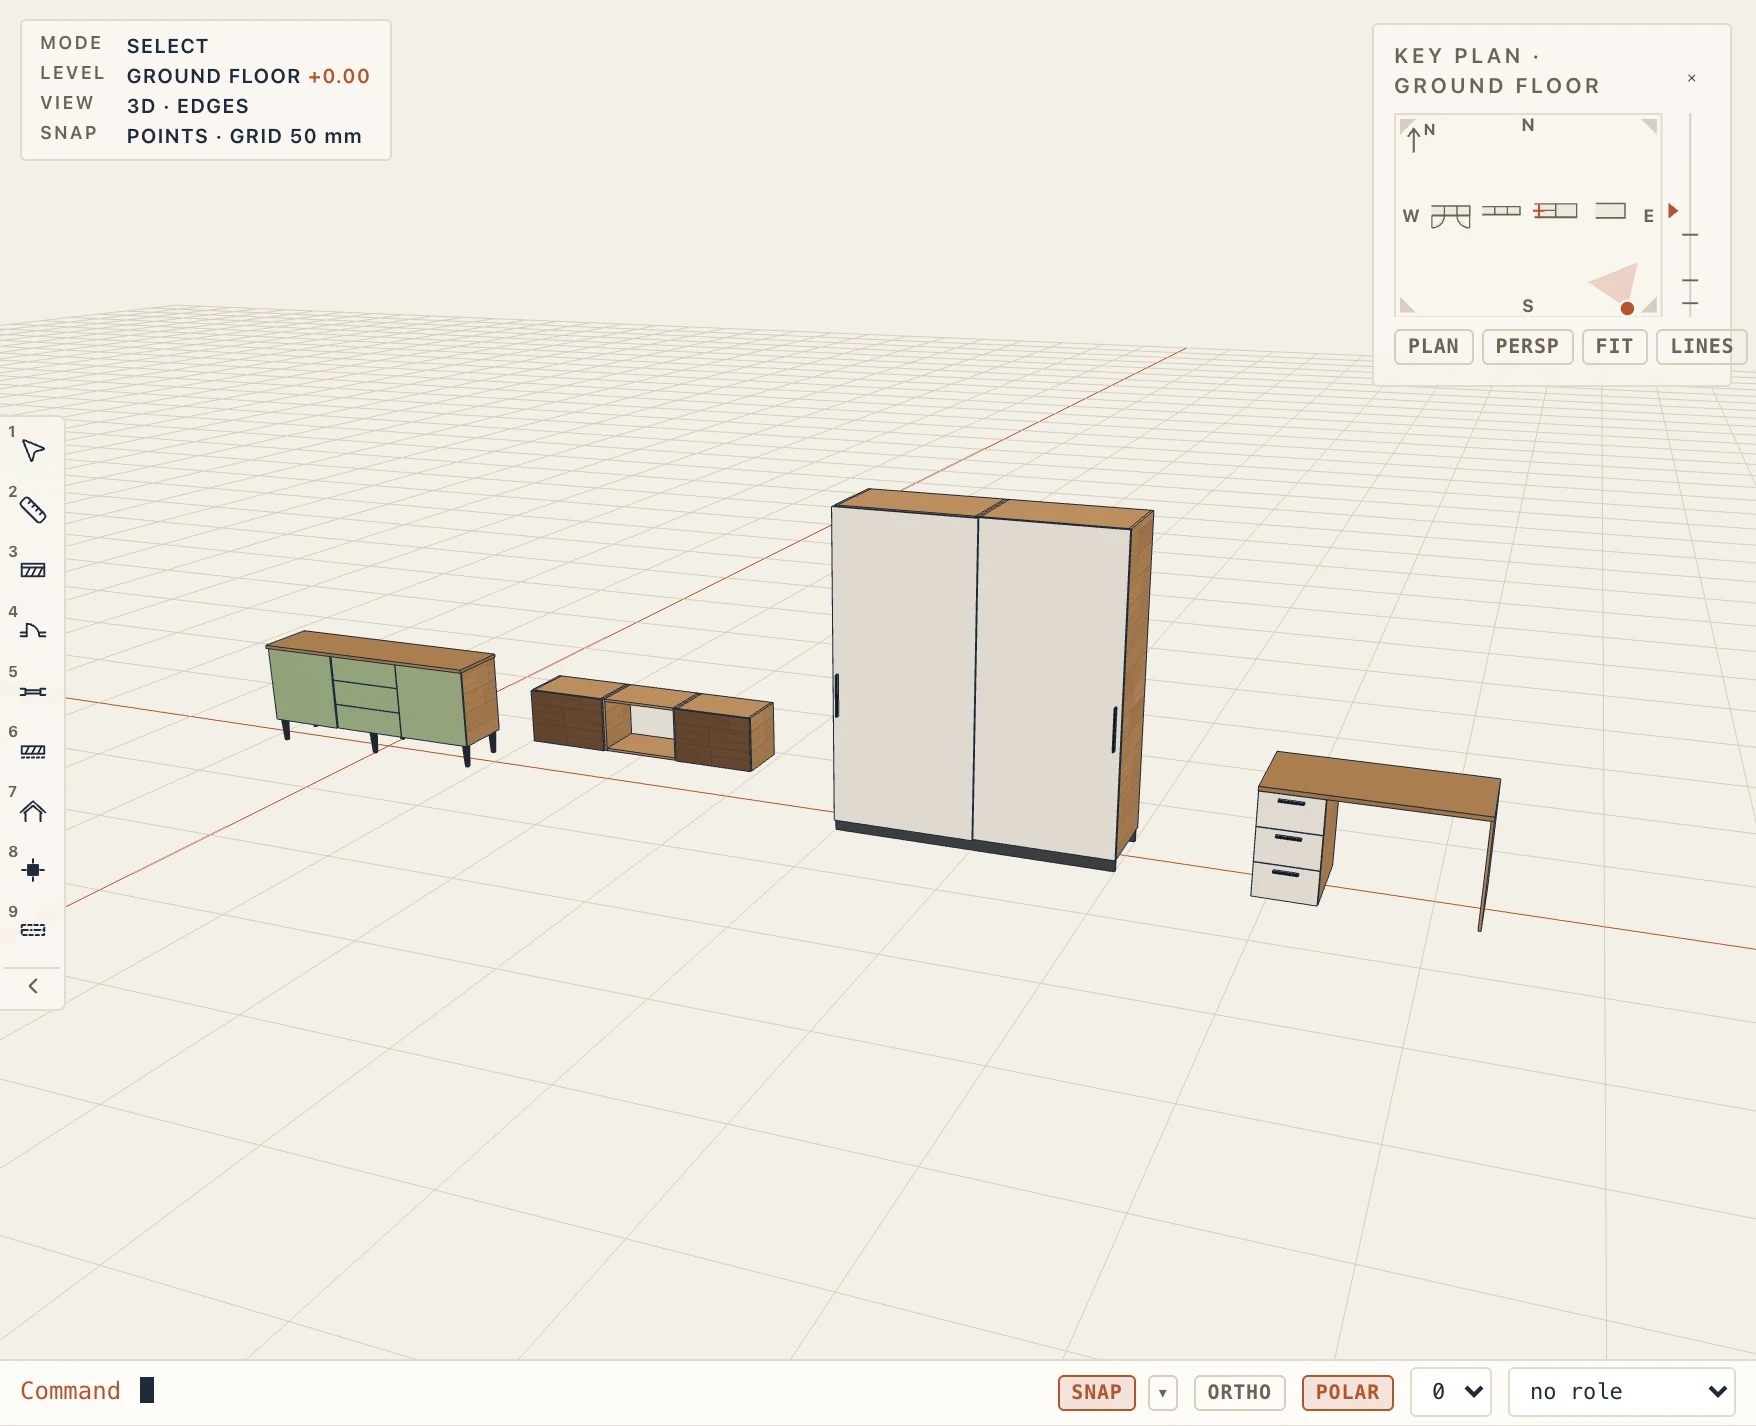
In IFC a casework piece is an IfcFurniture of its type, with its preset's predefined type (SHELF for a bookcase, DESK, BED, or USERDEFINED with Wardrobe, Sideboard, TV unit, Bathroom vanity…). Its carcasses travel with the type, so Lapin reads them back. The wardrobe, sideboard and chest kinds made before stay as they were.
Furniture from models
Interior → From a model puts down soft and shaped furniture made from ready models: sofas, a sofa with a chaise, corner sofa sections, an ottoman, armchairs, a recliner, chairs, an office chair, bar stools, benches, dining, round and coffee tables, a side table, floor, table, pendant and wall lamps, potted plants and rugs. The models are low-poly meshes under the CC0 licence (Kenney's Furniture Kit), shipped with Lapin with their source and licence recorded.
A model is stretched by zones: each model has a band on each axis that stretches, while what lies before and after it keeps its size. Make a sofa wider and its arms and legs stay as they are while the seat grows, so a two-seat sofa becomes a three-seat one; make a table taller and only its legs grow, its top keeps its thickness. Round tables, lamps' shades and plants scale whole across. Each model has the least and the most it can take; a size past them is kept at the limit.
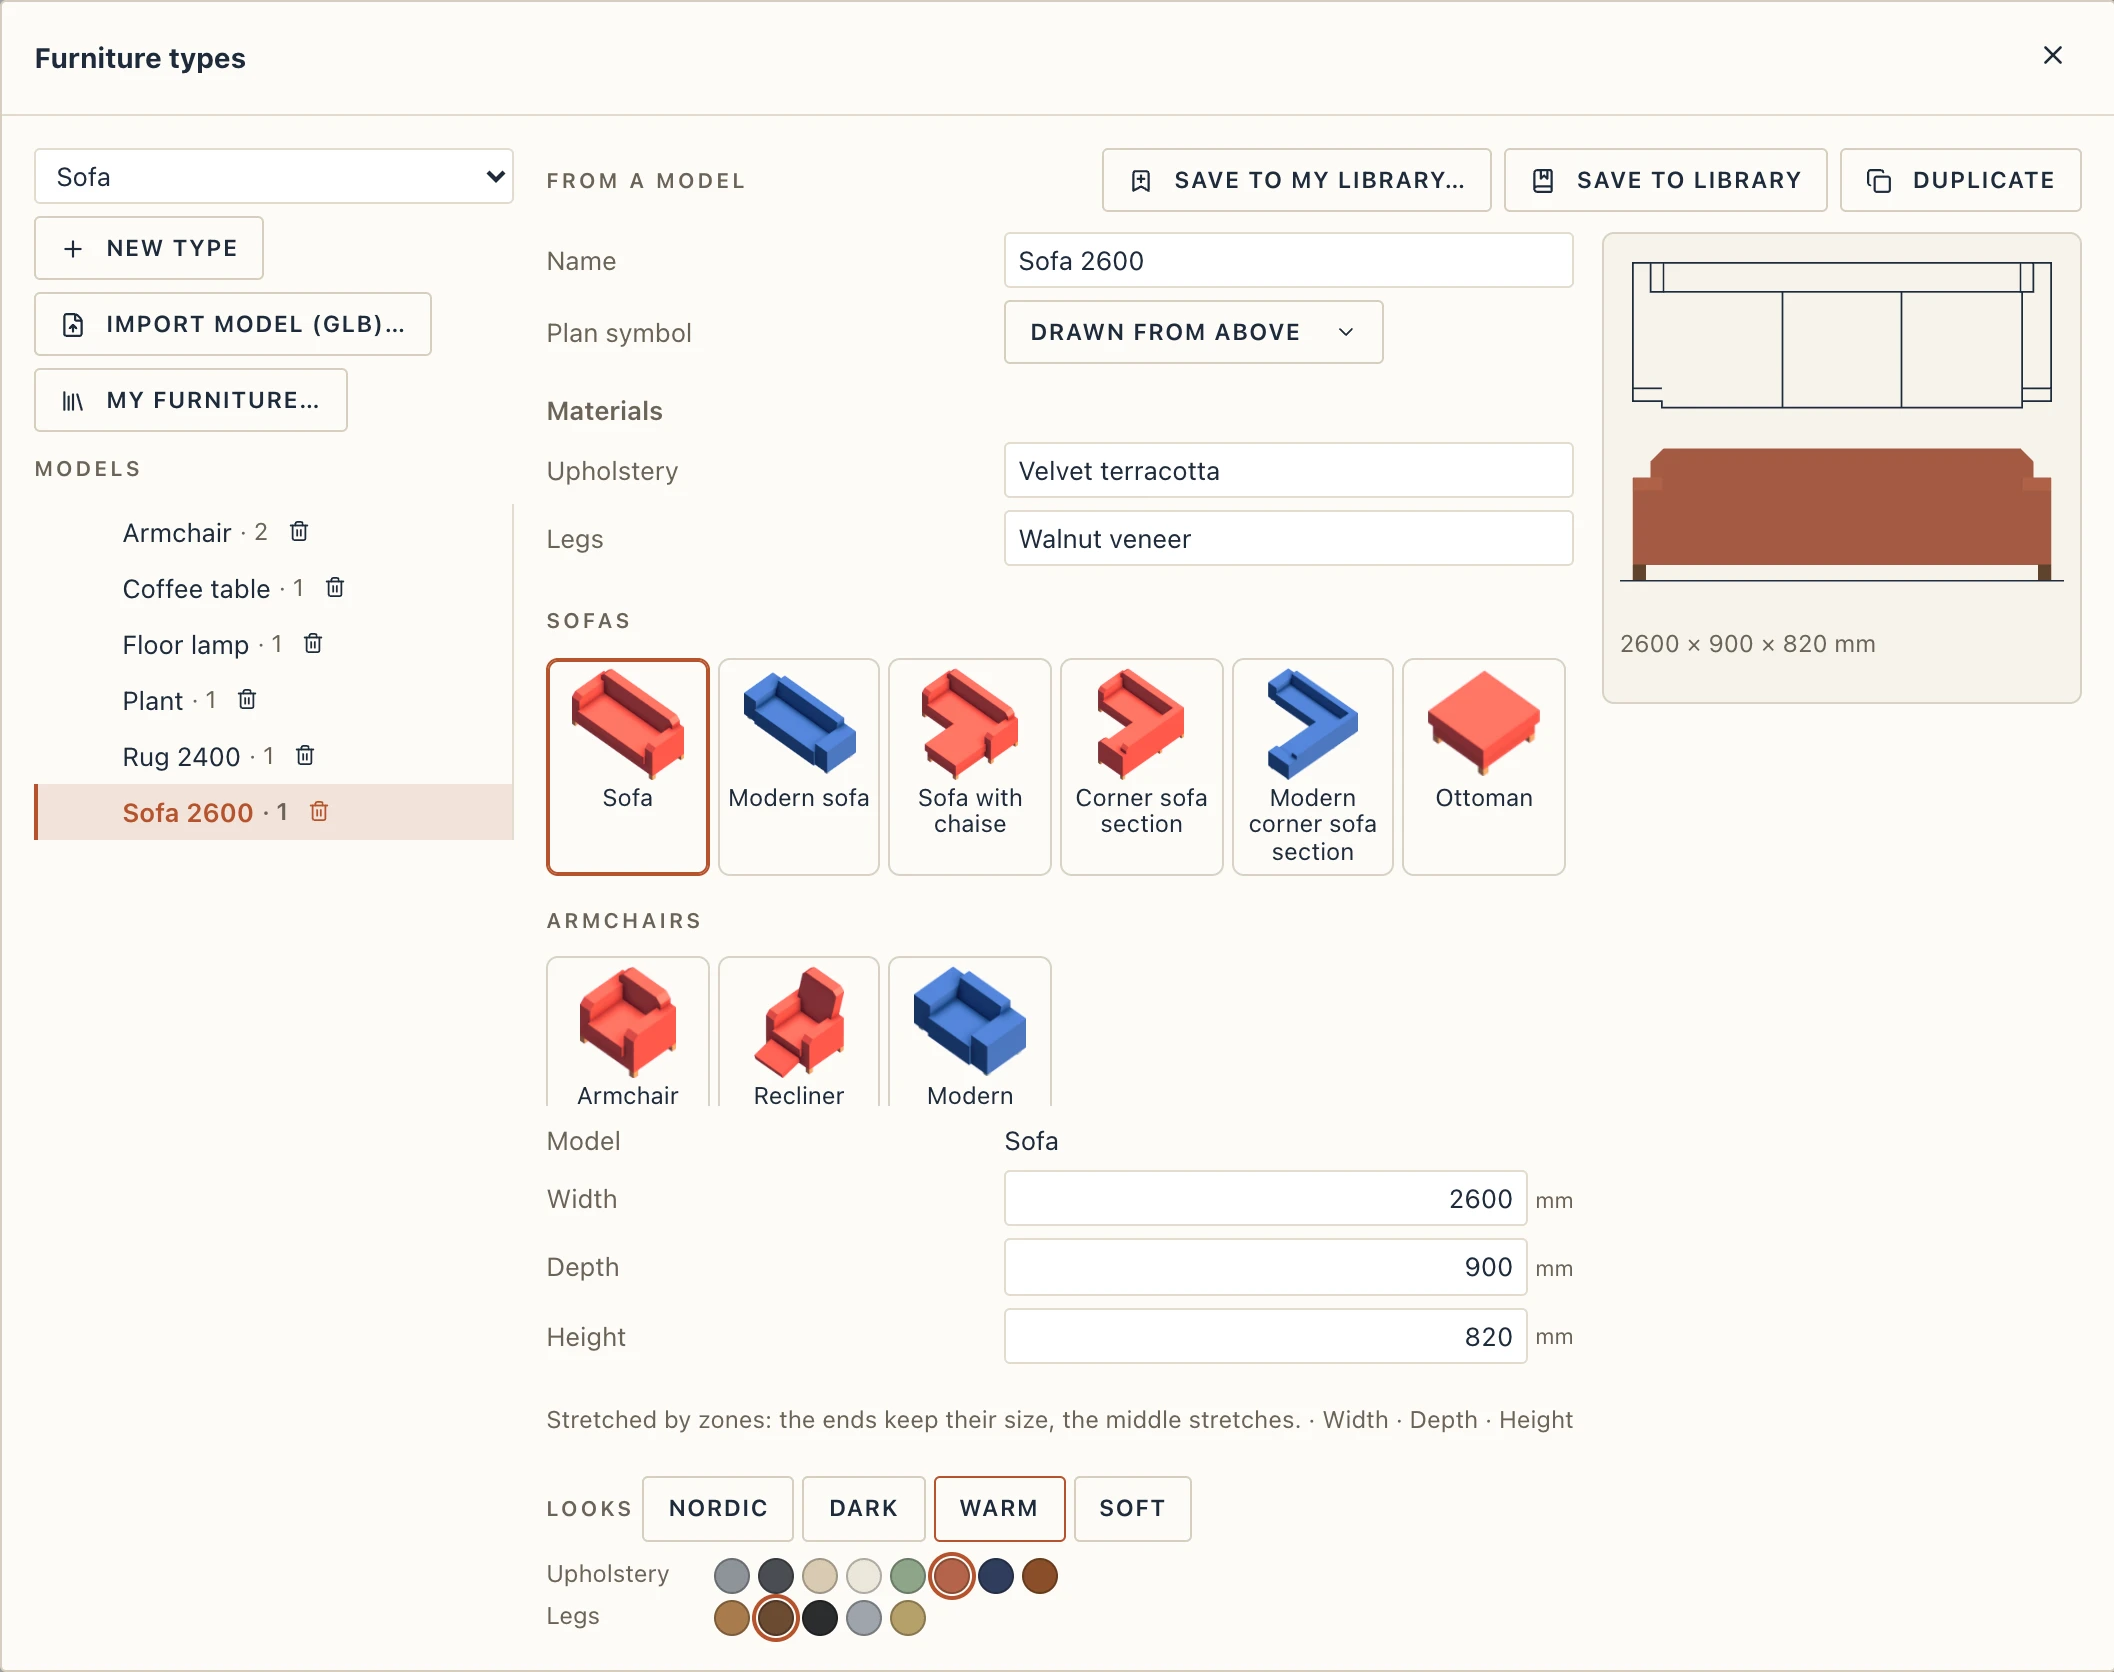
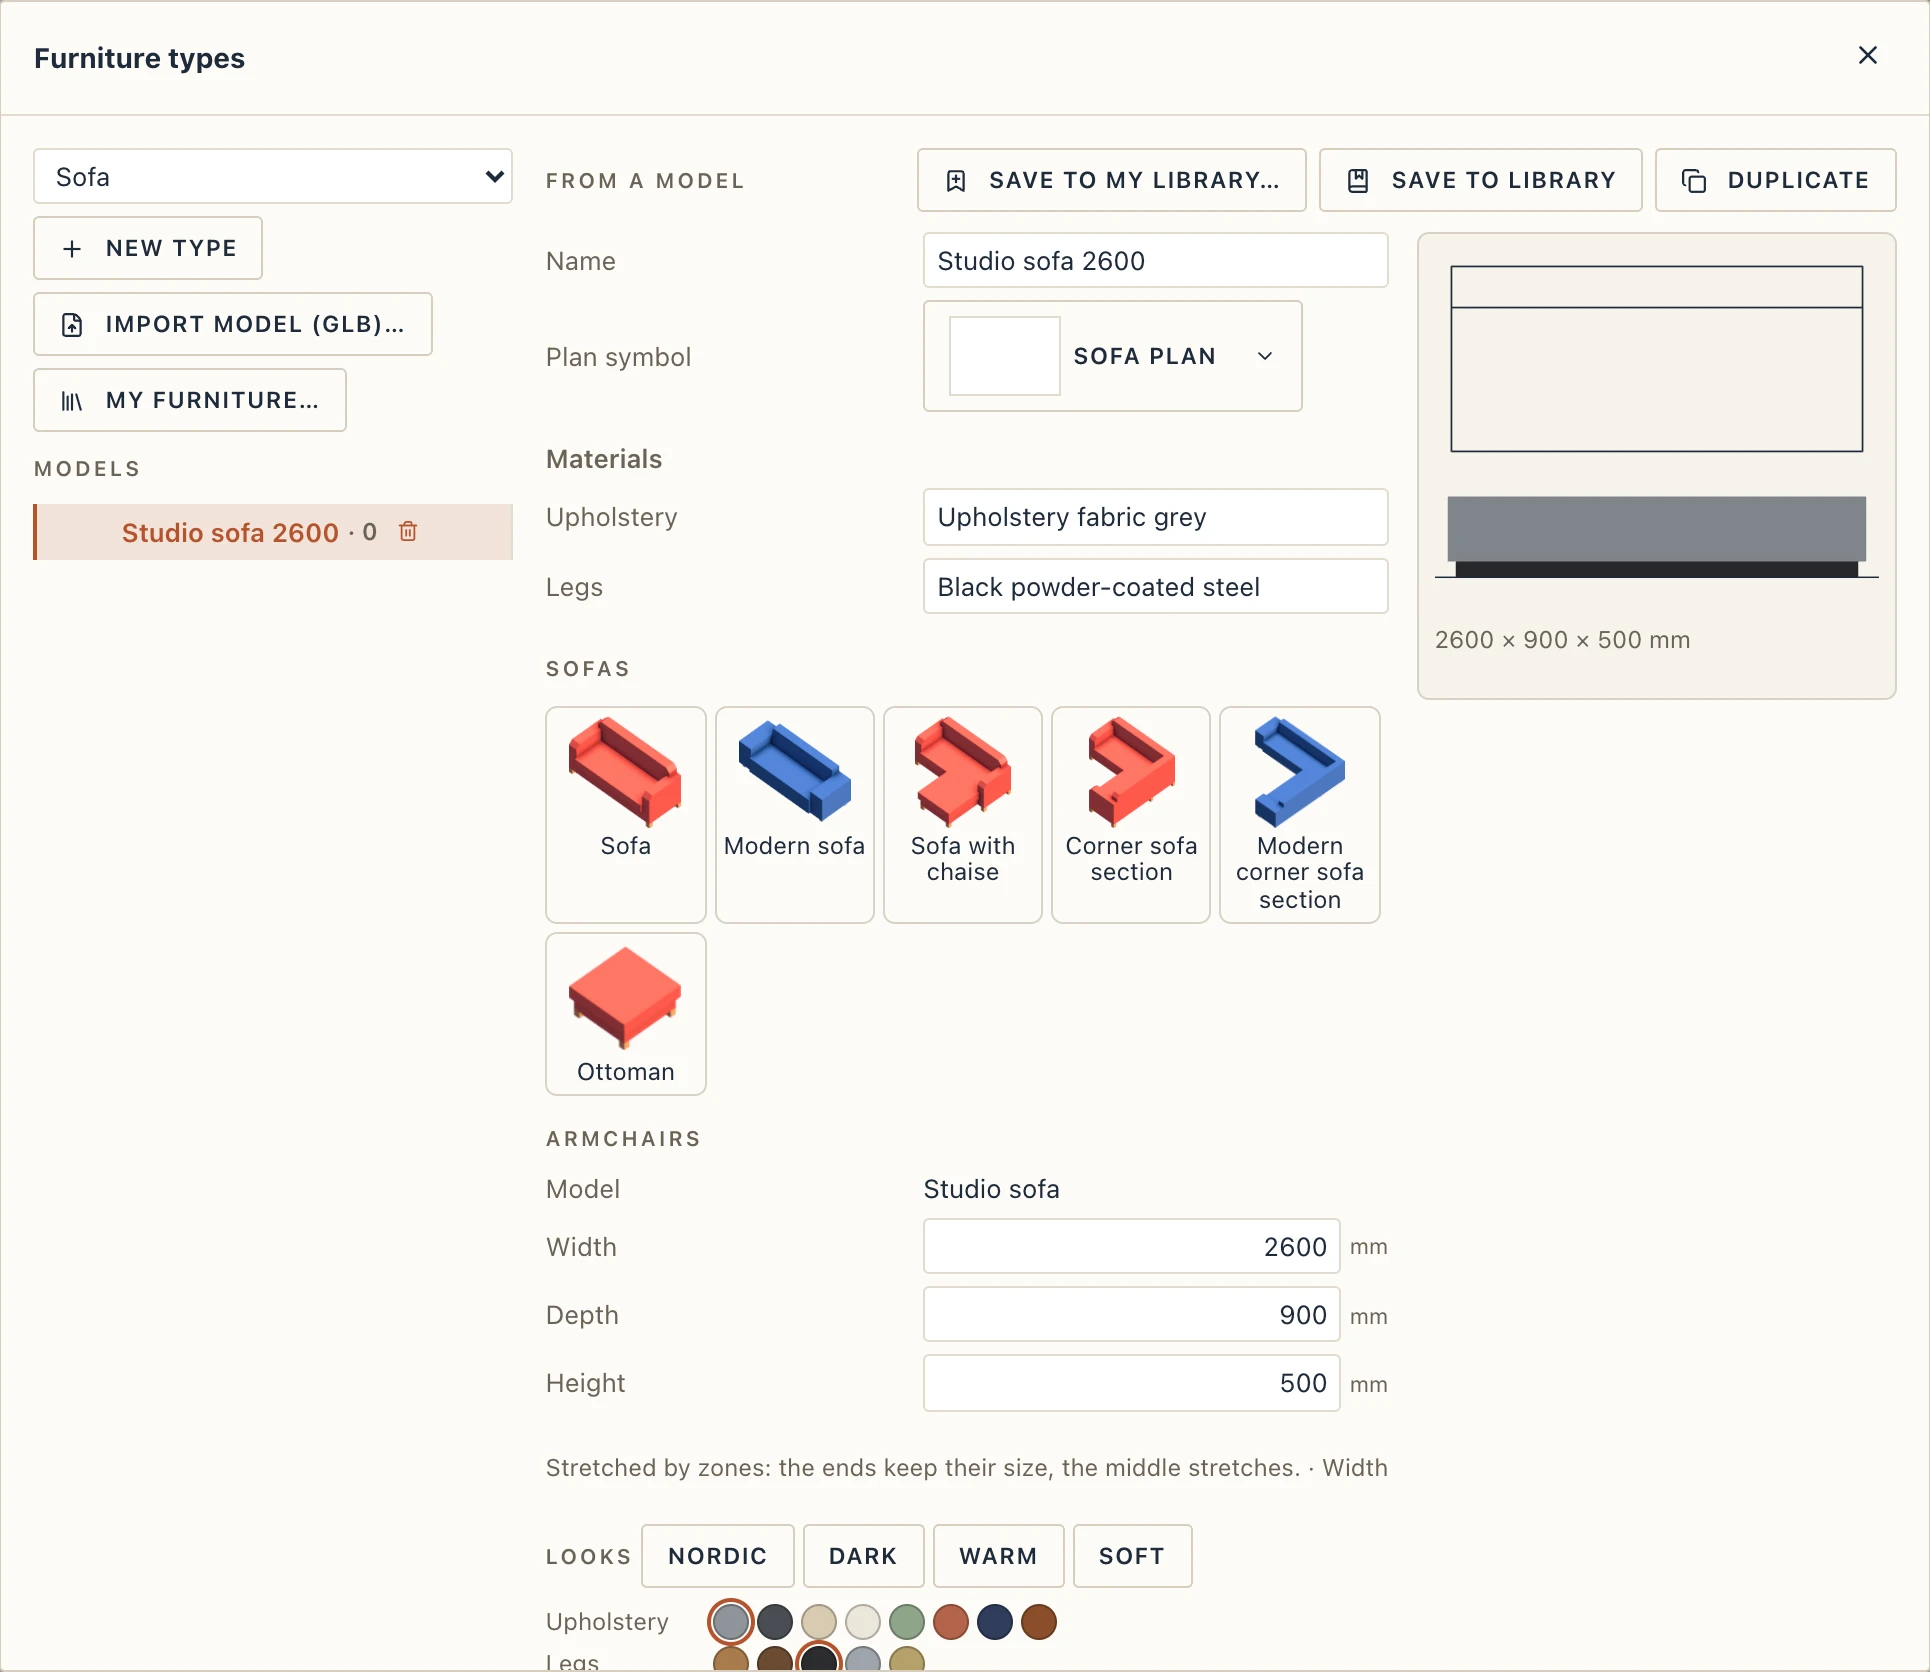
In Furniture types, choose From a model and a model, then New type. A type of a model has:
- the gallery of models by group (sofas, armchairs, chairs, tables, lamps, plants, rugs): click another to change the type's model, and it takes that model's size and materials;
- its width, depth and height, each within the model's range (hover a field to see it). The preview beside it is the engine's, so it shows the stretch as you type: the plan seen from above and the front in the type's colours;
- Hung at, for a pendant, a wall lamp or a table lamp, the height of its underside;
- the Looks (Nordic, Dark, Warm, Soft), which set the materials of every part in one step, and a row of colours for each part: upholstery, accent (a rug's border, a second fabric), body, top, legs, metal, glass, shade, foliage and pot. The materials are indicative: type your own in the materials below.
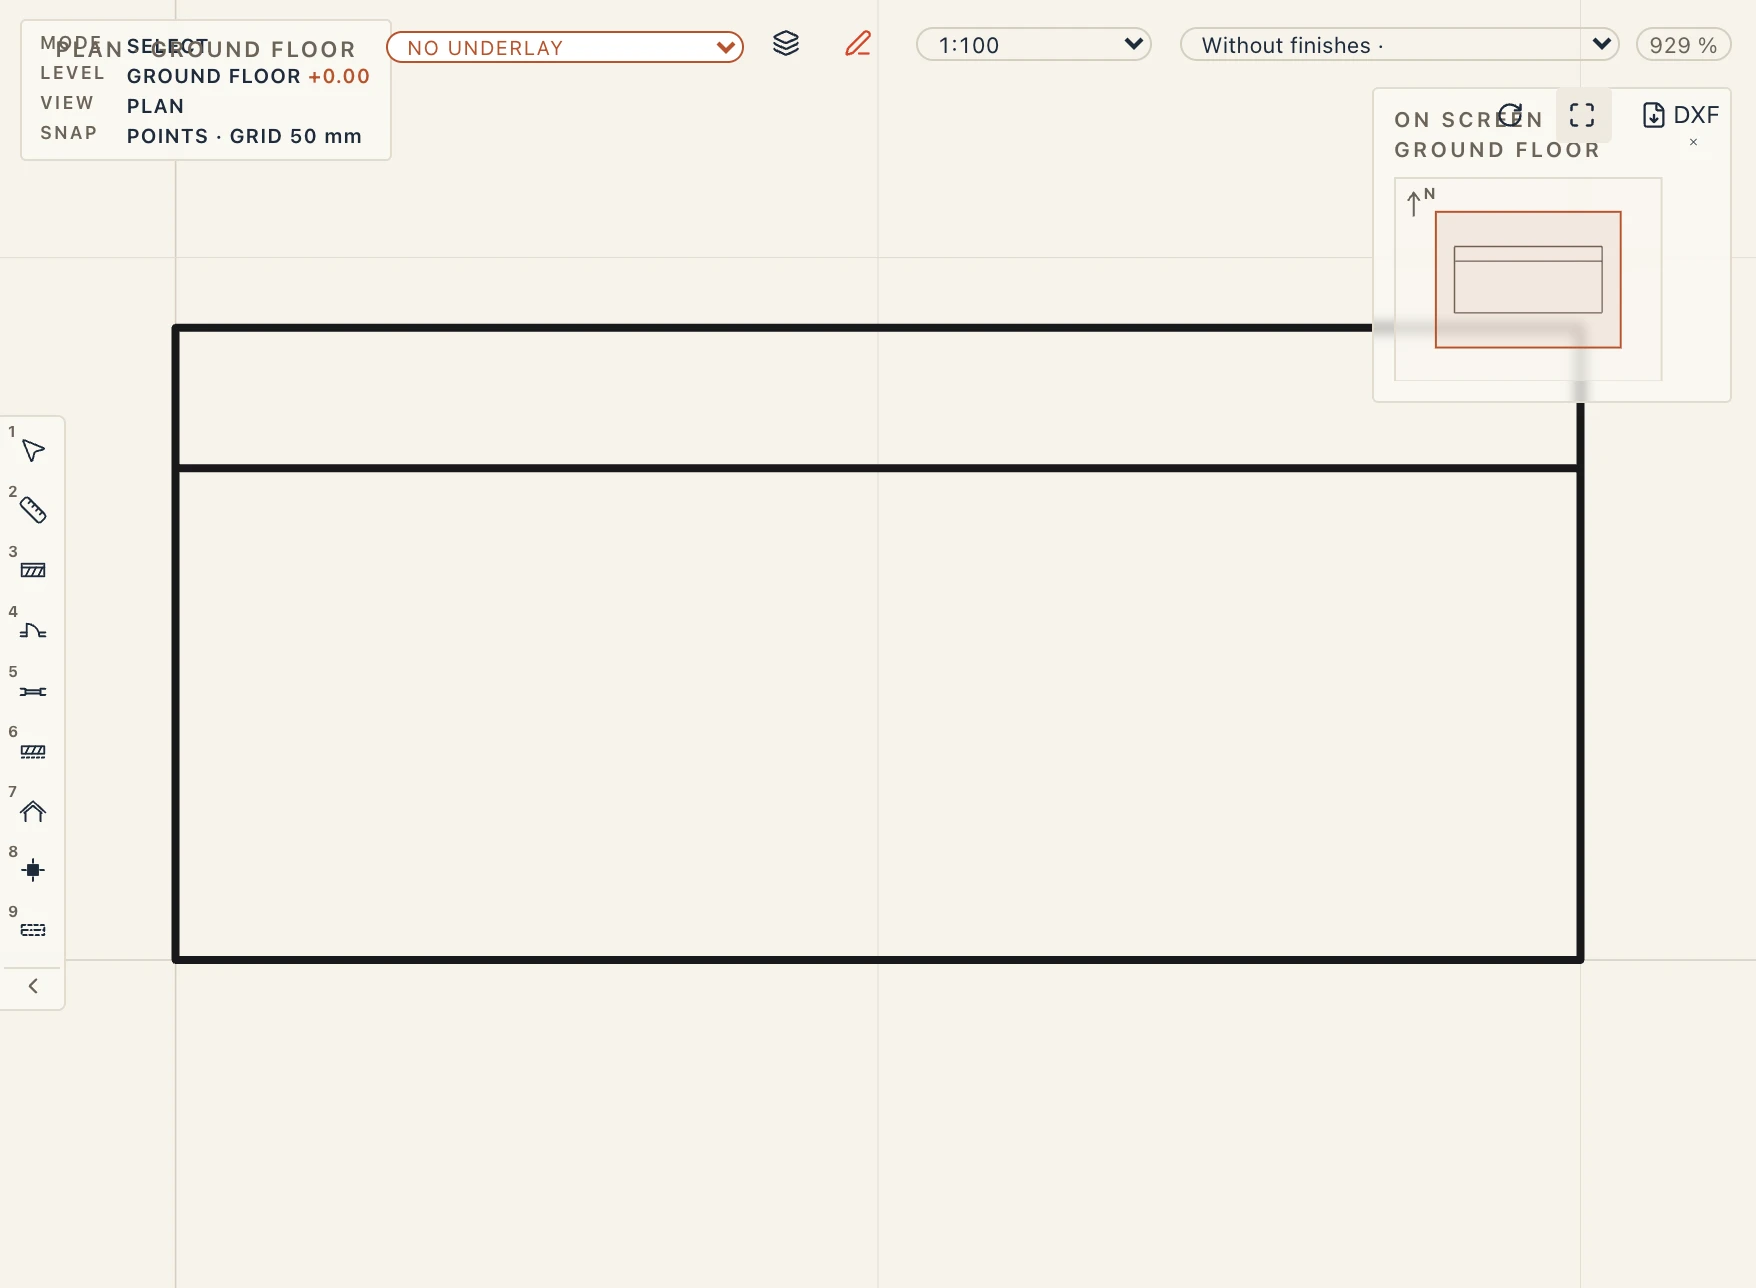
In plan a piece of a model is its body seen from above, drawn by the engine with the hidden lines removed; a sofa also shows its seats at 1:50 and finer. A lamp hung above 1.2 m is drawn overhead. Tables, chairs, rugs and free-standing lamps stand where you click; sofas, armchairs and side tables back onto the nearest wall like the other furniture.
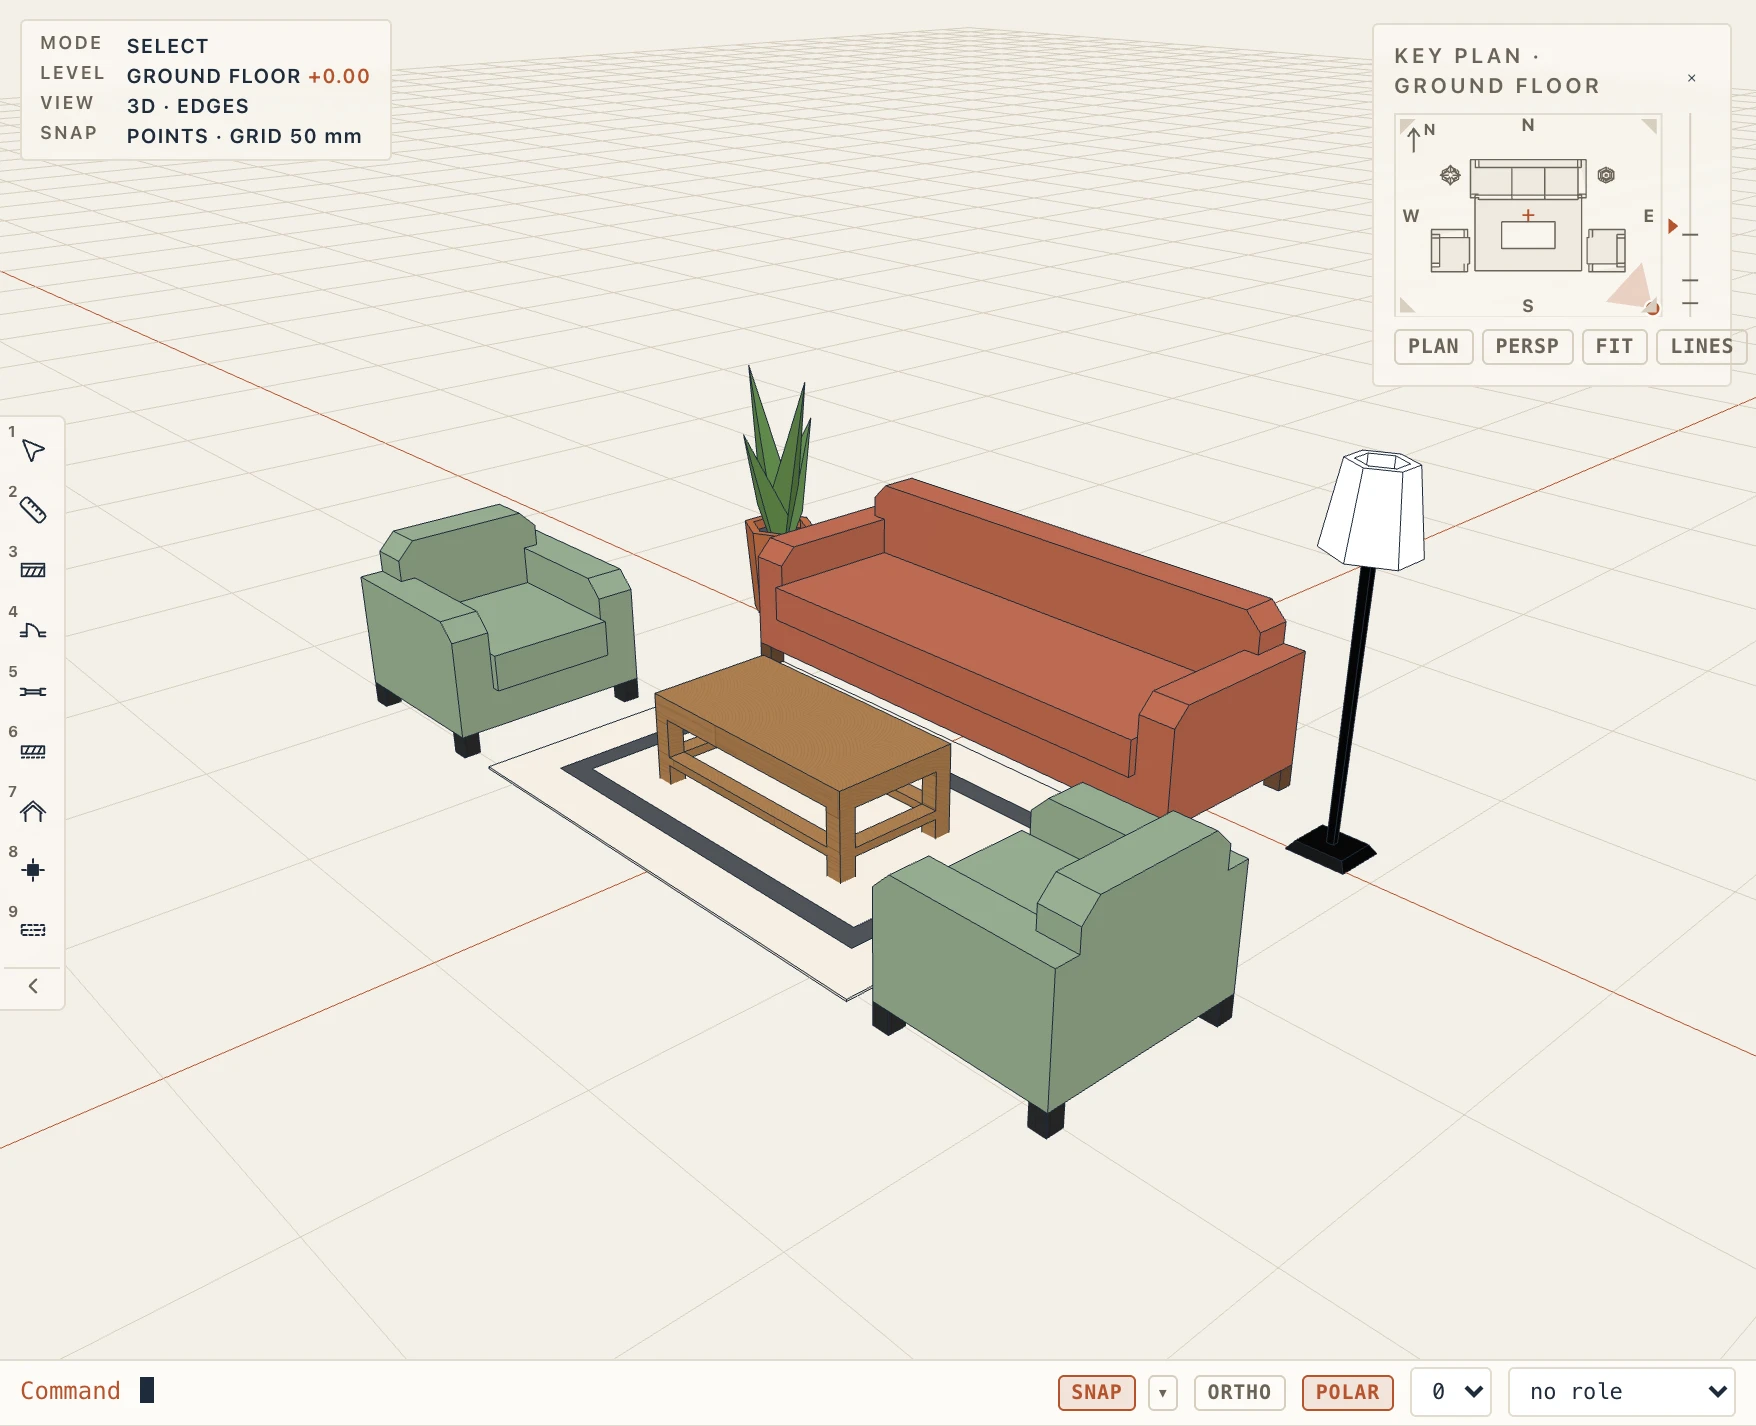
In IFC a piece of a model is an IfcFurniture of its type with the model's predefined type (SOFA, CHAIR, TABLE, or USERDEFINED with Floor lamp, Plant, Rug…), and its body is the stretched mesh, as a faceted B-rep or a face set as the export asks. The model and the size travel with the type, so Lapin reads them back. The furniture schedule lists them by group and model.
Models of your own
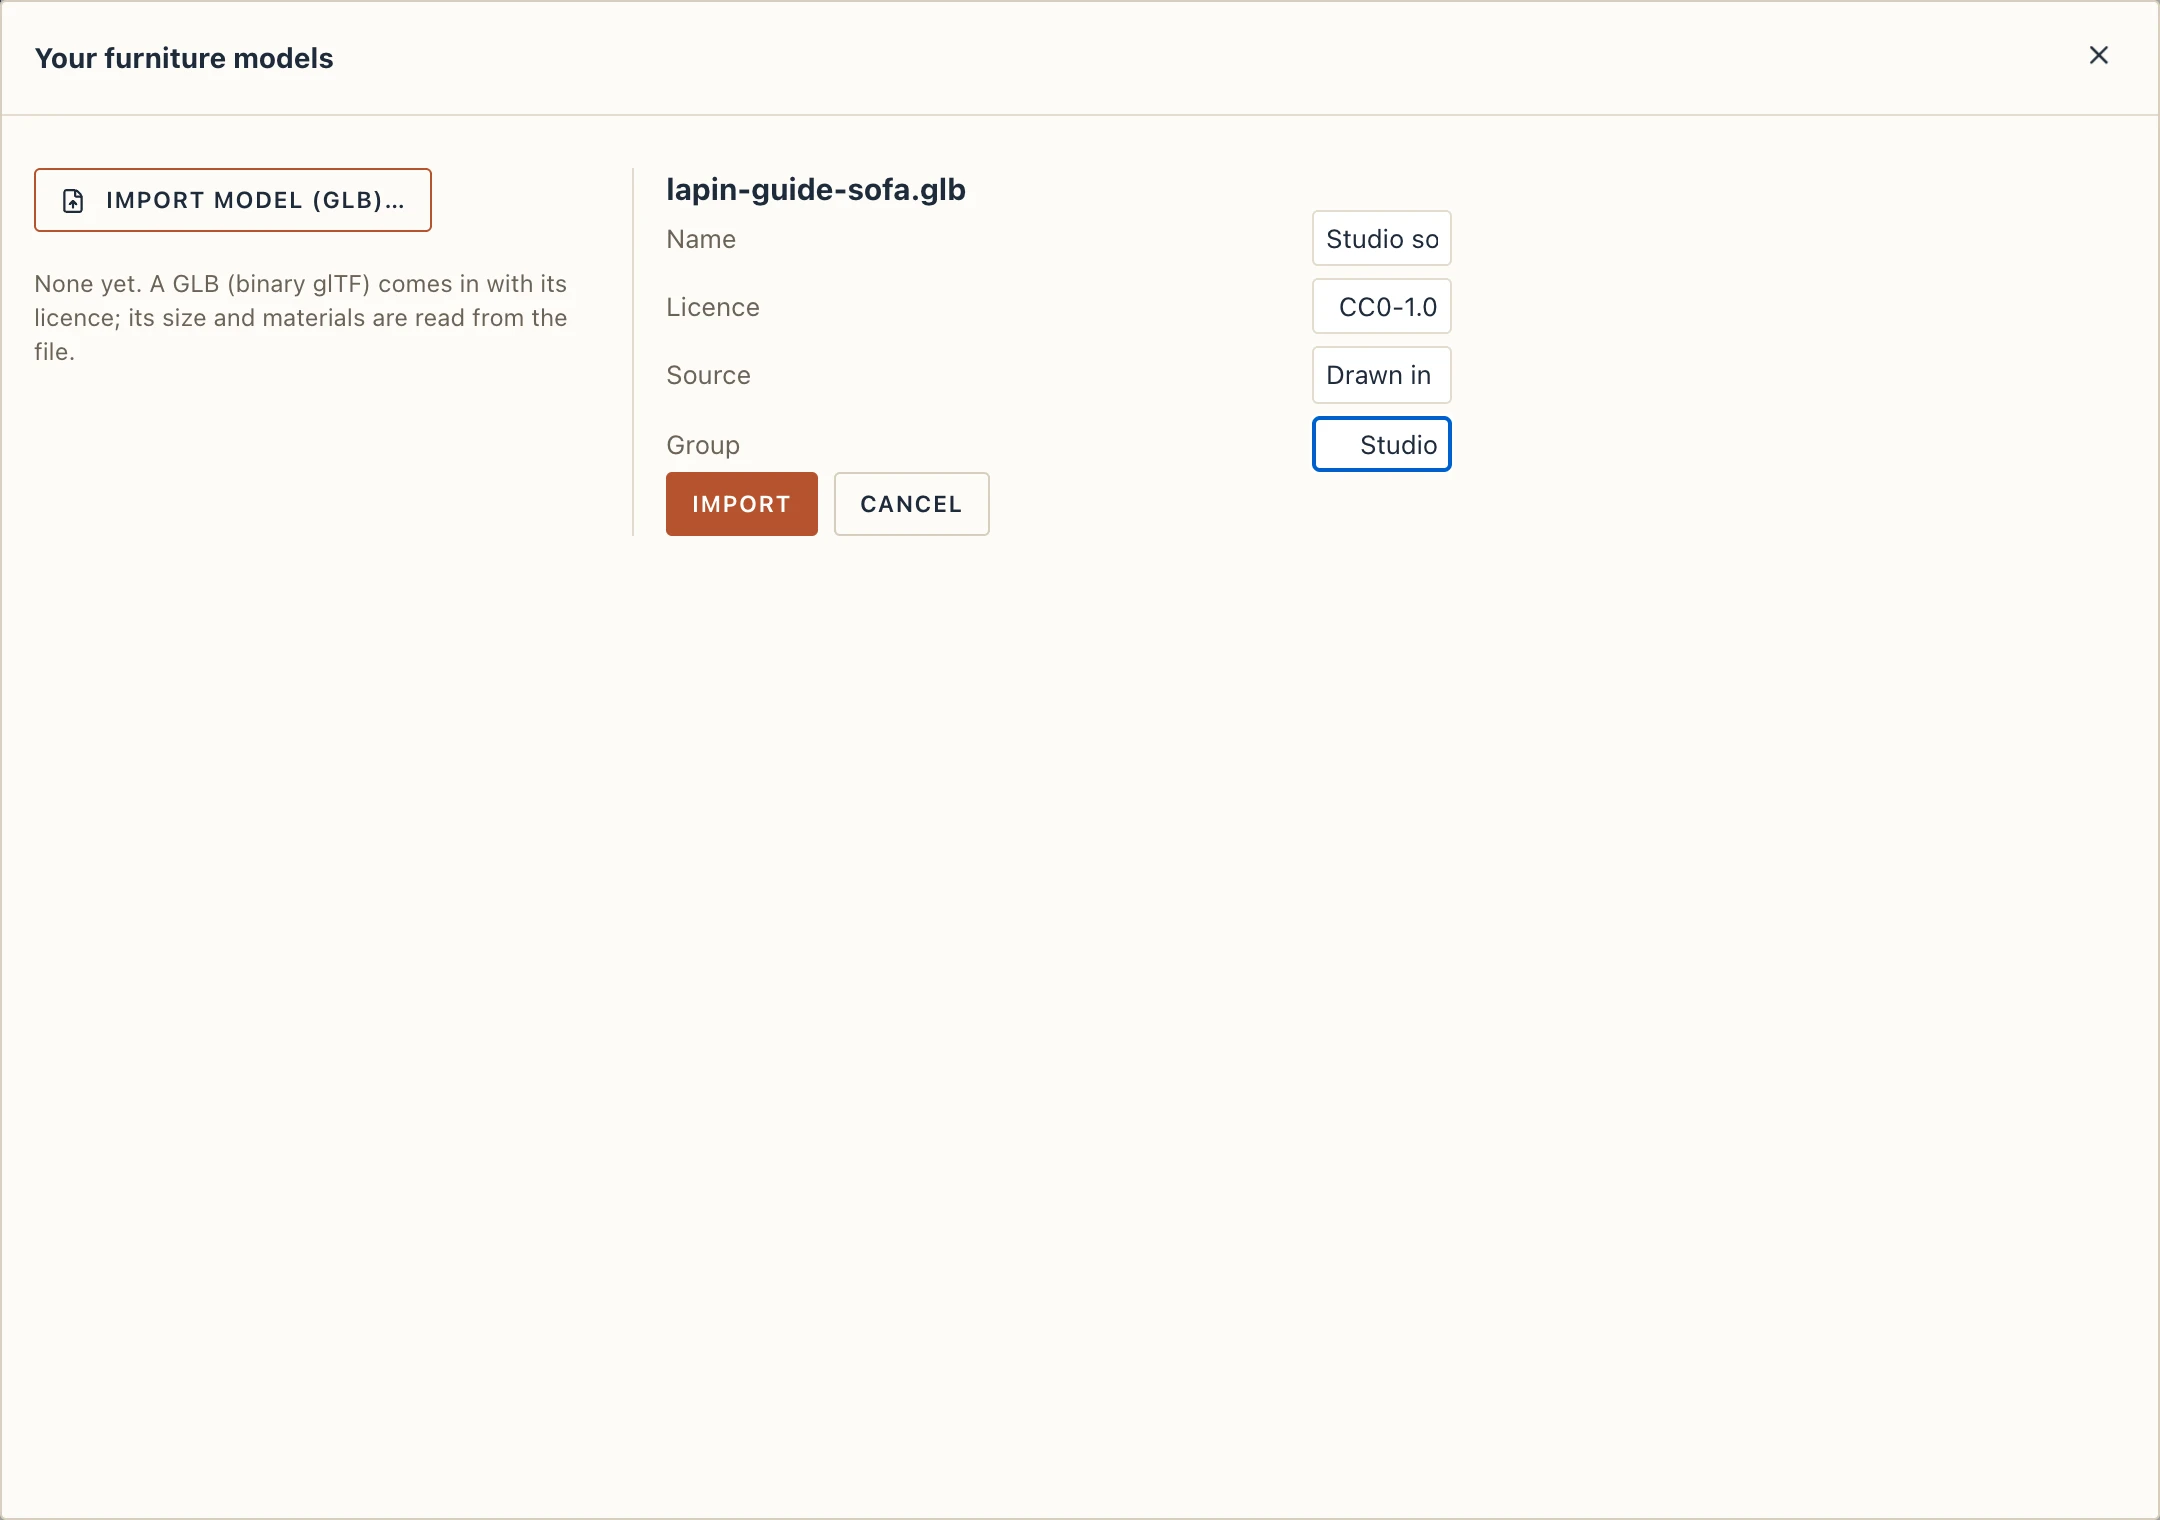
A model you made, bought or downloaded (a sofa from a maker's catalogue, a lamp you modelled) can be used like Lapin's own, if it is a GLB (binary glTF). In Furniture types, Import model (GLB)… opens Your furniture models: its list on the left, and Back to the furniture types (the close button) on the top right.
Import. Choose the file. Lapin reads its size and its materials from it, and asks for:
- a Name;
- the Licence: whose the model is and on what terms (CC0-1.0, CC-BY-4.0, your own…). It is required, so Import stays grey without it: a model comes in with its terms, and they travel with it wherever it goes;
- the Source: the maker, the site, the address it was downloaded from;
- the Group it is listed under in the gallery (My models if you leave it empty).
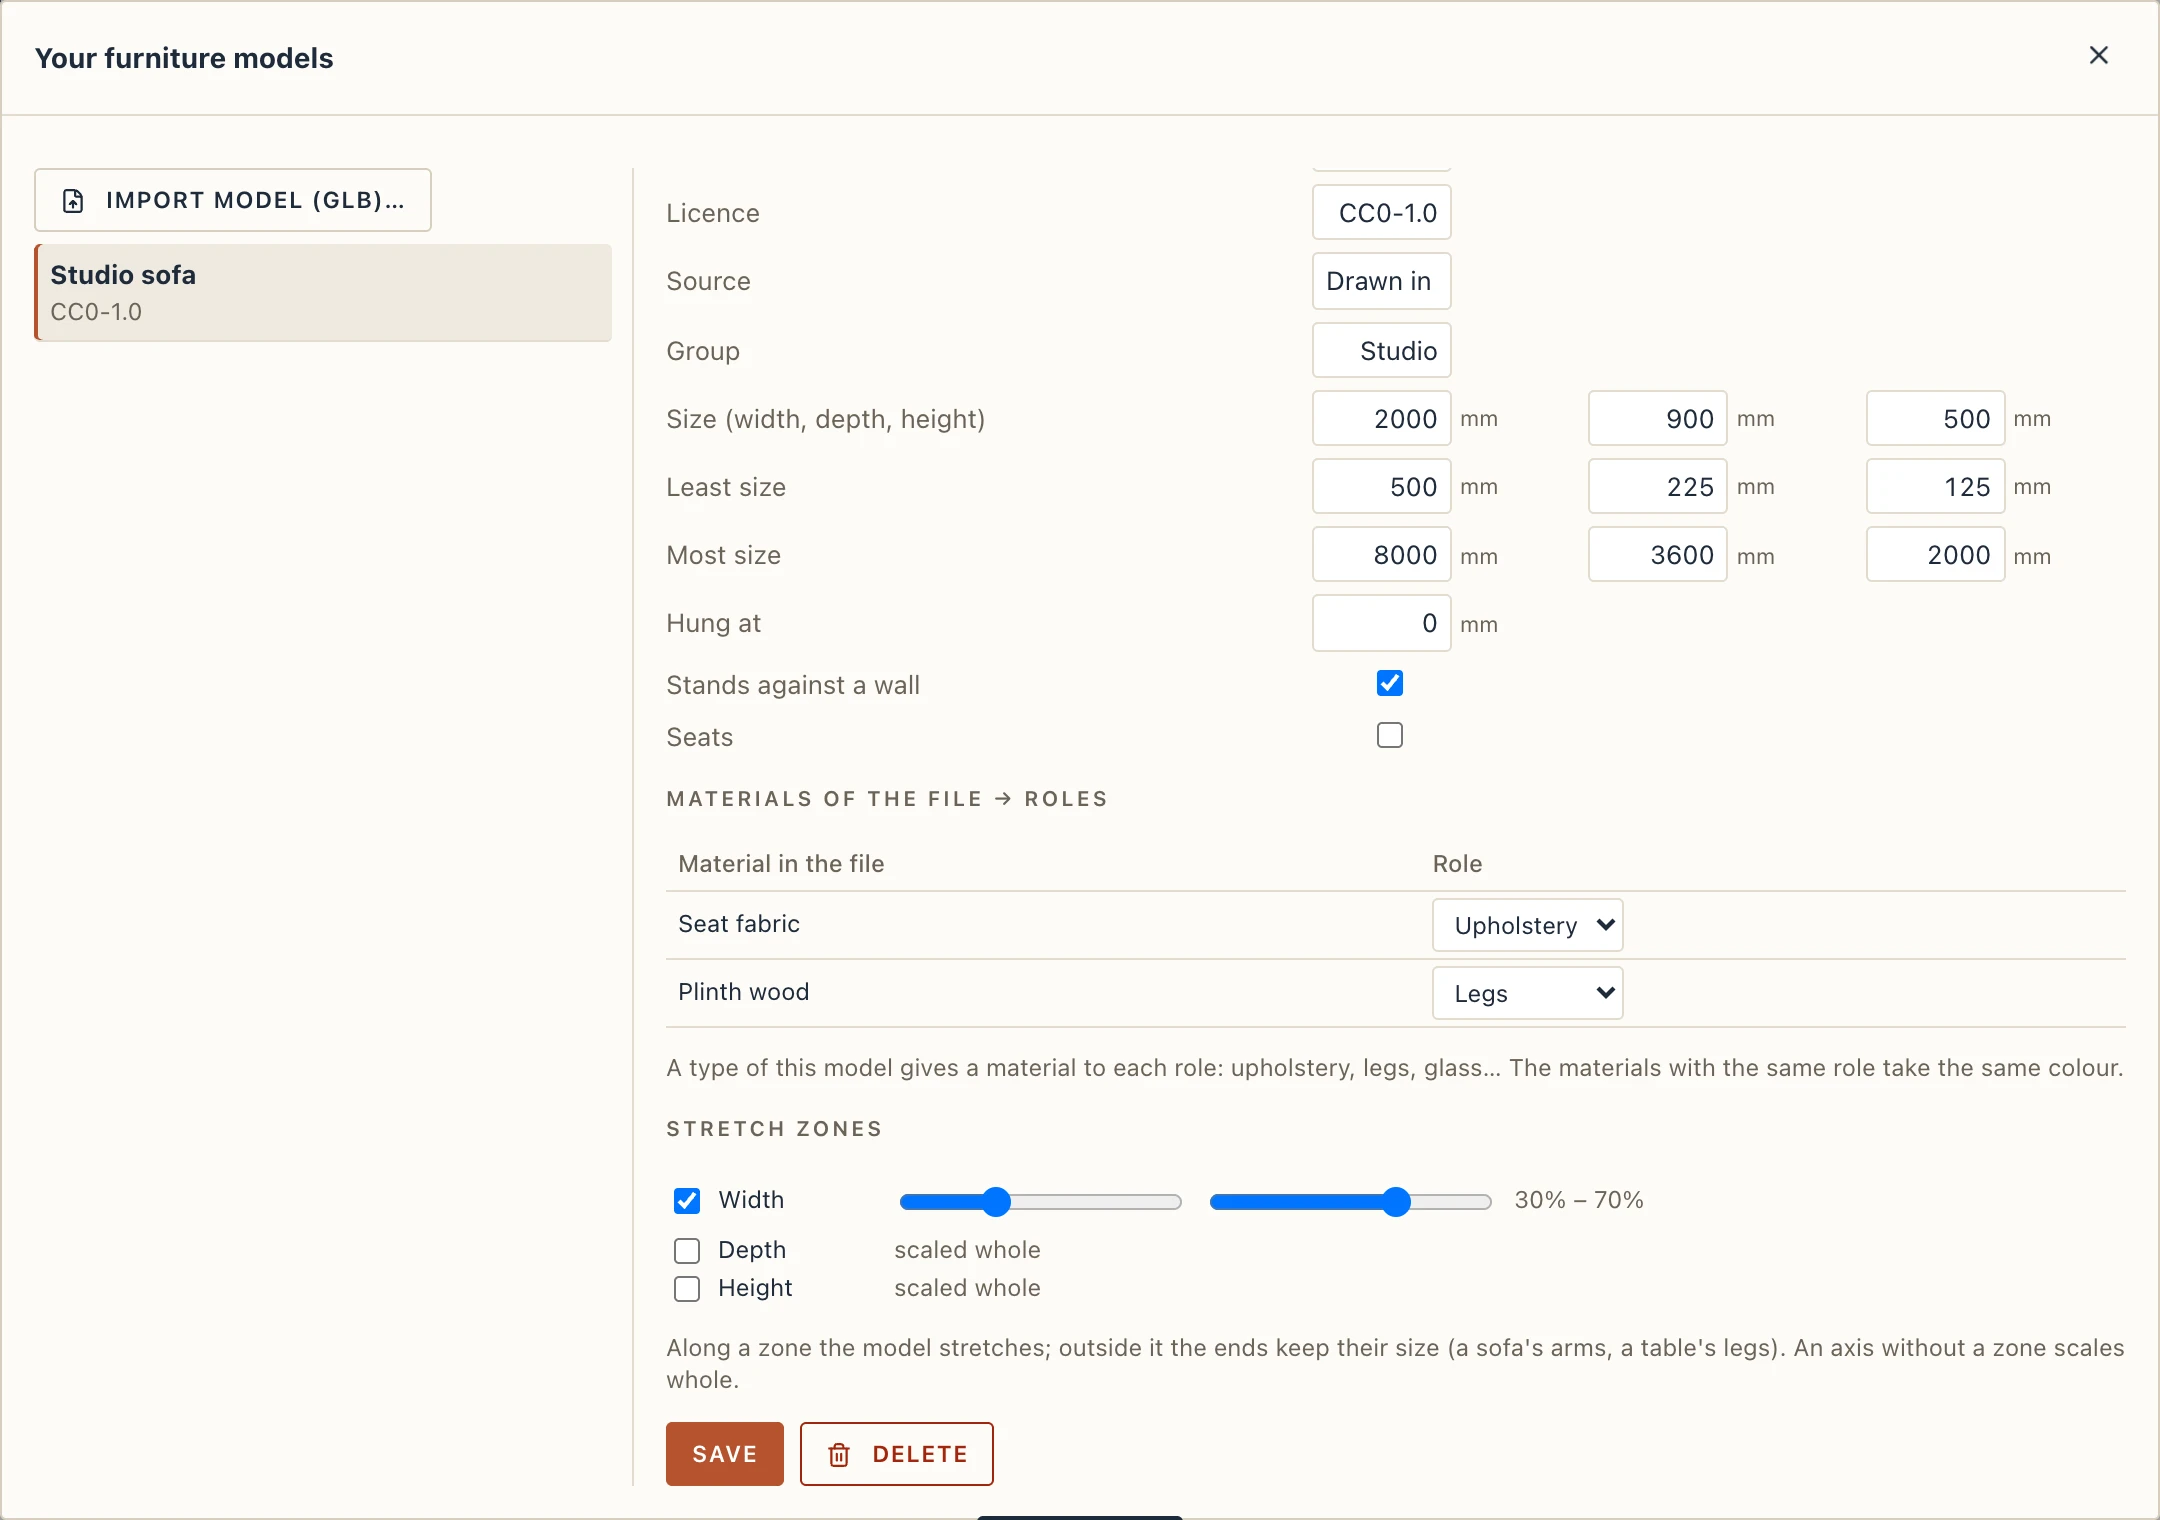
The model's settings. Choose it in the list to change:
- Size (width, depth, height): what a new type of it starts with, and the Least size and Most size it may take;
- Hung at: the height of its underside, for a wall lamp or a pendant (0: on the floor);
- Stands against a wall and Seats, as for Lapin's sofas and armchairs;
- Materials of the file → roles: each material in the file is given a role (upholstery, accent, body, top, legs, metal, glass, shade, foliage, pot). A type of the model gives a material to each role, so every material with the same role takes the same colour, and the looks and colours in the types dialog reach the model;
- Stretch zones: for each axis, tick it and drag the two sliders to say which band stretches. Outside the band the model keeps its size (a sofa's arms, a table's legs); inside it, it grows with the piece. An axis without a zone scales whole.
Save keeps the changes, and the types made of the model follow. Delete removes the model, once no type is made of it.
Back in Furniture types, the models are in the gallery after Lapin's, in their group; make a type of one with From a model, as for the others, and size and colour it. Your models go with the project, and with the types you save to My furniture.
A symbol for the plan
By default a plan draws a piece as its body seen from above. A type can use a symbol of yours instead (see Drafting, Symbols): in Furniture types, Plan symbol lists the symbols of the Furniture category first, then the others; Drawn from above goes back to the body. The symbol is scaled to the piece's size, so every piece of the type follows when the type or the symbol changes. It is for the plan: sections, elevations and 3D still show the model.
A piece's properties
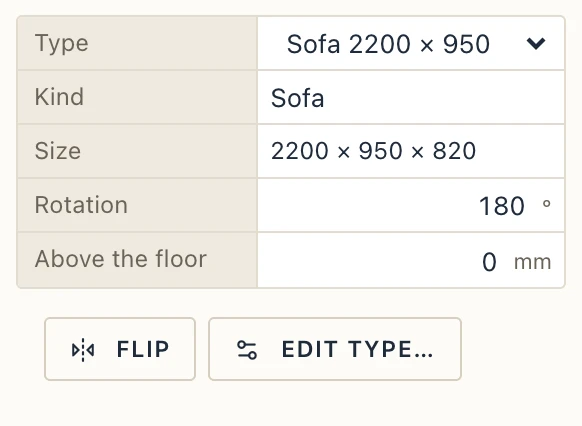
Select a piece to see:
- Type, its kind and size;
- Rotation;
- Above the floor, for a piece raised on a podium;
- Length, for a kitchen.
Flip gives a piece its other hand where it stands: the chaise longue on the other side, the fridge at the other end, the corner sofa's corner on the other side. Its front stays where it was. Modify → Mirror does the same.
Drag the grip in the middle of a piece to move it; drag the grip in front of it to turn its front towards the cursor.
Furniture types
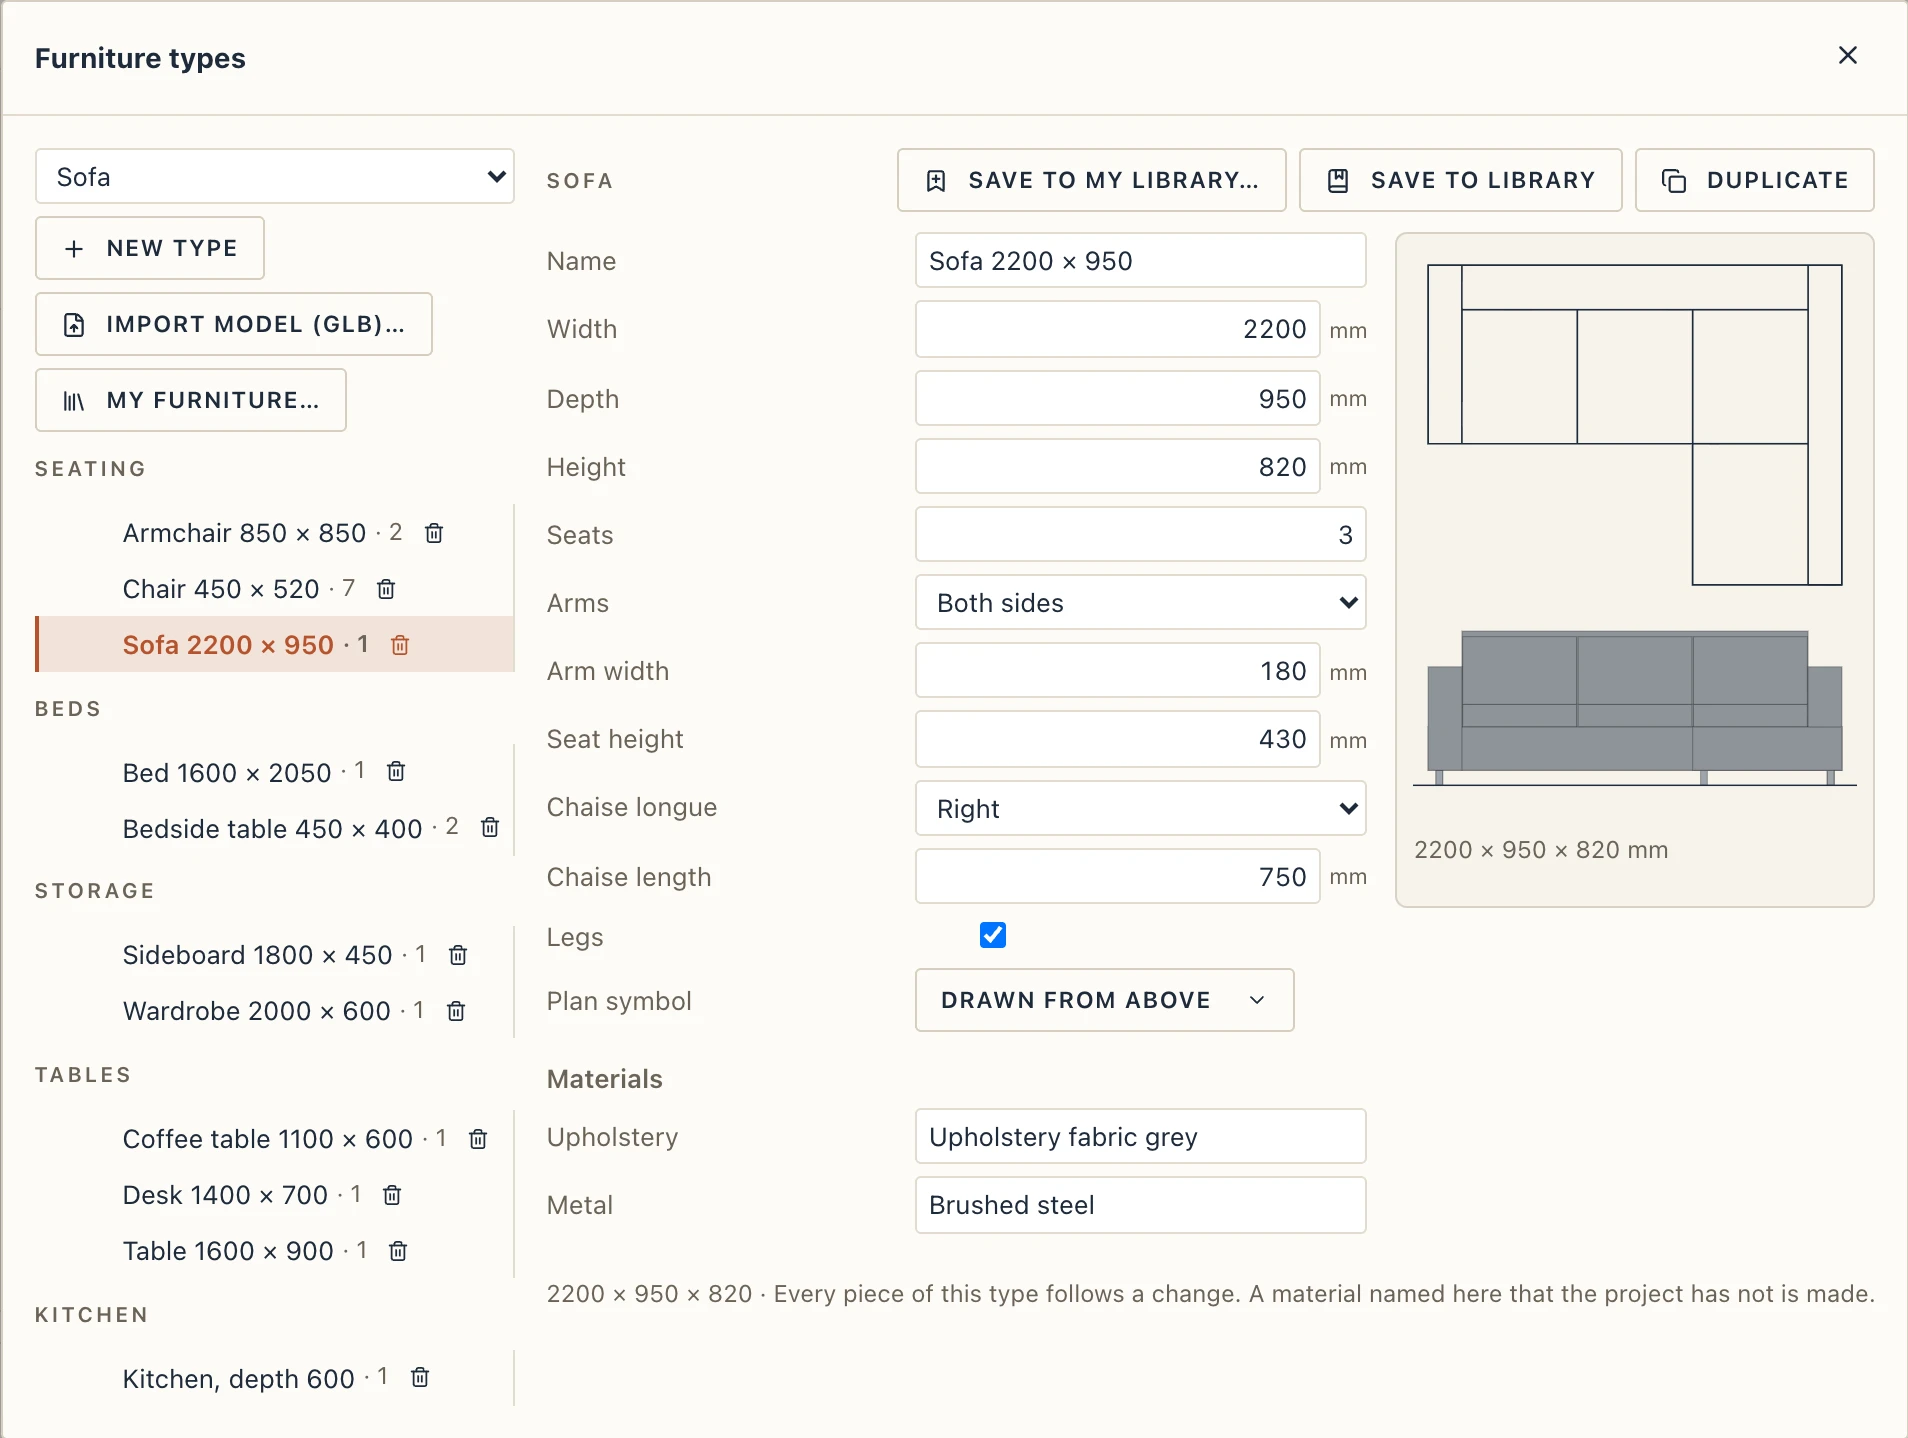
Interior → Furniture types lists the project's types by group (seating, beds, storage, tables, kitchen), each with how many pieces use it. Choose a kind and New type, or Duplicate a type to change a copy. A type holds:
- its name, width, depth and height (a sofa's height is its back's, a bed's its headboard's, a kitchen's its worktop's);
- its kind's own parameters:
- sofas and armchairs: seats, arms, arm width, seat height, a chaise longue on the left or right and its length, legs;
- a corner sofa: the side its corner is on and that side's length;
- a bed: the mattress top, headboard, footboard, pillows, a turned-down duvet;
- a wardrobe: doors, hinged or sliding, drawers at the bottom, plinth;
- a chest of drawers: rows and columns of drawers;
- a bookcase: shelves, and doors at the bottom up to a height;
- a sideboard: doors and drawers;
- a table: rectangular, round or oval, on four legs or a pedestal;
- a desk: a drawer pedestal on the left or right;
- a kitchen: base unit width, plinth, worktop, where the sink and hob go, wall units, tall unit, and its own units (above);
- its materials by role: body, upholstery, top, fronts, linen, metal, glass, and a kitchen's plinth and handles. Type any material name; one the project does not have is made, and Manage → Materials sets its colour and hatches.
The preview beside the fields shows the type's plan symbol and its front as you change it. Every piece of a type follows any change to it.
My furniture library
A type you have configured well (a kitchen, a wardrobe, a desk of boards, a sofa) can be kept for every project in My furniture, your own library on this computer.
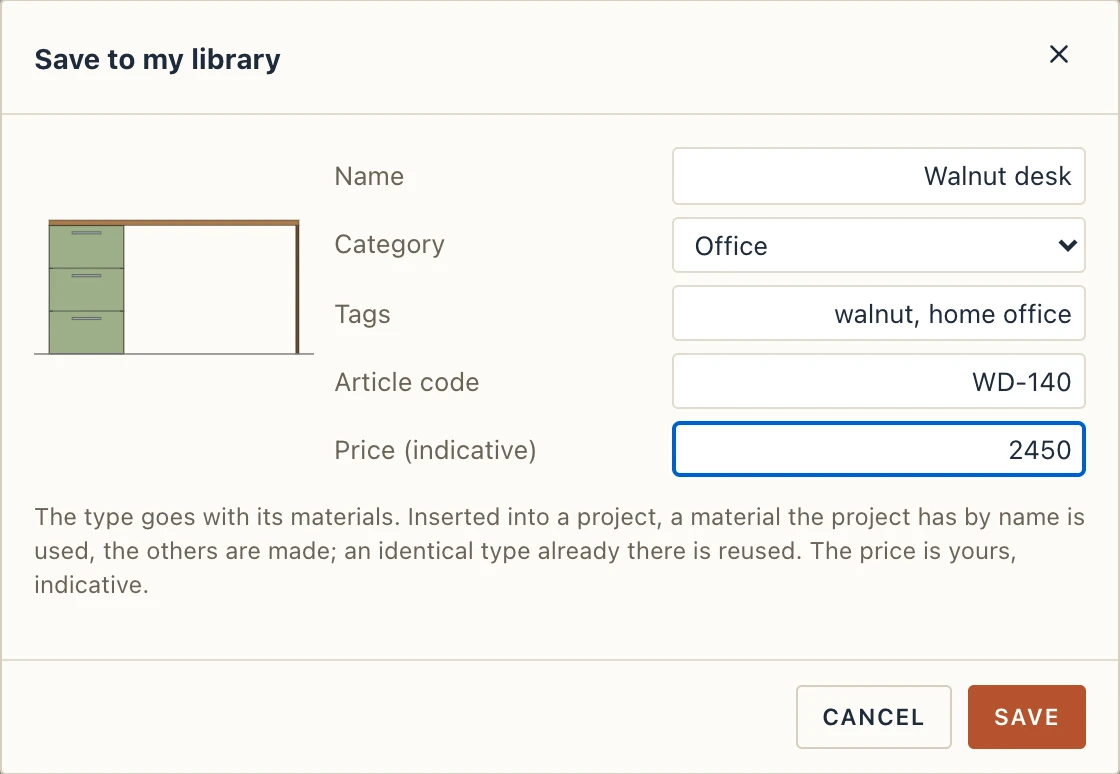
Save to my library… in Furniture types keeps the selected type. Give it:
- a name;
- a category: kitchen, living, bedroom, bathroom, office, storage or other;
- tags, separated by commas (oak, modern…);
- an article code and an indicative price, if you want them. Both are your own: Lapin ships no prices.
Its thumbnail is drawn from the type's preview. The type goes with everything it needs: its configuration and its materials, with their colours, hatches and images.
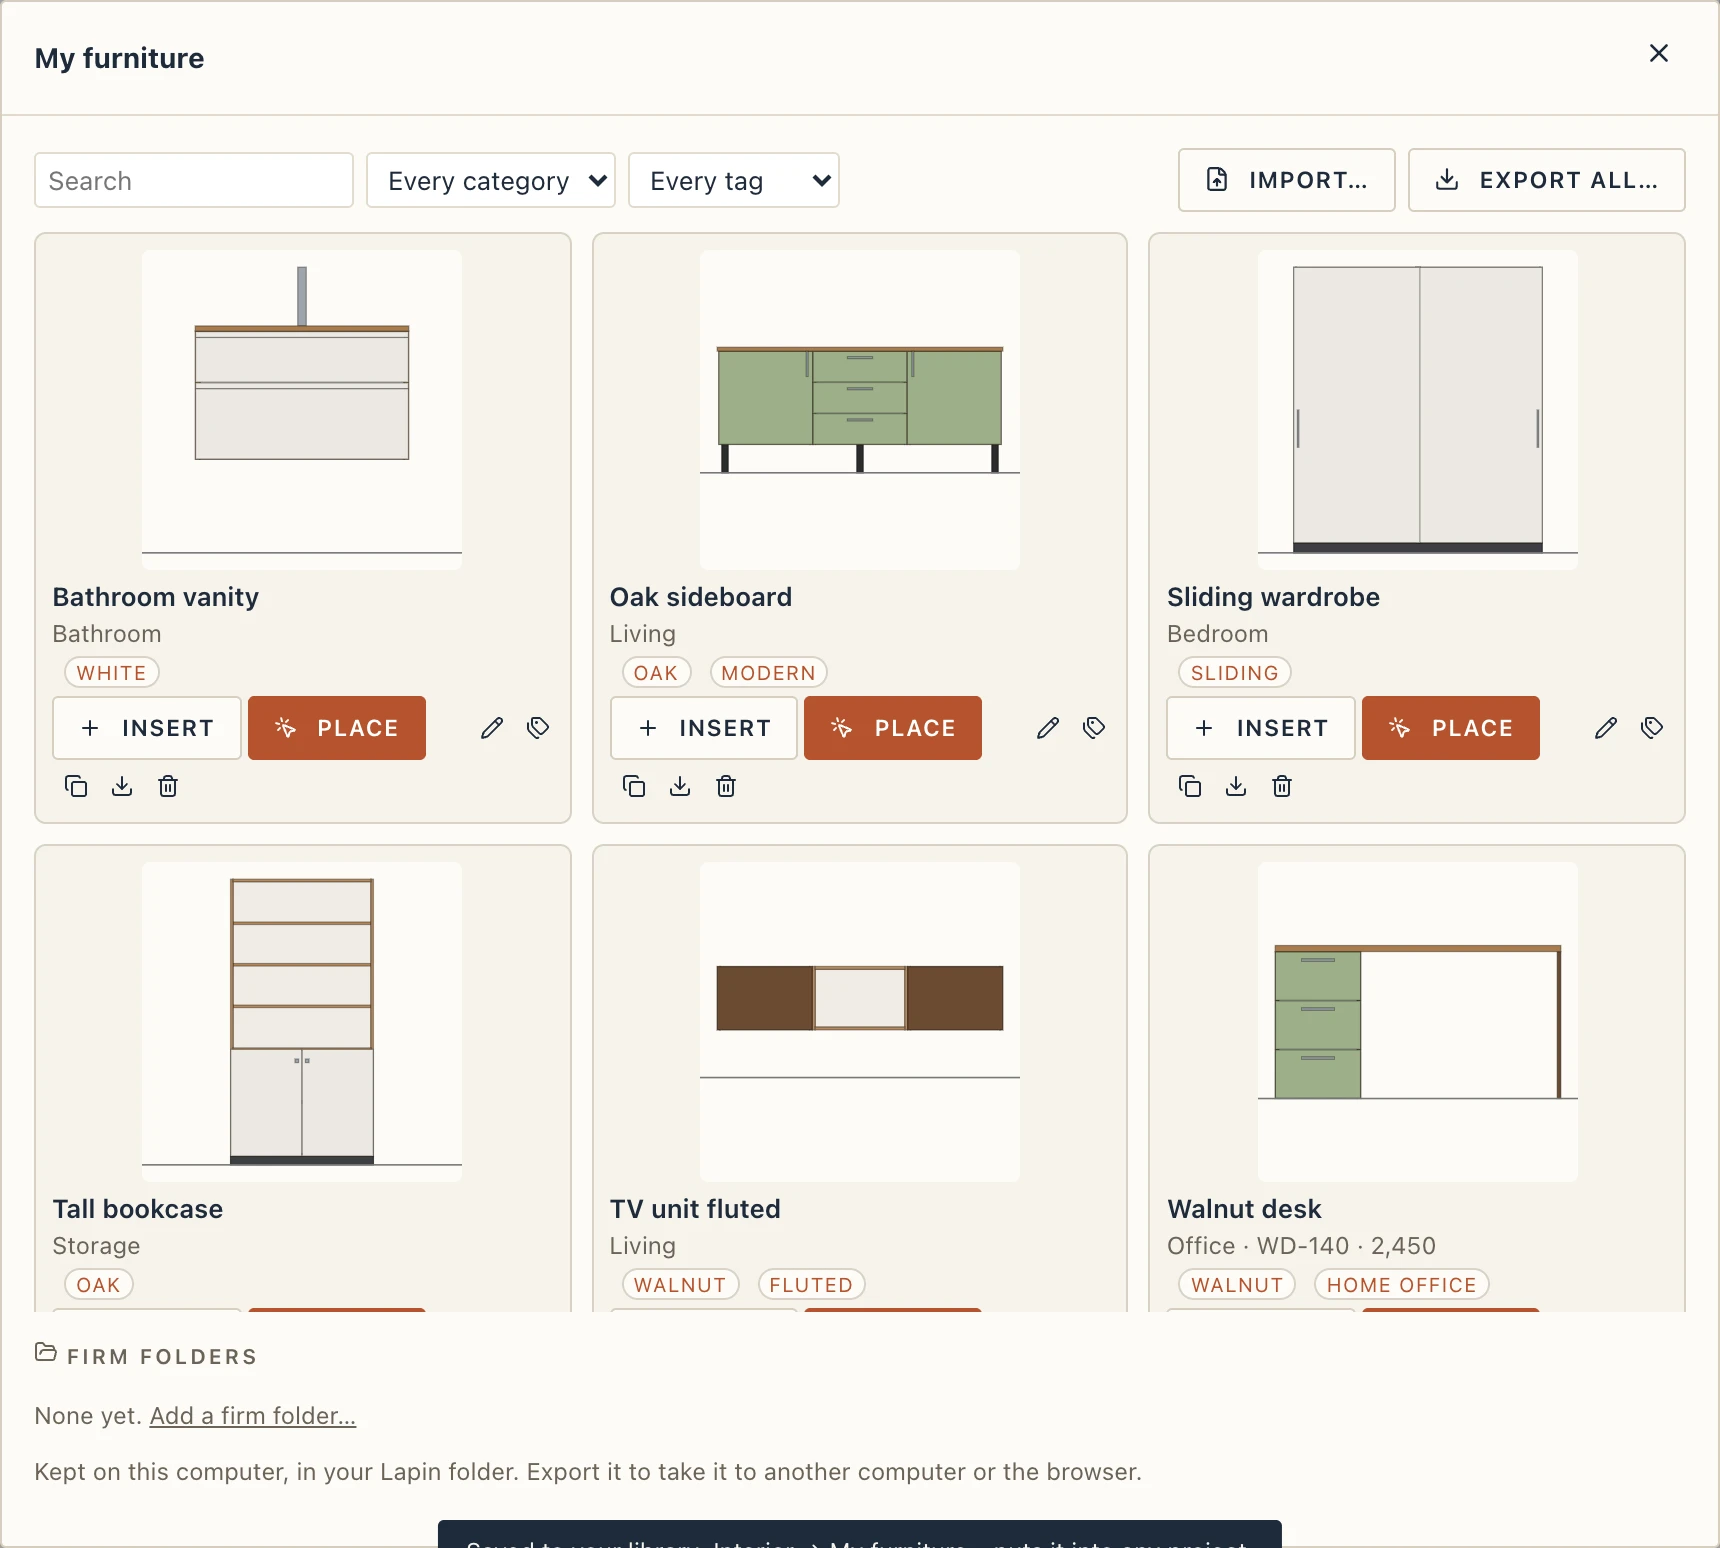
Interior → My furniture… opens the Place catalogue on the furniture (the project's types, the library and Lapin's kinds, searched together); its My furniture… button, or My furniture… in Furniture types, shows the library as thumbnails. Search it by name, tag, article or kind, and filter it by category and by tag. For each item:
- Insert puts the type into the open project and chooses it for its tool. A material the project already has by that name is used as it is, and the others are made. If the project already has an identical type, that one is used and no copy is made. Each insert is one undo step.
- Place inserts it and starts its tool, so the next click puts a piece down. A kitchen is drawn along a wall.
- Rename, Tags, Duplicate and Delete change the library only. Projects that already have the type keep it.
- Export writes the item as a
.lapinlibfile. Export all… writes the whole library, and Import… reads one back. An item already in the library unchanged is left as it is. When the file has an item you have but changed since (the same id), or another item with the name of one of yours, the import preview asks first: Replace (the default for the same item), Keep both (the default for the same name: Chair (2)) or Skip; see Importing a library file. - Add to a template… puts the type into one of your project templates, so every project started from it has the type.
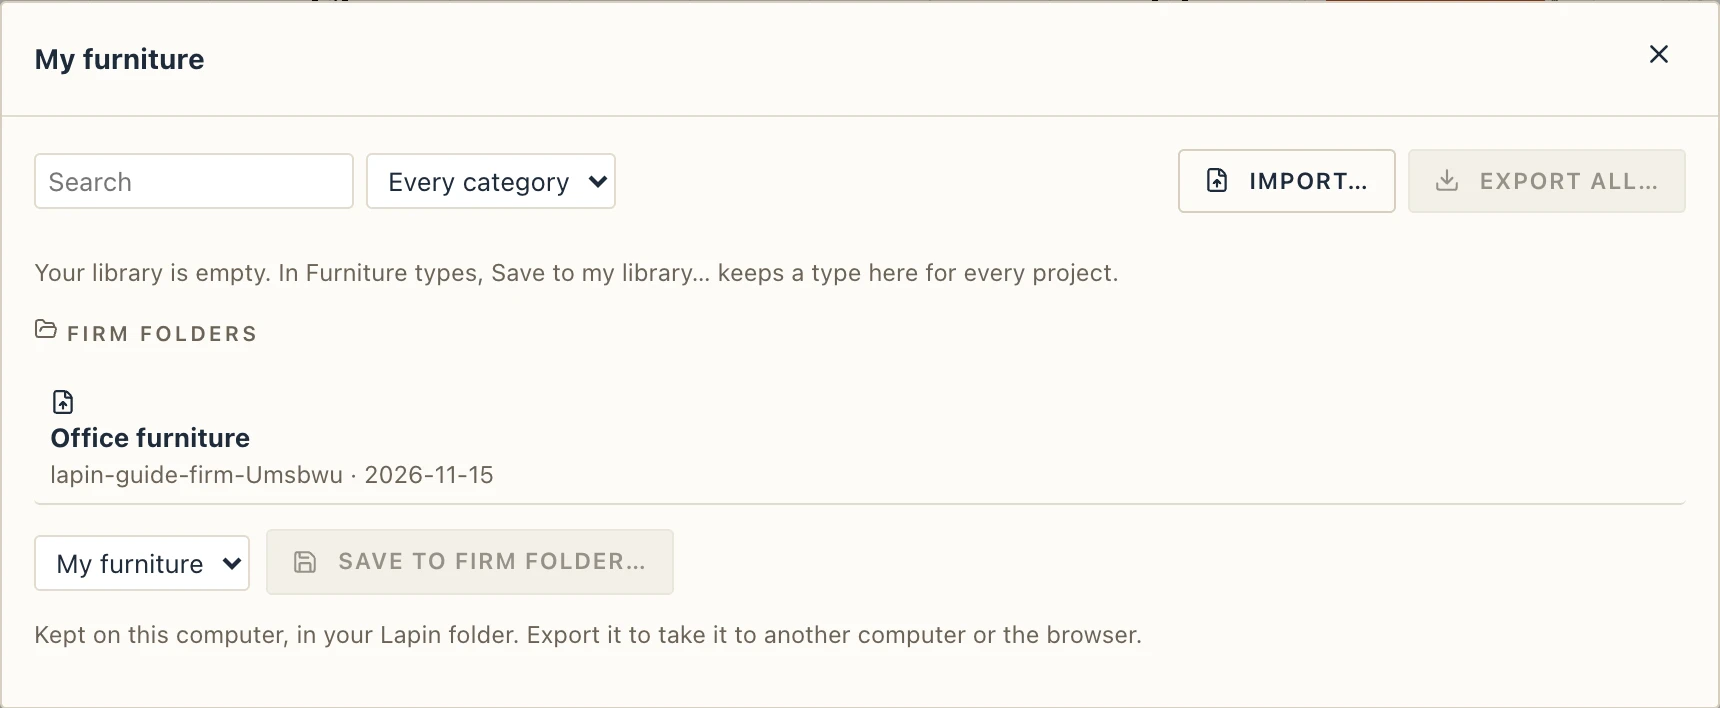
On the desktop the library is kept in your Lapin folder, one file per item. In the browser it is kept by the browser. To move it between the two, or to another computer, export it and import the file. A project template keeps the furniture types of the project it is saved from. Save as template… can also add every type in My furniture (Add every type in My furniture).
In the desktop app, My furniture also has a Firm folders block: the .lapinlib files in your firm's folders, one click adding their items to your library through the same import preview, and Save to firm folder… writing the whole library or one item into a writable folder.
Schedules and IFC
Furniture schedule lists each type with its kind, size, how many pieces use it and the rooms they stand in, with the total. Furniture by room lists each room with what stands in it. Both are in the project browser under Schedules, and print and export like any schedule. A furniture type with a cost article is priced per piece in the estimate.
In IFC a piece is an IfcFurniture, with the predefined type of its kind (SOFA, CHAIR, BED, TABLE, DESK, SHELF, or USERDEFINED with Wardrobe, Kitchen…). Its IfcFurnitureType is attached by IfcRelDefinesByType, and its bodies carry their materials. Lapin reads its own furniture back as native, editable pieces. Furniture from other programs comes in as references.